
Welcome again in the second series of our Building Registration form, in previous post we have added functionality of View Engine, Form Request now in this post we gonna setup our MongoDB and save our form data so without further ado, let’s get started … First we need to create some file, so our file structure will look like.
./
|-index.ejs
|-app.ts
|-static/
   |-style.css
For our form styling, you can check our video
> Inside our “index.ejs” our file gonna look like this
<head>
<link rel="stylesheet" href="/style.css">
</head>
<body>
<div class="container">
<h1>Hello
 <form method="POST" enctype="multipart/form-data" action="/post">
  <div class="form-container">
 <input type="email" class="form-input" name="email" required>
  <label class="form-input-label">Email
 <span class="form-input-bar">
</div>
<div class="form-container">
  <input type="password" class="form-input" name="password" required>
  <label class="form-input-label">Password</label>
 <span class="form-input-bar"></span>
</div>
<div class='form-container'>
<input type="submit" value="Submit">
</div>
</form>
</div>
</body>
And our “style.css” will look like
body{
font-family: Arial, Helvetica, sans-serif;
margin: 0;
padding: 0;
height: 100vh;
}
.container{
position: absolute;
top: 50%;
left: 50%;
transform: translateX(-50%) translateY(-50%);
}
.form-container{
position: relative;
margin-bottom: 45px;
}
.form-input{
background: none;
background-color: white;
color: black;
font-size: 18px;
padding: 10px;
display: block;
border: none;
border-bottom: 1px solid #F8BBD0;
border-radius: 0px;
}
.form-input:focus{
outline: none;
border-bottom: none;
}
.form-input-label{
color: #F8BBD0;
font-size: 18px;
font-weight: normal;
position: absolute;
pointer-events: none;
left: 5px;
top: 1px;
transition: 0.2s ease all;
-webkit-transition: 0.2s ease all;
}
.form-input:focus ~ .form-input-label,.form-input:valid ~ .form-input-label{
top:-20px;
color: #E91E63;
}
.form-input-bar{
position: relative;
display: block;
width: 100%;
}
.form-input-bar:before,.form-input-bar:after{
content: '';
height: 2px;
width: 0;
bottom: 1px;
position: absolute;
background-color: #E91E63;
transition: 0.2s ease all;
-webkit-transition: 0.2s ease all;
}
.form-input-bar:before{
left: 50%;
}
.form-input-bar:after{
right: 50%;
}
.form-input:focus ~ .form-input-bar:before,
.form-input:focus ~ .form-input-bar:after{
width: 50%;
}

Now let’s send our static so that web browser, first we need to import Send function from Oak module.
import {Application, Router, send} from 'https://deno.land/x/oak/mod.ts';
.
.
.
// Sending Static file as Middleware
app.use(async (ctx,next) => {
 await send(ctx, ctx.request.url.pathname, {
  root: `${Deno.cwd()}/static`
 });
 next();
});
Here we send our static file as middleware, using upper statement. Now let’s setup database, for our database we gonna use MongoDB for this we import our module as
import {MongoClient} from ‘https://deno.land/x/mongo@v0.8.0/mod.ts';
Let initiate our MongoClient class and setup our URI, for this example we are using local mongoDB data you can use mongoDB server from its website just copy the URL and paste inside clientURI.
const client = new MongoClient();

client.connectWithUri("mongodb://localhost:27017");
After initiating our mongoDB, Now create our collection and database as
const db = client.database("registrationDB");
const dataCollection = db.collection('data');
As our Boilerplate code for Database has finally finish let now save our data inside our POST method add following statement.
.post('/post', async (ctx) => {
const form = JSON.stringify(await multiParser(ctx.request.serverRequest));
const parse = JSON.parse(form);
const dataSaved = dataCollection.insertOne(parse);
ctx.render('index.ejs',{data:{msg: parse.email}});
})
Now open the browser and check our application is working or not. In case you missed any part here is the full code. app.ts
// Importing our modules
import {Application, Router, send} from 'https://deno.land/x/oak/mod.ts';
import {viewEngine,
engineFactory,
adapterFactory} from 'https://deno.land/x/view_engine/mod.ts';
import {multiParser} from 'https://raw.githubusercontent.com/deligenius/multiparser/master/mod.ts';
import {MongoClient} from 'https://deno.land/x/mongo@v0.8.0/mod.ts';

const ejsEngine = engineFactory.getEjsEngine();
const oakAdapter = adapterFactory.getOakAdapter();
// Setting up mongoDB
const client = new MongoClient();
client.connectWithUri("mongodb://localhost:27017");
const db = client.database("registrationDB");
const dataCollection = db.collection('data');
// Initiate our app and router
const app = new Application();
const router = new Router();
// Send View Engine as middleware
app.use(viewEngine(oakAdapter, ejsEngine));
// Handling request inside router
router
.get('/', async (ctx) => {
ctx.render('index.ejs',{data: {msg: 'World'}});
})
.post('/post', async (ctx) => {
const form = JSON.stringify(await multiParser(ctx.request.serverRequest));
const parse = JSON.parse(form);
const dataSaved = dataCollection.insertOne(parse);
ctx.render('index.ejs',{data:{msg: parse.email}});
})
;
// Send our router as middleware
app.use(router.routes());
app.use(router.allowedMethods());
// Send our Static folder as middleware
app.use(async (ctx,next) => {
await send(ctx, ctx.request.url.pathname, {
root: `${Deno.cwd()}/static`
});
next();
});
// Listening to database
console.log('App is listening on Port 8000');
await app.listen({port: 8000})
Now open you terminal and type command as “deno run — allow-net — allow-read — allow-write — allow-plugin — unstable app.ts” or your can use Denon. Now type your email and password inside form element.

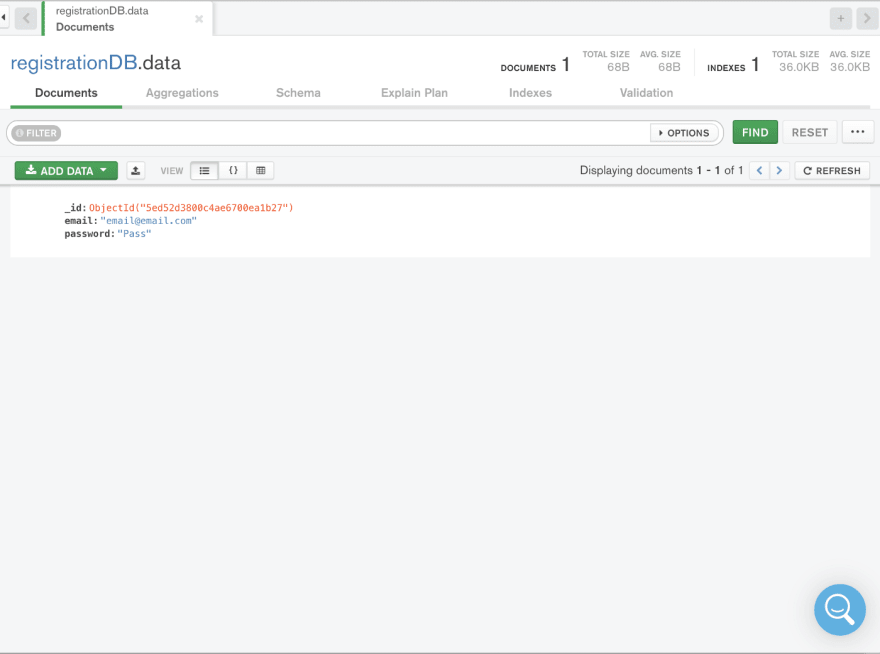
And our database gonna look like this
So hope you like our post see in future posts until then 👋.

Top comments (0)