In this tutorial, we will detail how you can use Replit to write and publish a blog or website. This can be a solo endeavour or a group or company blog. We'll build on the versatile Nix repl, using a static site generator called Hugo to ensure our site is fast, secure and flexible. We'll also use some repl tricks which will allow us to develop and host our blog without ever leaving Replit.
After this tutorial, you will:
- Be familiar with setting up a static website using Hugo.
- Understand how to connect multiple repls through GitHub.
- Find new uses for Replit's collaborative features.
Repl architecture
This project will make use of two repls:
- A development repl, which will be used to write and preview draft posts and make site changes. This repl will be where all development happens.
- A production repl, which will be used to host a public version of the site. This repl will be updated from GitHub when new posts are made public.
If you have a premium Replit plan, you might want to make these repls private, to prevent people from finding your unfinished posts.
Creating the working repl
Log into your Replit account and create a new repl. Choose Nix as your project type. Give this repl a name, like "blog-dev".

Most kinds of repls are intended for working in a specific programming language or framework, such as Python or Kaboom.js. Nix repls are different: you can think of them as a blank slate for running anything you want. So the first thing we need to do in our repl is define what we're going to run – in this case it will be Hugo. Open replit.nix and append pkgs.hugo to the deps list. Your file should look like this:
{ pkgs }: {
    deps = [
        pkgs.cowsay
        pkgs.hugo
    ];
}
This will install Hugo the next time we run our repl. If you'd like to understand more about what this code is actually doing, check out the tutorial on building with Nix on Replit.
Run your repl now. Once you see the ASCII cow in the repl console, type the following command:
hugo new site --force .
This will create a new Hugo site in our repl. The --force flag is necessary because Hugo usually doesn't like creating new sites in directories that already contain files.
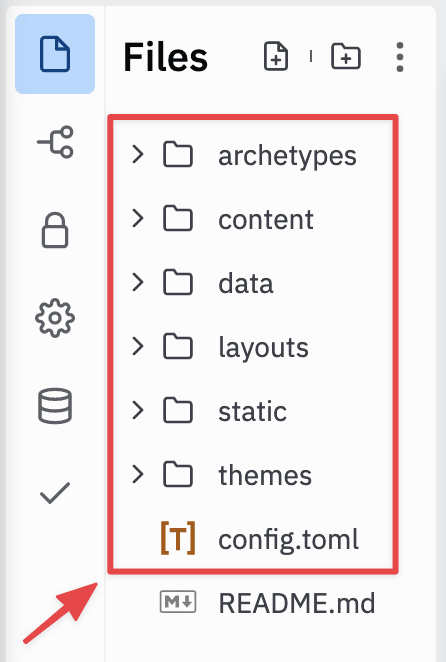
You should now see a number of new directories and files in your repl's file pane. This is the skeleton of your Hugo site. Don't worry about what each of these files and directories is for – you only need to know about a few of them to start blogging, and we'll explain them as we go.
Because Hugo is highly flexible and unopinionated, it doesn't even come with a default theme, so we won't be able to see our site in action until we choose one. There are a large number of choices on Hugo's official themes website. For this tutorial, we'll be using Radek Kozieł's Terminal theme, but feel free to pick a different one later.
To install the theme, run the following command in your repl's console:
cd themes && git clone https://github.com/panr/hugo-theme-terminal && cd ..
This will use Git to download the theme into our site's themes directory. To instruct our site to use this theme, add the following line to the bottom of config.toml:
theme = 'hugo-theme-terminal'
We must now configure our repl to host our static site so that we can see the results of our work. If you're familiar with static site generators (perhaps from a previous tutorial), you'll know that this is a two-step process:
- Render content in markdown and insert it into theme templates to create HTML pages.
- Host those HTML pages on a web server.
Hugo includes a built-in command that does both, hugo server. We can make this the command that executes when we click our repl's run button by editing the run directive in the .replit file as below:
run = "hugo server --buildDrafts --buildFuture --bind 0.0.0.0 --port 443 --baseURL https://YOUR-REPL-NAME-HERE.YOUR-USERNAME-HERE.repl.co"
In this command:
-
--buildDraftsand--buildFuturewill ensure that all site content is rendered, even if it's marked as a draft or scheduled for publishing in the future. -
--bind--portand--baseURLare all used to ensure that our repl will host our site correctly. Make sure to modify the argument for--baseURLas indicated (i.e. replacing the placeholdersYOUR-REPL-NAME-HEREandYOUR-USERNAME-HEREwith your own values).
Run your repl. You should see an empty site homepage.

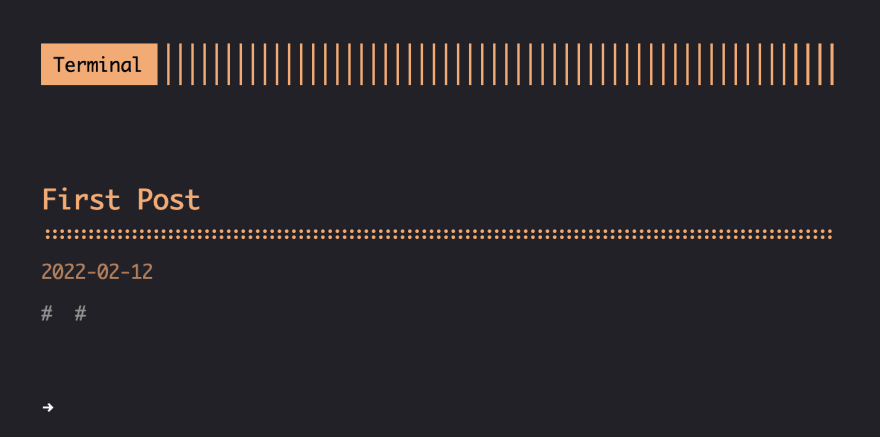
To create your first post, run the command below in the repl shell. Press Y when prompted to run Hugo from Nix:
hugo new posts/first-post.md
Your site will automatically reload and should now look like this:
You should see a file named first-post.md in the content/posts directory with contents resembling the following:
+++
title = "First Post"
date = "2022-01-30T11:21:41Z"
author = "Your name"
authorTwitter = "Your Twitter"
cover = ""
tags = ["", ""]
keywords = ["", ""]
description = ""
showFullContent = false
readingTime = false
+++
The text between the +++ lines is called front matter and defines metadata for your post, such as its title, author and time posted. Post content can be added as markdown-formatted text below the final +++. Add some now.
+++
title = "First Post"
date = "2022-01-30T11:21:41Z"
author = "Your name"
authorTwitter = "Your Twitter"
cover = ""
tags = ["", ""]
keywords = ["", ""]
description = ""
showFullContent = false
readingTime = false
+++

## Hello world!

This *is* **my** `first` post!

Preparing for production
We now have a functional workspace in which to develop our site, but we need to make a few alterations before it's ready for public consumption. First, let's make it easier to keep unfinished posts as drafts. By default, posts created using the Terminal theme will appear as published as soon as they're created – this is probably not what we want. Luckily, it's an easy fix.
Hugo stores content templates in a directory called archetypes. You should see an empty directory with this name in your repl's file pane. Archetype files are named after the content type (e.g. post or page) they're used for – currently, our archetypes directory only has a single file, named default.md, which will be used for content types without custom archetypes. However, if you look at the contents of default.md, you'll notice that it looks nothing like the post we created above. This is because Hugo doesn't just look for archetypes in our site skeleton, but also in our chosen theme.
You should find a file named posts.md in themes/hugo-terminal-theme/archetypes/. The contents of this file will resemble the new post you made in the last section. Duplicate this file, move it into your top-level archetypes directory, and rename it to posts.md. Then, in the new file, add the line draft = true just above the final +++. Your archetypes/posts.md file should look like this:
+++
title = "{{ replace .TranslationBaseName "-" " " | title }}"
date = "{{ .Date }}"
author = ""
authorTwitter = "" #do not include @
cover = ""
tags = ["", ""]
keywords = ["", ""]
description = ""
showFullContent = false
readingTime = false
draft = true
+++
If a file in a top-level directory has the same name as a file in the equivalent theme directory, the former will override the latter. This allows us to make site-specific tweaks without changing our theme. Create a new post by entering the following command into your repl's shell:
hugo new posts/second-post.md
This post and all subsequent new posts will be marked as drafts, and will thus only be included in our website if we run Hugo with the --buildDrafts flag. This will be useful for when we create our production repl. But before we can do that, we need to prepare this development repl to connect to it by creating a GitHub repository.
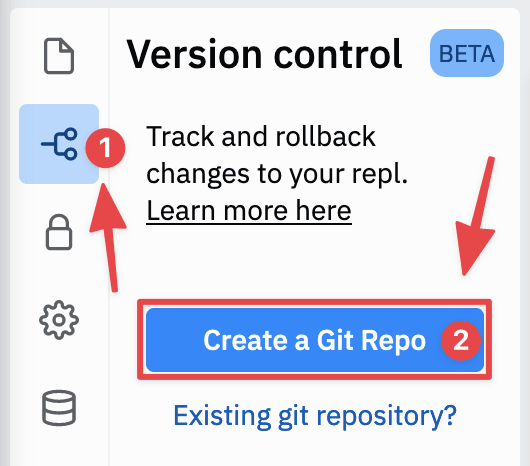
Select the version control tab in your repl's side pane and click on Create a Git Repo. This will create a local repository to track your code changes. From here, you can create snapshots of your code (called commits), which can you can revert to if needed.
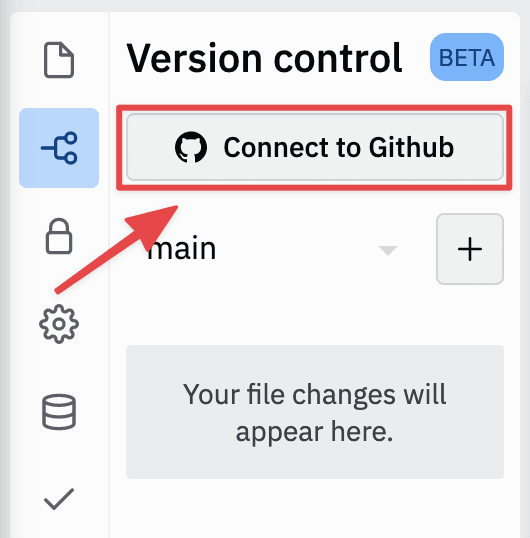
To push our repl to a repository on GitHub, we'll need a GitHub account. Create one if you haven't before. Once you've created an account or logged into your existing one, return to your repl and click on Connect to GitHub. Accept the Oauth confirmation message that appears.
Replit will then prompt you to specify a repository name, optional description and privacy setting. You can call your repository "blog". If you have a paid Replit plan, you can make it private, otherwise it will have to be public. Once you've created the GitHub repository, you'll be able to view it on your GitHub account.
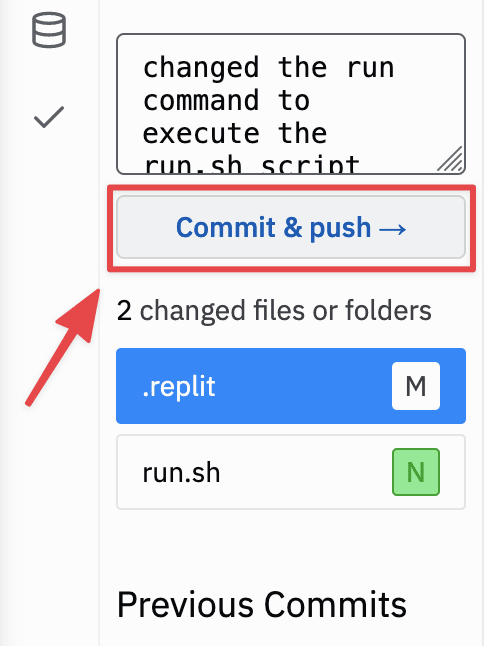
Now that your repl is connected to a GitHub repository, any time you make changes, those will be reflected in the version control tab. To commit those changes and push them to your GitHub repository, you can click on Commit and push in your repl's version control tab. You will be required to specify a commit message describing the changes you've made.
If our production repl will be sharing a code repository with our development repl, how will we ensure that drafts and future content aren't shown in production? One solution might be to use different branches, but that would require constant merging. All that really needs to change between development and production is the command that gets executed when we click the Run button. We'll use a bit of repl magic to make this work.
First, replace the run directive in the .replit config file with the following:
run = "sh run.sh"
Then create a file named run.sh and add the following code to it:
#!/bin/bash

if [ "$REPL_SLUG" == 'blog-dev' ] # draft space
then
  hugo serve --buildDrafts --buildFuture --bind 0.0.0.0 --port 443 --baseURL https://$REPL_SLUG.$REPL_OWNER.repl.co
else # production
  hugo serve --bind 0.0.0.0 --port 443 --baseURL https://$REPL_SLUG.$REPL_OWNER.repl.co
fi
Here we've used a couple of repl metadata environment variables to trigger different behavior when our code is run in different repls.
Return to your repl's version control tab and commit and push your changes. We are now ready to create the production repl.
Creating the production repl
Fork your development repl. Give the new repl a different name, such as "blog".

Since we've forked our development repl, both repls will be backed by the same repository on GitHub. This means we can commit and push changes from one repl (development) and pull those changes into the other repl (production). We could also achieve this by creating a new repl from our GitHub repository, but forking is quicker.
When your production repl is run, you should see an almost identical website to the one in your development repl. The only difference should be that the second post won't appear in the production repl, as it is a draft.
Let's test out our publishing flow.
- In your development repl, add some text to
content/posts/second-post.md. Specify some or all of the front matter, such as your author name and Twitter account. - Set
draft = falsein the post's front matter. - From the development repl's version control tab, commit and push your changes.
- In your production repl, navigate to the version control tab and click on the "← Pull" link. This will pull the changes we just pushed from development.

- Rerun your production repl. You should now see the contents of the second blog post live on the website.
This will be your workflow for publishing posts. Undraft, commit and push on development, then pull and rerun on production.
If you have a paid Replit plan, you should set your production repl as Always-on, so that people will always be able to reach your website.
You will probably also want to use a custom domain name, instead of blog.your-name.repl.co. Instructions for setting this up are provided here. As a bonus, following this process will also put your site behind Cloudflare's content delivery network (CDN), improving its performance and reachability across the global internet. Cloudflare is free for personal and hobby projects.
Writing posts
Now that we have a publishing platform in place, let's take a more detailed look at how to create content in Hugo.
The basis of all Hugo blogs is Markdown, a simple mark-up language for the web, originally created in 2004 by John Gruber. Markdown provides a simple, limited syntax, focused on the common needs of bloggers and other web-based writers. Basic Markdown elements are limited to headings, bold, italic and code-style text, blockquotes, lists, code blocks, horizontal rules, links and images. Markdown has been extended over the years to provide more advanced formatting, such as tables and footnotes. A cheat sheet covering both basic and extended syntax can be found here (Hugo supports both basic and extended Markdown).
To include images in your posts, upload them to the static directory. All files and subdirectories in static will be rendered as-is from your website's root URL. For example, if you create a file named static/images/pic.png, you will be able to include it in your posts by writing . You can put anything you want in static, including documents, audio files, or even videos.
If you want formatting that isn't included in Markdown, such as colored text, you can add HTML and CSS to your posts directly, but first you must configure Hugo's Markdown parser (Goldmark) to accept unsafe input. Add the following lines to config.toml:
[markup.goldmark.renderer]
unsafe = true
Stop and start your repl for the config change to take effect.
Hugo also provides functionality called shortcodes, which you can think of as HTML macros. Hugo provides built-in shortcodes for common tasks such as embedding tweets and YouTube videos. You can also create your own custom shortcodes.
Replit's multiplayer editing features aren't only good for collaborative programming, but can also be used for collaborative blogging. Multiple users can work in the same file in real time, and you can use inline code threads to leave each other feedback and discuss individual words and sentences.

If you need to include diagrams in your blog posts, you can draw them using your repl's built-in Excalidraw. Just create a new file with a .draw extension and start diagramming. When you're done, select your diagram, right-click and chose "Copy to clipboard as SVG". Then paste into the post you want to include the diagram in. Note that Goldmark must be configured in the manner shown above for this to work, as SVG images are part of HTML.

Where next?
You've now got a fully functional static blog hosted on Replit. Some things you might want to do with it:
- Learn more about Hugo from the official documentation.
- Choose a different theme from the Hugo themes showcase or create your own.
- Get a few collaborators and write some more blog posts.

Top comments (2)
you have done great deal . i appreciate your work . its helpful for us . फोटो के पीछे नाम लिखकर वशीकरण
This is awesome! Exactly what I was looking for..