
There are a few reasons why you may want to create your own digital certificates signed by your own Certificate Authority.
You might have a website running in an internal network and you might want all interactions with that website to be over HTTPS.
Another reason for creating your own certificates is to try out the process of configuring a web server with HTTPS.
This blog post describes a set of steps you can follow to create a digital certificate that you can then use to enable HTTPS on a website.

We are going to be using OpenSSL. You can perform these steps on Windows or Linux. If you are using Windows you can either install OpenSSL for Windows or, if you are using Windows 10, you can use the Bash on Ubuntu on Windows.
If you are using Linux, in most distributions (I tried it on Ubuntu 16.04) you just need to open a terminal window. OpenSSL is likely already installed, but in case it's not, the packages you need to install are libssl1.0.0 and libssl-dev.
Certificate Authority
To create our own certificate we need a certificate authority to sign it (if you don't know what this means, I recommend reading Brief(ish) explanation of how https works).
Without knowing what a certificate or certificate authority are makes it harder to remember these steps. Also, if something goes wrong, you'll probably have a much harder time figuring out why.
The first step in creating your own certificate authority with OpenSSL is to create a folder where the certificate authority's certificate and private keys will be stored, so lets do that:
~$ mkdir myCertificateAuthority
In the newly created folder add a sub folder for storing the signed certificates:
~/myCertificateAuthority$ mkdir certificates
Inside the myCertificateAuthority we have to create a file named serial (no extension) with the text "01" inside.
Each time we sign a certificate that file will be automatically updated.
A quick way to create the serial file with "01" inside in bash is:
~/myCertificateAuthority$ echo '01' > serial
The other file we need to create is named index.txt. This file can be created as an empty file. It will automatically be updated when we sign certificates.
~/myCertificateAuthority$ touch index.txt
The only thing left is the certificate authority's configuration file.
Certificate Authority Configuration File
The configuration file contains information about the certificate authority, namely identifying information such as its name, an email address, etc. Also, it contains default values, for example the certificates to be signed by this certificate authority's default duration.
Here's a modified sample taken from the OpenSSL help page for Ubuntu with some changes that we will discuss shortly.
[ ca ]
default_ca      = local_ca
#
#
# Default location of directories and files needed to generate certificates.
#
[ local_ca ]
dir             = /home/YOUR_USER/myCertificateAuthority
certificate     = $dir/certificateAuthorityCertificate.pem
database        = $dir/index.txt
new_certs_dir   = $dir/certificates
private_key     = $dir/certificateAuthorityPrivateKey.pem
serial          = $dir/serial
#
#
# Default expiration and encryption policies for certificates.
#
default_crl_days        = 365
default_days            = 1825
default_md              = sha256
#
policy          = local_ca_policy
x509_extensions = local_ca_extensions
#
#
# Copy extensions specified in the certificate request
#
copy_extensions = copy
#
#
# Default policy to use when generating server certificates.  The following
# fields must be defined in the server certificate.
#
[ local_ca_policy ]
commonName              = supplied
stateOrProvinceName     = supplied
countryName             = supplied
emailAddress            = supplied
organizationName        = supplied
organizationalUnitName  = supplied
#
#
# x509 extensions to use when generating server certificates.
#
[ local_ca_extensions ]
basicConstraints        = CA:false
#
#
# The default root certificate generation policy.
#
[ req ]
default_bits    = 2048
default_keyfile = /home/YOUR_USER/certificateAuthorityPrivateKey.pem
default_md      = sha256
#
prompt                  = no
distinguished_name      = root_ca_distinguished_name
x509_extensions         = root_ca_extensions
#
#
# Root Certificate Authority distinguished name.  Change these fields to match
# your local environment!
#
[ root_ca_distinguished_name ]
commonName              = A_NAME_FOR_YOUR_CERTIFICATE_AUTHORITY
stateOrProvinceName     = STATE_NAME
countryName             = COUNTRY_CODE_ONLY_TWO_CHARACTERS_ALLOWED
emailAddress            = EMAIL_ADDRESS
organizationName        = YOUR_ORGANIZATION_NAME
organizationalUnitName  = YOUR_ORGANIZATION_UNIT_NAME
#
[ root_ca_extensions ]
basicConstraints        = CA:true
The notable change is default_md's value that sets the default hashing function as sha256 instead of sha1. sha1 is in the process of being deprecated and unfortunately most examples found online use sha1.
Create a file named caconfig.cnf with the contents above and replace the block capital values with appropriate values for your case.
We are now ready to generate our own certificate authority's certificate and private key.
Before we do that here's a checklist of all the steps required so we can make sure we aren't missing any:
- Create a folder for the certificate authority (e.g. myCertificateAuthority)
- Create a file named serial containing the text "01"
- Create an empty file named index.txt
- Create a folder to store the signed certificates (e.g. myCertificateAuthority/signedCertificates)
- Create the certificate authority's configuration file (e.g. caconf.cnf)
Certificate Authority's Self-Signed Certificate and Private Key
To create the certificate and private key for our own certificate authority we first need to set caconf.cnf (the file we just created) as OpenSSL's configuration file. A quick way to do that is to set the path to the caconf.cnf file in the OPENSSL_CONF environment variable.
~/myCertificateAuthority$ export OPENSSL_CONF=~/myCertificateAuthority/caconf.cnf
We can now run the OpenSSL command to generate the certificate and private key:
~/myCertificateAuthority$ openssl req -x509 -out certificateAuthorityCertificate.pem -newkey rsa:2048 -keyout certificateAuthorityPrivateKey.pem -days 365
When you write openssl req you're accessing the certificate request and generating utility in OpenSSL. OpenSSL has many utilities/functions, this is just one of them.
The -x509 means self-sign the certificate. This means the private key that matches the public key in the certificate will be used to sign it.
The -out flag indicates the name of the certificate file. In this case certificateAuthorityCertificate.pem.
-newkey rsa:2048 means: create a new rsa key pair with 2048 bits. The public key will be in the certificate and the private key is specified with the -keyout parameter. In this case certificateAuthorityPrivateKey.pem
The location and names of the certificate and the private key (-out and -keyout) must match what is in caconf.cnf (certificate and private_key) or else you will have problems when signing certificates with this certificate authority.
-days is for specifying for how long the certificate authority's certificate should be valid. The default value is 1 month.
Note that even though in caconf.cnf there's a field named default_days, that field defines the default validity of the certificates signed by this certificate authority. The validity of certificate authority's certificate itself is not affected by this value. What this means is if you don't specify the -days option you'll get a certificate for your certificate authority that will only last one month.
When you run the command you'll get an output similar to this:
Generating a 2048 bit RSA private key
...........................+++
........+++
writing new private key to 'certificateAuthorityPrivateKey.pem'
Enter PEM pass phrase:
If you don't want to create a certificate with a password you can include the -nodes option.
If you want to check if everything is OK with your certificate authority's certificate you can run the following command:
$ openssl x509 -in certificateAuthorityCertificate·pem -text
The output will include the validity (start and end date) of the certificate, the signature algorithm and all the information you've specified in caconf.cnf, like the commonName, emailAddress, etc.
Now that we have our own a certificate authority we can start signing certificates. But for our certificate authority to be recognized, it has to be recognized as a trusted certificate autority.
Adding our Certificate Authority to Chrome
Certificates are only trusted if they were signed by a trusted certificate authority's. For a certificate authority to be trusted its certificate has to be added as a trusted source. There are ways to do this at the OS level, but they are specific to the OS you are using.
As an alternative that works for any OS you can just add the certificate authority's certificate to your browser trusted certificate authority's store. For example, for Chrome this is how you'd do that (the process for Firefox is identical).
Open Chrome, go to settings.

Click on "Show advanced settings".

Look for HTTP/SSL and click "Manage certificates".

Select the Authorities (in Windows this is the Trusted Root Certification Authorities) tab.

Click import (in Windows the .pem format won't show as one of the options, but if you select "Show all files" you will be able to import it as well).

Here's how it will look like in the end:
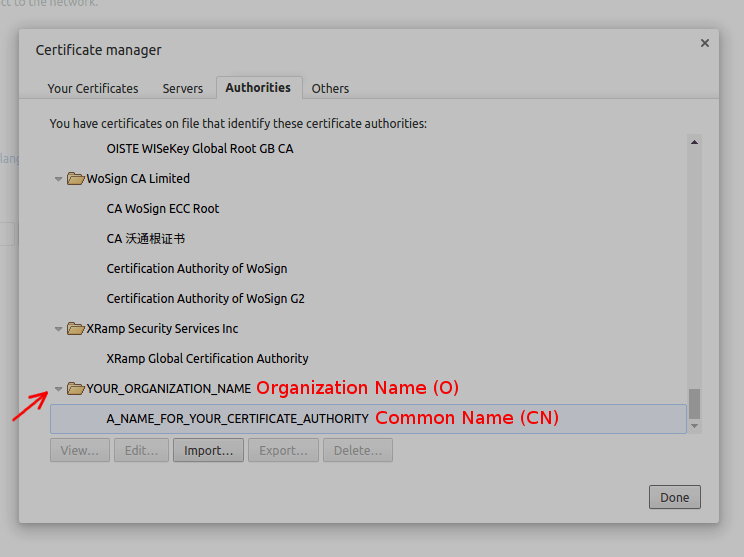
The organization name you picked in caconf.cnf is shown as the folder and the common name is shown as an entry under that folder (if you are using Windows, the UI is slightly different, it will only show the Common Name, i.e. it won't group the certificates by Organization Name).
Certificate Signing Request (CSR)
A certificate signing request is a file that is sent to a certificate authority for it to verify. It contains all the information required to create the certificate including the public key.
It's the certificate authority responsibility to validate if the information is valid (e.g. the certificate for somedomain.com is really being issued to its owner).
If the certificate authority finds that the information in the CSR is indeed correct it can them issue a signed certificate.
Since this blog post is about doing this for a development environment, let's create a CSR for localhost.
We can start by creating a new folder where we will store all the files required for generating the CSR and for storing the certificate.
~$ mkdir myCertficates
~$ mkdir myCertificates/localhost
Then inside ~/myCertficates/localhost create a file named localhost.cnf with the following contents:
[ req ]
prompt                  = no
distinguished_name      = server_distinguished_name
req_extensions          = v3_req

[ server_distinguished_name ]
commonName              = localhost
stateOrProvinceName     = STATE_NAME
countryName             = COUNTRY_CODE_ONLY_TWO_CHARACTERS_ALLOWED
emailAddress            = EMAIL_ADDRESS
organizationName        = THE_ORGANIZATION_NAME
organizationalUnitName  = THE_ORGANIZATION_UNIT_NAME

[ v3_req ]
basicConstraints        = CA:FALSE
keyUsage                = nonRepudiation, digitalSignature, keyEncipherment
Replace what's on block capitals with values that are appropriate for your use case. The commonName is the value that defines for which domain this certificate is valid. If you were to create a CSR for a different domain, e.g. myDomain.com, you'd put commonName=myDomain.com.
Set OpenSSL's configuration file to this newly created file:
$ export OPENSSL_CONF=~/myCertificates/localhost/localhost.cnf
And run this command to generate the CSR:
~/myCertificates/localhost$ openssl req -out localhostCsr.pem -newkey rsa:2048 -keyout localhostPrivateKey.pem
You will be prompted for a password for the private key. If you don't want the private key to be password protected include the -nodes option.
This command is very similar to the one we used to generate the certificate for the certificate authority. The only difference is the absence of the -x509 option. That's just how OpenSSL works.
After running the command you should have three files in the folder. localhost.cnf, localhostCsr.pem and localhostPrivateKey.pem.
Validating a CSR and emitting the certificate
The process of validating a CSR and emitting a certificate is quite simple, you just need to point OpenSSL's configuration settings to the certificate authority's configuration file:
$ export OPENSSL_CONF=~/myCertificateAuthority/caconf.cnf
And run the following command:
$ openssl ca -in ~/myCertificates/localhost/localhostCsr.pem -out ~/myCertificates/localhost/localhostCertificate.pem
The output should be something similar to this:
Using configuration from /home/YOUR_USER/myCertificateAuthority/caconf.cnf
Enter pass phrase for /home/YOUR_USER/myCertificateAuthority/certificateAuthorityPrivateKey.pem:
Check that the request matches the signature
Signature ok
The Subject's Distinguished Name is as follows
commonName            :ASN.1 12:'localhost'
stateOrProvinceName   :ASN.1 12:'STATE_NAME'
countryName           :PRINTABLE:'IE'
emailAddress          :IA5STRING:'EMAIL_ADDRESS'
organizationName      :ASN.1 12:'THE_ORGANIZATION_NAME'
organizationalUnitName:ASN.1 12:'THE_ORGANIZATION_UNIT_NAME'
Certificate is to be certified until Jan 25 22:24:10 2022 GMT (1825 days)
Sign the certificate? [y/n]:y


1 out of 1 certificate requests certified, commit? [y/n]y
Write out database with 1 new entries
Data Base Updated
If you check your ~/myCertificateAuthority folder you'll noticed that the serial file now contains "02" inside, your index.txt was also update and contains information about the certificate that was just issued, and the ~/myCertificateAuthority/certificates folder contains a file named 01.pem. That file is the certificate for localhost.
However because we used the -out ~/myCertificates/localhost/localhostCertificate.pem option, you'll also find the certificate in the localhost folder with the name localhostCertificate.pem.
PKCS12
For using the certificate in your web server it is sometimes required to use the pfx (Personal Information Exchange) format . A pfx file is a certificate and private key bundled together. To generate a pfx for localhost run the following command:
$ openssl pkcs12 -export -in localhostCertificate.pem -inkey localhostPrivateKey.pem -out localhost.pfx
You will be prompted for the private key's password if you chose to add one previously, and then you will be asked for a password for the pfx file (this one is not optional).
In the my next post I'll be explaining how to enable HTTPS in ASP.NET Core using Kestrel with a certificate created using the same process as was described here.
To be sure you won't miss it, follow me on twitter @ruidfigueiredo and I'll let you know when the new post is online.

Top comments (0)