This article series focused on implementing a serverless CI/CD with AWS services, During the implementation process we are going introduce lots of new AWS services. Due to topic complexity, the article has been divided into 2 parts. Your reading first part of the article where we will implementing Continuous Integration (CodeBuild Project, CodePipeline and test case with jest).
To follow the steps mentioned in this article, you should have your own AWS free tier account.
What should you know before starting implementing this article series?
- Basic understanding of git workflow.
- We are implementing CI/CD with CodeBuild, CodePipeline, S3, and Serverless Framework etc. So you have required a good knowledge of this AWS services.
- If you stuck in between process, you're curiosity help you to get rid of the obstacle.
If you don't know about AWS services, I will try to explain to you as simple as possible.
Let's jump into understanding CI/CD
What is Continuous Integration (CI) / Continuous Delivery (CD)?
Continuous Integration(CI) is a development and testing phase of the software development. As developers make changes to software code, these changes are immediately checked into a shared source code. When the code is checked in, automated build processes and tests are triggered to make sure that the changes did not break the software application. It helps us to caught coding errors more quickly, and this avoids bugs before code merges into the shared source code.
Continuous Delivery (CD) means that as coding changes, new feature or bug fixes passes the automated build tests, then we have to do a set of configuration before ship changes to users land and deliver it rapidly as possible.
In this article, we are going to create a weight watcher application which asks for weight on every day and we store storing this weight inside the database.
We are going to create a new repository at GitHub. Give a name weight-watchers to the repository and feel free to skip description then hit on Create Repository Button. After the successful creation weight-watchers repository, we are ready to clone this repository to the local machine for writing magical code. Clone repository using SSH or HTTP method as per your convenience.
If you stuck with cloning repository hit this link help you
git clone git@github.com:sagar-gavhane/weight-watchers.git
For sake of simplicity, we are using GitHub. If you want to use CodeCommit feel free to create a repository on AWS CodeCommit and clone it.
What is AWS CodeCommit?
AWS CodeCommit is a version control service hosted by Amazon Web Services that you can use to privately store and manage source code in the cloud. We can state that it's alternative to GitHub only difference is that you can't make your repository public. CodeCommit has great integration with CodeBuild and CodePipeline over other version control services.
Add necessary files and packages to project
Add .gitignore file to ignore tracking folders and files which are generated at run-time or some secret files to avoid uploading to the repository. Paste the raw content of https://www.gitignore.io/api/node to created .gitignore file.
touch .gitignore && gedit .gitignore
Let's create a package.json file using npm init command.
npm init --y
We are using express-js for creating API endpoints. Install project dependencies by hitting npm below command.
npm install aws-sdk body-parser express serverless-http --save
Okay, wait for a while let me quickly explain project dependencies.
aws-sdk- The aws-sdk provides an API for AWS services you can use to build applications. The API lets developers build libraries or applications that make use of AWS services. There are different aws-sdk for different languages, we are using aws-sdk for JavaScript.
body-parser - body-parser extract the entire body portion of an incoming request stream and exposes it on req.body. Means whatever we send data using post method are stored inside req.body.
express - Express is a light-weight web application framework to help organize your web application into an MVC architecture on the server side. We are using for creating API endpoints.
serverless-http - serverless-http module allows you to 'wrap' your express API for serverless use. It's not handling any HTTP server, ports or sockets.
One more step, Let's add a buildspec.yml file to our project, create a file with name buildspec.yml and add below code snippets. Later, I will explain to you the role of the buildspec file in the CI/CD pipeline.
buildspec.yml
version: 0.2
phases:
  install:
    commands:
      - npm install
      - npm test
It's a good time to commit changes to the repository. Move on to next section of creating a solid CI/CD pipeline.
git add . && git commit -m "initial commit"
git push origin master
Settings S3 bucket (Simple Storage Service)
Amazon S3 is object storage built to store and retrieve any amount of data from anywhere. Before we start to creating pipeline we have to setup S3 bucket to store our build artifacts. Build artifacts are files outputted from our builds that we want to save for future use.
Goto to AWS console and select S3 service from services dropdown, Click Create bucket and enter a name for your bucket. Here, I’m using weight-watchers-artifacts. So I’ve appended -artifacts to S3 bucket to make my bucket easier to find. S3 bucket name is unique so you have to enter suffix random numbers. Choose a region and click Next. Set default settings to S3 bucket as it is.
I strongly recommended that, stick with one region during this article. I'm sticking with US East (N. Virginia) region and also checkout necessary services are available to the your selected region.
Configure AWS CodeBuild project
AWS CodeBuild is a continuous integration service that compiles source code, runs tests, and produces software packages that are ready to deploy. We have just required to create CodeBuild project with proper settings.
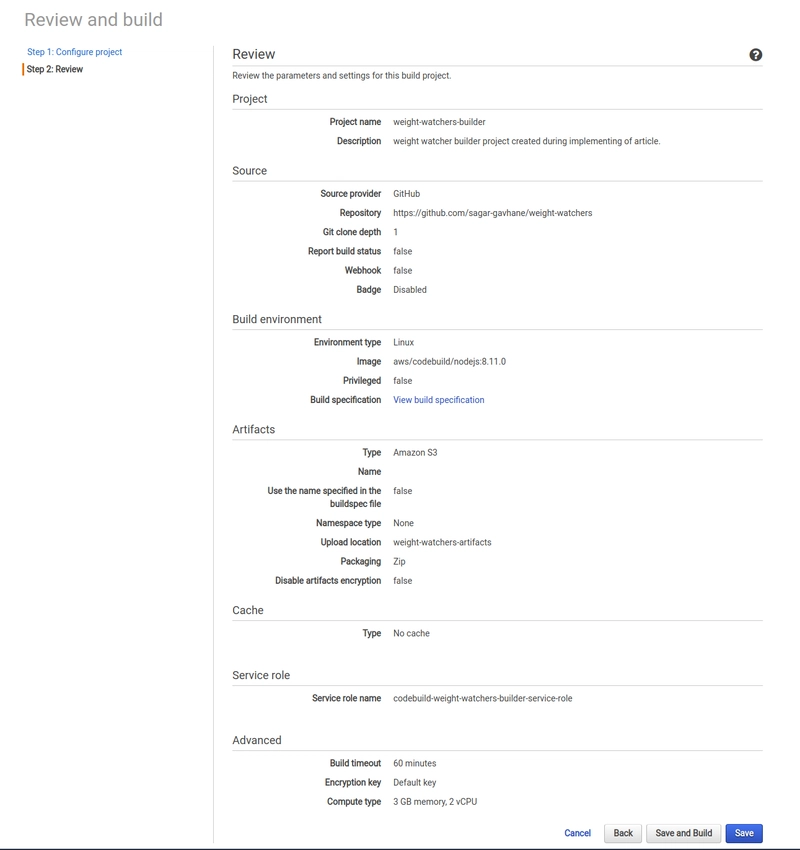
Find CodeBuild service from services dropdown, once you're on CodeBuild dashboard hit on create project button. For the naming convention, I have given a name weight-watchers-builder to the project. Choose source provider to GitHub (If you're using CodeCommit then choose CodeCommit). It will prompt you for GitHub authentication, authenticate your GitHub account. Enter your repository complete URL, I entered https://github.com/sagar-gavhane/weight-watchers repository URL. In Source: What to build section skip remaining settings as default.
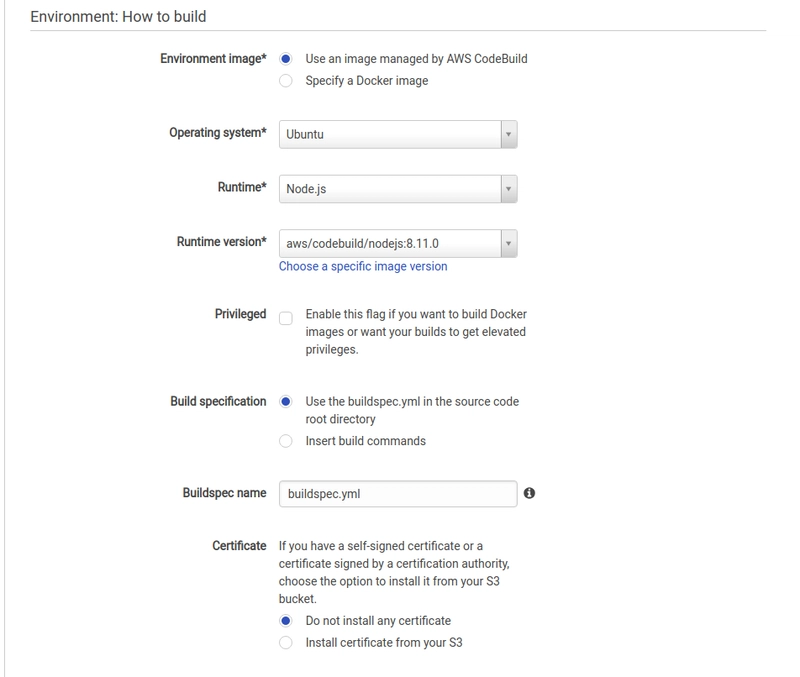
Move onto Environment: How to build section. There is two way of selecting a building environment, either you can use AWS CodeBuild image or specific docker image. I'm sticking with AWS CodeBuild image. I have chosen an operating system as Ubuntu with runtime environment as nodejs, with specific runtime version to aws/codebuild/nodejs:8.11.0.
Build specification, We will use buildspec.yml file which is located in the root of the repository. Right now just select Use the buildspec.yml in the source code root directory and buildspec name to buildspec.yml.
If you know building setting then feel free to toggle settings as per your requirements.
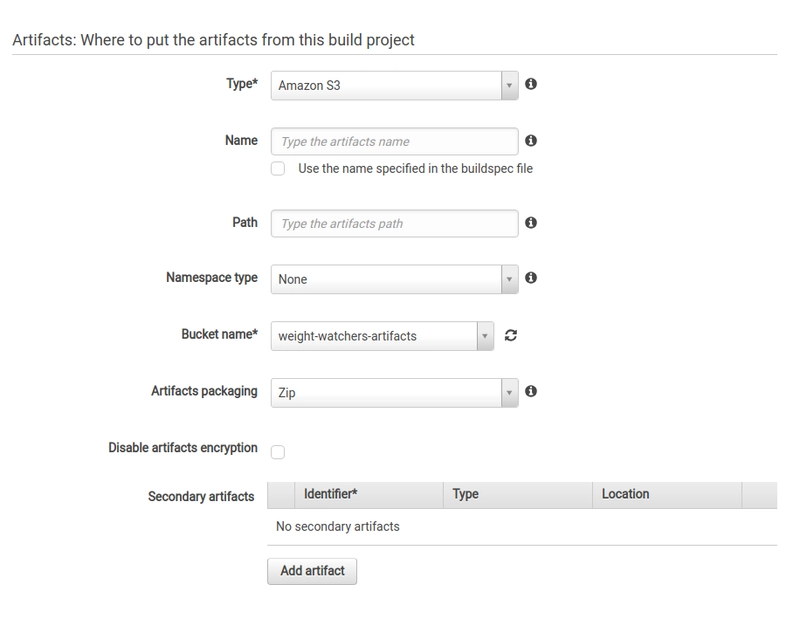
Now, it’s time to tell our CodeBuild project to save artifacts in that S3 bucket we created. Artifacts: Where to put the artifacts from this build project section select type as Amazon S3 and set name, the path to empty. Bucket name, I will choose weight-watchers-artifacts and artifacts packaging to zip.
And remaining settings: Cache, Service Role, and VPC. We don’t need to do anything with Cache and VPC for this article.
Move over to Service role section, In this section, we will need an IAM service role when your build runs, it will assume this role. This service role will give it permissions to do write logs to CloudWatch and write artifacts to S3. Choose create a service role in your account it will create a service role for us. I have given role name to codebuild-weight-watchers-builder-service-role.
Okay, we don't need to change any advanced settings. Hit on continue button to review what we have built so far.
Congratulations!! You have successfully created a CodeBuild project. Take a break, I know sticking with this article until this point is hard but step by step we will improve our knowledge and skills.
Configure CodePipeline
AWS CodePipeline is a continuous delivery service that helps us to rapidly and reliably deliver features and updates. You can define your release process workflow and describes how a new code change progresses through your release process.
A pipeline comprises a series of stages (e.g., build, test, and deploy). each stage is made up of a sequence of actions, which are tasks such as building code or deploying to test environments.
Enough theory!!. Let's focus on creating our own pipeline. select CodePipeline from services dropdown. CodePipeline creation divided into 6 steps as Name, Source, Build, Deploy, Service Role, Review.
In Name step, enter your pipeline name, for a naming convention, I will choose pipeline name as weight-watchers-pipeline then hit next step button.
In Source step, Choose source provider as GitHub repository (If your created repository on CodeCommit then select CodeCommit). It will prompt you for GitHub authentication. Authenticate your GitHub account. Once you successfully authenticate then you're ready to enter repository name and branch name. I will go with the repository name http://github.com/sagar-gavhane/weight-watchers and branch name as master. Skip Change detection options section. then move onto the next step.
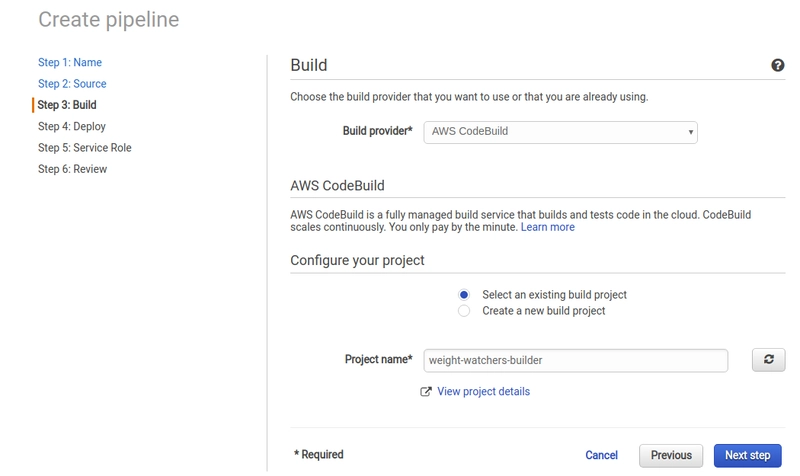
In Build step, choose the build provider that you want to use, I'm sticking with CodeBuild. Move onto Configure your project section, select your project builder name. We already created a project builder in starting of this article so, I will choose weight-watchers-builder then move to the next step.
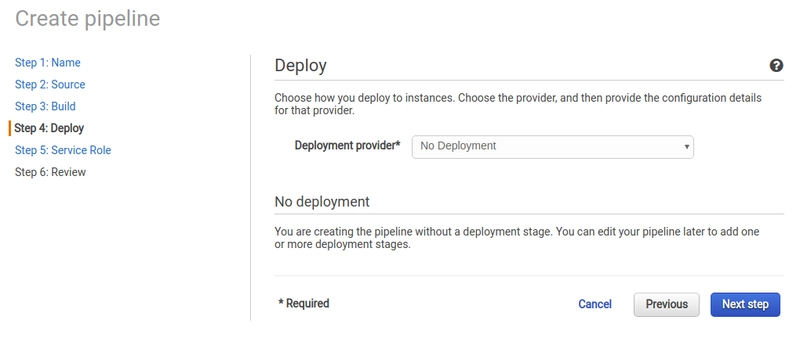
In Deploy step, choose deployment to provide as No Deployment. Later we will edit our pipeline and add one deployment stage. move to the next step.
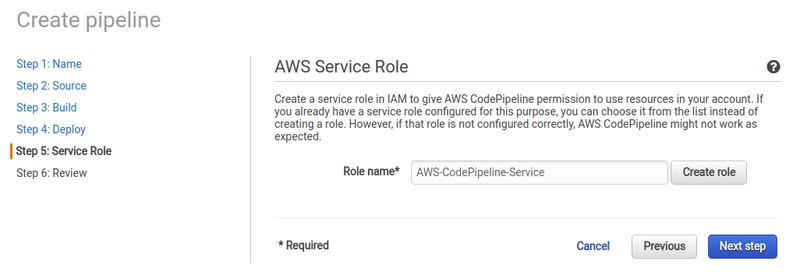
In Service Role step, Our pipeline needs a role that gives permission for access CodeBuild project, watching CloudWatch events. Now, we're selecting ready-made service role AWS-CodePipeline-Service. However, if that selected your custom role and role is not configured correctly, AWS CodePipeline might not work as expected.
Finish, you have done CodePipeline configuration, just given quick review on the pipeline and then hit create pipeline button.
Congratulations!! your pipeline successfully created.
Configure the testing environment with Jest.
Jest is a delightful JavaScript testing framework created and maintained by a community of open source contributors and Facebook employees.
Write a simple unit test for check given number is prime or not using a jestjs. In __test__ directory create a file named primeNumber.test.js and copy paste below code snippets. In code snippets, we wrote a function which returns true if the given number is prime else return false.
Before writing code, install jestjs as a development dependency.
npm install jest --save-dev
primeNumber.test.js
function isPrime(num) {
  for (var i = 2; i < num; i++) if (num % i === 0) return false;
  return num !== 1;
}

describe("test prime number", () => {
  it("17 is a prime number", () => {
    expect(isPrime(17)).toBe(true);
  });
});
Make little changes to our package.json file add the script as "test": in script section. We have to run npm test command during CodeBuild execution.
"jest"
"scripts": {
"test":

"jest"
},`
Okay! Whatever you have done modification with weight-watcher project in local machine, commit your changes to GitHub and check release change in weight-watchers-pipeline pipeline. If your both phase successfully passed you're created your own CI pipeline.
Thanks for reading this article, I understood that maybe you're stuck with the problem or you have a good suggestion for this article. Don't forget to like and comment on your question or feedback.
In the next article, we will implement CD (Continues Delivery) so keep in touch with me. Have a good day!!
Happy Coding...







Top comments (10)
Hi! Thanks for your article. You mention that there are "2 parts", but I don't see the 2nd part posted. Did you ever write it? I was curious to see where you were going to go with the testing portion.
We fully utilize CodePipeline for all of our automatic deployments (managed via Terraform), and we're looking to add in jest testing. With your instructions, you're adding in the "testing" phase into the actual CodeBuild package building phase?
I tested the entire suite of the new AWS dev tools, what I can say so far is that it does not worth it. They are limited, hard to setup (lots of not documented errors) and if you do not deploy on EC2 instances you are looking for trouble.
I spent a few days on them for the AWS certificate, and I wouldn't return to them, at least for a few more years. A vanilla Jenkins have 2000% more features and less pains.
Is this because you're just used to Jenkins and not really open to learning AWS Code* in-depth? Do you think your experience would have differed had you had no previous knowledge of Jenkins?
I feel like your experience may be a bit biased leaning towards Jenkins.
It's 2019 and CodePipeline is still a toy, and I would say the architecture is fundamentally wrong.
A build system needs to monitor all branches and take most configuration from the repository itself (so that workflows can be modified in lockstep with development).
Also, you must offer status callbacks to enable branch protection. You can hack that in with Lambda, but it's a mess.
I think the state of CodePipeline in 2019 is that it is unsuitable for teams.
We use just CodeBuild for testing (on all branches), then CodePipeline on specific branches to do the actual deploy artifact builds and deploying them.
I agree that you definitely want to build & test all branches, but you can do that with CodeBuild without involving CodePipeline.
No, I don't like Jenkins per se, I just used it as an example because is the most popular way to do it.
We can compare it to GitLab tools and still you will notice that AWS Tools are just in their infancy.
With no CI/CD experience I would have been stuck in AWS console. I tried to use them in a non-conventional way, as in I didn't want to deploy in an EC2 behind a LB and the experience was terrible.
I guess they introduced more features meanwhile, maybe even Lambda.
AWS Cloud9 on the other hand, was a great experience, it just worked. But there again it is a polished mature product bought by Amazon.
@adrian ,
I completely agree with I faced many issue during learn AWS. AWS official website has all information but its scattered.
Great post Sagar!
I agree with some of the comments on how it's tricky to setup the AWS Code* tools. But if anybody is looking to extend this setup to create a CI/CD pipeline for monorepo apps deployed to multiple AWS accounts; we wrote about it here - seed.run/blog/how-to-build-a-cicd-...
@sagar
with Jenkins and GitHub, I can use Checks to show build status of current commit/PR.
How do you implement it with CodePipeline? Thanks.
There is no build in way to do it, so I created a Lambda function for it: github.com/fishbrain/codepipeline-...