
What the course will cover
- How to spawn docker containers with docker-compose
- How to connect a Prisma Express app to the PostgreSQL database
- How to connect a Prisma Express app to the Redis database
Prerequisites
To follow along with this tutorial, make sure you have the following:
Software
VS Code Extensions
- Docker(optional) – To manage docker containers directly in VS Code
-
Prisma – Adds syntax highlighting, formatting, auto-completion, and linting for
.prismafiles.
Assumed Knowledge
- You already know the basics of JavaScript, TypeScript, and Node.js
- You have basic knowledge of SQL, PostgreSQL, Redis, Prisma, and Docker
How to Setup Node.js with Express, PostgreSQL, Redis, and Prisma.
Creating PostgreSQL and Redis Database with Docker-compose
The most obvious way to get PostgreSQL and Redis databases running on your machine is to use Docker and Docker-compose.
Am going to assume you already have Docker and Docker-compose installed on your computer.
In the root directory create a docker-compose.yml file and paste the configurations below into it.
docker-compose.yml
version: '3'
services:
  postgres:
    image: postgres:latest
    container_name: postgres
    ports:
      - '6500:5432'
    volumes:
      - progresDB:/data/postgres
    env_file:
      - ./.env

  redis:
    image: redis:alpine
    container_name: redis
    ports:
      - '6379:6379'
    volumes:
      - redisDB:/data
volumes:
  progresDB:
  redisDB:
Throughout this tutorial series, we’ll be using this VS Code extension to view the data stored in either the PostgreSQL or Redis databases.

To provide the credentials (username, password, and database name) needed by the PostgreSQL Docker image, we need to create a .env file in the root directory.
You can add the .env file to your .gitignore file to omit it from your Git commits. I will include some of the .envfile content in an example.env file so that you can see what the .env file should look like.
.env
PORT=8000
NODE_ENV=development

POSTGRES_HOST=127.0.0.1
POSTGRES_PORT=6500
POSTGRES_USER=admin
POSTGRES_PASSWORD=password123
POSTGRES_DB=node_prisma
It is a convention for environment variables to be in uppercase.
Once we have the above configurations in place, run this command to spawn the docker containers.
docker-compose up -d
Setup Environment Variables
The most essential part of our application is to set up environment variables. This allows us to store sensitive information (API Keys, passwords, etc) and we can easily exclude them from the Git commits.
Am going to use the popular library dotenv to load the environment variables from the .env file.
Also, I will use the config library to set and access the environment variables. The config library helps us provide the TypeScript types for our environment variables
Initialize a new Typescript Node.js project with this command:
yarn init -y && yarn add -D typescript @types/node && npx tsc --init
Remove the configurations in the tsconfig.json file and paste these configurations into it.
{
  "compilerOptions": {
    "target": "es2016",
    "experimentalDecorators": true,
    "emitDecoratorMetadata": true,
    "module": "commonjs",
    "esModuleInterop": true,
    "forceConsistentCasingInFileNames": true,
    "strict": true,
    "strictPropertyInitialization": false,
    "skipLibCheck": true,
    "outDir": "./build",
    "rootDir": "."
  }
}
Run this command to install the dotenv and config packages.
yarn add config dotenv && yarn add -D @types/config
In the root directory create a config folder and within the config directory create two files named default.ts and custom-environment-variables.ts.
Copy and paste the code snippets below into their respective files.
default.ts
export default {
  origin: 'http://localhost:3000'
};
custom-environment-variables.ts
export default {
  port: 'PORT',
  nodeEnv: 'NODE_ENV',
};
Validating Environment Variables
Forgetting to add an environment variable can lead to unexpected bugs which will cause your application to malfunction.
To prevent this, we’re going to use the envalid package to validate the environment variables
yarn add envalid
Create an src folder in the root directory and within the src folder create another folder named utils .
Within the utils folder create a validateEnv.ts file.
src/utils/validateEnv.ts
import { cleanEnv, port, str } from 'envalid';

const validateEnv = () => {
  cleanEnv(process.env, {
    NODE_ENV: str(),
    PORT: port(),
    POSTGRES_HOST: str(),
    POSTGRES_PORT: port(),
    POSTGRES_USER: str(),
    POSTGRES_PASSWORD: str(),
    POSTGRES_DB: str(),
  });
};

export default validateEnv;
The envalid package will throw an error if we don’t have any of the defined variables in the .env file or if they’re of the wrong types.
Initialize a Prisma Project with ExpressJs
Prisma comes with a CLI tool we can use to perform different operations like creating migrations out of our schema definitions and pushing the generated migration code to the preferred database.
To do that, you need to install the prisma CLI tool as a dependency.
yarn add -D prisma
Now run this command to create a basic Prisma setup with the Prisma CLI:
npx prisma init --datasource-provider postgresql
The
--datasource-providerflag tells the Prisma CLI what database to use. I usedpostgresqlsince that’s what am writing about in this tutorial.
A new prisma folder is created in the root directory and within the prisma folder you will find a schema.prisma file. The schema.prisma file is the main Prisma configuration file which will contain your database schema.
Also, if you open the .env file you should see a PostgreSQL database connection URL created by the Prisma CLI.
Change the default credentials in the URL created by the Prisma CLI with the credentials we provided to the Docker PostgreSQL image.
.env
POSTGRES_HOST=127.0.0.1
POSTGRES_PORT=6500
POSTGRES_USER=admin
POSTGRES_PASSWORD=password123
POSTGRES_DB=node_prisma
Your connection URL should now look somewhat like this assuming you used the configurations I provided.
.env
DATABASE_URL="postgresql://admin:password123@127.0.0.1:6500/node_prisma?schema=public"
Creating a database schema with Prisma
When you open the /prisma/schema.prisma file you’ll find a barebone schema:
prisma/schema.prisma
// This is your Prisma schema file,
// learn more about it in the docs: https://pris.ly/d/prisma-schema

generator client {
  provider = "prisma-client-js"
}

datasource db {
  provider = "postgresql"
  url      = env("DATABASE_URL")
}
In the datasource field, you can see Prisma used postgresql as the database provider and that we’re loading the database connection URL form the .env file.
Also, in the generator block, the provider = "prisma-client-js" tells Prisma to generate the Prisma Client based on our data models.
Defining the user model
prisma/schema.prisma
model User{
  @@map(name: "users")

  id String  @id @default(uuid())
  name String  @db.VarChar(255)
  email String
  photo String? @default("default.png")
  verified Boolean? @default(false)

  password String
  role RoleEnumType? @default(user)

  verificationCode String? @db.Text

  createdAt DateTime @default(now())
  updatedAt DateTime @updatedAt

  @@unique([email, verificationCode])
  @@index([email, verificationCode])
}

enum RoleEnumType {
  user
  admin
}
In the above, we defined the User model and the @@map(name: "users") tells Prisma to use users as the database table name.
Each field in the model has a name followed by a type and an optional field attribute(s).
The @id attribute on the id field specifies that it’s a primary key of the users table. Also, the @default(uuid())attribute sets a default UUID (Universally Unique Identifier).
All the fields are required by default so adding ? after the field type specifies that it’s optional.
The RoleEnumType enum denotes whether the user is an admin or not.
The @@unique([email, verificationCode]) specifies that the email and verificationCode fields provided in the array should have unique constraints in the database.
Lastly, the @@index([email, verificationCode]) defines indexes on both the email and verificationCode fields in the database.
Database Migration with Prisma
To create a new migration, run the following command
The PostgreSQL docker container must be running for this to work.
npx prisma migrate dev --name user-entity --create-only
The--name flag gives the migration a name and the --create-only tells Prisma to only create the migration without applying it.
Now run this command to install the Prisma Client. Needed for the next step.
yarn add @prisma/client
To create the users table in the database, run the following command:
npx prisma db push
How to connect an ExpressJs app to Redis
Run the following command to install Express and Redis
yarn add express redis && yarn add -D @types/express
Create a connectRedis.ts file in the utils folder and add the code snippets below.
src/utils/connectRedis.ts
import { createClient } from 'redis';

const redisUrl = 'redis://localhost:6379';

const redisClient = createClient({
  url: redisUrl,
});

const connectRedis = async () => {
  try {
    await redisClient.connect();
    console.log('Redis client connect successfully');
    redisClient.set('try', 'Welcome to Express and TypeScript with Prisma');
  } catch (error) {
    console.log(error);
    setTimeout(connectRedis, 5000);
  }
};

connectRedis();

export default redisClient;
I used the .set() method on the Redis instance to add a message with a try key to the Redis database.
Next, create an app.ts file in the src folder and paste the code snippets below into it.
src/app.ts
require('dotenv').config();
import express, { Response } from 'express';
import config from 'config';
import validateEnv from './utils/validateEnv';
import { PrismaClient } from '@prisma/client';
import redisClient from './utils/connectRedis';

validateEnv();

const prisma = new PrismaClient();
const app = express();

async function bootstrap() {
  // Testing
  app.get('/api/healthchecker', async (_, res: Response) => {
    const message = await redisClient.get('try');
    res.status(200).json({
      status: 'success',
      message,
    });
  });

  const port = config.get<number>('port');
  app.listen(port, () => {
    console.log(`Server on port: ${port}`);
  });
}

bootstrap()
  .catch((err) => {
    throw err;
  })
  .finally(async () => {
    await prisma.$disconnect();
  });
Here is the breakdown of what I did in the app.ts file:
- First I evoked the
validateEnv()function to validate the environment variables in the.envfile. - Next, I created an instance of the Prisma Client and Express
- Next, I created a
bootstrapfunction where I define the application logic. I created a/api/healthchecker GET route to help us check if all the configurations we provided are valid.
Also, I called the listen() method to start the server.
Lastly, in the /api/healthchecker route controller, I used the .get() method on the redisClient instance to get the message we stored in the Redis database.
Now add the following scripts to your package.json file.
{
"scripts": {
    "start": "ts-node-dev --respawn --transpile-only --exit-child src/app.ts",
    "migrate": "npx prisma migrate dev --name user-entity && npx prisma generate",
    "push": "npx prisma db push",
    "build": "tsc . -p"
  }
}
Since we’re using TypeScript, we need a package to automatically restart the server upon file change.
I recommend ts-node-dev since it’s optimized for speed compared to nodemon and ts-node .
Run this command to install the ts-node-dev package
yarn add ts-node-dev
With ts-node-dev installed, run this command to start the development server.
yarn start
Open a new tab in your browser and enter this URL http://localhost:8000/api/healthchecker and you should see a JSON response with the massage we stored in the Redis database.
Connecting to PostgreSQL and Redis with MySQL VS Code Extension
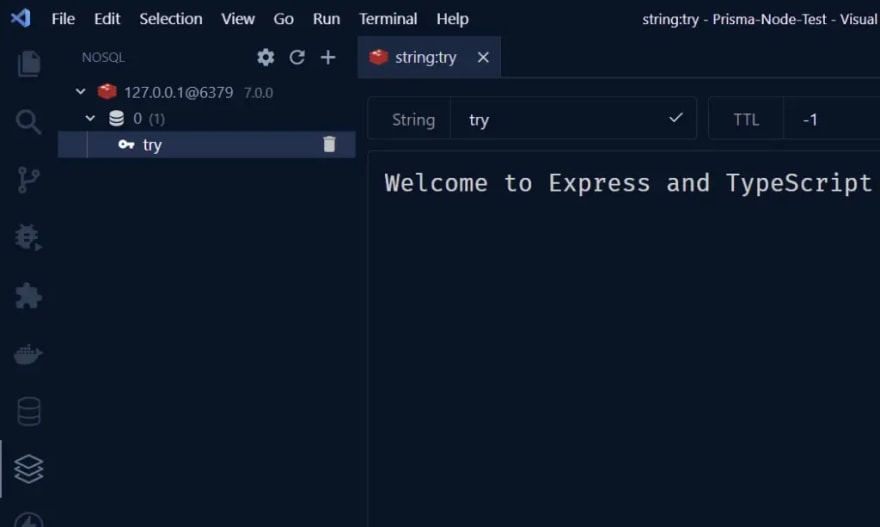
Connecting to the Redis Docker container
Click on the NoSQL tab on the sidebar and then click on the “Create Connection” blue button.

We don’t need to provide any credentials to connect to the Redis container so click on the “Connect” button.

Expand the dropdowns and click on the try key to see the message we stored in the Redis database.
Connecting to the PostgreSQL Docker container
Click on the database tab on the left sidebar of VS Code and then click on the “Create Connection” button.

Select PostgreSQL from the available server types then provide the database credentials contained in the .env file and click on the “Connect” button.

Assuming the connection was successful, expand the dropdowns on the left side and click on the users table to see the columns we defined with Prisma.

Conclusion
Congratulation on reaching the end. In this article, you learned how to set up a Node.js project with ExpressJs, Redis, Prisma, PostgreSQL, and Docker.

Top comments (0)