
To start designing astonishing 3D models in CATIA V5, you need to know your way around the toolbars. They are the principal resource for working in any CAD software. In this post, I will write about them and explain how to work with them and customize them.
Toolbars
Depending on the module we are working at, we will have different toolbars active, as we use each module for diverse tasks. For example, the part design module will have its toolbars for solid elements, while the drafting module is for 2D drawings.
To change the active module, we need to click on the "Start" menu and select the one we want to use. This way, the icons on each toolbar will change, adapting to the new module.

To make our lives easier as designers, CATIA V5 has different icons in each toolbar, and each icon represents a function with many parameters. It also orders those functions depending on utility in various toolbar and icon groups.
You can try opening different modules to see how toolbars and icons change.
Moving toolbars
To move toolbars attached to borders, you need to click on the fat grey line of the toolbar and drag. You can move it to any position you want on the desktop (even to another desktop if you have another screen). You can attach it to another border or leave it "floating" on the graphic area.

You can also rotate toolbars and place them horizontally by maintaining "Shift" while you drag the bar.

You will also have hidden toolbars in the borders. CATIA represents them by two arrows at the end of the edges:

To recover those bars, click on the arrows and drag until those arrows disappear.
You can configure toolbars as you like since CATIA will save your choices and load them the next time you open the program.
Subtoolbars and icons
There are some icons in the toolbars with a small black arrow below them. If you click on that arrow, it will open a new toolbar.

You can also drag this new bar to place it in another position if you want to keep it visible. You can also close it by clicking anywhere in the graphic area outside the bar.
You may also see some grey icons. It means that we can't use those functions right now. For example, you can't use an extrude function if you don't have at least one profile to extrude.
Showing & Hiding toolbars
To show or hide a toolbar, we need to open the menu View -> Toolbars. There, we will see that the ones visible have a tick. We can select or unselect them to show and hide them.
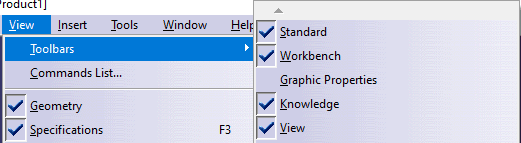
If you have a bar floating on the screen, you can also click the "x" in the upper right corner.
Restoring predeterminate positions
To restore the initial positions, we need to click on Tools -> Customize , and in the Toolbars window, click Restore Positions.
To sum up
Learning how to edit and move toolbars is one of the most basic and relevant steps in any CAD software, as they are the main element we will use to create our models.
In this post, we have explained everything you need to know about how to edit them. I hope you found it fruitful!
Useful links
Learn more about CAD design with this intro to CATIA V5:

Top comments (0)