
In this article I will explain how to build Mean Stack application using MondoDB, Express, Angular and NodeJS. We will use Angular to develop frontend and NodeJS, Express and MongoDB to develop backend server of our CustoreStore mean stack application that will perform simple basic CRUD operations on the Customer model.
Let’s see what we need to build Mean Stack application from scratch.
Prerequisite
- First, we need Node.js, which is JavaScript runtime installed on our machine. With Node.js comes NPM which is a node package manager that we will use to install other packages like Express and many others needed to develop this application. So download and install the latest Node.js available from this link.
- We need code editor as well, I will recommend VS Code but if you already have any other code editor that you are using to write C# code then stick with that otherwise download and install VS Code from this link.
- Last, we need to have MongoDB installed on the machine. You can download and install MongoDB community edition free from this link.
MongoDB Installation/Setup
Download and run the installer, select Custom option and follow the wizard instructions and keep the default setting as is. It will create data folder at C:\Program Files\MongoDB\Server\4.2\data to store databases and also start MongoDB Server as window service after installation is finished.
That’s all we need to do on MondoDB side for this application.
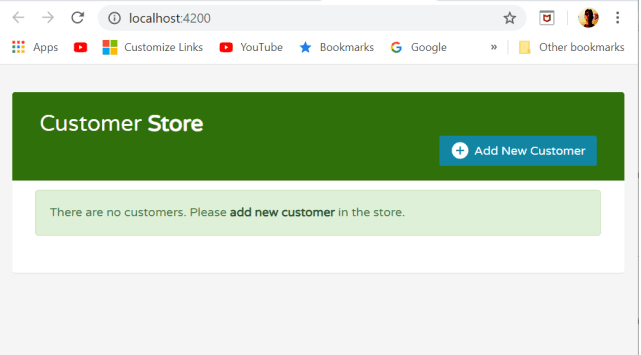
Now that we have setup our dev environment, we are ready to kick off writing code for our CustomerStore Mean Stack application which would look like the image below.

Get Started…
First, we will start with developing backend server that will be hosting a restful API exposing CRUD operations on MongoDB database using Express and Nodejs.
And then we will develop client frontend using Angular that will consume this restful API to perform CRUD operations exposed by this API. So let’s get started…
Build Backend Server
Start with creating project folder mean-stack that will contain code for our mean stack application and move into it.
$ mkdir mean-stack
$ cd mean-stack
Now we will start with creating package.json file which is the first building block for Node.js application and holds application configuration and package dependencies details that is required for the backend server. So open the command window in the project folder and run following command to create it.
$ npm init --yes
Install Express, Mongoose and body-parser
Express is a minimal and flexible Node.js web application framework that provides many features and HTTP utility methods and middleware to create a robust web API.
Mongoose is a MondoDB object data modelling package that provides a straight-forward, schema-based solution to model data in the Node.js application.
body-paser is Node.js middleware for parsing incoming request bodies in a middleware.
So install all these packages by running following command in the command window.
$ npm i express mongoose body-parser --save
Writing Code
Now open the code editor to start writing code. Run following command to start VS Code editor in the project folder.
$ vscode .
- Create db.js file and add following code to create and export connection with MongoDB using mongoose.
const mongoose = require("mongoose");
mongoose.connect(
  "mongodb://localhost:27017/customerDb",
  { useNewUrlParser: true, useUnifiedTopology: true },
  err => {
    if (!err) console.log("Successfully connect to MondoDB...");
    else
      console.log(
        "Connection to MongoDb failed :"
        + JSON.stringify(err, undefined, 2)
      ); });
module.exports = mongoose;
- Create index.js file and add following code to create Express server to host our restful API. It will also import mongodb connection from db.js.
const bodyParser = require("body-parser");
const { mongoose } = require("./db");
const customer = require("./Controller/CustomerController");

const express = require("express");
const app = express();

//added middleware code
app.use(bodyParser.json());
app.use("/customers", customer);

const port = process.env.port || 3000;
app.listen(port, () => {
  console.log(`server listening at port :${port}`);
});
- Now we need to create object data model to store Customer data in the MongoDB database. So create Models folder and create Customer.js file in it. Add following code to hold Customer model schema and export it as well.
const mongoose = require("mongoose");

var Customer = mongoose.model("Customer", {
  first_name: String,
  last_name: String,
  gender: String,
  age: Number,
  email: String
});
module.exports = { Customer };
- The last piece of code is to add controller code that will expose our restful API endpoints. So create Controller folder and in it create CustomerController.js file. Now add following code for CRUD operations. Add following code to handle GET request to fetch the Customers.
router.get("/", (req, resp) => {
  Customer.find((err, docs) => {
    if (err)
      console.log(
     "Error while getting customers..."
      + JSON.stringify(err, undefined, 2)
      ); else resp.send(docs);
  });});
To create new Customer, add following code to handle POST request from the client.
router.post("/", (req, resp) => {
  let cust = new Customer({
    first_name: req.body.first_name,
    last_name: req.body.last_name,
    gender: req.body.gender,
    age: req.body.age,
    email: req.body.email
  });
  cust.save((err, doc) => {
    if (err)
      console.log(
        "error in saving customers..."
        + JSON.stringify(err, undefined, 2)
      ); else resp.send(doc);
  });});
Add following code to handle PUT request from client to update existing Customer.
router.put("/:id", (req, resp) => {
  let customerId = req.params.id;
  if (!ObjectId.isValid(customerId))
    return resp.status(400)
    .send(`Customer not found for id :${customerId}`);
And to handle DELETE request to delete the Customer, Add following code.
router.delete("/:id", (req, resp) => {
  let customerId = req.params.id;
  if (!ObjectId.isValid(customerId))
    return resp.status(400)
    .send(`Customer not found for id :${customerId}`);

  Customer.deleteOne({ _id: customerId }, (err, docs) => {
    if (err)
      console.log(
        "Error while deleting customers..."
        + JSON.stringify(err, undefined, 2)
      ); else resp.send(docs);
  }); });
That’s all we need to code for our back-end server.
Build Frontend Client
First, we need to install Angular CLI to develop our client application in Angular.
So run following command to install Angular CLI on your machine.
$ npm install -g @angular/cli
After installation, create client application by running following command.
$ ng new client
It will create client folder containing Angular application code. So now move into this folder since we have to create few components and shared resources using Angular CLI.
$ cd client
Create Shared Resource
First we create shared folder in the src/app location to hold shared resource like Customer model and API service for our application.
- Run following command to create customer model class and add following code in it.
$ ng generate class customer --type=model
export class Customer {
  _id: string;
  first_name: string;
  last_name: string;
  gender: string;
  age: number;
  email: string;}
- Now create customer service class by running following command and add following code to make calls to restful API endpoints to perform CRUD operations.
$ ng generate service customer
customers: Customer[];
  readonly APIUrl = "http://localhost:3000/Customers";
  constructor(private http: HttpClient) {}
  PostCustomer(cust: Customer) {
    return this.http.post(this.APIUrl, cust); }
  GetCustomerList() {
    return this.http.get(this.APIUrl); }
  GetCustomerById(id: string) {
    return this.http.get(this.APIUrl + `/${id}`); }
  PutCustomer(cust: Customer) {
    return this.http.put(this.APIUrl + `/${cust._id}`, cust); }
  DeleteCustomer(custid: string) {
    return this.http.delete(this.APIUrl + `/${custid}`); }
Create Components and Routing
Now we need to create following components to design our client’s UI.
home – it will be the main UI component and will contain navbar and list-customer component.
navbar – it will show navigation bar containing application title “Customer Store” and “Add New Customer” button that will route to create-customer component.
list-customer – it will show list of customers with delete and edit button for each customer.
create-customer – it will show customer entry form.
edit-customer – it will show customer form to edit the customer details.
Run following commands to create these components.
$ ng generate component home
$ ng generate component navbar
$ ng generate component list-customer
$ ng generate component create-customer
$ ng generate component edit-customer
We also need to create routing module to setup routing among home, create customer and edit customer components.
So run following command to create routing module.
$ ng generate module routing
Add Code to Components and Routing Module
- Open routing.module.ts file and add following routing code in it.
const routes: Routes = [
  { path: "", component: HomeComponent },
  { path: "new", component: CreateCustomerComponent },
  { path: "edit/:id", component: EditCustomerComponent }
];
@NgModule({
  imports: [RouterModule.forRoot(routes)],
  exports: [RouterModule]
})
- Add following mark-up code in the html file of home component to render navbar and list-customer components.
<div class="table-wrapper">
    <app-navbar></app-navbar>
    <app-list-customer></app-list-customer> </div></div>
- Go to navbar component and add following mark-up in the html file to create router link to create-customer component.
<div class="table-title">
<div class="row">
<div class="col-sm-6">
<h2>Customer <b>Store</b></h2>
</div> <div class="col-sm-6">
<a [routerLink]="['new']" class="btn btn-success"
data-toggle="modal">
<i class="material-icons"></i>
<span>Add New Customer</span>
</a> </div> </div></div>
- Open list-customer component and add following mark-up in the html file and code in the typescript file to render details of the customers and also delete and edit buttons.
<div [hidden]="this.customers.length !== 0"
class="alert alert-success" role="alert">
There are no customers. Please
<a [routerLink]="['new']" class="alert-link">add new customer</a>
in the store.</div>
<table [hidden]="this.customers.length == 0"
class="table table-striped table-hover w-auto">
<thead><tr><th>First Name</th>
<th>Last Name</th>
<th>Gender</th>
<th>Age</th>
<th>Email</th>
<th>Actions</th></tr></thead>
<tbody id="customers">
<tr *ngFor="let customer of customers">
<td>{{ customer.first_name }}</td>
<td>{{ customer.last_name }}</td>
<td>{{ customer.gender }}</td>
<td>{{ customer.age }}</td>
<td>{{ customer.email }}</td>
<td><a [routerLink]="['edit', customer._id]" class="edit"
data-toggle="modal">
<i class="material-icons" data-toggle="tooltip" title="Edit">
</i></a>
<a href="#deleteCustomerModal"
(click)="displayDeleteForm(customer._id)"
class="delete" data-toggle="modal">
<i class="material-icons" data-toggle="tooltip"
title="Delete"></i></a> </td> </tr>
</tbody></table>
<div [hidden]="this.customers.length == 0" class="clearfix">
<div id="counter" class="hint-text">{{ counter }}</div></div>
<!-- Delete Modal HTML -->
<div id="deleteCustomerModal" class="modal fade">
<input type="hidden" id="delete-id" />
<div class="modal-dialog">
<div class="modal-content">
<form>
<div class="modal-header">
<h4 class="modal-title">Delete Customer</h4>
<button type="button" class="close" data-dismiss="modal"
aria-hidden="true">× </button> </div>
<div class="modal-body">
<p>Are you sure you want to delete this Customer?</p>
<p class="text-warning">
<small>This action cannot be undone.</small>
</p> </div>
<div class="modal-footer">
<input type="button" class="btn btn-default"
data-dismiss="modal" value="Cancel"/>
<input type="submit" class="btn btn-danger"
data-dismiss="modal" (click)="deleteCustomer()"
value="Delete"/>
</div> </form></div> </div></div>
deletedCustomerId: string;
counter: string;
customers: Customer[];
constructor(private customerService: CustomerService) {
this.customers = []; }
ngOnInit() { this.GetCustomersFromService(); }
GetCustomersFromService() {
this.customerService.GetCustomerList().subscribe(resp => {
this.customers = resp as Customer[];
this.counter = `Showing ${this.customers.length} Customers...`;
}); }
deleteCustomer() {
this.customerService
.DeleteCustomer(this.deletedCustomerId)
.subscribe(resp => {
this.GetCustomersFromService();
}); }
displayDeleteForm(custid) {this.deletedCustomerId = custid;}
- Add following mark-up and code in the html and typescript files of the create-customer component to render customer data entry form and functionality to make API call to save it in the database.
<div class="container">
  <div class="table-wrapper">
    <div class="table-title">
      <div class="row">
        <div class="col-sm-6">
          <h2>Customer <b>Store</b></h2> </div>
        <div class="col-sm-6"></div> </div> </div>
    <!-- Add Modal HTML -->
    <div id="addCustomerModal">
      <div class="modal-dialog">
        <div class="modal-content">
          <form name="addCustForm" #addCustomerForm="ngForm">
            <div class="modal-header">
              <h4 class="modal-title">Add Customer</h4> </div>
            <div class="modal-body">
              <div class="form-group">
              <label>First Name</label>
              <input type="text" name="first_name" #first_name="ngModel"
                  [(ngModel)]="customerDetail.first_name"
                  placeholder="Enter First Name" class="form-control"
                  required /> </div>
              <div class="form-group">
              <label>Last Name</label>
              <input type="text" name="last_name" #last_name="ngModel"
                  [(ngModel)]="customerDetail.last_name"
                  placeholder="Enter Last Name"
                  class="form-control" required /> </div>
              <div class="form-group">
                <label>Gender</label>
                <input type="text" name="gender" #gender="ngModel"
                  [(ngModel)]="customerDetail.gender"
                  placeholder="Enter Gender" class="form-control"
                  required /> </div>
              <div class="form-group">
                <label>Age</label>
                <input type="text" name="age" #age="ngModel"
                  [(ngModel)]="customerDetail.age"
                  placeholder="Enter Age" class="form-control"
                  required/> </div>
              <div class="form-group">
                <label>Email</label>
                <input type="text" name="email" #email="ngModel"
                  [(ngModel)]="customerDetail.email"
                  placeholder="Enter Email" class="form-control"
                  required/> </div> </div>
            <div class="modal-footer">
              <input type="button" (click)="backToHome()"
              class="btn btn-default" value="Cancel" />
              <input type="submit" class="btn btn-success"
                [disabled]="!addCustomerForm.valid"
                (click)="addCustomer(addCustomerForm)"
                value="Add" /></div>
          </form></div></div></div> </div></div>

customerDetail: Customer;
  constructor( private customerService: CustomerService,
    private router: Router ) {
    this.customerDetail = {
      _id: "",
      first_name: "",
      last_name: "",
      gender: "",
      age: null,
      email: ""
    }; }
  addCustomer(addCustomerForm) {
    this.customerService.PostCustomer(addCustomerForm.value)
    .subscribe(resp => {
      this.router.navigate([""]);
    }); }
  backToHome() { this.router.navigate([""]); }
- Now go to edit-customer component and add following mark-up and code in the html and typescript files to render customer edit form and load selected customer data into it and make API call to update the data back in the database.
<div class="container">
  <div class="table-wrapper">
    <div class="table-title">
      <div class="row">
        <div class="col-sm-6">
          <h2>Customer <b>Store</b></h2> </div>
        <div class="col-sm-6"></div> </div></div>
    <!-- Edit Modal HTML -->
    <div id="updateCustomerModal">
      <div class="modal-dialog">
        <div class="modal-content">
        <form name="updateCustomerForm" #updateCustomerForm="ngForm">
            <div class="modal-header">
              <h4 class="modal-title">Edit Customer</h4> </div>
            <div class="modal-body">
              <input type="hidden"
                name="_id" #_id="ngModel"
                [(ngModel)]="customerDetail._id"/>
              <div class="form-group">
              <label>First Name</label>
              <input type="text" name="first_name" #first_name="ngModel"
                  [(ngModel)]="customerDetail.first_name"
                  placeholder="Enter First Name" class="form-control"
                  required /></div>
              <div class="form-group">
              <label>Last Name</label>
              <input type="text" name="last_name" #last_name="ngModel"
                  [(ngModel)]="customerDetail.last_name"
                  placeholder="Enter Last Name" class="form-control"
                  required /> </div>
              <div class="form-group">
                <label>Gender</label>
                <input type="text" name="gender" #gender="ngModel"
                  [(ngModel)]="customerDetail.gender"
                  placeholder="Enter Gender" class="form-control"
                  required /> </div>
              <div class="form-group">
                <label>Age</label>
                <input type="text" name="age" #age="ngModel"
                  [(ngModel)]="customerDetail.age"
                  placeholder="Enter Age" class="form-control"
                  required /> </div>
              <div class="form-group">
                <label>Email</label>
                <input type="text" name="email" #email="ngModel"
                  [(ngModel)]="customerDetail.email"
                  placeholder="Enter Email" class="form-control"
                  required /> </div> </div>
            <div class="modal-footer">
              <input type="button" (click)="backToHome()"
                class="btn btn-default" value="Cancel" />
              <input type="submit" class="btn btn-info"
                [disabled]="!updateCustomerForm.valid"
                (click)="updateCustomer(updateCustomerForm)"
                value="Save"/></div>
          </form></div> </div> </div></div></div>

customerDetail: Customer;
  constructor(
    private customerService: CustomerService,
    private route: ActivatedRoute,
    private router: Router
  ) {
    this.customerDetail = {
      _id: "",
      first_name: "",
      last_name: "",
      gender: "",
      age: null,
      email: "" }; }

  ngOnInit() {this.GetCustomerFromService
(this.route.snapshot.paramMap.get("id"));}

  updateCustomer(updateCustomerForm) {
    this.customerService
      .PutCustomer(updateCustomerForm.value)
      .subscribe(resp => {
        this.router.navigate([""]);
      }); }
  GetCustomerFromService(custid) {
    this.customerService.GetCustomerById(custid)
.subscribe(resp => {this.customerDetail = resp as Customer;
    }); }
  backToHome() { this.router.navigate([""]); }
- Open app component html file, delete all existing mark-up code and replace it with following mark-up that will make all the routed component to be rendered in the app component.
<router-outlet></router-outlet>
- Last, open the index.html file and add following CSS links and scripts tag to apply bootstraps classes and functionality.
<link rel="stylesheet"
 href="https://fonts.googleapis.com/css?
family=Roboto|Varela+Round"/>
    <link rel="stylesheet"
      href="https://fonts.googleapis.com/icon?
family=Material+Icons"/>
    <link rel="stylesheet"
      href="https://maxcdn.bootstrapcdn.com/
font-awesome/4.7.0/css/font-awesome.min.css"/>
    <link rel="stylesheet"
      href="https://maxcdn.bootstrapcdn.com/
bootstrap/3.3.7/css/bootstrap.min.css"/>
    <script src="https://ajax.googleapis.com/
ajax/libs/jquery/1.12.4/jquery.min.js"></script>
    <script src="https://maxcdn.bootstrapcdn.com/
bootstrap/3.3.7/js/bootstrap.min.js"></script>
Now we are done with the coding so let’s run our mean stack application.
Run Server and Client Applications
- To run the server we need to move to mean-stack folder and run following command in the command window.
$ Node server.js
It will launch the web server that will host our API available at http://localhost:3000/Customers.
- And to run the Angular client application open another command window and move into client folder and run following command.
$ ng serve --open
It will open the CustomerStore client application in the browser at http://localhost:4200 URL like the image below.
Hope you would have got fair amount of idea about developing mean stack application through this article…check out my article on building restful API as well.
You can get the source code of this application from my mean-stack-application GitHub repository.
The post Build Mean Stack Application appeared first on Sanjay Saini’s Tech World.

Top comments (0)