Forrest Brazeal, an AWS Serverless Hero who I follow on Twitter, recently tweeted about a #CloudResumeChallenge to build a resume site using AWS. In return, Forrest would use his network to help everyone who completed the challenge land a job. An awesome deal! I already have IT experience (which disqualifies me) but I thought it would be fun to build the site anyway and write up a post about how I did it.
The challenge set some rules for the website:
- Resume must be written in HTML and styled with CSS
- Deployed as an Amazon S3 static website
- Should be accessible via HTTPS
- Have a custom domain name
- Include a Javascript visitor counter
- Visitor count stored on DynamoDB
- The site must communicate with DynamoDB via Lambda and API Gateway
- Lambda and API Gateway should be deployed with AWS SAM CLI
- Website automatically updates on push to GitHub
Setting up the site content
All right, let's start with the content. Since I'm not in this for the networking, I didn't think it made much sense to develop another personal site for this challenge. I did it on Alan Turing instead. Why? Because he's cool, and none of us would be looking at this without him.
Anyway, create an empty Git repo.
git clone git@github.com:seanziegler/AlanTuringResume.gitI hate HTML and CSS so I stole a nice little resume template from this CSS-Tricks article.
Originally, it was based on Cthulu which.... was a little strange, but okay. After some Wikipedia research and a little front-end stumbling, I had a clean one-page resume site about Alan Turing developed.

Create an S3 Static Site
Okay, on to the more interesting part, the back-end. The first requirement of the site is it should be a static site hosted by AWS S3.
First thing we need is an S3 bucket. You'll need to configure the AWS CLI if you haven't done so already.
aws s3 mb s3://turingresumeCopy all the files for your website into the bucket. The root page of your website (often index.html) should be at the root level of the S3 bucket.
aws s3 cp <project_dir> s3://turingresume --recursiveLast, tell S3 that this should be a static website, not a normal bucket.
aws s3 website s3://turingresume --index index.htmlCheck to see if your website is available. You can access it at http://"bucketname".s3-website-"bucketregion".amazonaws.com/
If you can see your website, you've successfully deployed the static site using S3. Let's work on making it easier to reach your site since that S3 website URL isn't exactly memorable.
Purchase a domain
We're off to Route 53 where you can purchase a domain from inside the AWS console. Unfortunately, AlanTuring.com wasn't available, so I went with the much friendlier heyitsalan.com. I realized later that it looks a lot like "hey its Satan" which is unfortunate, but I already paid for the domain and I'm not made of money.

Ok, that's all we can do in Route53 for now.
Create an SSL certificate in ACM
Since we will serve the site over HTTPS, we will need an SSL certificate. Fortunately, the AWS Certificate Manager makes it simple to generate a certificate.
Make sure you request a certificate for *.yourdomain.com so it covers all sub-domains (especially the www and non-www versions of your URL).

You'll need to add a TXT record to the DNS records of your domain to prove that you own it.

If you bought your domain on Route53 like I did, you can just click the "Add DNS Records to Route53" button. If you're on a different host, you'll have to look at their documentation.

Once AWS Certificate Manager sees the DNS record and knows you own the domain, it will issue your SSL certificate.

Create a CloudFront Distribution
We're ready to tie everything together and get this domain name tied up. All we need to do is create a HTTPS CloudFront Distribution and with our S3 website as its origin. After that, we'll point the domain name to the CloudFront distribution to finish. Start by creating a CloudFront distribution.

You'll also need to add your domain as an alternate CNAME in the CloudFront distribution and import the SSL certificate you generated earlier.
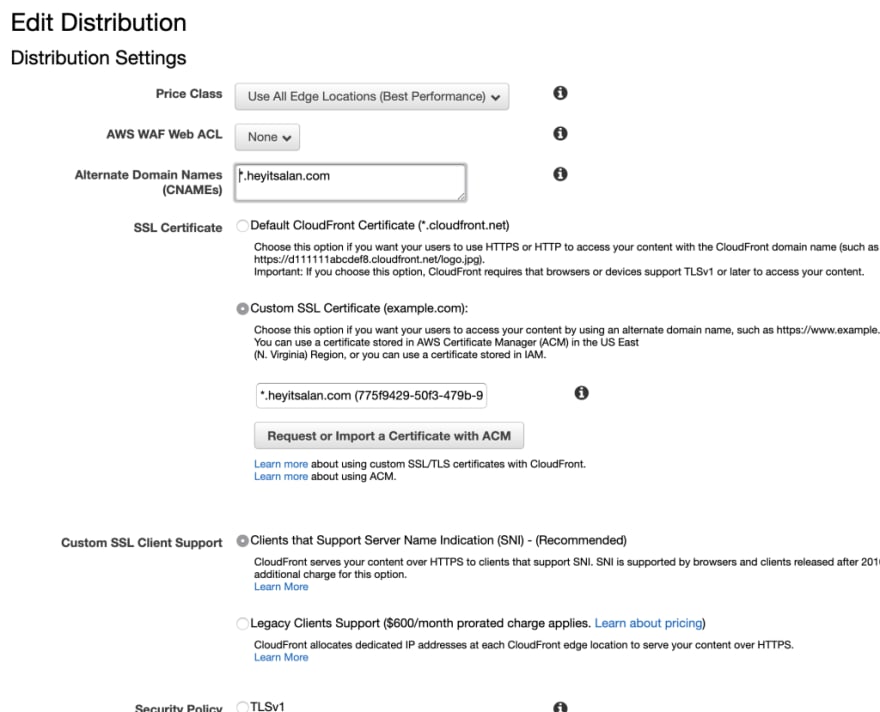
Fire up Route53 and head to the DNS records for the domain you registered. We will add CNAME alias record, which points to the domain name for the CloudFront distribution created earlier.

Now, you can test your domain and see if it works (although you might need to wait a few minutes for the site to propagate through the CloudFront edge locations).

Deploy a DynamoDB table with CloudFormation
Since our problem statement calls for a DynamoDB table to hold the visitor count, I will use CloudFormation. CloudFormation is an excellent product for deploying AWS resources and makes life so much easier when you need to update or manage your resources later.
This is a super simple DynamoDB table. In all honestly, I'm not convinced this is a good use of DynamoDB, but the problem statement calls for it, so who am I to argue?
AWSTemplateFormatVersion: "2010-09-09"
Resources:
  TuringResumeCounterDynamodb:
    Type: AWS::DynamoDB::Table
    Properties:
      AttributeDefinitions:
        -
          AttributeName: "Site"
          AttributeType: "N"
      KeySchema:
        -
          AttributeName: "Site"
          KeyType: "HASH"
      ProvisionedThroughput:
        ReadCapacityUnits: "1"
        WriteCapacityUnits: "1"
      TableName: "turingresumecounter"
Deploying this is a single AWS CLI command (I love CloudFormation!).
aws cloudformation deploy --template-file dynamodb.yml --stack-name turingresumecounterI will create a single attribute to hold the visitor count.
aws dynamodb put-item --table-name turingresumecounter --item '{"Site":{"N":"0"}, "Visits": {"N": "0"}}'Great, now I can read and write from this attribute to keep track of the visitor count. I don't think this is a good solution if you are running in a production setup, so I might re-factor this later.
Deploy a serverless API with Lambda and API Gateway
The site still needs some interface to communicate with DynamoDB. I'm going to implement this with Lambda and API Gateway since they are the de facto standard for serverless APIs on AWS. I'm a big fan of API Gateway because it makes it a breeze to set up rate limits, throttling, and other usage plan metrics for your API.
CloudFormation is great, but it can be a bear to use when deploying serverless resources. AWS makes a companion product called the SAM CLI. The SAM CLI designed to make deploying serverless assets easier and is perfect for our use case.
The first step is to create another YAML file that describes the deployment.
AWSTemplateFormatVersion: '2010-09-09'
Transform: AWS::Serverless-2016-10-31
Resources:
  Counter:
    Type: AWS::Serverless::Function
    Properties:
      Handler: function.handler
      Runtime: python3.8
      Policies: AmazonDynamoDBFullAccess
      Events:
        HttpGet:
          Type: Api
          Properties:
            Path: '/counter'
            Method: get
The Handler: function.handler line above tells SAM that we will provide the lambda function in a file named function.py with a function named handler.
The handler function uses the AWS SDK for Python called boto3.
UPDATE: After talking to Forrest, we decided it would be best if future participants had to design these parts on their own. Good luck :)
Great, now when we send a GET request to the API Gateway URL we will see the visitor count. Now, let's work that into the site itself.

Add the visitor counter to the site
The site needs an element to display the visitor counter. I'm going to create some HTML to display the visitor count and add it to the bottom of the page.
<div>
    <p style = "text-align: center;">
    Visits: <span id="visits">0</span>
    </p>
</div>
Yes, I know inline CSS is bad. Sue me. Let's add some Javascript magic to the footer. This function sends a GET request to the API gateway endpoint every time the page is refreshed. Technically, this is a counter of page views not visitors, but I digress.
UPDATE: After talking to Forrest, we decided it would be best if future participants had to design these parts on their own. Good luck :)
Cool, let's check the page.

Create a pipeline for automated deployments
We are nearing the finish line! All that's left is creating a pipeline in CodePipeline to deploy our code to the S3 bucket when we push to Git. I already wrote about how to deploy from GitHub to EC2, but since we're going to S3 this time, let's do a quick overview.
Setup a pipeline.
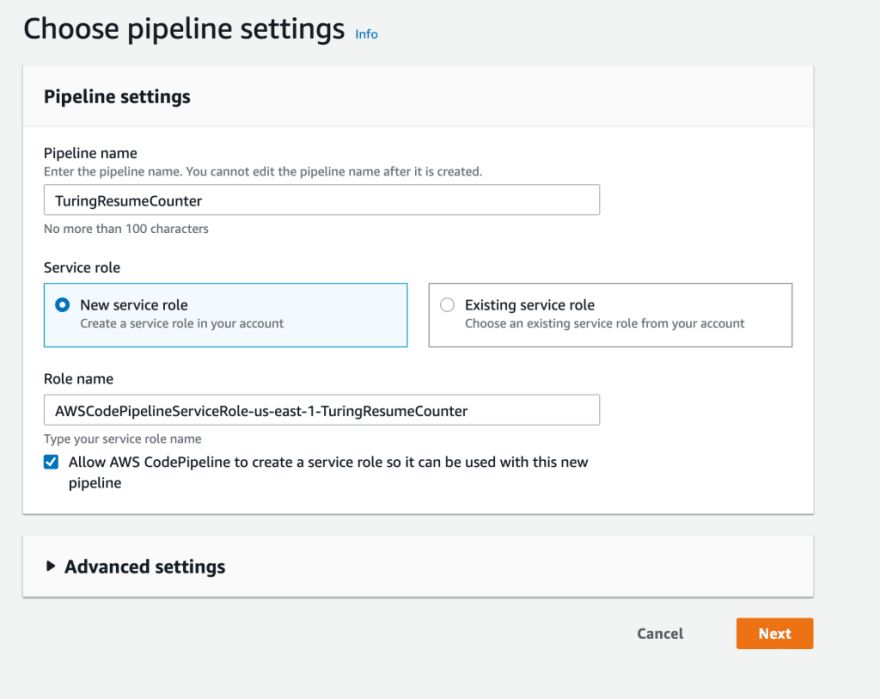
Make the Git repo your source.

Setup a deployment stage which pushes the files to your S3 bucket.

That's all there is to do! You've got a fully functional static S3 that updates on Git push and is served over HTTPs, all for essentially free.

If you enjoyed this content, follow me on Twitter to see more stuff like this!

Oldest comments (1)
One note that make sure your SSL in ACM must be created at us-east-1 to associate with Cloudfront