
Table of Contents
- Before We Begin
- Comparisons Of Widget Technologies
- Widgets Can Be Project Specific
- Widgets Simplify Models, Views, and Controllers
- Widgets vs Structured Content
- Don't Forget Caching
- Leverage Widget Scoping
- Don't Forget Widget Sections
- Conclusion
Before We Begin
In this Design Patterns series, we haven't looked at one of the coolest 😎 ways that Kentico enables developers to provide a rich content presentation experience to users of the platform - Kentico MVC Widgets.
If you aren't familiar with building Widgets or leveraging any of the Page Builder features, take a look at the video below first:
Or read up on developing widgets in Kentico's documentation.
I've assuming that you've familiarized yourself with how widgets work within Kentico 📚 and how you might code them as a developer 🤓, so let's begin with the discussion!
Comparisons Of Widget Technologies
If we watch the above video or read some of the documentation we can see references to a couple different terms that are all related but have distinct meanings and use-cases.
The primary pieces of Widget infrastructure are as follows (I'm ignoring Form Components since they don't typically play a direct part in the page flow and apply to both Widget Sections and Widgets):
- Editable Area
- Widget Section (and Widget Zones)
- Widgets
- Inline Editors
When we place these parts of Page Builder infrastructure on a spectrum spanning from Abstract/Layout oriented to Detail/Design oriented, we can see each part serves a specific role 🧐.
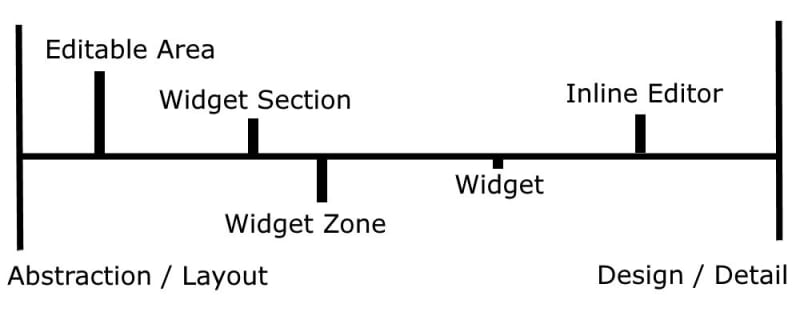
With this visual in mind, let's compare and contrast 💡!
Widget Sections vs Widgets
At their simplest level, Widget Sections are for layout and Widgets are for content and design.
Yes, a Widget could have properties that change the HTML elements and CSS classes of its view, thus changing the layout of its content.
Likewise, we could have properties on a Widget Section that change its background color (again via CSS) or borders.
This kind of flexibility might be desired, but we want to keep in mind the ideal use-case for both of these parts and focus on how each can work best in those ways.
We can shift around their positions on the above spectrum some, but the further we try to push them away from their intended purpose, the more we will notice their limitations 🙄.
Focus on using Widget Sections for arranging content and Widgets for displaying content 👍.
Widgets vs Inline Editors
When looking at the Kentico DancingGoat MVC sample site, we might be led to believe that Widgets and Inline Editors always go hand-in-hand.
While this might be the case for some Widgets - especially those that intend to provide the most flexible content editing experience - there is no technical requirement to combine Widgets and Inline Editors.
As mentioned above, Widgets are for displaying content.
On the other hand, Inline Editors are for editing content. It just so happens that a great UX pattern for content editing is allowing content to be edited in-place/in the page.
However, as we will see below in the Widgets Can Be Project Specific section, when leveraging Widgets in our projects, this combination of Widgets and Inline Editors might not be as common as we first think 😯.
Inline Editors vs Form Components
Even though Inline Editors are an interesting way for us to extend the functionality of a Widget, there are alternatives for editing a Widget's content or configuration.
We can edit the content in the Content tab of documents in the content tree and have our Widgets source data from those documents.
This is discussed further below, see: Widgets vs Structured Content.
We can also use Form Components to change Widget properties.
Form Components can be used for simple Widget content or configuration, where a well defined and precise set of options is needed. Think of standard HTML forms - check boxes, radio buttons, select boxes, and text inputs ✔.
There are also some pre-built advanced Form Components from Kentico, the page and media selectors.
The caveat of Form Components is that the effects of changing the values are not seen until the content editor saves the the form - it's not as interactive as an Inline Editor 😞.
Inline Editors are a better option when the content editor really benefits from seeing, live, how the page design and flow changes with the updates they make to the content of the Inline Editor.
Here are two rules of thumb:
- Is a content editor editing configuration of a Widget?
- Use a Form Component.
- Are they editing content of a Widget and that editing experience central to the Widget's functionality?
- Try using an Inline Editor.
Widgets vs Page Types + Razor Views
One of the key benefits of using the Page Builder system is the dynamic nature of a page's layout and content with Page Builder. It allows us to re-order rows of content, split rows into multiple columns, or display new types of content that the page wasn't originally designed to work with.
While the flexibility enabled by Page Builder pages might technically be achievable through custom Page Types and complex Razor view manipulation, it's never going to be the best option when layout or content flexibility is a requirement.
Use Page Content from the content tree combined with pre-defined Razor views when you don't need the layout of a page to be dynamic or when you are strictly defining the structure of Documents in the content tree.
That said, when the layout or types of content need to be dynamic, then Widgets are the best option 👍.
Widgets Can Be Project Specific
There's been a fair amount of talk of teams building up general purpose, reusable libraries of Kentico MVC Widgets to help improve development efficiencies on projects 🤓.
Also, if we look at the Widget selection of what is in the Kentico Marketplace, we are going to see a lot of very generic reusable Widgets 😉.
This is primarily because the only types of Widgets that would get a lot of use in the broader Kentico community are going to be those non-business, non-project specific Widgets that any developer can grab and integrate into their application.
I think, though, that this focus detracts from an awesome (and maybe more common?) use-case for Widgets - flexible outlets of content that are very client and site specific 🤔.
As an aside, I'd love to see more general purpose Widgets in the Kentico Marketplace and I don't want to discourage any developers from sharing that next cool Widget!
We shouldn't be afraid to build one-off Widgets for our Kentico 12 MVC sites. Widgets don't have to be infinitely flexible and re-usable to be useful.
We should feel OK to go build that "Featured Ceramic Cactus Plant Pottery Image Carousel Widget" if it's helpful to display that content in many places around our sites 😊.
Featured Products Widget Example
Let's look at a quick example of a valid, project specific, Widget use-case.
This Widget will enable content editors to display a list of SKUs, of a specified number, that are in a specified Public Status.
First we create a new FeaturedProductsWidgetController class that defines how we take our Widget properties and translate their values in a View Model for the Razor view for this Widget.
public class FeaturedProductsWidgetController :
    WidgetController<FeaturedProductsWidgetProperties>
{
    public const string IDENTIFIER = "sandbox.widget.featuredproducts";

    public FeaturedProductsWidgetController() { }

    public FeaturedProductsWidgetController(
        IComponentPropertiesRetriever<FeaturedProductsWidgetProperties>
            propertiesRetriever,
        ICurrentPageRetriever currentPageRetriever) :
        base(propertiesRetriever, currentPageRetriever) { }

    public ActionResult Index()
    {
        var properties = GetProperties();

        int statusId = ValidationHelper.GetInteger(properties.StatusId, 0);

        if (statusId == 0)
        {
            return PartialView("Widgets/_FeaturedProdcts",
                new FeaturedProductsWidgetViewModel
                {
                    Title = properties.Title,
                    Products = Enumerable.Empty<FeaturedProduct>()
                });
        }

        int count = Math.Max(10, properties.Count);

        var products = CacheHelper.Cache(
            () => GetProducts(statusId, count),
            new CacheSettings(1,
                nameof(FeaturedProductsWidgetController),
                $"status:{statusId}",
                $"count:{count}"));

        return PartialView("Widgets/_FeaturedProdcts",
            new FeaturedProductsWidgetViewModel
            {
                Title = properties.Title,
                Products = products
            });
    }

    private IEnumerable<FeaturedProduct> GetProducts(int statusId, int count) =>
       SKUInfoProvider.GetSKUs()
            .WhereEquals(nameof(SKUInfo.SKUPublicStatusID), statusId)
            .TopN(count)
            .Columns(
                nameof(SKUInfo.SKUID),
                nameof(SKUInfo.SKUName),
                nameof(SKUInfo.SKUPrice),
                nameof(SKUInfo.SKUImagePath)
            )
            .TypedResult
            .Select(s => new FeaturedProduct(
                s.SKUID,
                s.SKUName,
                s.SKUPrice,
                s.SKUImagePath)
            )
            .ToList();
}
We will also want the corresponding View Model defined:
public class FeaturedProductsWidgetViewModel
{
    public string Title { get; set; }
    public IEnumerable<FeaturedProduct> Products { get; set; }
}

public class FeaturedProduct
{
    public string Name { get; }
    public decimal Price { get; }
    public int Id { get; }
    public string ImageUrl { get; }

    public FeaturedProduct( ... ) { ... }
}
Next we create a custom Form Component to populate a <select>, for the Widget properties, of all the public statuses defined in our system:
public class PublicStatusSelectComponent :
    SelectorFormComponent<PublicStatusSelectComponentProperties>
{
    public const IDENTIFIER = "sandbox.component.publicstatusselect";

    protected override IEnumerable<SelectListItem> GetItems() =>
        PublicStatusInfoProvider.GetPublicStatuses()
            .WhereTrue(nameof(PublicStatusInfo.PublicStatusEnabled))
            .WhereEquals(
                nameof(PublicStatusInfo.PublicStatusSiteID),
                SiteContext.CurrentSiteID)
            .TypedResult
            .Select(x => new SelectListItem
            {
                Text = x.PublicStatusDisplayName,
                Value = x.PublicStatusID.ToString()
            })
            .ToList();
}

public class PublicStatusSelectComponentProperties : SelectorProperties
{

}
Along with the Form Component, we will define a Razor view that renders the <select> element:
@using Kentico.Forms.Web.Mvc

@model Sandbox.Features.PageBuilders.FormControls.PublicStatusSelectComponent

@{
    var htmlAttributes = ViewData.GetEditorHtmlAttributes();
}

@Html.DropDownListFor(x => x.SelectedValue, Model.Items, null, htmlAttributes)
Next we define the Widget properties class that dictates how content editors can configure our Widget:
public class FeaturedProductsWidgetProperties : IWidgetProperties
{
    [EditingComponent(
        TextInputComponent.IDENTIFIER, Order = 0, Label = "Title")]
    [Required]
    [MinLength(1)]
    public string Title { get; set; } = "Featured Products!";

    [EditingComponent(
        IntInputComponent.IDENTIFIER, Order = 1, Label = "Products Count")]
    [Required]
    [Range(1, 10)]
    public int Count { get; set; } = 3;

    [EditingComponent(
        PublicStatusSelectComponent.IDENTIFIER, Order = 2, Label = "Status")]
    [Required]
    public string StatusId { get; set; } = "";
}
Finally we define the View for our Widget:
@model Sandbox.Features.PageBuilders.Widgets.FeatureProductsWidgetViewModel

@if (!Model.Products.Any())
{
    return;
}

<h3>@Model.Title</h3>

<div class="section">
    @foreach(var product in Model.Products)
    {
        <p>
            @product.Name

            // ... ect
        </p>
    }
</div>
This Widget has no Inline Editors, no conditional rendering based on whether "Preview" mode is currently enabled, and no restrictions on which Page types it can be used with (in regards to the current Document's available content).
However, the design/layout of its View and the usefulness of filtering and displaying products based on SKUPublicSiteID is a business question - not something that's as infinitely reusable, between teams or projects, as a "WYSIWYG" text editor or image uploader.
That said, content editors could drop this Widget in various pages on the site, moving it around in the layout, integrating its configuration with A/B testing. Very awesome stuff 👏👏!
In this example, we can see how a project specific Widget that is based off specific business requirements could be a powerful tool 🛠 for content editors.
Widgets Simplify Models, Views, and Controllers
In MVC development, we typically have 3 required architectural pieces - Models, Views, and Controllers.
However, we might end up with many more, as noted in my previous post Kentico 12: Design Patterns Part 20 - Choosing a Solution Architecture

As pages in our applications grow in complexity, in terms of the content they display, our Models, Views, and Controllers increase in complexity.
There are ways to simplify them with things like Partials and Child Actions.
We can also think of Widgets as Child Actions * 100 😲!
They remove all traces of the additional content from our normal MVC code for a specific page. If we use the same content on multiple pages, we can build the Model, View, and Controller for a Widget once, and reuse that functionality 💪.
Another option to simplify the MVC pieces is to render content client-side using JavaScript and a Web API Controller, which I cover in my post Kentico 12: Design Patterns Part 16 - Integrating Vue.js with MVC
Widgets vs Structured Content
Widgets in Kentico 12 MVC are a very powerful tool 🔧 both for developers (eg: they can simplify MVC patterns) and content editors (eg: the rich layout building and editing capabilities).
As Kentico developers building new sites in the MVC world, we need to know when it's best to leverage Widgets as a technology solution and when to rely on existing options.
It's really important to note something about Widgets:
They are meant to improve the flexibility of the presentation of content, not the management of content.
What does this mean exactly?
Content editors using Kentico EMS have the responsibility of keeping content updated and consistent, and in larger sites or organizations content governance might be a key part of their job.
Inline Editors, while enabling a slick content authoring experience, typically don't lead to the most manageable content.
If content is stored in a Document's Page Type custom fields, that content can be aggregated or selected for specific reuse elsewhere on a site.
It's also manageable in a distinct location with the robust system of Kentico EMS's Form Controls validation and type restrictions.
Content that is stored exclusively in a Widget (eg: when entered through an Inline Editor that stores the text in the Widget itself or a Form Component) cannot take advantage of anything mentioned above out of the box 😑:
- ❌ Content aggregation or reuse
- ❌ EMS Form Control validation
- ❌ Custom Page Type field type restrictions
This means that in typical Widget development, our best option is to source content from Documents in the content tree, whether those are Pages that we can navigate to, or structured content without associated presentation.
This recommendation leads to the following pattern:
- ✔ Create custom Page Types
- ✔ Add Documents using these Page Types to the content tree and manage content there
- ✔ Expose content through customizable Widgets
With this approach, as opposed to adding and managing content in the Widget itself, we get all the benefits of content maintainability and presentation flexibility 🤗.
Please note:
Skipping robust content modeling using custom Page Types in exchanging for doing everything through Widgets should be considered an 🧨 Anti-Pattern 💣 in Kentico 12 MVC development.
Don't Forget Caching
Since content editors can use Widgets to dynamically alter the content of any pages implementing Page Builder functionality, the data sources supplying data to Widgets could be called on many, many times throughout a site.
Imagine our "Featured Products" Widget is used on 20 different pages to drive traffic to these products.
Even with Output Caching enabled, loading those 20 pages in succession would result in the product data being pulled from the database 20 times 😱.
Widgets are an easy place to implement data caching 🧐!
If we properly implement data caching for a Widget, no matter how many landing pages content editors create that use the "Featured Products" Widget, the data will only be queried from the database when the first landing page is visited - all successive pages will pull the data from the cache.
To learn more about caching database queries in Kentico, check out my post Kentico 12: Design Patterns Part 12 - Database Query Caching Patterns
Leverage Widget Scoping
Not all Widgets belong on all pages. Some Widgets might be specific to a certain part of the site, or should only be used with specific page types.
Kentico enables developers to place restrictions on the type of Widgets that content editors can place on a page.
There are a couple different patterns for defining these restrictions 🤔.
Editable Area Definitions
One option is to hard code the list of allowed Widgets directly in the call to HtmlHelper.EditableArea() which defines where on the page Kentico should enable Page Builder functionality.
This simple approach would look as follows:
<div class="section">
  @Html.EditableArea(
    // The Editable Area name
    "my-area-name",

    // The default Widget Section identifier
    "myDefaultSection",

    // The allowed Widget identifiers
    "widgetOne", "widgetTwo", "widgetThree")
</div>
This approach is fine for getting started but will quickly start to cause problems 😒.
Even if we replace the "Scattered Strings" (eg "widgetOne") with references to constant identifiers, we are not being clear as to why those Widgets are allowed here.
And, if we add a new multi-purpose Widget, it won't show up until we update every Editable Area definition 😖.
WidgetHelper class
Another option is to create a class that uses strong typing and Widget identifiers to statically define which Widgets are allowed for well named parts of your application.
Here is an example of a simple helper utility:
public class WidgetHelper
{
    public string[] HeaderWidgets() =>
        new []
        {
            WidgetOneIdentifier, WidgetTwoIdentifier
        };

    public string[] FooterWidgets() =>
        new []
        {
            WidgetOneIdentifier
        };

    public string[] TextWidgets() =>
        new []
        {
            UnstyledTextWidgetIdentifier, WYSIWYGWidgetIdentifier,
            CallToActionWidgetIdentifier, LinkWidgetIdentifier
        };
}
This WidgetHelper class can then be used to specify which Widgets are allowed for each Editable Area definition:
<div class="section">
  @Html.EditableArea(
    // The Editable Area name
    "my-area-name",

    // The default Widget Section identifier
    "myDefaultSection",

    // The allowed Widget identifiers
    WidgetHelper.TextWidgets())
</div>
HtmlHelper Extensions
A third approach is to encapsulate the entire EditableArea() call inside an HtmlHelper extension method:
public static class HtmlHelperWidgetAreaExtensions
    {
        public static IHtmlString EditableHeaderArea(
            this ExtensionPoint<HtmlHelper> helper,
            string areaIdentifier)
        {
            string[] allowedWidgets =
            {
                WidgetOneIdentifier, WidgetTwoIdentifier
            };

            return helper.EditableArea(
                $"header-{areaIdentifier}",
                HeaderDefaultSectionIdentifier,
                allowedWidgets);
        }
}
Usage:
<div class="section">
  @Html.EditableHeaderArea("my-header")
</div>
This approach is great when layouts tend have common design patterns and you want your team to easily be able to define, update, and comprehend where Page Builder functionality will appear on the page 👍.
Don't Forget Widget Sections
While this post focuses on Page Builder Widgets, its companion component, Widget Sections, serves an important purpose and should not be forgotten.
Widget Sections give a higher level of abstraction in the Page Builder component hierarchy, and therefore are often more useful in affecting the layout and structure of a page, as opposed to the design and content.
As web developers we often work with a grid for layout, whether we are using CSS Grid or leveraging a CSS framework like Bootstrap.
Widget Sections parallel nicely with how we want to implement a grid on our pages and can integrate nicely into our CSS grid system to allow content editors working with Page Builder to position Widgets in that system.
If we notice that our Widget needs to take on more layout related responsibilities than design and content ones, it might be we are building functionality that is better suited to a Widget Section.
While code and abstraction level distinction is key here, another important part of this separation is educating content editors, using the Page Builder functionality, as to what role Widget Sections serve compared to Widgets for a given site.
Conclusion
😅 Whoa! That was a lot of stuff to cover (but this was a Design Patterns post, so you knew what you were getting into 😁).
We looked at the different types of Page Builder components - Editable Areas, Widget Sections, Widgets, Inline Editors, and even Form Components.
Each plays a role in providing a robust and flexible toolkit to both developers and content editors.
They all have different purposes and we need to keep in mind their intended roles when leveraging them in a Kentico 12 MVC application.
We looked at an example project specific Widget and how these types of Widgets are actually very useful even though they don't feature every bit of functionality that Widgets can offer and maybe aren't that broadly reusable.
Widgets can sometimes help simplify the primary MVC types in our applications - Models, views, and Controllers, by pulling presentation behavior out into the Widget's code.
An important thing to keep in mind when planning how Widgets should be used in an application is that they don't replace our existing tools - the content tree and custom Page Types. Forgetting this could lead to an Anti Pattern of Widget use.
Since Widgets are so easily reusable, their internal data access calls are a prime target to integrate with data caching, and we saw this in our Featured Products Widget Example.
Finally, we looked at a couple examples of how we can restrict Widget use through scoping, and a reminder to not forget the role Widget Sections play after shining a spot light on Widgets for so long.
As always, thanks for reading 🙏!
We've put together a list over on Kentico's GitHub account of developer resources. Go check it out!
If you are looking for additional Kentico content, checkout the Kentico tag here on DEV:
Or my Kentico blog series:

Top comments (0)