
This is the continuation of my last post on this series about upgrading your personal project game. In this edition, we'll finish implementing the CD in CI/CD - continuous delivery.
End result 🔚
- A project hosted on Netlify (free tier)
- A new
config.ymlCircleCI configuration file. - A workflow on CircleCI that will allow you to deploy on every merge of a pull request to your
master branch
Continuous Delivery (CD) 🤝
In this edition I'm not resorting to Microsoft docs, but to continuousdelivery.com, which says:
Continuous Delivery is the ability to get changes of all types—including new features, configuration changes, bug fixes, and experiments—into production, or into the hands of users, safely and quickly in a sustainable way.
Pretty straightforward. In the last post, we talked about the integration, an instance for thorough testing - you wish -, the last revision to be sure that the changes you just made to your app won't break the end product that the user receives. Now it's all about ensuring that your user gets that new app in the quickest and seamlessly way 🏃♂️.

First Step 1️⃣: Create a Netlify account
- Enter this link and create an account.
- When you finish registering you'll be redirected to your dashboard, which will be empty. Click in "New site from Git".

Click on Github and enter your credentials 🔐.
You'll be prompted with a Netlify installation 🔧 that needs to be done on Github.
You have two options here, allow Netlify app to peak in all your projects or only on the selected ones. I'll choose the latter, only allow it on the project that we created in the last post.

Click install and write your password 🔑 .
In the next window click again in the name of your Github Project.
Now you get to a form where you can set the build options of your repository. I'll leave this as it is because it is just how I need it to be for the next steps.

Click in Deploy Site
If you are following this series everything should work and in a phew seconds your project should have built. Below your projects name, there should be a link with a .netlify.com extension. If you click it, you will be redirected to your live website!

If your site wasn't deployed 🙅🏽♂️ I have some guesses in what could have happened :
- Your project was built with npm and in the 8th step it was set to use
yarn build. You just need to go tosettings > build & deploy > edit settings. There you can modify yourbuild commandto use npm. - Maybe you gave Netlify permission to another repository. To check which repository your Netlify project is linked to, go to
settingand click below your app url where it saysGithub. That link will redirect you to the repository of this particular build.
Add a build Hook to your Netlify configuration
In simple words, the build hook is an endpoint. If you send an empty POST request to it, you unleash a build + deploy of the target branch - master in this case.

Go to
settings > build & deployand scroll down tobuild hooks.

Click in
Add build Hook
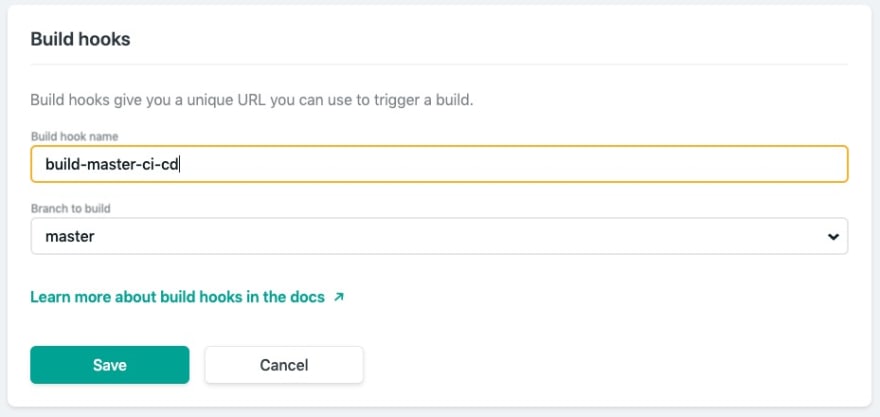
Write a descriptive name to your build and save it.
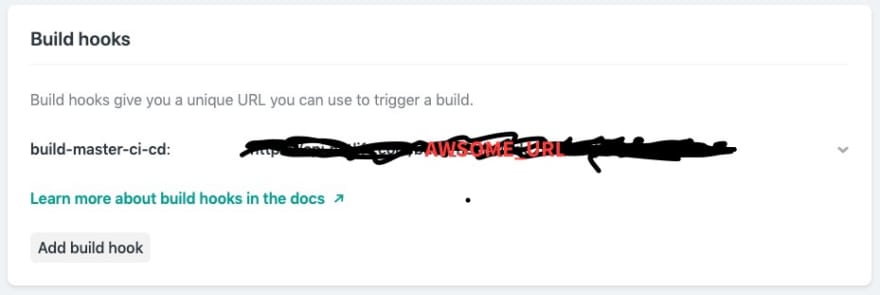
Copy the url that was generated on save. Paste it somewhere because we'll need it later.
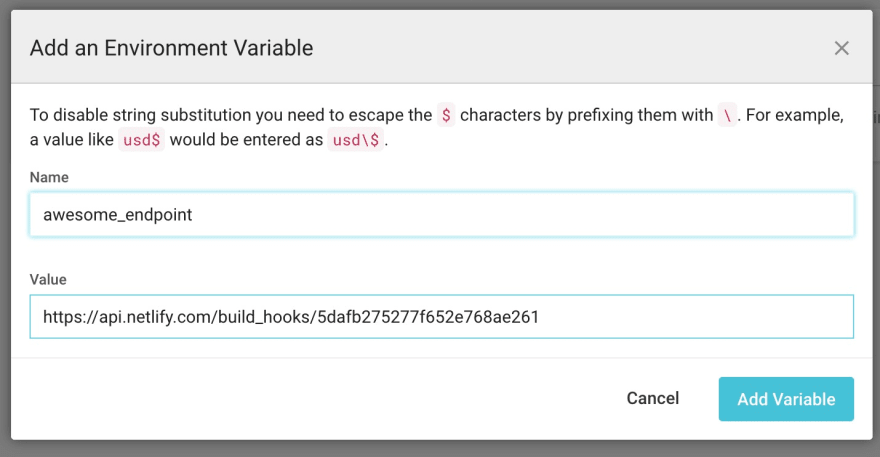
Configure an environment variable in CircleCI
So now we have a url that serves us as an endpoint to trigger our build + deploy. We are going to use it in our CircleCi configuration file config.yml. But as the good developers that you are, I imagine you don't want to put that same url in the public github repository config.yml file, no? 🤔 For that, we are going to use the environment variables that the people from CircleCI were kind enough to provide us.
- Go to your CircleCI app.
- Click in
Jobs. Click in the settings icon next to your project's name.

We entered the settings of that specific
Job. Click where it saysEnvironment Variables.Click in
Add Variable

We'll give it a descriptive name like
awesome_endpointand in thevaluepaste that endpoint url I told you to save previously.Click in
Add Variableagain.
Almost done, one step more!
Change CircleCI configuration
In our last config.yml file we only ran a set of tests. Now the goals are to test only in your feature branch and only deploy when your master branch merges a pull request.
FIRST: be sure to be in a feature branch, NOT your master 🙏🏽. If you look at the config.yml file. You'll see the word jobs. Below this, we can only see one job, build. We are going to add a second job, we'll name it deploy.
In this job we'll specify a machine to work on, in this case I chose a macos one. Then, remember the url we were given in our build hook 🧠, now it's time to use it - think it this way: Netlify calls the specified command in an environment that runs a macos virtual machine.
Your new job will look like this.
deploy:
    machine:
      macos:
        xcode: '9.0'
    steps:
      - run:
          command: curl -X POST -d {} ${awesome_endpoint}
As you imagine, behind that ${awesome_endpoint} hides the environment variable with the secret endpoint that triggers our project 👀.
Now we have two CircleCi jobs, build & deploy. How to join them? With workflows. We can schedule jobs to run in certain conditions we previously configured. More information here in the docs.
workflows:
  version: 2
  build:
    jobs:
      - build:
          filters:
            branches:
              ignore: master
      - deploy:
          filters:
            branches:
              only: master
First, we declare at top-level the workflows keyword. Then, we write each job we want to run and filter each one by branches. The build job ignores master branch, so it runs on any other branch - very useful if our feature branches will have various names. On the other hand, the deploy job clearly stipulates that it will run only in the master branch. Like we talked before, we are only thinking in a suite of tests in our feature branch before merging and only deploy our master branch.
Your final config.yml should now look like this:
version: 2
jobs:
  build:
    docker:
      - image: circleci/node:lts
    working_directory: ~/repo

    steps:
     - checkout
     - restore_cache:
          keys:
            - v1-dependencies-{{ checksum "package.json" }}
            - v1-dependencies-

      - run: yarn install

      - save_cache:
          paths:
            - node_modules
          key: v1-dependencies-{{ checksum "package.json" }}

      - run: yarn test

  deploy:
    machine:
      macos:
        xcode: '9.0'
    steps:
      - run:
          command: curl -X POST -d {} ${awesome_endpoint}


workflows:
  version: 2
  build:
    jobs:
      - build:
          filters:
            branches:
              ignore: master
      - deploy:
          filters:
            branches:
              only: master
Commit changes and push the feature branch
The only changes we did in this repository's code was in the config.yml file. Add it and push it to your remote repository with git add .circleci/config.yml && git commit -m 'circleci: add deploy job and workflow' && git push origin <branch_name>
Create a pull request as we saw in the last post.
Here is where everything we've done in these 2 posts shines.
First, you'll have to wait for the checks to complete. Specifically, the build job that we configured to the master branch as protection. If this doesn't complete successfully we aren't going to be able to merge.

Meanwhile you wait, on the CircleCI website the build is running.

After we merge the pull request, the deploy job runs on the master branch.

When completed, it triggers the build hook from Netlify - the one we wrote in the environment variable on the CircleCI website. This triggers a build + deploy to our Netlify site - the one with the .netlify.com extension.

Finally, after Netlify's build succeeds our site is live

DONE.

Last words
This ends our journey. You are now the proud owner of a project that tests and deploys automatically. Feel proud and you are allowed to overkill each one of your projects with these awesome features. Believe in your development game. You rock.
Best wishes.


Top comments (0)