
This article was originally posted on my personal blog
If you want to start your own blog, or just want to learn a cool CMS platform, then you should check out Strapi. Strapi is an open-source Node.js headless CMS. This means that you set up Strapi and plug it into any frontend or system you have.
In this tutorial we'll first look at why you should use Strapi, how to set it up from scratch, then we'll use one of Strapi's starters to easily create a blog with Next.js.
Why Strapi
Headless APIs provide you with a lot of flexibility. When you want to develop a system with different components, you don't have to worry about finding one framework or programming language that you can use to be able to implement all the components.
Strapi allows you to integrate CMS into your projects regardless of what they are. Whether you want to add CMS to your e-commerce store, build a blog, or any other use case that requires CMS, you can easily use Strapi to build the CMS part, then use its APIs to integrate it into your system.
What sets Strapi apart is that it's fully customizable. You are not bound to a database schema or data structure. Once you set up Strapi, you are free to create your own models and c0llections as fit your needs. This makes setting up your CMS much easier and allows you to focus on creating the front-end.
Set Up Strapi
In this section, you'll learn how to set up Strapi from scratch. This allows you to understand better how it works and what are the different elements to it. In the next section, you'll be using a Strapi starter blog that does all the heavy lifting for you.
Install Strapi
The first step is to install Strapi. You can do that with this command:
npx create-strapi-app strapi-blog --quickstart
Register as Admin
Once the installation is complete, a tab will open in your default browser and it will be a registration form. You will need to fill out your information as an admin user.

Once you're done, you'll be logged into your dashboard.
Create a Content-Type
Let's say you're creating the blog's database yourself. You'll need to create a posts table that stores all the posts you'll create.
In Strapi, you create Content-Types. In these Content-Types, you can add any kind of field you would to the table.
On your dashboard, you should see "Create Your First Content-Type". Click on it.

Then, a pop-up will appear asking you to name the Content-Type. Content-Types are named in the singular form in Strapi. So, enter post in the Display Name field then click Continue.
After that, you'll need to add some fields to the Content-Type. You'll see that there are many to choose from.
Add the following fields to the Post Content-Type:
-
titleof type Text. You can set it to required by clicking on the Advanced Settings Tab and checking the required checkbox. -
contentof type Rich text. You should also set it to required. -
admin_userthis will be a Relation type. You'll link it to the User Content-Type. -
date_createdthis will be a Date field of type Datetime. You can also set it to required. -
filethis will be a Relation type as well to the File Content-Type. We can use it to add an image to the post
Once done, the Post Content-Type should look like this:

Click Save, and the new Content-Type will be added successfully.
Set Permissions
Next, you'll set permissions to allow users to access the posts. To do that, in the sidebar go to Settings, then go to Roles under Users & Permissions.
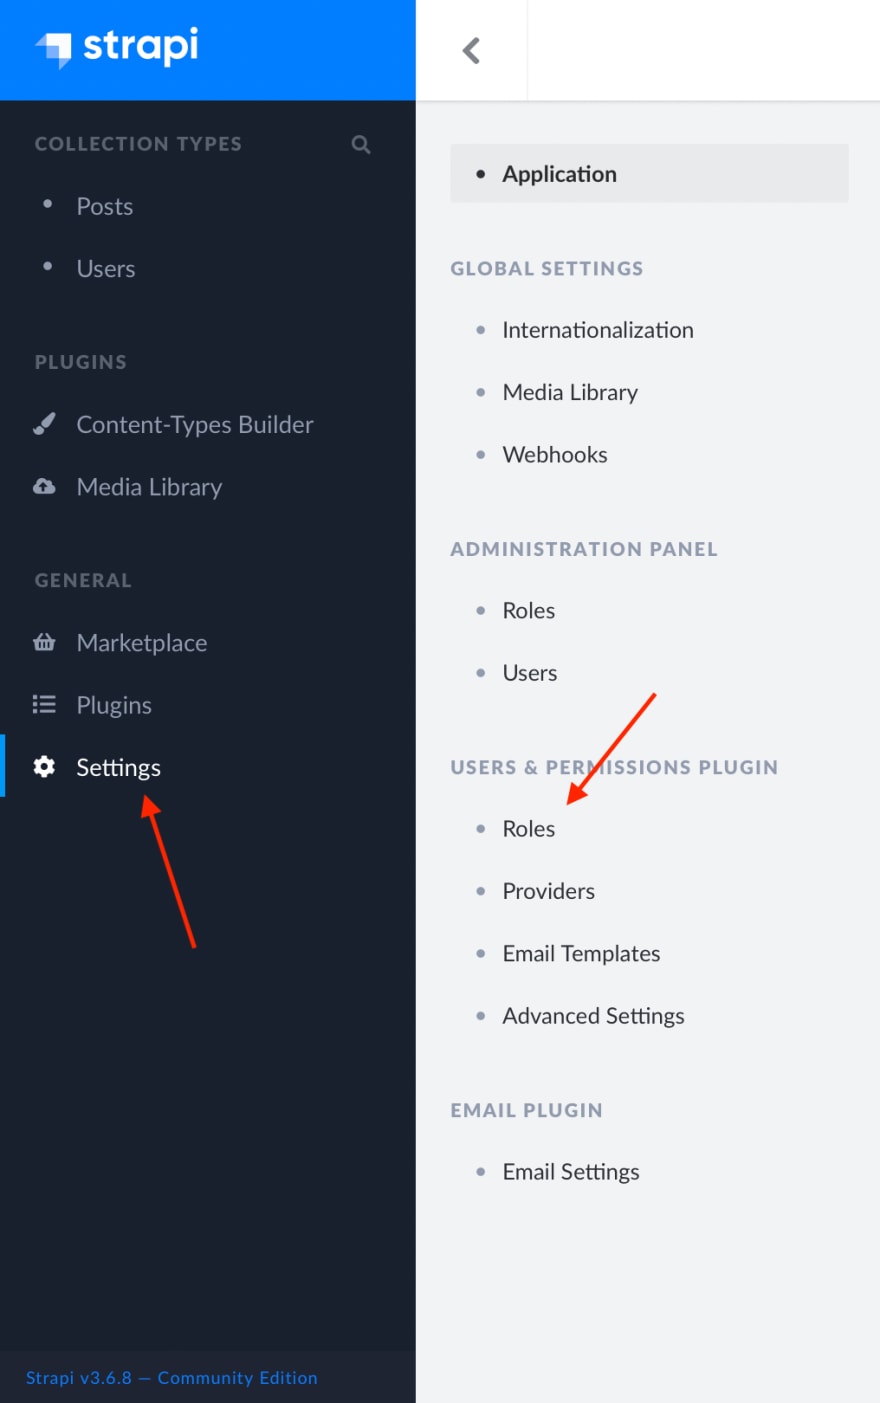
There, choose Public, then scroll down to Permissions and select all permissions.
Making Requests
If you now try sending a GET request to localhost:1337/posts you'll see an empty array.
In Strapi, once you create a Content-Type, you'll have the following API requests ready for use:
- GET
/posts: Get the list of items in the Content-Type. - GET
/posts/{id}: Get the item having id{id}. - GET
/posts/count: Get the number of items in the Content-Type. - POST
/posts: Create a new post. - DELETE
/posts/{id}: Delete a post of id{id}. - PUT
/posts/{id}: Update a post of id{id}.
Note that we use the plural form of the Content-Type in the requests.
As we can see, Strapi makes it easy to create Content-Types on the fly and once you do you can start accessing them with the REST API right away.
Using Strapi Starters
There are many starters for Strapi for different languages and frameworks. Starters allow you to start with a certain template with ready front-end or a configured Strapi instance with the Content-Type required for the template. This saves you time rebuilding or reconfiguring the same project ideas.
In this section, you'll create a blog using Strapi starters. We'll use Next.js for the front-end.
Set Up Next.js Starter
To create a Strapi blog with Next.js, you can use strapi-starter-next-blog. It comes with both a Strapi installation ready with the necessary Content-Types which are Article and Category.
In your terminal run the following command to install it:
npx create-strapi-starter strapi-next-blog next-blog
This will install inside a directory called strapi-next-blog 2 directories. One called backend, which includes the Strapi installation, and one called frontend, which includes the Next.js installation.
Once the installation is done, change to the frontend directory then run both Strapi and Next.js with one command:
npm run develop
This will run Strapi on localhost:1337 and Next.js on localhost:3000.
If the browser was not opened with to the Strapi dashboard, go to localhost:1337/admin/auth/register-admin and register as a new user just like you did before.
When you are redirected to the dashboard, you'll see that there are already Content-Types and Collections for these types ready.

If you go to each of them you'll see that there are already demo data available.
Now, to check the frontend, go to localhost:3000. You'll see a blog with some blog posts ready.

And that's it! You can now post stories on the Strapi dashboard and see them on your Next.js frontend. With one command, you were able to create a blog.
Conclusion
Strapi is a fully customizable CMS that makes it easier for you to integrate CMS into your systems or websites, as well as use it to create CMS platforms.
After following along with this tutorial, you should check out more of Strapi's Content API documentation to learn more about how you can access the content types and more.

Top comments (0)