I my previous post I showed how to deploy a simple Machine learning model using flask into heroku. In this post I will show you how to deploy a web-scrapper flask app. I have created a simple python-flask API for fetching financial statement of a company by searching the ticker.
What is a Ticker ?
A ticker symbol is an abbreviation generally represented as a collection of letters that is used to identify a publicly traded security. Ticker symbols vary depending on what stock market they are traded on. They can consist of letters, numbers, or a combination of both. Sometimes they are also called stock symbols.
Steps involved:
- Create a web scrapper.
- Create a web app using flask.
- Heroku hosting.
Web Scrapping
I am scrapping the data from Yahoo Finance. The python script will then send a HTTP request and will search for the given ticker in the website, the output will be a simple HTML response. This can be achieved using Beautiful Soup which is a Python library for getting data out of HTML, XML, and other markup languages. It downloads that page’s source code, just as a browser would, but instead of displaying the page visually, it filters through the page looking for HTML elements.
import pandas as pd
from bs4 import BeautifulSoup
from urllib.request import urlopen, Request


def search_company(search_string):
    url = 'https://finance.yahoo.com/quote/' + search_string + '/financials?p=' + search_string
    client = Request(url)
    response = urlopen(client).read()
    html = BeautifulSoup(response, "html.parser")
    return html


def company_financials(string_search):
    headers, temp_list, label_list, final = ([] for i in range(4))
    index = 0

    html_content = search_company(string_search)
    features = html_content.find_all('div', class_='D(tbr)')

    for item in features[0].find_all('div', class_='D(ib)'):
        headers.append(item.text)

    while index <= len(features) - 1:
        temp = features[index].find_all('div', class_='D(tbc)')
        for line in temp:
            temp_list.append(line.text)
        final.append(temp_list)
        temp_list = []
        index += 1
    df = pd.DataFrame(final[1:])
    df.columns = headers
    df.rename(columns={'ttm': 'Trailing 12 months'}, inplace=True)
    df.style.set_properties(subset=["Breakdown"], **{'text-align': 'left'})
    return df
Flask Application
I have the application code hosted on my Github account. I have added all the html templates for reference.
I have used pretty html table python package for creating HTML table. Please checkout my first blog on how to create HTML table using pretty html table package.

Convert a Dataframe into a pretty HTML table and send it over Email
Siddhesh Shankar ・ Jul 25 ・ 2 min read
from bs4 import BeautifulSoup
from flask_cors import cross_origin
from supp import company_financials
from pretty_html_table import build_table
from flask import Flask, render_template, request

app = Flask(__name__)


@app.route('/', methods=['POST', 'GET'])
@cross_origin()
def index():
    if request.method == 'POST':
        search_string = request.form['content'].replace(" ", "")
        content = company_financials(search_string)
        table = build_table(content, 'blue_light', font_size='small', font_family='Lucida Grande', text_align='right')
        financials = BeautifulSoup(table, 'html.parser')
        return render_template('main.html', tables=financials, company=search_string.upper())
    else:
        return render_template('index.html')


if __name__ == "__main__":
    app.run(port=8000, debug=True)
In order for us to successfully deploy any application to Heroku, we must add a Procfile to that application. Heroku apps include a Procfile that specifies the commands that are executed by the app on startup.
- First install Gunicorn
pip install gunicorn
- Update requirements.txt
pip freeze > requirements.txt
beautifulsoup4==4.9.1
bs4==0.0.1
certifi==2020.6.20
chardet==3.0.4
click==7.1.2
Flask==1.1.2
Flask-Cors==3.0.9
gunicorn==20.0.4
idna==2.10
itsdangerous==1.1.0
Jinja2==2.11.2
MarkupSafe==1.1.1
numpy==1.19.2
pandas==1.1.2
pretty-html-table==0.9.dev0
pymongo==3.11.0
python-dateutil==2.8.1
pytz==2020.1
requests==2.24.0
six==1.15.0
soupsieve==2.0.1
urllib3==1.25.10
Werkzeug==1.0.1
- Create a Procfile
web: gunicorn app:app
Commit your code GitHub and connect Heroku to GitHub
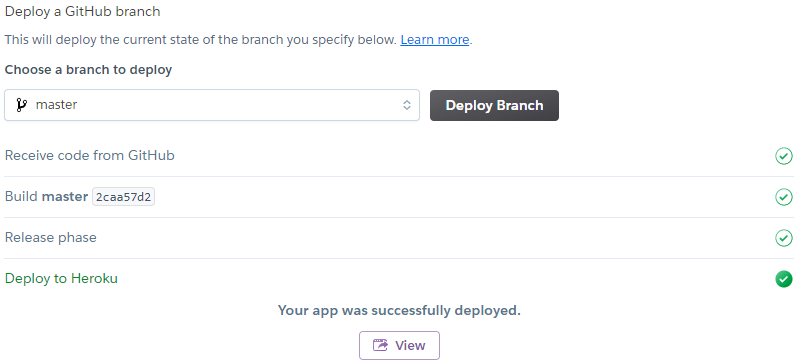
After you connect, there are 2 ways to deploy your app. You could either choose automatic deploy or manual deploy. Automatic deployment will take place whenever you commit anything into your github repository. Automatically the build will start. I have deployed it using manual deploy.
Just by selecting the branch and clicking on deploy, build will start. After successful deployment, deployment tab should look as shown below:
Heroku Hosting
After successful deployment, app will be created. Click on the view button and your app should open. An API will be created.
Checkout my app: https://get-company-financials.herokuapp.com/
I hope you found this post useful. This will help end-users to create a web scrapper and deploy it using flask.


Top comments (0)