Installing Photon OS - actually any OS - on the Dell Edge Gateway 300x series is generally quite tricky as neither the 3001 nor 3002 offer a display port.
Any OS installation therefore must be headless and automated.
During a recent attempt to install Photon OS I found the instructions provided for the Edge Gateway 300x on the Photon OS site missed a bit of detail.
Fortunately I got some very good instructions from a helpful person at VMware that got me nearly there with a few tweaks that I had to figure out.
In this post I’ll provide a step by step guide to create a bootable USB stick for an automated Photon OS installation and how to run this on the Dell Gateway.
The Photon OS ISO includes configuration for grub and MBR boot options. The instructions on the Photon OS site (https://vmware.github.io/photon/assets/files/html/3.0/photon_installation/Installing-Photon-OS-on-Dell-300X.html) reference the grub based approach.
I’ll use the MBR approach instead - the basic steps are:
- Create a bootable USB media from the Photon OS ISO image
- Configure the boot menu for automated boot
- Configure kickstarter for headless installation
- Add BIOS script to instruct Gateway to boot from USB
- Install Photon OS onto the Gateway using the USB media
It's best to use a USB stick with an indicator LED for disk activity as it will make it easier to monitor the installation process.
Create bootable USB media from Photon OS ISO
Download the ISO file for your processor architecture (x86/64 for the Dell Edge GW) from the Photon OS site: https://github.com/vmware/photon/wiki/Downloading-Photon-OS
Copy the contents of the ISO onto a USB stick. As a result the stick must be in FAT format and bootable via MBR.
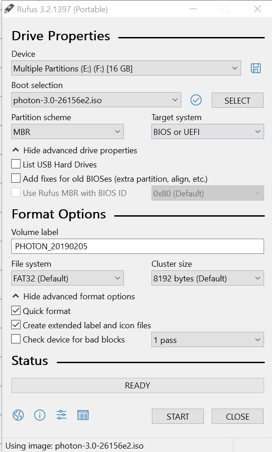
On Windows this can easily be achieved using Rufus, select “ISO file” in the "boot selection” and locate the Photon ISO file on your disk.
Make sure the options are similar to below. If you don’t see the "FAT32(Default)" option for “File System” go with any other FAT32 option there may be and use its default cluster size.
Configure the boot menu for automated start
Open the syslinux.cfg file on the USB stick that you have prepared and verify it looks like this:
DEFAULT loadconfig

LABEL loadconfig
  CONFIG /isolinux/isolinux.cfg
  APPEND /isolinux/
This file references isolinux.cfg in the isolinux folder. Open it in a text editor.
The line default vesamenu.c32 in this file forces the install into graphic mode even though the prompt and timeout values should ensure the boot runs automatically.
Change the line to default install, your file should look similar to this:
# D-I config version 2.0
include menu.cfg
default install
prompt 0
timeout 0
The boot menu is now configured to auto-run the install installation option.
The next steps will configure the install option for automated installation using kickstarter.
Open /isolinux/menu.cfg and change the append line as below so kickstarter picks up a configuration file (accessible as a CD ROM):
menu hshift 7
menu width 61

menu title Photon installer boot menu
include stdmenu.cfg

default install
label install
    menu label ^Install
    menu default
    kernel vmlinuz
    append initrd=initrd.img root=/dev/ram0 loglevel=3 photon.media=cdrom ks=cdrom:/isolinux/sample_ks.cfg console=ttyS0,115200n8
Configure kickstarter for headless installation
Now let's review the /isolinux/sample_ks.cfg which configures the automated installation. The changes required in this file are also documented on the Photon OS site - it's the same file the grub boot option uses.
The important part in this file is to adjust the postinstall section to enable remote SSH for the root account so you can actually connect to the Gateway once the installation is finished.
The postinstall step simply patches the /etc/ssh/sshd_config.
Also adjust the hostname and password.text as needed and take note of the values as you will need these to connect to the Gateway after installation.
Also note for the 300X series the disk device name must be specified as /dev/mmcblk0
{
    "hostname": "photon-machine",
    "password":
        {
            "crypted": false,
            "text": "Secret!"
        },
    "disk": "/dev/mmcblk0",
    "partitions": [
                        {"mountpoint": "/", "size": 0, "filesystem": "ext4"},
                        {"mountpoint": "/boot", "size": 128, "filesystem": "ext4"},
                        {"mountpoint": "/root", "size": 128, "filesystem": "ext4"},
                        {"size": 512, "filesystem": "swap"}
                    ],
    "packagelist_file": "packages_minimal.json",
    "additional_packages": ["vim"],
    "postinstall": [
                        "#!/bin/sh",
                        "sed -i 's/PermitRootLogin no/PermitRootLogin yes/g' /etc/ssh/sshd_config"
                   ],
    "public_key": "<ssh-key-here>",
    "install_linux_esx": false
}
Make sure there is a packages_minimal.json in the isolinux folder and that it looks like this:
{
    "packages": [
                 "minimal",
                 "linux",
                 "initramfs"
                 ]
}
Add BIOS script to instruct Gateway to boot from USB
In order to force the Gateway to boot from the USB stick we will need to add a file that instructs the BIOS to do so.
Create a UsbInvocationScript.txt file in the root of the USB drive with the content below:
usb_disable_secure_boot noreset;
usb_one_time_boot usb;
The Gateway Manual provides more information on Using USB invocation scripts
Install onto Gateway using the USB media
Now you are ready to install the OS onto the Gateway.
There are two visual indicators for the installation process:
- The USB stick's activity LED
- The Gateway's status LEDs - only two will be active, the power and network LED.
Power-off the Gateway - unplug network/POE or power cable. Insert your USB stick and power up the Gateway again.
I'll describe what to generally expect to happen but will skip details.
If you want to understand in detail what Gateway LEDs you should expect to flash and in which sequence have a look at "Edge Gateway USB script utility User's Guide" accessible from Using USB invocation scripts.
Once you have powered up the Gateway I'd recommend to closely monitor the installation.
The following will happen:
- Power and Network LED turn green
- The gateway scans for
UsbInvocationScript.txtfiles on the USB interfaces. - The USB stick's LED flashes once the Gateway found our invocation script.
- The gateway LEDs flash in different patterns as the BIOS script is executed. The flash patterns correspond to the commands in the
UsbInvocationScript.txt - Eventually the power LED turns green and the network LED turns amber and both will be on continuously.
- The activity LED of the USB stick flashes indicating that the Gateway boots from the stick and has started copying data during the installation.
- Eventually - after 5 to 10 minutes both Gateway LEDs will turn green again. Unplug your USB stick as soon as that happens, otherwise the Gateway may reboot from the USB stick and kick off the installation again.
Once the installation is complete find the IP address of the Gateway in your router. Depending on your router you can identify the IP address by the MAC address of the Gateway or the host name that is set in the /isolinux/sample_ks.cfg.
This is how it looks like on my router, showing the IP, host name and MAC address:

You can now connect to the Gateway via SSH using the IP address above and the root password that you set in the /isolinux/sample_ks.cfg:
ssh root@192.168.0.112

Top comments (1)
Photon was the only solution possible on one of my older vmware servers. Today, however, I would prefer to use CoreOS because it contains more elaborate features.