
Hello Everyone. In this post we will learn how to create and run an EC2 instance on Amazon AWS. I am assuming that you have an AWS account, if not you need to create an account here.
I will start the post with a small introduction about EC2 if you do not know already.
What is EC2?
To start with, EC2 stands for "Elastic Cloud Compute". In other words, EC2 is AWS synonym for a Virtual Machine. Elastic Compute Cloud (EC2) is the IaaS (Infrastructure as a Service) offering from AWS that is, you can rent out servers with customizable memory, storage and bandwidth. These servers can then be used for several purposes like hosting your applications, etc.
Step wise process for creation of an Ubuntu EC2 Instance:-
Step 1: Choosing Amazon Machine Image
Once you login into your AWS account, Click on the search bar and Search for EC2. After clicking you will see the EC2 dashboard. First, click on "Launch Instance" from the EC2 dashboard. This gives us a list of available instances in our region. There's a large variety to choose from, but for the purposes of this post we'll choose Ubuntu Server 20.04 LTS, which stands for Long Term Support and ensures there's support for the server for at least 5 years.

Step 2: Choosing an instance type
The next step is to choose an instance type for our EC2 instance. The screen shows the different instance types which are available for us. I am going to pick the t2.micro as it's part of the free tier. However, it's worth knowing roughly what each instance class is best suited for. The t2.mirco class is best suitable for experimenting and playing around, anything in the M class is for general purpose web apps. Upwards from there, you'll notice the C class, which is for compute intensive applications, the R class is memory optimized and I represents storage optimized instances.

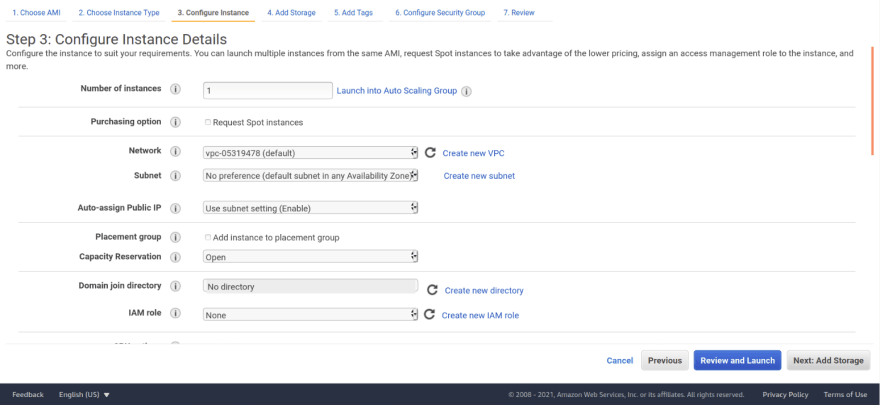
Step 3: Configuring the instance details
All of this can be left as is, but it is important to atleast understand what some of it represents. Obviously the top option allows you to choose the number of instances you want to launch.
Spot Instances are special type of instances which are available to us at a lower price but can be taken by AWS at any point of time. This is great for applications where cost is a key factor and interruptions are ok.
IAM Roles is a whole separate topic, which I'll probably cover in a later post, we'll leave it as it is for now.
The last section allows us to choose the shutdown behavior, whether you want the instance to stop or be terminated straight away. The difference is that if you stop, you can still reboot, however there's no way back from termination. I am not changing any of the default configurations.
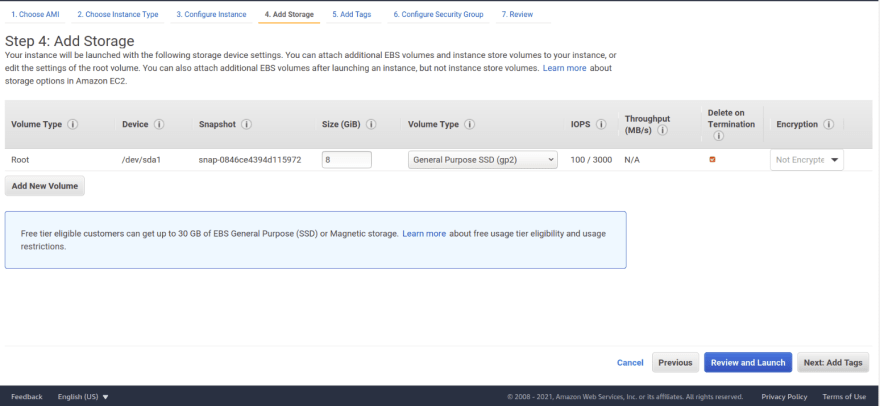
Step 4: Adding Storage
The next section allows us to add storage to your instance, again for the purposes of the post we'll be leaving it as it is i.e., at the default 8GB.
Step 5: Adding Tags
Tags are a great way to keep our instances organized. They work in key value pairs and help in quickly distinguishing our instances apart. For the instance I am going to create, I have added just 1 tag with "Name" as key and "EC2 Instance - 101" as its value.

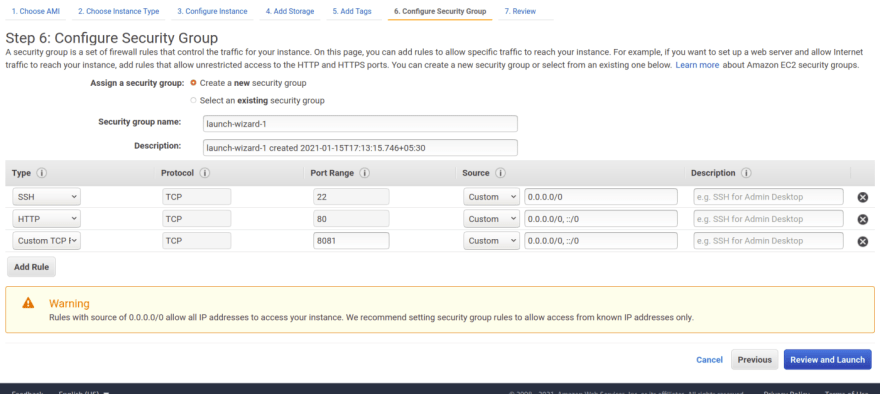
Step 6: Configuring Security
We want to SSH into our EC2 instance, so that's an obvious one and we'd probably want to allow users to be able to visit the site over HTTP. I have chosen port 8081 and added 0.0.0.0/0 in Source so that anyone can this visit the port on my EC2 instance. You'll notice the warning, which is absolutely fine. It is just letting us know that all IP addresses are able to connect to your instance.
After this is complete we'll be ready to launch. We will be taken to a page which allows us to review our instance.
Step 7: Reviewing the Instance
Review your instance details and then Click on "Launch" button. You'll be greeted with a pop up asking to either choose or create a key pair to access your instance securely. Lets create a new one for this instance by choosing the Create a new key pair option from the drop-down list.

The PopUp window looks as follows:-

Name the file whatever you want and hit download, this will generate a key pair and download the .pem file for you. I have named my key as KeyPair.pem. I have an SSH directory within my downloads folder, but as long as it's accessible for you, that's ok.
Your instance will now take a minute or two to launch and warm up, in the mean time open up your terminal and navigate to the directory where your .pem file is located. In order to be able to SSH into your instance, you have to change the permissions on the file with the following command:-
$ chmod 400 KeyPair.pem
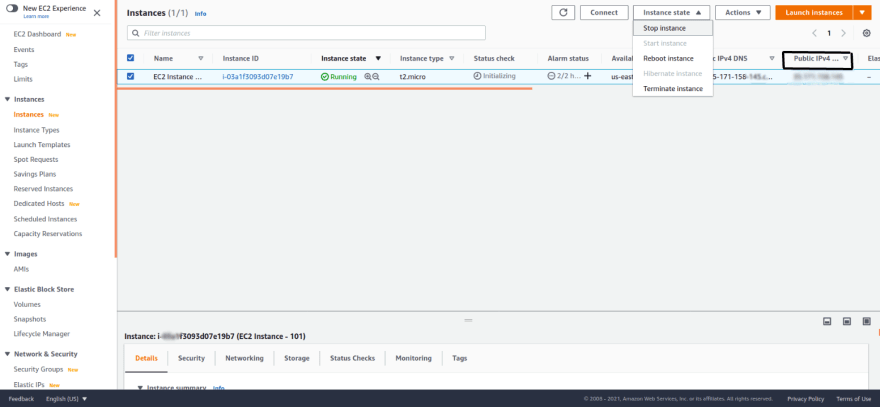
Once your instance is all setup and ready your EC2 dashboard should look something like this:-
Setting up our EC2 Instance
First, we're obviously going to need to SSH into your newly launched instance. Make sure that you're in the directory where your pem file is located and that you've changed the permissions on it as mentioned above.
For Ubuntu instances the user is called "Ubuntu", and depending on distribution you use, it is different.
The command used to ssh in is simply:
$ ssh -i KeyPair.pem ubuntu@YourInstancePublicIP
Your instance's public IP address can be found on the dashboard.

You'll be asked if you're sure you want to connect, to which you'll obviously reply yes. Once that's done you're in!
A good thing to do immediately after logging into EC2 instance is to get a quick update.
Your instance is pretty much setup to go now, but bear in mind that you are starting from scratch so depending on your tech stack you'll need to download everything from scratch.
That's about creating an Ubuntu EC2 instance in a nutshell. Thanks for reading!

Top comments (2)
Hey, that's a great one!! This helped :)
Thanks YASH. Glad you liked it :)