1. What this guide covers
Back in Chapter II we covered authorization architecture and walked through the life of a request in our GitClub sample application. We saw there are a few places that we might want to add authorization, and that these center on the question: is the actor allowed to perform action on this resource? This question is our authorization interface, and the two sides of that interface are the decision and the enforcement.
In Chapters III and IV we looked at how we can use authorization models to make authorization decisions. These models included roles and relationships.
This chapter covers enforcement, the second half of our authorization = decision + enforcement equation that we introduced in Chapter II. We provide a model for determining where to enforce authorization, what you should be enforcing at those places, how to connect enforcement to the decision mechanism, and what to do with the decision.
As with the previous chapters, we continue to use our GitClub example application. As a reminder: GitClub is a website for source code hosting, collaboration, and version control, similar to real-life applications GitLab and GitHub. GitClub offers a pure example of what motivates authorization in the first place – securing access to resources. A "resource" is "something that can be accessed", like a repository in GitClub. Users may or may not be able to read or make changes to a repository.
What is enforcement?
In the last two chapters, we’ve walked through how to make the authorization decision: should this actor be able to take this action on this resource? Enforcement is the process of requesting that authorization decision and acting on the result.
In other words, enforcement is the part you add to your application that will actually prevent users from accessing the wrong data.

In the GitClub application, one example of enforcement is in the code that handles fetching and returning a single repository. To request an authorization decision, we first determine what the authorization query would be: is the current user allowed to read the repository they are asking for? In GitClub, we handle authorization through a library. So requesting a decision means invoking the library method is_allowed(user, “read”, repository).
We get back a decision. If the decision is “allow", we let the request continue as normal. However, if the decision is “deny”, then we’ll return an error to the user.
Where to enforce?
It is helpful to think about where to add enforcement by thinking about layers of a multitiered architecture. We’re not writing a book on architecture patterns here, so if this is unfamiliar, take a look at Wikipedia to see what we’re talking about.
The layers of GitClub:
- Service layer – responsible for handling and routing requests, in GitClub this layer refers to both our network proxy and the router in the application itself.
- Business logic layer – the functionality of the GitClub application.
- Data layer – provides access to data. In GitClub this is the database, and the filesystem where we store repository data.
- Presentation layer – what to show to the user. This is the GitClub web interface that you’d see if you visited the (hypothetical) https://www.gitclub.dev.
For each layer of our application, there are different levels of authorization to apply. Levels are differentiated by the data they use to make authorization decisions.
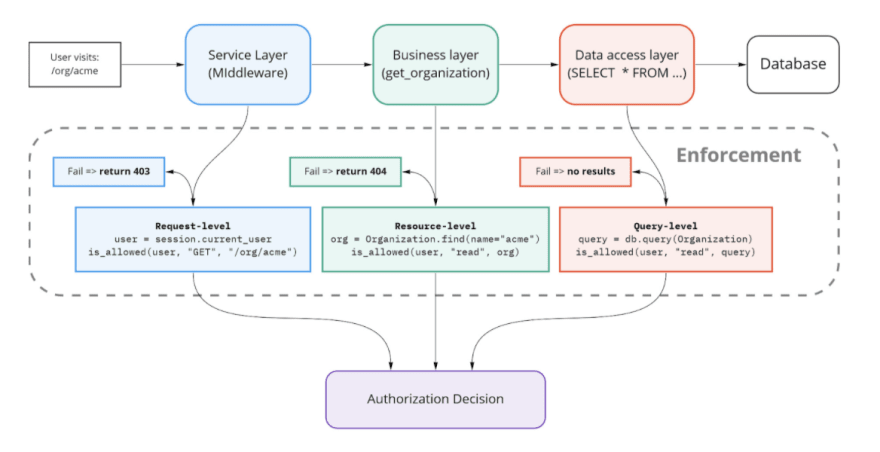
In the service layer, we can make authorization decisions based on the contents of the request. Given the lack of application context, it is only practical to enforce whether the endpoint is accessible. This is request-level authorization.
The business logic layer is where we mostly focus. At this layer, we have full context about what the user is doing and the resource they are accessing. This is resource-level authorization.
When performing authorization in bulk over datasets, it is desirable to push it down to the data layer. The way to accomplish this is by applying authorization to the communication with the data layer. This is query-level authorization.
We can also perform a kind of authorization in the presentation layer. This is client-side authorization. Unlike the other levels, this cannot be trusted to actually enforce authorization, since it’s possible for users to circumvent the client and access our backend directly.
In the next section, we’ll go through each layer and level in turn and go into detail about the steps to take in constructing the query, sending it to the decision mechanism, and handling the response.
2. Enforcement by Layer + Level
Let’s go through each in layer turn and see what enforcement looks like. We’ll leave the presentation layer to the end, it’s a bit different compared to the others.
Service layer + Request-level
At the service layer we are dealing with raw HTTP requests. In GitClub, one of the places we handle the HTTP requests is in the request middleware. Almost every web framework will have some form of request middleware that you can use to apply the same logic to every request.

What is request-level authorization?
Performing authorization over requests at the service layer is appropriately known as request-level authorization. This is authorization that makes use of information available in the request itself to make authorization decisions.
In request-level authorization, there is only a single kind of query: “is the actor allowed to make this request to this service”. In the case of HTTP requests, the information used to make an authorization decision is typically the request path and the HTTP method.
It is also common to have access to the user data. For example, many applications will handle user sessions as part of a middleware step or include additional data about the user as part of the authentication credentials. However, you should not commonly fetch resources from the database as part of the service layer, since this will be duplicating work that will happen in the business layer.
This restriction prevents us from applying many authorization models. The models we’ve covered in previous chapters all depend on application data to make decisions.
Let’s take a look at a couple of examples and what the actor, action, and resource is in each case.
A user who isn’t logged visits the homepage
When the web user is logged-out, we would consider the actor to be a guest.
The action in this case is making a GET request to /home.
The resource is the GitClub web application.
The authorization query is: are guests allowed to make GET requests to the /home route on the GitClub web application?
For the decision, we would implement: “anyone can make GET requests to a route starting with /home on the web application”. We will also need to make sure that guests can visit the login page. Anything else will be denied, and redirect the user to the login page
We can perform more kinds of request-level authorization by adding additional context to the request. The best way to do this is by adding it to the cryptographic tokens that are often used for managing sessions. This way, additional context can be provided to the user and included in subsequent requests. The cryptographic guarantees that the token provides ensure the user is not manipulating that additional context.
In GitClub, we might want to allow users to create API tokens with a specific set of permissions. There would be a special page where users can request an API token, and select what permissions they want the token to have. For example, a token would have a list of strings “issues:read”, “repositories:read” indicating what actions the bearer of the token can perform.
The GitClub CLI tries to use an API token to open a new pull request in the Acme/Anvil repository
When using the API token to make requests, we identify the bearer of the token as the actor.
The action in this case is making a POST request to /org/acme/repo/anvil/pull_requests.
The resource is the GitClub API service.
The authorization query is: Is the API token allowed to make POST requests to /org/acme/repo/anvil/pull_requests on the GitClub API service?
We are unable to conclusively determine whether the request should be allowed. We cannot know whether the user who created the token is allowed to open pull requests in the Acme/Anvil repository.
However, we can use the information in the request to make an initial decision. Our API tokens are cryptographic tokens and contain what permissions are granted to the bearer of the token. Therefore, we can make a decision based on whether the token has the “repository:write” permission.
Since this same logic is required for every API endpoint, by using request-level authorization at the service layer we can handle it in just one place.
However, the authorization it handles is still quite coarse. For example, the application would still need to check if the user who created the token is allowed to open pull requests to Acme/Anvil. This would need to take place at the resource-level in the business layer. The advantage is that the logic for handling API tokens is handled in the service layer, so we do not need to pass this information along to the business layer.
Where to enforce
In a monolith application, request middleware is the best place to implement request-level authorization. The best approach is to perform authorization on every request, and rely on an opt-out mechanism to specific routes that do not need authorization.
In the context of service-oriented architectures, you can also add request-level authorization checks as part of network proxies. These come in a few different flavors, like API gateways, service meshes, and load balancers. Network proxies can enforce request-level authorization by delegating the authorization decision to a central service. As we have seen in the previous examples, this service will typically need to access user data.
What to return
For API requests, it is better to return a 403 Forbidden error message along with any error details in the body of the response.
Business logic layer + Resource-level
Once the request has been properly routed, we’re into the business logic of the application. This is where the magic happens! This is where the application retrieves data, operates on it, updates other pieces of data, and triggers background jobs.
In the business logic layer, the code often deals with objects, classes, or types that represent the core domain concepts of the application. And this is where you will typically find the majority of authorization takes place, in the form of resource-level authorization.

What is resource-level authorization
A “resource” refers to any piece of data that users may attempt to access or interact with in an application. Organizations, repositories, issues, and comments are all examples of resources in GitClub.
Resource-level authorization uses resources and their associated data directly when making decisions. The examples we’ve used in past Authorization Academy chapters are all resource-level. For example, “is the user allowed to read issue #1313 of the acme/anvil repository?” is a resource-level check.
What to enforce
Imagine your friend asks you: "can I let myself into your apartment?". You might find it hard to answer without any additional context! "Well, sure... but what do you want to do?". Maybe they just left their jacket behind and want to go fetch it. It would be easier to answer your friend if they asked 'can I pick up my jacket from your apartment?'"
We have the same problem with application authorization. Suppose we are handling a request from a user to close issue #312 of the acme/anvil repository. The most specific query we can construct would be: “is the user (actor) allowed to close (action) issue #312 of the acme/anvil repo (resource). This specificity provides the decision mechanism with as much information as possible, which it will use to determine the best answer.
Let’s consider the alternative: making the authorization query more general. At times, this can be tempting because you can potentially reuse the query across other methods, and you have fewer permissions to worry about. For example, if we change the query above to “is the user (actor) allowed to edit (action) the acme/anvil repository (resource)”, then we can easily make an authorization decision based on what permissions the user has for the repository. And we can use this same query for any change a user requests on the repo!
But if we do that, we’ve thrown away information by making the query more general. What if the user is not a member of the repository, but is actually an external collaborator who opened the original issue? We should be able to use relationship-based authorization to determine that issue owners can close issues, which the original, more specific query supports.
The problem is that authorization logic has leaked into the application code. We’ve implicitly assumed that users can close an issue if they can edit the repository it belongs to.
In summary, always make the authorization query as precise as possible. This keeps the authorization logic separated, requires less thinking about what to enforce, and lets the decision logic be more flexible.
Where to enforce
The best place to add resource-level authorization is in the application code, as close as possible to where the intended action is performed.
If we already have the resource in hand, then we can perform the authorization straight away. This is often the case for creating new resources.
Otherwise, we might need to first fetch the resource, enforce access, and then perform the action. For example, when reading data, the first step will be to fetch the resource from the database, and then check whether the user is allowed to read it. (We’ll cover an alternative approach in the next section).
What to return
The default strategy for handling an authorization failure is to return an HTTP 403 Forbidden message, along with any details that might be helpful for the client.
However, in some cases returning an error message would be revealing information that the user should not otherwise know. For example, suppose a GitClub user visits /org/acme/repo/secret_project – a private repository – then a 403 Forbidden message might reveal to the user that such a repository exists.
Therefore, it is best practice to return an HTTP 404 NotFound message whenever the user is not even allowed to read the resource, regardless of what action they are attempting.
Field-level access
It is often the case that we want to control what fields of a resource a user can access.
For example, in GitClub users can view their own profile, and see all the data about themselves. Users are also allowed to view other’s profiles, but they can only see a subset of the data.
This is known as field-level access. It’s an additional level beyond resource-level.
There are two ways to handle field-level enforcement:
- Individual: create a new, more specific action to represent the field being accessed
- Generic: make the field an additional parameter to the authorization decision.
The individual approach requires no additional work on top of resource-level authorization, but is a little less flexible. The second is more powerful, but requires changing the authorization interface. Let’s look at when we would use either one in the context of GitClub.
GitClub users are allowed to make changes to repositories. They can change the name, add a description, specify tags, and so on. All of this is handled through a single “update repository” method. We use resource-level authorization to check if the user is allowed to update the repository.
However, now we want to restrict this so that only organization admins are allowed to make a repository private. Our current approach cannot handle this, since we only check whether a user is allowed to update the repository.
Taking the individual approach to field-level enforcement is fine for a small number of fields, but over time leads to a substantial amount of authorization logic spilling over into the application. Here’s how we would do it:
First, we would add a new action called “change visibility” on repositories and assign this as a permission to the organization admin role. On the enforcement side, we would have to use the “change visibility” action in our authorization query if the user attempts to modify the “private” field of a repository. This requires us to add some authorization logic into our application, as we must choose what enforcement to apply based on what resource fields are present in the request.
Over time, we might want to add more control over which fields users can update. For example, only repository maintainers are allowed to update the repository description, but repository contributors are allowed to add tags.
To make those changes, we would have to leak a lot of our authorization logic into the application.
The generic approach to field-level enforcement would instead update the query to include what fields are being requested. In the case of an update, we would amend the original query to: is the user allowed to update these fields on the repository? That is, instead of thinking about the action as simply “update”, we instead include the full context of the fields that are being updated.
By doing this, the decision mechanism is responsible for handling the logic of: if the update request contains a “private” attribute, then the user must have permission to “change_visibility” on the repository. And similarly for all other fields contained in the request.
The downside of the generic approach is that we need to update our authorization interface to handle the additional parameter -- the fields. Given this, the individual approach is suitable when there are only a few fields to handle.
Data layer + Query-level
Resource-level authorization has one substantial disadvantage: you need to fetch the resource in order to perform authorization.
This may not seem like such a big deal. After all, we generally want to get the resource anyway. However, fetching each resource individually becomes a problem when performing authorization over a large set of resources, as is common when implementing list endpoints.
In GitClub, we expose an endpoint that lists all of the repositories that a user has access to.
Doing this with resource-level authorization means fetching every repository in the database and requesting an authorization decision for each one.. Instead, we can push authorization down to the data layer and use query-level authorization. The data layer commonly refers to a database, although it can also mean other services.

What is query-level authorization
Query-level authorization is an approach to enforcing authorization at the data layer by modifying the data access query (e.g. SQL query) to include authorization parameters.
This involves an authorization interface that is different from what we have seen so far. The authorization decision is no longer a single yes/no response. Instead the decision must be made for each resource in the dataset, by encoding the decision as a filter on the query.
As a simple example, we know that a user can read any repository that they’ve created. To reflect this authorization logic, a query to fetch all repositories could contain the condition “where the created_by field is set to the ID of the current user”. With this in place, we are filtering the database so that only the authorized resources are returned.
Decisions and enforcement
You should think about the authorization query for query-level authorization as: is the actor allowed to perform action over all the resources in this query?
For the example above, the query would be: is the user allowed to perform the action “read” over the repositories returned by querying the “repositories” table?
In our past enforcement examples, the authorization decision would be a simple yes/no answer. But for query-level authorization the decision must include all of the conditions that the enforcement should apply to the query.
For GitClub, some of the scenarios under which somebody can read a repository are:
- The repository is public
- The user was added to the repository as a collaborator
- The user has a role in the organization the repository belongs to
Each of these conditions would need to be represented in such a way that the enforcement mechanism is able to apply the suitable query filter. The more flexible the format for these conditions, the more extensible the authorization logic is. However, this requires implementing a decision mechanism that is able to return arbitrary conditions. In Oso, we made this possible by having our policy language Polar able to return a set of constraints as the output of an authorization query.
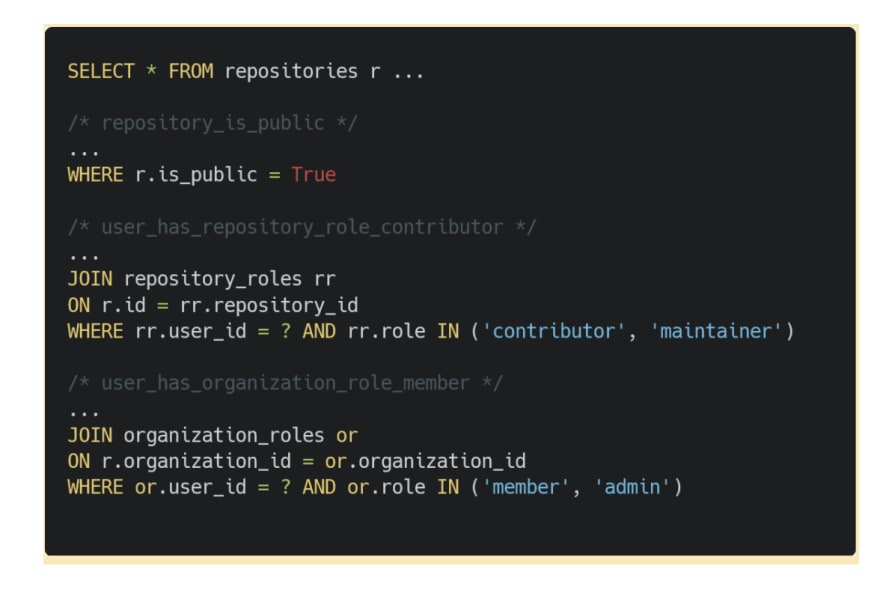
You can avoid needing a full policy language by sacrificing some flexibility and specifying a finite number of conditions that can be returned by the decision mechanism. In the previous example, we could return a string for each condition:
- “repository_is_public” – check the repository is public
- “user_has_repository_role_contributor” – check the user has the “contributor” role for a repository
- “user_has_organization_role_member” – check the user has the “member” role for the organization that a repository belongs to
The role of the enforcement mechanism is to process the conditions returned by the decision mechanism and apply these to the query. You can think of this as the enforcement being applied proactively, as opposed to retroactively enforcing after data is retrieved.
We expect that the data layer supports some form of filtering, whether accessing a database, search engine, or external service. To enforce authorization at the query-level, you must be able to translate any conditions returned from the decision into those supported filters.
For example, each of the previous conditions can be implemented as SQL filters:
Where to enforce
Query-level authorization should be added in the data access layer – the part of the application code responsible for fetching data from databases and other sources.
The authorization query still needs much of the same context as resource-level authorization, such as the current user and the action being performed. This context needs to become part of the query interface.
What to return
Since authorization is applied via filtering the dataset, there is no need to handle the result in any specific way. To the application code, an unauthorized item will simply look as though it does not exist. This is ideal for “read” actions.
However, in some cases it is better to differentiate “no results”, from “not allowed”. If a GitClub user attempts to list the teams for an organization, there might be no results because the user is not a part of the organization, or no results because all the teams are private. To differentiate these two cases, you can add an additional resource-level check: is the user allowed to “list teams” for this organization. If the result is no, then return an error or redirect the user. If the result is yes, then proceed to making the query-level check.
Query-level authorization can also be used to replace some resource-level checks. For example, instead of fetching a repository from the database and then checking whether the user has read access, you can do both steps in one go with query-level authorization. This is good when you want to avoid revealing whether a resource exists, much like we described earlier for resource-level checks.
Presentation layer + Client-side authorization
The last layer to consider for enforcement is the presentation layer. The presentation layer refers to any user interface (UI), whether a server-side rendered web page, single page application, command line application or website. In all of these cases, the enforcement code is running on the untrusted client. Since this can easily be bypassed, we can only use client-side authorization as a way to provide a better user experience.
What is client-side authorization?
Client-side authorization refers to using authorization decisions in a user interface in order to inform what a user can expect to be able to do. This makes for a better user experience — nobody wants to click on a button only to be presented with an error message.
To avoid this, we use client-side authorization to preempt whether a request will be allowed or not. If the request will be denied, then the particular user interface component can either be deactivated or hidden from the user entirely.
Even better, we could display the reason for an authorization decision to the user, so they know exactly why they cannot do the action in the first place.

GitHub repository settings page explaining why an organization member cannot delete or transfer a repository.
What to enforce
One of the main challenges of client-side authorization is how to keep it synchronized with the authorization implemented in the backend.
Usually you want to hide or show a UI component based on what actions the current user is allowed to take on a resource. A good pattern is to ask the backend server for what those actions are. This avoids duplicating the authorization logic that the server already must implement. And the client is able to use those actions at its discretion.
For example, when rendering the “repositories settings” page, we can compute all the set of all permissions the current user has for the repository. This might be “read”, “change_visibility”, and “update”. The web page only needs to implement simple logic: hide the delete button if the “delete” permission is absent in the list of user permissions.
However, we have still introduced a dependency between the client and server: the two must stay synchronized on what actions are required for each endpoint on the server.
3. Summary: when to use each level
When we covered where to perform authorization in Chapter II, we concluded that it should happen in the business logic and data access layers. In these two places we had the most context available to handle common authorization scenarios, like “can this user read this repository?”
We’ve now covered in more detail four different layers throughout the application architecture that we can enforce authorization, and what level of authorization we can add. The summary is that each authorization level has its place:
- Request-level should be used to extract out common enforcement steps that are the same across all requests. It can also be used for defense-in-depth, as an additional layer on top of resource-level authorization.
- Resource-level is a safe choice for most scenarios. At this level, all the relevant context is available for authorization decisions.
- Query-level is a powerful approach and should be used when you need to apply resource-level authorization over an entire dataset.
- Client-side is a purely additive layer on top of any enforcement performed on the backend. It should be used wherever possible to help signal to users what actions can/cannot be performed.
In other words, there are a lot of places where authorization might be happening, and it can be hard to keep track! You should look to ensure that at least one level of authorization is applied across a request path.
For more guidance on authorization, see other chapters from Authorization Academy.
As before, we encourage you to join the community of developers in the Oso Slack! We'd love to talk about what you're working on and answer any questions you may have. If you want to kickstart the process of building authorization into your application, you can use the Oso library and learn more about it in the Oso documentation.

Top comments (0)