
Introduction
Within this tutorial, you will build a Voice Recorder service accessed via a mobile React Native application that provides users with the functionality of creating a personal account and recording a voice input associated with their account data.
While building this application, you will model your application data using Content-Types from a Strapi Admin dashboard. You will also learn how to enable and use the GraphQL API and perform file uploads using the GraphQL API.
Prerequisites
To follow along with this tutorial, it is recommended that you satisfy the following requirements;
- Have an installation of PostgreSQL on your local machine.
- Have either an android or iOS emulator set up on your local computer. The development section of Expo documentation explains how to set up a development emulator on your local machine.
- Have Node installed with either Yarn or NPM as a package manager.
Before building the Strapi and react native application, open your terminal window and execute the two commands below to create a parent directory and change your working directory to it.
    # create directory
    mkdir strapi-voice

    # change directory
    cd strapi-voice
The two applications that will be built in this article will be stored in the parent strapi-voice directory.
Creating Strapi Application
In this tutorial, you will use a Postgres database to store data from your Strapi application. By default, Strapi uses an SQLite database for new applications, but you will change this to a Postgres database during the installation steps.
Before creating the Strapi application, create a new database within your running Postgres cluster for the Strapi application. This database name will be specified while creating a new Strapi application.
Execute the SQL command below using psql to create a new database, replacing the DATABASE_NAME placeholder with your desired database name;
Note: A*lternatively, you can also use your preferred GUI database tool to create the database.*
CREATE DATABASE <DATABASE_NAME>;
The first step to working with Strapi is to create a new Strapi project using the create-strapi-app CLI with npx. Execute the command below to launch the interactive installer;
npx create-strapi-app voice-app
Executing the command above would launch the interactive installer that would walk you through the process of configuring a new Strapi application in the following steps;
- Select the Custom installation method as you would be using a Postgres database with the Strapi application.
- Select Postgres as the default database client for this application.
- Provide the connection details of your Postgres cluster and a database. If you are using a Postgres cluster running on your local system, you can use the default values provided by the installer for the Postgres connection.
After providing the database credentials, wait for some minutes for the Strapi installer to verify that the credentials are valid and create the data schema in the specified database.
After a complete installation, execute the commands below to change the directory into the Strapi application and start the development server to start the Strapi server.
    # change directory
    cd voice-api

    # start the development server
    yarn develop
Executing the command above will start the Strapi server on port 1337. Open the admin dashboard for your Strapi application at [http://localhost:1337/admin](http://localhost:1337/admin) to create a root admin user with an admin email and password.

Modeling Strapi Content-Type
At this point, you have your Strapi application up and running with a full setup admin dashboard. The next step will be to model the data within your Strapi application using the Content Builder.
From the Strapi dashboard, navigate to the Content-builder page using the left sidebar. Click the Create new collection type text from the left placed Collection Types section to launch the modal for creating a new collection type.
Within the opened modal, specify voice-recordings in the display name text field as the name of this collection type.

As shown above, a unique identifier for the collection type will be generated from the display name.
Next, click the Advanced Settings tab to reveal more advanced settings for the collection. Toggle off the default enabled Draft / publish system for this collection type.
The draft / publish system provides an application admin with the feature to create a draft entry and review it later before publishing. You will not need this feature within the application.

After toggling off the Draft / publish system, leave other settings at their default and click the continue button.
The next step will be to create the fields within the collection content type. Select the following fields shown within the modal;
Text -- Specify recording_name as the name of this field. It would be used to identify each entry within the collection content type.
Rich Text -- Specify recording_description as the name of this field. It will be used to store a description of each entry within the voice-recording content-type.
DateTime -- Specify date_created as the name of this field. It will be used to store the date and time the new voice recording was created.
Media -- Specify the name of this field as recording. It would contain the blob recording file from the User's device.
Relation -- Specify created_by as the name of this relationship within the voice-recording field name text field.
At the right-hand side, click the default File ( from: upload ) dropdown and select the User ( from: users-permission ) option to relate the voice-recordings relation to the User collection-type.

After creating the created_by relation similar to the relation shown in the image above, click the Finish button to complete the entire collection.
From the Content Builder page, the voice-recordings collection content type will be listed with all the newly added fields as shown below;

As shown in the image above, your voice-recordings collection type has five fields, each making up the voice-recording details.
Setting Application Role-Based Access Control
Proper user management is an essential aspect of every application. In the design of this application, every User will be able to create a recording and view their past recordings.
To protect the privacy of each User's data, you will configure the role of users using the Role-Based Access Control ( RBAC ) feature provided by Strapi.
Note: This article within the Strapi blog provides an in-depth explanation of the Role-Based Access Control features of Strapi.
Using the Strapi Admin dashboard, navigate to the settings page, click the Roles item listed in the User & Permissions section within the left-placed navigation bar. This will display the default Public and Authenticated roles for each created User.
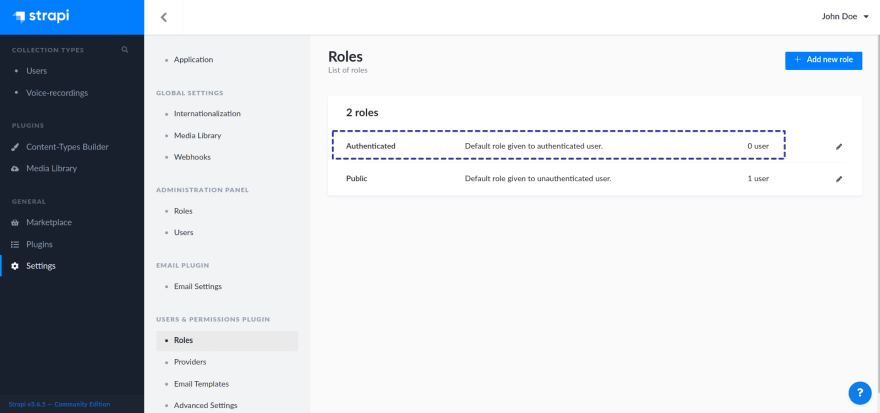
Among the two listed roles above, the Authenticated role highlighted will be of primary focus as you will expand the scope of this role in the next step.
Click the first Authenticated role to display the view for the role that allows you to edit the permissions and details.
In the Permissions card within the Authenticated role view, the voice-recording content type will be displayed with its allowed actions within the Application permission. Click the Select All checkbox to grant all users with the authenticated role to perform the enabled actions on the voice-recording content type.

Click the Save button and wait for the new change made to the Authenticated role to be effected.
At this point, the Strapi application is fully functional and ready for use. However, the design of the mobile application is to send and consume data from a GraphQL API to enjoy the benefits of GraphQL. Hence, you need to enable the GraphQL API within the Strapi application by installing the GraphQL plugin.
Stop the running Strapi application, and install the GraphQL plugin for Strapi using the command below;
yarn strapi install graphql
After installing the plugin above, restart the management server and navigate to the GraphiQL playground in your web browser at http://localhost:1337/graphql to view your application data.

The authentication section of the GraphQL plugin documentation for Strapi explains how to generate and use a JWT token in your playground HTTP headers before using a GraphQL operation from the GraphiQL playground.
With the Strapi application fully set up having a Users and Voice-recordings collection type, whose data is served through a GraphQL API, you can build the React Native application connected to the GraphQL API.
Creating A React Native Application
Within this article, we would use the Expo CLI to bootstrap a new React Native application quickly. Expo is an open-source platform that abstracts away all the complexities of building a React application by providing tools to effortlessly build and deploy your application.
If you do not have the Expo CLI installed, execute the command below to install the expo-cli globally on your local computer using NPM.
npm install -g expo-cli
Next, execute the command below to launch the interactive installer within the expo-cli that will walk you through creating a new react native application with Expo.
expo init voice-app
When prompted to choose a template by the installer, select the blank template within the managed workflow type.

With the application created, you can launch either an android or iOS emulator based on your operating system to view local changes to the application.
Next, start the expo metro server to bundle and install your code on the running emulator;
expo start
Press a to install the application on an Android emulator, or press o to install the application on an iOS emulator.
Note: You can also work with the expo application using the Metro DevTools launched in your default browser.
To use the GraphQL API from Strapi within this application, you will need to install client libraries from react-apollo alongside libraries from react-navigation to implement navigation across screens within the application;
npm install @apollo/client react-native-vector-icons @react-native-community/masked-view @react-navigation/native @react-navigation/stack graphql expo-av expo-file-system @react-native-async-storage/async-storage apollo-link-error
Each time a GraphQL operation is performed against the Strapi API, you must provide a valid JWT token to authenticate the request. This JWT token will be obtained from the operation response when a user either signs in to the application or creates a new account. This token will be stored in the application using the @react-native-async-storage/async-storage library that was installed above.
To use the @react-native-async-storage/async-storage library, it is recommended that you create an abstraction over the library's API. To do this, create a storage.js file and add the code block's content below that contains helper functions for working with the @react-native-async-storage/async-storage library.
    // ./src/storage.js

    import AsyncStorage from "@react-native-async-storage/async-storage";

    export const USER_TOKEN_KEY = "@USER_TOKEN";
    export const USER_ID_KEY = "@USER_ID";

    const validateParameter = (key) => {
      if (!key && key !== String) {
        throw new Error("Invalid key specified");
      }
    };

    export const setItem = async (itemKey, itemValue) => {
      if (!key && !val && typeof key !== String && val !== String) {
        throw new Error("Invalid key or val specified");
      }
      try {
        await AsyncStorage.setItem(
          itemKey,
          JSON.stringify({
            data: itemValue,
          })
        );
      } catch (e) {
        console.log(`Error setting key: ${e}`);
      }
    };

    export const clearItem = async (key) => {
      validateParameter(key);
      try {
        await AsyncStorage.removeItem(key);
      } catch (e) {
        console.log(`Error removing key: ${e}`);
      }
    };

    export const getItem = async (key) => {
      validateParameter(key);
      try {
        const data = await AsyncStorage.getItem(key);
        return JSON.parse(data);
      } catch (e) {
        console.log(`Error removing key: ${e}`);
      }
    };
The code block above contains three exported asynchronous helper functions for creating, deleting, and retrieving data stored in the device local storage using the @react-native-async-storage/async-storage library. In the next step, you will use the getItem function exported from the code block above to retrieve the stored token when creating an ApolloClient instance.
Using your preferred code editor, open the App.js file. You will replace the boilerplate code with the content of the code block below, which instantiates the ApolloClient class and adds the navigation screens within the application.
    import { StatusBar } from "expo-status-bar";
    import React, { useState, useEffect } from "react";
    import { ApolloProvider } from "@apollo/client";
    import { createStackNavigator } from "@react-navigation/stack";
    import {
     ApolloClient,
     ApolloLink,
     HttpLink,
     InMemoryCache,
    } from "@apollo/client";
    import { NavigationContainer } from "@react-navigation/native";

    import Home from "./src/screens/home";
    import CreateRecording from "./src/screens/create-recording";
    import CreateAccount from "./src/screens/create-account";
    import Login from "./src/screens/login";
    import { getToken, USER_TOKEN_KEY } from "./src/utils";

    const headerTitleStyle = {
     fontSize: 17,
     color: "#fff",
     fontWeight: "normal",
    };

    export default function App() {
     const [token, setToken] = useState(null);
     const Stack = createStackNavigator();

     useEffect(() => {
       (async function () {
         const data = await getToken(USER_TOKEN_KEY);
         setToken(data);
       })();
     }, []);

     const client = new ApolloClient({
       cache: new InMemoryCache(),
       link: ApolloLink.from([
         new HttpLink({
           # Replace this with an environment variable containing the URL to your deployed Strapi API
           uri: "http://localhost::1337/graphql",
           headers: token
             ? {
                 Authorization: `Bearer ${token.jwt}`,
               }
             : null
         }),
       ]),
     });

     return (
       <NavigationContainer>
         <ApolloProvider client={client}>
           <StatusBar style="auto" />

           <Stack.Navigator>
             <Stack.Screen
               options={{
                 title: "Login",
                 headerShown: false,
                 headerTitleStyle,
                 headerLeftContainerStyle: {
                   color: "#fff",
                 },
                 headerStyle: {
                   backgroundColor: "#8c4bff",
                 },
               }}
               name="login"
               component={Login}
             />

             <Stack.Screen
               options={{
                 title: "CreateAccount",
                 headerTitleStyle,
                 headerShown: false,
                 headerLeftContainerStyle: {
                   color: "#fff",
                 },
                 headerStyle: {
                   backgroundColor: "#8c4bff",
                 },
               }}
               name="create-account"
               component={CreateAccount}
             />

             <Stack.Screen
               options={{
                 headerStyle: {
                   backgroundColor: "#8c4bff",
                 },
                 headerLeft: null,
                 title: "My Recordings",
                 headerTitleStyle,
               }}
               name="home"
               component={Home}
             />
             <Stack.Screen
               options={{
                 title: "New Recording",
                 headerTitleStyle,
                 headerLeftContainerStyle: {
                   color: "#fff",
                 },
                 headerStyle: {
                   backgroundColor: "#8c4bff",
                 },
               }}
               name="CreateRecording"
               component={CreateRecording}
             />
           </Stack.Navigator>
         </ApolloProvider>
       </NavigationContainer>
     );
    }
The code block above contains the root component for the React Native application. When the component is mounted, a useEffect hook is first executed to retrieve any token stored locally.
Whatever token that is found is stored in the component's local state and further used in the ApolloClient headers for authenticating GraphQL operations made to the Strapi API.
The ApolloClient instance store in the client variable is further passed as a prop to the ApolloProvider wrapper, which wraps the entire application component tree.
Navigation within this application is also implemented in the App.js file by making use of the React-Navigation library.
The createStackNavigator hook from React-Navigation is used to create a stack of screens comprising a Login, CreateAccount, Home, and CreateRecording screen. These screens have not been created yet, but you will create them soon.
To keep the component free from unnecessary code, we would keep all unrelated code in their respective files and only important what is needed.
Create a graphql.js file within the src directory and add the code block content below that contains the gql template literals created using the gql template literal tag from @apollo/client.
    // ./src/graphql.js
    import { gql } from "@apollo/client";

    export const FETCH_RECORDINGS = gql`
      query fetchRecordings {
        voiceRecordings {
          description
          recording_name
          id
          created_at
        }
      }
    `;

    export const CREATE_ACCOUNT = gql`
      mutation createAccount(
        $email: String!
        $password: String!
        $username: String!
      ) {
        createUser(
          input: {
            data: { username: $username, email: $email, password: $password }
          }
        ) {
          __typename
        }
      }
    `;

    export const LOGIN_USER = gql`
      mutation loginUser($email: String!, $password: String!) {
        login(input: { identifier: $email, password: $password }) {
          jwt
          user {
            id
          }
        }
      }
    `;

    export const CREATE_RECORDING = gql`
      mutation createRecording(
        $description: String
        $name: String
        $userId: String
        $fileId: String
      ) {
        createVoiceRecording(
          input: {
            data: {
              description: $description
              recording_name: $name
              users_permissions_user: $userId
              recording: $fileId
            }
          }
        ) {
          voiceRecording {
            description
            recording_name
            recording {
              id
            }
          }
        }
      }
    `;

    export const UPLOAD_FILE = gql`
      mutation uploadFile($file: Upload!) {
        upload(file: $file) {
          id
        }
      }
    `;
The code block above contains five exported variables, each containing the respective gql template literal tag for the Query and Mutation operations within the application.
Create a new screens directory within the src directory. This new directory will contain the navigation screens imported and used in the App.js file. In the four outlined steps below, you will create a file for each of these screens and build the components within them;
- Create Account Screen
Using your opened code editor, create a CreateAccount.js file and add the code block's content below into the new CreateAccount.js file to create a component with text fields for a user to specify a username, email, and password detail for creating a new account in the Voice recorder application.
    // ./src/screens/CreateAccount.js

    import * as React from "react";
    import {
      View,
      Text,
      TextInput,
      ActivityIndicator,
      StyleSheet,
      Dimensions,
      TouchableOpacity,
    } from "react-native";
    import { useMutation } from "@apollo/client";
    import { CREATE_ACCOUNT } from "../graphql";

    const { height, width } = Dimensions.get("window");

    const CreateAccount = (props) => {
      const [Email, setEmail] = React.useState("");
      const [username, setUsername] = React.useState("");
      const [Password, setPassword] = React.useState("");
      const [confirmPassword, setConfirmPassword] = React.useState("");
      const [error, setError] = React.useState(null);
      const [isLoading, setLoading] = React.useState(false);

      const [createAccount, { data }] = useMutation(CREATE_ACCOUNT, {
        variables: {
          username,
          email: Email,
          password: Password,
        },
      });

      const handleCreateAccount = async () => {
        setLoading(true);
        try {
          await createAccount();
          if (data) {
            props.navigation.navigate("login");
          }
        } catch (e) {
          console.log(`error creating account : ${e}`);
          setError(e);
        } finally {
          setLoading(false);
        }
      };

      return (
        <View style={styles.body}>
          <View>
            <Text style={[styles.title, styles.alignCenter]}>
              Strapi Voice Recorder
            </Text>
            <View style={{ marginVertical: 5 }} />
            <Text style={{ textAlign: "center", fontSize: 15 }}>
              {`Voice recorder application  powered \n by Strapi CMS API`}{" "}
            </Text>
            <View style={{ marginVertical: 15 }} />
            {error && (
              <Text style={{ textAlign: "center", fontSize: 14, color: "red" }}>
                {error.message}{" "}
              </Text>
            )}
            <View style={styles.input}>
              <TextInput
                keyboardType="text"
                value={username}
                placeholder="Your username. e.g Johnny"
                onChangeText={(val) => setUsername(val)}
              />
            </View>
            <View style={{ marginVertical: 10 }} />
            <View style={styles.input}>
              <TextInput
                keyboardType="email-address"
                value={Email}
                placeholder="Your email. John@mail.com"
                onChangeText={(val) => setEmail(val)}
              />
            </View>
            <View style={{ marginVertical: 10 }} />
            <View style={styles.input}>
              <TextInput
                secureTextEntry={true}
                value={Password}
                placeholder="Your Password"
                onChangeText={(val) => setPassword(val)}
              />
            </View>
            <View style={{ marginVertical: 10 }} />
            <View style={styles.input}>
              <TextInput
                secureTextEntry={true}
                value={confirmPassword}
                placeholder="Confirm Your Password"
                onChangeText={(val) => setConfirmPassword(val)}
              />
            </View>
            <View style={{ marginVertical: 10 }} />
            <View style={styles.alignCenter}>
              <TouchableOpacity
                disabled={Password !== confirmPassword}
                onPress={() => handleCreateAccount()}
                style={[styles.button, styles.alignCenter]}
              >
                {!isLoading ? (
                  <Text style={{ color: "#fff" }}> Create New Account </Text>
                ) : (
                  <ActivityIndicator color="#282c34" />
                )}
              </TouchableOpacity>
            </View>
            <View style={{ marginVertical: 10 }} />
            <TouchableOpacity
              disabled={isLoading}
              onPress={() => props.navigation.navigate("login")}
            >
              <View style={styles.flex}>
                <Text style={styles.infoText}>Have An Account?</Text>
                <Text style={[styles.infoText, { color: "black", marginLeft: 10 }]}>
                  Login Instead
                </Text>
              </View>
            </TouchableOpacity>
          </View>
        </View>
      );
    };
    const styles = StyleSheet.create({
      flex: {
        display: "flex",
        flexDirection: "row",
        justifyContent: "center",
      },
      title: {
        fontSize: 22,
        textAlign: "center",
        fontWeight: "500",
      },
      infoText: {
        textAlign: "center",
        fontSize: 14,
        color: "grey",
      },
      body: {
        backgroundColor: "#fff",
        height,
        display: "flex",
        justifyContent: "center",
        alignItems: "center",
      },
      input: {
        backgroundColor: "#fff",
        paddingHorizontal: 10,
        borderWidth: 1,
        borderRadius: 5,
        borderColor: "#c0c0c0",
        height: 45,
        width: width - 30,
      },
      alignCenter: {
        display: "flex",
        justifyContent: "center",
        alignItems: "center",
      },
      button: {
        height: 40,
        borderWidth: 1,
        borderColor: "#28BFFD",
        backgroundColor: "#28BFFD",
        color: "#fff",
        width: width - 30,
        fontSize: 16,
        borderRadius: 3,
      },
    });

    export default CreateAccount;
The component within the code block above displays input fields and stores the values typed in the local component state, after which the input values are used in a GraphQL mutation as variables to create a new user.
Of peculiar interest is the handleCreateAccount function within the CreateAccount component. This function is executed at the top of the Create New Account button. It executes the createAccount GraphQL mutation destructured from the GraphQL literal using the useMutation hook from @apollo/client.
After the GraphQL mutation is executed without any error, the User is navigated to the Login screen to login using the same credentials used in creating the account. This flow adheres to the Strapi API structure and allows the application to retrieve the User's JWT token to authenticate future requests.
An example of the Create-account screen in the voice recorder application running within an Android emulator is shown in the image below;
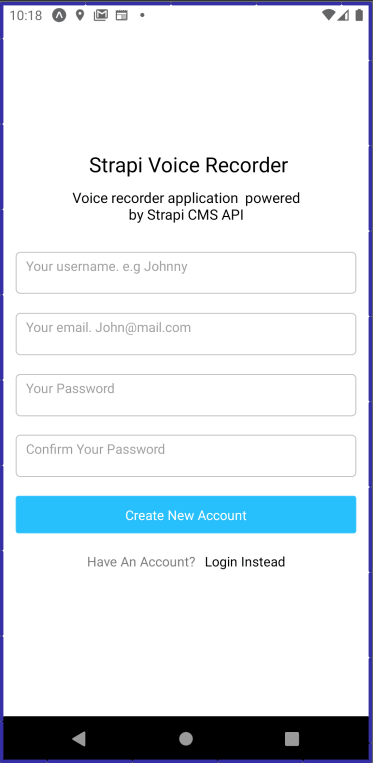
As shown in the image above, a user can also navigate to the Login screen to login to an existing account by tapping the Login Instead text. In the next step, you will create the Login screen.
- Login Screen
Using your opened code editor, create a login.js file in the screens directory and add the code block's content below into the login.js file to create a component that accepts a user's email and password specified when an account was created.
    // ./src/screens/login.js

    import * as React from "react";
    import { useMutation } from "@apollo/client";
    import {
      View,
      Text,
      TextInput,
      StyleSheet,
      Dimensions,
      ActivityIndicator,
      TouchableOpacity,
    } from "react-native";
    import { setItem, getItem, USER_TOKEN_KEY } from "../storage";
    import { LOGIN_USER } from "../graphql";
    const { height, width } = Dimensions.get("window");

    const Login = (props) => {
      const [Email, setEmail] = React.useState("");
      const [Password, setPassword] = React.useState("");
      const [isLoading, setLoading] = React.useState(false);
      const [error, setLoginError] = React.useState(null);
      const [loginUser, { data }] = useMutation(LOGIN_USER);

      React.useEffect(() => {
        (async function () {
          const token = await getItem(USER_TOKEN_KEY);
          if (token) {
            props.navigation.navigate("home");
          }
        })();
      }, []);

      const handleLogin = async () => {
        setLoading(true);
        try {
          await loginUser({
            variables: {
              email: Email,
              password: Password,
            },
          });
          if (data) {
            await setItem(data.login.jwt);
            await setItem(data.login.user.id)
            props.navigation.navigate("home");
          }
        } catch (e) {
          console.log(e);
          setLoginError(e);
        } finally {
          setLoading(false);
        }
      };

      return (
        <View style={styles.body}>
          <View>
            <Text style={[styles.title, styles.alignCenter]}>
              {" "}
              Strapi Voice Recorder
            </Text>
            <View style={{ marginVertical: 5 }} />
            <Text style={{ textAlign: "center", fontSize: 15 }}>
              {" "}
              {`Voice recorder application  powered \n by Strapi CMS API`}{" "}
            </Text>
            <View style={{ marginVertical: 15 }} />
            {error && (
              <Text style={{ textAlign: "center", fontSize: 14, color: "red" }}>
                {error.message}
              </Text>
            )}
            <View style={styles.input}>
              <TextInput
                value={Email}
                placeholder="Enter your email address"
                onChangeText={(value) => setEmail(value)}
              />
            </View>
            <View style={{ marginVertical: 10 }} />
            <View style={styles.input}>
              <TextInput
                value={Password}
                secureTextEntry={true}
                placeholder="Enter your Password"
                onChangeText={(value) => setPassword(value)}
              />
            </View>
            <View style={{ marginVertical: 10 }} />
            <View style={styles.alignCenter}>
              <TouchableOpacity
                onPress={() => handleLogin()}
                disabled={isLoading}
                style={[styles.button, styles.alignCenter]}
              >
                {!isLoading ? (
                  <Text style={{ color: "#fff", fontSize: 15 }}> Sign In </Text>
                ) : (
                  <ActivityIndicator color="#fff" />
                )}
              </TouchableOpacity>
            </View>
            <View style={{ marginVertical: 10 }} />
            <TouchableOpacity
              onPress={() => props.navigation.navigate("create-account")}
            >
              <View style={styles.flex}>
                <Text style={styles.infoText}>Don't Have An Account?</Text>
                <Text style={[styles.infoText, { color: "black", marginLeft: 10 }]}>
                  Create Account
                </Text>
              </View>
            </TouchableOpacity>
          </View>
        </View>
      );
    };

    const styles = StyleSheet.create({
      flex: {
        display: "flex",
        flexDirection: "row",
        justifyContent: "center",
      },
      title: {
        fontSize: 22,
        textAlign: "center",
        fontWeight: "500",
      },
      infoText: {
        textAlign: "center",
        fontSize: 14,
        color: "grey",
      },
      body: {
        backgroundColor: "#fff",
        height,
        display: "flex",
        justifyContent: "center",
        alignItems: "center",
      },
      input: {
        backgroundColor: "#fff",
        paddingHorizontal: 10,
        borderWidth: 1,
        borderRadius: 5,
        borderColor: "#c0c0c0",
        height: 45,
        width: width - 30,
      },
      alignCenter: {
        display: "flex",
        justifyContent: "center",
        alignItems: "center",
      },
      button: {
        height: 40,
        borderWidth: 1,
        borderColor: "#28BFFD",
        backgroundColor: "#28BFFD",
        color: "#fff",
        width: width - 30,
        fontSize: 16,
        borderRadius: 3,
      },
    });

    export default Login;
The component above uses a useEffect hook to check if a JWT token for the User is present in the device. If the JWT token is found, the User is navigated to the Home screen.
This check serves as a simple means to detect if the User is already authenticated, and it is performed here because the Login screen is the first screen in the Navigation Stack, and it will be the first screen shown when the application is opened.
Note: This authentication can be better performed by writing a custom middleware with React Navigation.
The component also contains two input fields for collecting a user email and password input values and stores them in the local state created using the useState hooks. These input values are further passed as variables into a GraphQL mutation to authenticate the User.
The handleLogin function is executed at the tap of the Sign In button, and it executes the GraphQL mutation to submit the User's email and password to the Strapi GraphQL API and returns an object containing the JWT token and the User's ID.
The token and user id values are further stored in the device local storage using the setItem helper function, which uses the @react-native-async-storage/async-storage library underneath.
The JWT token will be used to authenticate GraphQL operations to retrieve and create data to the Strapi API. The user ID will be used to identify the User when creating a new recording later on.
The image below shows the Login screen within the voice recorder application running on an Android emulator.

- Home Screen
The home screen within this application will serve as the default screen for all authenticated users, displaying a list of created recordings.
The Home screen has been broken down into a Home parent component to follow React composition design principle. A record card child component displays a card with details about a user's recording gotten from the parent component as a prop.
We would begin by building the RecordCard component. Create a new components directory within the src directory and create a RecordCard.js file within the component directory. Add the content of the code block below into the RecordCard.js file.
    // ./src/components/RecordCard.js

    import * as React from "react";
    import { View, Text } from "react-native";
    import Icon from 'react-native-vector-icons/AntDesign';

    import { HomeStyles as styles  } from "../styles"

    const RecordingCard = ({data, onPlay}) => (
       <View style={[styles.alignCenter]}>
           <View style={styles.post}>
               <View
                   onClick={() => onPlay()}
                   style={[styles.play, styles.alignCenter
                       , {
                           flexDirection: "column"
                       }]}>
                   <Icon size={30} name={"playcircleo"}/>
                   <Text style={{fontSize: 14}}> Play </Text>
               </View>

               <View style={[styles.alignCenter, {flexDirection: 'column'}]}>
                   <Text style={styles.title}>  {data.recording_name}</Text>
                   <Text> {data.created_at} </Text>
               </View>

               <View />
           </View>
       </View>
    )

    export default RecordingCard;
The RecordingCard component above receives a data object containing the details of a user's recording and an onPlay function that is executed when the play icon within the card is clicked. This function plays the recorded audio for the User to listen to.
Next, create a Home.js file in the screens directory and add the code block content below to import and use the RecordingCard component in a Flat list component.
    // ./src/screens/Home.js

    import React, { useEffect } from "react";
    import {
     View,
     Text,
     TouchableOpacity,
     StyleSheet,
     FlatList,
     Dimensions,
     ActivityIndicator,
    } from "react-native";
    import { useQuery } from "@apollo/client";
    import Icon from "react-native-vector-icons/Ionicons";
    import MaterialIcons from "react-native-vector-icons/MaterialIcons";
    import RecordingCard from "../components/recordingCard";

    import { clearToken, getToken, USER_TOKEN_KEY } from "../utils";
    import { FETCH_RECORDINGS } from "../graphql";

    const { width, height } = Dimensions.get("screen");

    const handleLogout = async (navigation) => {
     try {
       await clearToken(USER_TOKEN_KEY);

       navigation.navigate("login");
     } catch (e) {
       console.log(e);
     }
    };

    const Home = ({ navigation }) => {
     useEffect(() => {
       (async function () {
         const token = await getToken(USER_TOKEN_KEY);
         if (!token) {
           navigation.navigate("login");
         }

         navigation.setOptions({
           headerRight: () => {
             return (
               <View style={{ paddingRight: 15 }}>
                 <TouchableOpacity
                   style={{ flexDirection: "row" }}
                   onPress={() => handleLogout(navigation)}
                 >
                   <MaterialIcons name={"logout"} color={"#fff"} size={20} />
                 </TouchableOpacity>
               </View>
             );
           },
         });
       })();
     }, []);

     const { data, error, loading } = useQuery(FETCH_RECORDINGS);

     if (loading) {
       return (
         <View style={styles.alignCenter}>
           <ActivityIndicator color="#8c4bff" />
         </View>
       );
     }

     if (error) {
       return (
         <View style={[styles.alignCenter, { paddingTop: 15 }]}>
           <Text> An error occurred while loading your recordings... </Text>
         </View>
       );
     }

     return (
       <View style={{ flex: 1, backgroundColor: "#fff" }}>
         <FlatList
           data={data.voiceRecordings}
           keyExtractor={(item) => item.id}
           renderItem={({ item }) => (
             <RecordingCard onPlay={() => playAudio()} data={item} />
           )}
         />

         <View style={styles.alignCenter}>
           <TouchableOpacity
             onPress={() => navigation.navigate("CreateRecording")}
             style={styles.button}
           >
             <Icon name={"ios-add"} color={"#fff"} size={20} />
             <Text style={{ color: "#fff" }}> Create New Recording </Text>
           </TouchableOpacity>
         </View>
       </View>
     );
    };

    const styles = StyleSheet.create({
     alignCenter: {
       display: "flex",
       justifyContent: "center",
       alignItems: "center",
     },
     button: {
       display: "flex",
       justifyContent: "center",
       alignItems: "center",
       flexDirection: "row",
       borderColor: "#8c4bff",
       backgroundColor: "#8c4bff",
       height: 47,
       width: width - 25,
       borderWidth: 1,
       color: "#fff",
       fontSize: 16,
       borderRadius: 5,
       marginBottom: 10,
     },
    });

    export default Home;
In the Home component above, a GraphQL Query operation was made to retrieve the created recordings through the useQuery hook from the @apollo/client library. The data gotten from the GraphQL Query is passed into a Flat list component to render a performant list of recordings using the previously created RecordingCard component.
The Home component also contains a useEffect hook, and the logic to check if a user is authenticated from the Login screen is also performed within the useEffect hook. If no token is found, the User is navigated to the Login screen.
The image below shows the Home screen within the application running on an Android emulator;
![]()
As displayed in the image above, an empty array was returned from the GraphQL Query because a recording within the voice-recording content type hasn't been created yet.
At the top of the Create New Recording button at the bottom of the page, a user will be navigated to the CreateRecording screen. This screen doesn't exist yet. Hence you will create it in the next step.
- Create Recording Screen
As the name implies, the CreateRecording screen has a record button for a user to record a voice input and provide a name and description using the two input fields on the page.
Create a createRecording.js file within the screens directory and add the code block content below to build the component within the CreateRecording screen.
    // ./src/screens/createRecording.js

    import * as React from "react";
    import {
      View,
      Text,
      TextInput,
      StyleSheet,
      Dimensions,
      TouchableOpacity,
    } from "react-native";
    import Icon from "react-native-vector-icons/Ionicons";
    import { Audio } from "expo-av";
    import * as FileSystem from "expo-file-system";
    import { useMutation } from "@apollo/client";
    import { CREATE_RECORDING, UPLOAD_FILE } from "../graphql";
    import { getItem, USER_ID_KEY } from "../utils";

    const { width, height } = Dimensions.get("screen");

    const CreateRecording = ({ navigation }) => {
      const [name, setName] = React.useState("");
      const [description, setDescription] = React.useState("");
      const [canRecord, setRecordStatus] = React.useState(false);
      const [record, setRecord] = React.useState(null);
      const [uploadFile, { data }] = useMutation(UPLOAD_FILE);
      const [createRecording, { error }] = useMutation(CREATE_RECORDING);

      const startRecording = async () => {
        setRecordStatus(!canRecord);
        try {
          await Audio.requestPermissionsAsync();
          await Audio.setAudioModeAsync({
            allowsRecordingIOS: true,
            playsInSilentModeIOS: true,
          });
          console.log("Starting recording...");
          const recording = new Audio.Recording();
          await recording.prepareToRecordAsync(
            Audio.RECORDING_OPTIONS_PRESET_HIGH_QUALITY
          );
          await recording.startAsync();
          setRecord(recording);
        } catch (err) {
          console.error("Failed to start recording", err);
        }
      };

      const submitRecording = async () => {

        await record.stopAndUnloadAsync();
        const uri = record.getURI();
        const Recording = await FileSystem.readAsStringAsync(uri, {
          encoding: FileSystem.EncodingType.UTF8,
        });

        try {
          await uploadFile({
            variables: {
              file: Recording,
            },
          });
          const userId = await getItem(USER_ID_KEY);
          await createRecording({
            variables: {
              name,
              fileId: data.id,
              description,
              userId,
            },
          });
          navigation.navigate("home");
        } catch (e) {
          console.log(e);
        } finally {
          setRecordStatus(!canRecord);
        }
      };

      return (
        <View style={styles.root}>
          <View style={styles.alignCenter}>
            <Text> {error} </Text>
            <View style={styles.inputContainer}>
              <Text style={styles.title}> Recording Name </Text>
              <View style={styles.input}>
                <TextInput
                  value={name}
                  placeholder="A name for the recording"
                  onChangeText={(value) => setName(value)}
                />
              </View>
            </View>
            <View style={styles.inputContainer}>
              <Text style={styles.title}> Recording Description </Text>
              <View style={styles.input}>
                <TextInput
                  value={description}
                  placeholder="A description of your recording"
                  onChangeText={(value) => setDescription(value)}
                />
              </View>
            </View>
            <View style={{ marginVertical: 10 }} />
            <TouchableOpacity
              disabled={!name.length > 2 && description.length > 2}
              onPress={() => {
                if (!canRecord) {
                  startRecording();
                } else {
                  submitRecording();
                }
              }}
              style={[
                styles.button,
                styles.alignCenter,
                {
                  backgroundColor: canRecord ? "red" : "#8c4bff",
                  borderColor: canRecord ? "red" : "#8c4bff",
                },
              ]}
            >
              {!canRecord ? (
                <Text style={{ color: "#fff", fontSize: 15 }}>
                  Save and Start Recording
                </Text>
              ) : (
                <Text style={{ color: "#fff", fontSize: 15 }}>Stop Recording</Text>
              )}
            </TouchableOpacity>
            <View style={[styles.iconContainer, styles.alignCenter]}>
              {canRecord ? (
                <View>
                  <Icon name={"ios-mic-outline"} size={85} />
                </View>
              ) : (
                <Icon
                  name={"md-mic-off-circle-outline"}
                  color={"#c0c0c0"}
                  size={85}
                />
              )}
            </View>
          </View>
        </View>
      );
    };

    const styles = StyleSheet.create({
      title: {
        fontSize: 15,
        paddingBottom: 8,
      },
      root: {
        backgroundColor: "#fff",
        height,
      },
      input: {
        backgroundColor: "#fff",
        paddingLeft: 10,
        borderWidth: 0.7,
        borderColor: "#c0c0c0",
        height: 50,
        borderRadius: 4,
        marginBottom: 5,
        width: width - 25,
      },
      inputContainer: {
        marginTop: 10,
        width: width - 25,
      },
      alignCenter: {
        display: "flex",
        justifyContent: "center",
        alignItems: "center",
      },
      button: {
        borderColor: "#8c4bff",
        backgroundColor: "#8c4bff",
        height: 47,
        width: width - 25,
        borderWidth: 1,
        color: "#fff",
        fontSize: 16,
        borderRadius: 5,
      },
      iconContainer: {
        height: 350,
      },
    });

    export default CreateRecording;
The CreateRecording component in the code block above provides a user with the functionality to record a voice input, provide a name and description detail, then submit the recording to the Strapi GraphQL API.
This is made possible through the use of three functions within the component that is explained below;
- startRecording —
This function is executed at the tap of the Save and Start Recording button, and it uses the expo-av library in a try/catch block to record a user's voice input.
The requestPermissionAsync method is invoked to request the User's permission to use the device audio API. After which, a recording session is started and stored in the component's local state.
- submitRecording —
This function is executed at the tap of the Stop Recording button, which is shown when the recording session is active. This function stops the active recording session and uploads the recording to the Strapi GraphQL API.
First, the stopAndUnloadAsync method in the record class is invoked to stop the active recording and save it to the device's local storage in a WAV file. The file path to the recording file is gotten using the getURI method and stored in the uri variable for later use.
Next, the recording file is retrieved in a UTF8 encoding format and stored in a variable. The User's recording stored in the recordingFile variable is then uploaded to the Strapi API in a GraphQL mutation containing the file.
After the file has been uploaded, another GraphQL mutation containing the recording name, description, userId, and fileId is executed. The fileId used in this mutation is gotten from the response object returned after the uploadFile mutation was executed successfully. It relates the voice-recording file within Strapi to the recording details created by a user.
The image below shows the Home screen within the application running on an Android emulator;

After a recording has been taken and two GraphQL mutations within the CreateRecording component have been executed successfully, the User is programmatically navigated to the Home screen where the recording created is listed out.
The image below shows the recording created in the previous image listed out;

With the application fully functional, you can create more recordings and show them on the Home screen.
Going through the Strapi web admin dashboard, you will find the recordings in the voice-recording collection type and the uploaded files in the Media-library.
Conclusion
Huge congrats to you.
By going through the various steps within this article, you have built a fully functional mobile application that allows users to create an account and record their voice input.
First, we began the article by creating a new Strapi application. Then we built the data model for the application using the Content builder from the new application's admin dashboard. After that, you enabled GraphQL support for the API.
Next, we bootstrapped a React Native application using the Expo CLI then we connected the mobile application to the Strapi GraphQL API. Lastly, we ended the article by building the application screens and making GraphQL queries and mutations from the components.
The source code for the React Native application has been pushed to this GitHub repository. Feel free to clone it and use it as a boilerplate when building your mobile application using Strapi.

Top comments (0)