
Outline
- Introduction
- Goals
- Prerequisites
- Create the Packages collection
- Build the React server
- Execute with Deno
- Deploy to Deno Deploy
- Conclusion
Plenty of articles show you how to use Strapi with various frameworks, such as Gatsby, Next.js, and Nuxt.js, but these frameworks require Node.js for the backend.
This article will show you how to replace Node.js with Deno, a new JavaScript and TypeScript runtime by the original creator of Node.js, Ryan Dahl. Deno introduces plenty of new features not available in Node, but the biggest is out-of-the-box support for TypeScript and ES Modules.
Thanks to ES Modules (or ESM), Deno doesn't need a package manager. Instead of a huge node_modules directory in every project, Deno will download dependencies from the internet and cache them for future use.
Deno also comes with a free (at the time of writing) serverless service: Deno Deploy. Described as "A Globally Distributed JavaScript VM," it works similarly to Amazon Lambda or Azure Functions, but with significantly less setup involved. Deno Deploy comes with a tool for local development, which we will be using as our HTTP server.
You will have a static server-side React web app in less than 100 lines of code.
Goals
By the time this is over, you will have created a simple web app that fulfills the following requirements:
- Renders and displays a simple React component in a web browser.
- No Node.js; only Deno is needed. (disclaimer: Node is still required for Strapi)
- Only server-side rendering --- We only send static HTML and nothing more.
- It should be written in TypeScript and should be deployable using Deno Deploy.
- Whenever a request is sent to the Deno server, it should fetch the latest data from a Strapi server and render it before sending it back to the client.
Prerequisites
Before you can start, you should have a basic understanding of the following.
- Basic knowledge of JavaScript/TypeScript
- Basic knowledge of ReactJS.
- Basic understanding of Strapi - get started here.
The Strapi command-line requires Node.js, so that will need to be installed first. After that, it's time to install Deno:
curl -fsSL https://deno.land/x/install/install.sh | sh

# OR

iwr https://deno.land/x/install/install.ps1 -useb | iex
Deno should now be ready to use on your machine. Now the only thing left to install is deployctl.
deno install --allow-read --allow-write --allow-env --allow-net --allow-run --no-check -r -f https://deno.land/x/deploy@0.3.0/deployctl.ts
Create the Packages collection
The first thing we need to do is to create a new Strapi app. If you already have a Strapi server you'd like to use for this tutorial, then you can skip the next part. Otherwise, in the root of your project folder, run this:
npx create-strapi-app packages --quickstart
The command above will scaffold a new Strapi project in the directory you specified. Thanks to the fine people at Strapi, there should now be a Strapi server running at http://localhost:1337. Before you go any further, make sure you create a new admin user at http://localhost:1337/admin.
All that's left is to create a new collection, populate it, and set the permissions.
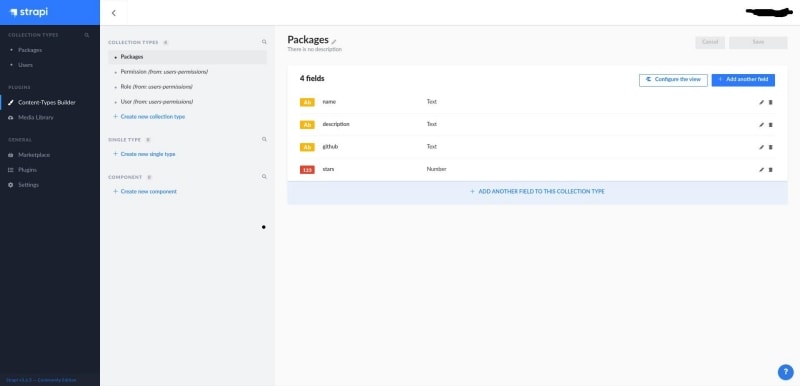
First, go to Content-Types Builder and create a new collection type. Name it packages and then add the following data:

Navigate to the new Packages collection and add the following test data.


Now go to Settings, Users & Permissions Plugin, Roles, and then click Public. Enable the find and findOne permissions.
Congratulations! You have completed the Strapi part of this tutorial. Now you are ready to start the Deno server.
Building the React server
Create a new file main.tsx and paste the following:
/// <reference path="https://raw.githubusercontent.com/denoland/deployctl/main/types/deploy.fetchevent.d.ts" />
/// <reference path="https://raw.githubusercontent.com/denoland/deployctl/main/types/deploy.window.d.ts" />

import * as React from "https://esm.sh/react@17.0.2";
import * as ReactDOMServer from "https://esm.sh/react-dom@17.0.2/server";

import { createElement as h } from "https://esm.sh/react@17.0.2";

// @ts-ignore Because VSCode occasionally complains that Deno is not defined.
const STRAPI_API_URL = Deno.env.get("STRAPI_API_URL") ||
  "http://localhost:1337";

interface Package {
  name: string;
  description: string;
  github: string;
  stars: number;
}

interface Props {
  packages: Package[];
}

function App({ packages }: Props) {
  return (
    <html lang="en">
      <head>
        <meta charSet="utf-8" />
        <link
          href="https://cdn.jsdelivr.net/npm/bootstrap@5.0.2/dist/css/bootstrap.min.css"
          rel="stylesheet"
          integrity="sha384-EVSTQN3/azprG1Anm3QDgpJLIm9Nao0Yz1ztcQTwFspd3yD65VohhpuuCOmLASjC"
          crossOrigin="anonymous"
        />
        <title>Hello from JSX</title>
      </head>
      <body>
        <div className="container">
          <h1>Hello, World!</h1>
          <table className="table">
            <thead>
              <tr>
                <th scope="col">Name</th>
                <th scope="col">Description</th>
                <th scope="col">Stars</th>
                <th scope="col">URL</th>
              </tr>
            </thead>
            <tbody>
              {packages.map((pkg: Package) => (
                <tr>
                  <th scope="row">{pkg.name}</th>
                  <td>{pkg.description}</td>
                  <td>{pkg.stars}</td>
                  <td>
                    <a href={pkg.github}>{pkg.github}</a>
                  </td>
                </tr>
              ))}
            </tbody>
          </table>
        </div>
      </body>
    </html>
  );
}

async function getData(path: string) {
  const url = `${STRAPI_API_URL}${path}`;
  const response = await fetch(url, {
    headers: {
      "Content-Type": "application/json",
    },
  });
  return response.json();
}

addEventListener("fetch", async (event: FetchEvent) => {
  // Fetch data.
  const packages = await getData("/packages");

  // Render React components to a string.
  const str = ReactDOMServer.renderToString(<App packages={packages} />);

  // Prepend the DOCTYPE for better compatibility.
  const body = `<!DOCTYPE html>${str}`;

  const response = new Response(body, {
    headers: { "content-type": "text/html; charset=utf-8" },
  });

  event.respondWith(response);
});
Let's walk through this step-by-step.
/// <reference path="https://raw.githubusercontent.com/denoland/deployctl/main/types/deploy.fetchevent.d.ts" />
/// <reference path="https://raw.githubusercontent.com/denoland/deployctl/main/types/deploy.window.d.ts" />

import * as React from "https://esm.sh/react@17.0.2";
import * as ReactDOMServer from "https://esm.sh/react-dom@17.0.2/server";

import { createElement as h } from "https://esm.sh/react@17.0.2";
First, notice that we are importing from URLs. That's the magic of Deno. We don't need to install anything; dependencies are downloaded and cached as needed.
The two reference lines at the top are only to import types for TypeScript in IDEs like Visual Studio Code. You may remove them if you are using plain-old JavaScript.
We import createElement as h because Deno Deploy supports JSX, but only when the factory function is named h. Support for additional JSX factory functions is planned, but as of August 2021, only the h factory from Preact is available.
// @ts-ignore Because VSCode occasionally complains that Deno is not defined.
const STRAPI_API_URL = Deno.env.get("STRAPI_API_URL") ||
  "http://localhost:1337";
Instead of hardcoding the Strapi URL, we first try to use the value of the environment variable STRAPI_API_URL. If that isn't available, we use the default fallback of http://localhost:1337. This will let us use Deno Deploy without any changes to the code.
You can delete the ts-ignore line if you want. It's there because the Deno plugin for Visual Studio Code sometimes doesn't detect Deno scripts.
function App({ packages }: Props) {
  return (
    <html lang="en">
      ...
    </html>
  );
}
This code is a standard ReactJS component, just like anything you'd find in a regular React web application. The only difference is that everything will be rendered on the server and sent to the frontend as static HTML.
We include Bootstrap to make everything look nicer. It isn't strictly necessary, but it helps. Finally, the packages prop is an array of packages from the Packages collection we created earlier.
addEventListener("fetch", async (event: FetchEvent) => {
  // Fetch data.
  const packages = await getData("/packages");

  // Render React components to a string.
  const str = ReactDOMServer.renderToString(<App packages={packages} />);

  // Prepend the DOCTYPE for better compatibility.
  const body = `<!DOCTYPE html>${str}`;

  const response = new Response(body, {
    headers: { "content-type": "text/html; charset=utf-8" },
  });

  event.respondWith(response);
});
Here is where things get more interesting. The addEventListener is the cornerstone of Deno Deploy. Deno Deploy is a serverless HTTP server that translates HTTP requests into FetchEvents and forwards them to the listener function.
We fetch the list of packages from Strapi using getData. After that, we pass the data as a prop to the <App /> component and render it using ReactDOMServer.renderToString. The result is a static HTML string. From there, we create a Response object using the HTML string as the body.
The event.respondWith(response) sends the response back to the Deno Deploy server, which sends it to the web browser.
Now that you understand how our Deno app works, it's time to execute it.
Execute with Deno
Before we upload our script to Deno Deploy, let's make sure it works first. To do that, we use deployctl, the official tool for running Deno Deploy scripts locally.
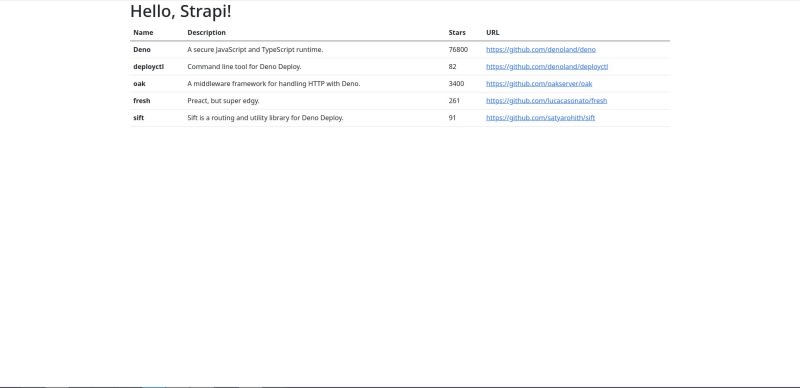
If you aren't running the Strapi server from earlier, go to the packages folder created by create-strapi-app and run npm run develop. After that, open a new window and run deployctl run --libs=ns --watch main.tsx. Then open http://0.0.0.0:8080 in your web browser.** The result should look something like this:
Deploy to Deno Deploy
Deno Deploy is a serverless framework similar to AWS Lambda or Azure Functions.
Before deploying to Deno Deploy, you must have already deployed your Strapi server, which is not covered in this tutorial.
First, create a new GitHub gist and paste the content of main.tsx. Make sure you remember the raw URL, which should look something like https://gist.githubusercontent.com/Symbitic/aee01de4d0ef9b2e44b550b59a132ed8/raw/2ca0b1ba13bdaca426b010f653a987bb030ecb4c/strapi-demo.tsx.
Deno Deploy supports linking to GitHub projects, but we can use a GitHub gist because our example is simple.

First, go to https://deno.com/deploy and create a new account. After that, please create a new project and give it a name. We use strapi-demo-1 as the name for our demo, but you will not be able to use that since it has already been reserved.

Your first step is to go to Settings, then click Environment Variables. Add STRAPI_API_URL as an environment variable and point it toward your Strapi server. After that, head back to the project page and click Deploy from the URL. Add your gist URL from earlier and deploy it.
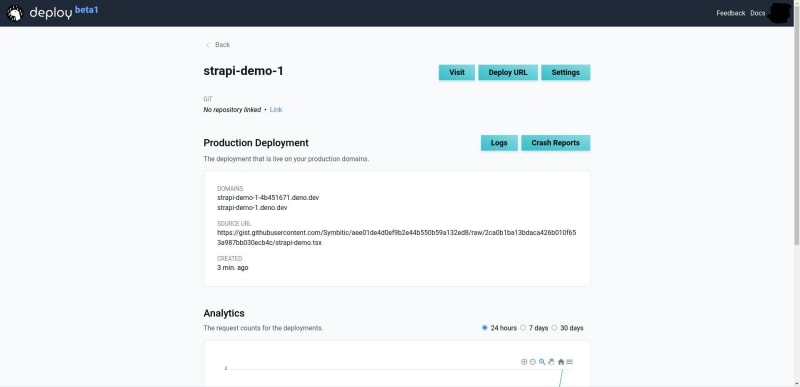
That's it. That's all there is to server-side rendering with Deno and Deno Deploy! Go to https://strapi-demo-1.deno.dev/, and you'll see it looks just like it did when we ran it locally!
Conclusion
As we've seen, Deno is very powerful. First-class support for ES Modules makes managing dependencies a breeze, and Deno Deploy lets us get SSR up and running much more straightforward than any other platform.
Deno Deploy is still in beta at the time of writing (August 2021). Still, it is already a competent platform and a serious competitor to established players like AWS Lambda or Netlify. Although not every Deno API is supported in Deno Deploy, it is enough to cover 95% of most user's needs. WebSockets are supported, as is the WebCrypto API.
For this tutorial, we used entirely static server-side rendering. One limitation of this is that React hooks will not work correctly. Other projects attempt to solve this problem, such as nhttp, sift, and fresh. None were production-ready at the time this article was written. Check the Deno Deploy docs for the most up-to-date status on JSX support.
You can find the script we used on GitHub Gists.
Let me know if you have any suggestions for improvement, and feel free to share what you will be building with React and Deno.

Top comments (0)