
The greatest approach to improve your Web 3.0 skills is to use them to create coding projects. But building them from scratch and adding different libraries can be challenging. This is why in this article we will be creating a simple full-stack application using React, Hardhat, Solidity, Ethers.js, and Metamask which can be used as a boilerplate for our future projects.
Setting up Git
Git is a source code management technology used by DevOps. It is a free and open-source version control system that is used to efficiently manage small to extremely big projects. In this project, we will be using Git to track all the changes in the project.
Creating a Git repository
The first step would be creating a git repository. In this article, I will be using GitHub, but you can also use similar services like GitLab or Bitbucket.
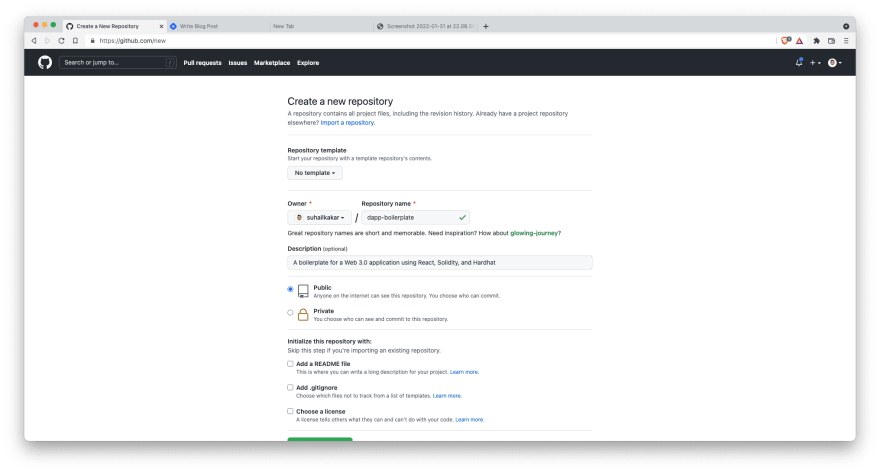
Head over to the GitHub website and click on the button Create a new repository. Enter the name of your project select the visibility (Public or Private) and click on the button Create repository.
Adding Git to the project
Now that we have created the git repository, we can add git to our project. Create a new folder on your computer and open it on a terminal.
Now go back to your browser and copy the code which is provided by default on your project repository in GitHub.
It should look similar to the below code
echo "# dapp-boilerplate" >> README.md
git init
git add README.md
git commit -m "first commit"
git branch -M main
git remote add origin https://github.com/suhailkakar/dapp-boilerplate.git
git push -u origin main
Paste it on your terminal and that is it, you have successfully added git to your project.
If you don't know what the above command means, check out my "Ultimate Guide to Git and GitHub"
Setting up the frontend using React
To get started, we can use the command below to create a simple react application.
npx create-react-app ./
Once it is completed, your folder structure should look like this.
.
├── README.md
├── README.old.md
├── package-lock.json
├── package.json
├── public
│   ├── favicon.ico
│   ├── index.html
│   ├── logo192.png
│   ├── logo512.png
│   ├── manifest.json
│   └── robots.txt
└── src
    ├── App.css
    ├── App.js
    ├── App.test.js
    ├── index.css
    ├── index.js
    ├── logo.svg
    ├── reportWebVitals.js
    └── setupTests.js
Now that our react application is created we can install some packages such as ethers.js, chai, and hardhat.
Run the below command to install those packages using yarn.
yarn add ethers hardhat @nomiclabs/hardhat-waffle ethereum-waffle chai @nomiclabs/hardhat-ethers
And that is it for now, we will come back to our react application to setup ethers.js.
Configuring an Ethereum Development Environment
Next, we need to setup the Ethereum Development Environment, we can simply use Hardhat for this.
Open up your terminal and run the command below.
npx hardhat
Once completed, you should see below new files/folders generated on your project directory.
test: This folder contains a test script written in Chai and it is used to test our smart contracthardhat.config.js: This file contains the configuration for Hardhatscripts: This folder contains a sample script to show to deploy a smart contractcontracts: This is the folder, which includes the files, in which we write our smart contract code.
Modifying the Hardhat configurations
Now, we need to do some modifications to our Hardhat configuration file. Open up hardhat.config.js in your code editor and update the module.exports object to the below code
module.exports = {
  solidity: "0.8.4",
  networks: {
    hardhat: {
      chainId: 1337,
    },
    paths: {
      artifacts: "./src/artifacts",
    },
  },
};
In the above code, we added the chainId as 1337, It is because of the Metamask configuration issue. We have also added path to our artifacts which are the compiled version of our contracts.
Smart contracts
Next, we have smart contracts. A smart contract is a decentralized program that responds to events by executing business logic. They are often written in Solidity.
Take a look at Greeter.sol file which is present in the contracts folder.
//SPDX-License-Identifier: Unlicense
pragma solidity ^0.8.0;

import "hardhat/console.sol";

contract Greeter {
    string private greeting;

    constructor(string memory _greeting) {
        console.log("Deploying a Greeter with greeting:", _greeting);
        greeting = _greeting;
    }

    function greet() public view returns (string memory) {
        return greeting;
    }

    function setGreeting(string memory _greeting) public {
        console.log("Changing greeting from '%s' to '%s'", greeting, _greeting);
        greeting = _greeting;
    }
}
Let's break the file into lines and go through each of them.
//SPDX-License-Identifier: Unlicense

pragma solidity ^0.8.0;
In the two above lines, we have the License and the version of Solidity that we are using for this smart contract
Next, we have a Greeter contract that contains the code for our smart contract.
contract Greeter {
...
...
}
In the below line, we are declaring a private string that is stored on the blockchain
string private greeting;
And at last, the functions inside our contract are used to set the value of greeting on the blockchain and retrieve them,
For now, we don't need to bring any changes to our smart contract and we can compile the same thing.
Compiling our smart contracts with Hardhat
Now that you have good knowledge about the sample smart contracts, let's go ahead and compile them.
You can compile it using the command below
npx hardhat compile
Once you run the command, you should see a new file in your src folder called artifacts.
Artifacts contain the compiled version of our smart contract in JSON format. This JSON file contains an array called abi. ABI or Application Binary Interface is what we need to connect our client (React app) with our compiled smart contract.
Deploying smart contract on a local blockchain
Now, we can deploy our smart contract on a local blockchain using Hardhat. To do that first, we need a local network. To start a local network, run the below code in your terminal.
npx hardhat node
This command also generates 20 test accounts and addresses, that can be used to deploy and test our smart contracts.
Don't close this terminal as we need it to deploy our smart contract
Now, simply rename sample-script.js to deploy.js in your scripts folder. And then run the below code to deploy your smart contract on a local network.
npx hardhat run scripts/deploy.js --network localhost
If it was successful, you should see an output similar to below code.
❯ npx hardhat run scripts/deploy.js --network localhost

Greeter deployed to: 0x5FbDB2315678afecb367f032d93F642f64180aa3
You can also check the logs from the terminal which you opened previously.
  Contract deployment: Greeter
  Contract address:    0x5fbdb2315678afecb367f032d93f642f64180aa3
  Transaction:         0x6d6833f7bd9ee1523fa8763120271f11b344d7d1df6ec301275277a33bc697ba
  From:                0xf39fd6e51aad88f6f4ce6ab8827279cfffb92266
  Value:               0 ETH
  Gas used:            497026 of 497026
  Block #1:            0x42c4d55bf844eba09393c9e3c0f26ca1a7c8de685d21219926c45389d044c316

  console.log:
    Deploying a Greeter with greeting: Hello, Hardhat!
In the above logs, we have the Contract address, Gas used, and the address of the one which deployed the smart contract.
The next step would be connecting Metamask to our Local Hardhat Blockchain Node
Connecting Metamask to Hardhat Blockchain Node
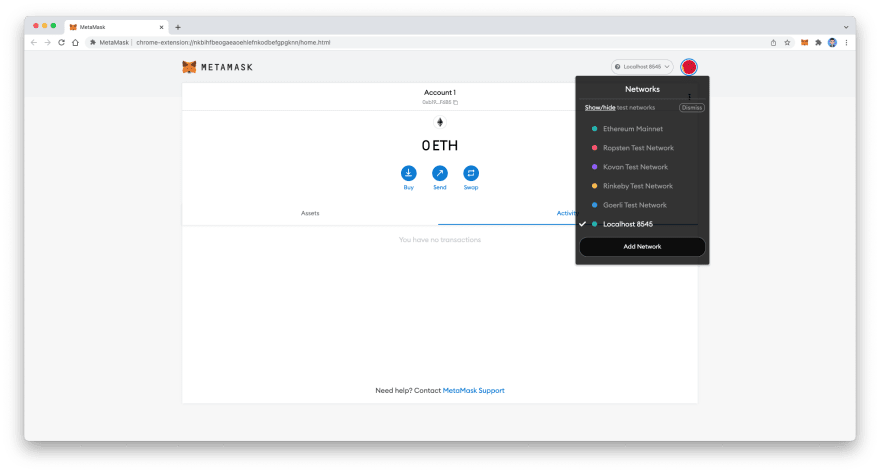
Download and install the Metamask extension in your browser and complete the onboarding process. Once it is completed click on networks and choose Localhost 8545
Once you did, click on the avatar image on Metmask and choose "Import Account".

Copy any private key from the account that was logged into your terminal and import it to Metamask.
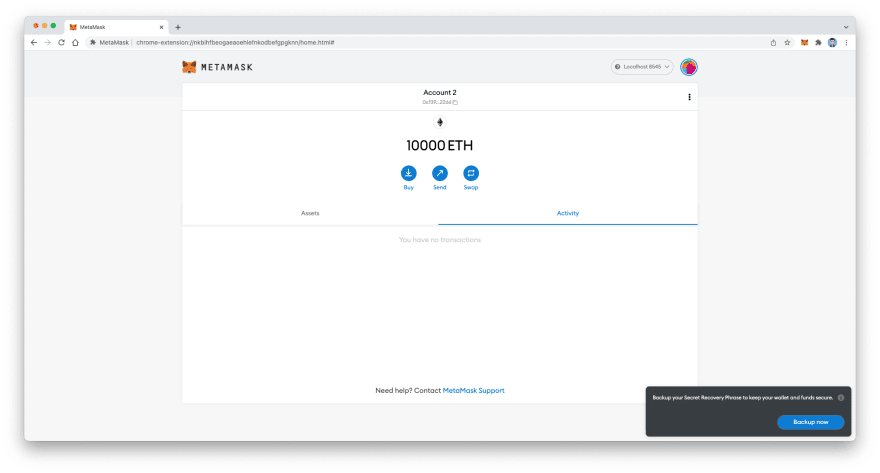
And, that is it, we have connected our local blockchain to Metamask.
Connecting the Front-end with Smart contract
Now we can start connecting the front-end of our application with smart contract.
In your main directory run the command below to start the react app.
npm start
Now we can start with allowing users to connect with Metamask in your react app.
Connect with Metamask
Replace the code in your app.js with the below code.
import React, { useEffect } from "react";

export default function App() {
  const connectWallet = async () => {
    try {
      const { ethereum } = window;

      if (!ethereum) {
        alert("Please install MetaMask!");
        return;
      }

      const accounts = await ethereum.request({
        method: "eth_requestAccounts",
      });

      console.log("Connected", accounts[0]);
    } catch (error) {
      console.log(error);
    }
  };

  useEffect(() => {
    connectWallet();
  }, []);

  return <div></div>;
}
In the above code, we have a useEffect which calls connectWallet function every time the app loads. And using ethereum from the window object we are connecting to our app with Metamask.
Save the file and reload your app, you should see a MetaMask popup asking you to connect Wallet.

Fetching greetings from smart contract
Now that we have connected Metamask we can work on fetching greetings from the contract.
But before that, we need to import ABI and ether.js in our app.js file.
After getting the account you can call a new function called and here is the code for it.
  const fetchGreetings = async () => {
    let contractAddress = "YOUR_CONTRACT_ADDRESS";
    const { ethereum } = window;

    if (!ethereum) {
      alert("Please install MetaMask!");
      return;
    }

    const provider = new ethers.providers.Web3Provider(ethereum);
    const signer = provider.getSigner();
    const contract = new ethers.Contract(
      contractAddress,
      Greeter.abi,
      provider
    );

    const greeting = await contract.greet();
    console.log(greeting);
  };
In the above code, we are checking if used have Metamask installed and then get its provider, and using ether.js we are reading the contract and fetching the greets.
Finally, this how your app.js should look like.
import React, { useEffect } from "react";
import Greeter from "./artifacts/contracts/Greeter.sol/Greeter.json";
import { ethers } from "ethers";

export default function App() {
  const connectWallet = async () => {
    try {
      const { ethereum } = window;

      if (!ethereum) {
        alert("Please install MetaMask!");
        return;
      }

      const accounts = await ethereum.request({
        method: "eth_requestAccounts",
      });

      console.log("Connected", accounts[0]);
      fetchGreetings();
    } catch (error) {
      console.log(error);
    }
  };

  const fetchGreetings = async () => {
    let contractAddress = "YOUR_CONTRACT_ADDRESS";
    const { ethereum } = window;

    if (!ethereum) {
      alert("Please install MetaMask!");
      return;
    }

    const provider = new ethers.providers.Web3Provider(ethereum);
    const signer = provider.getSigner();
    const contract = new ethers.Contract(
      contractAddress,
      Greeter.abi,
      provider
    );

    const greeting = await contract.greet();
    console.log(greeting);
  };

  useEffect(() => {
    connectWallet();
  }, []);

  return <div></div>;
}
The process of sending greeting is also similar, you just need to call that function using ether.js
And that is it. You can also push your final code to GitHub and you have a basic full-stack application that can be used as a boilerplate for your other projects.
Conclusion
That is it for this article. I hope you found this article useful, if you need any help please let me know in the comment section.
Let's connect on Twitter and LinkedIn.
👋 Thanks for reading, See you next time

Top comments (0)