
Amazon Web Services provide us amazing solutions which is now widely used by all small and large industries , helping them manage and easily access their resources with flexible costing. AWS provides "Easy to use" , "Flexible" , "Cost effective" , "Reliable" , "Scalable and High Performance" and "Secure" solutions when it comes to virtualizing your resources.
The official documentation of AWS security speaks "The AWS Cloud enables a shared responsibility model. While AWS manages security of the cloud, you are responsible for security in the cloud."
Most of the AWS guides will give a detailed description about all services of AWS and benefits of it. What people rarely speak about is how can we secure our AWS account? Here, I have tried to document some simple yet very important techniques to secure your AWS account. Let's begin.
Table of Contents
1.Root user vs IAM user
2.Hardening account
Root user vs IAM user

First of all on logging into your account you will find the two ways to login ~ 1. Root user and 2. IAM user. Usually when you create your account for the first time , we always login through the root user. But most of the times, you will be recommended by people to use the IAM user to login. What exactly is the difference between them?
1. Root user - Root user is the main account user who has access to all the resources in the AWS account. When we first create our AWS account we have a Root user only. We can't restrict access of the resources of a Root user by adding any IAM roles or policies (discussed below). Since, limiting permissions of a root user is difficult (only done by Service Control Policies of AWS), using root user as the only account for AWS services becomes vulnerable to "brute force attacks"(These attacks are done by excessive forceful attempts to try and decode your root password by hackers leading them into your root account and taking advantage of root user privileges).Therefore it is always encouraged to define IAM user with Administrative Access and use it to access all AWS services instead of using Root account.
2. IAM user - IAM stands for Identity and AWS Management. The main goal of IAM is to provide Right access to Right people. Among all services of IAM , one of the service is of IAM users. IAM users are defined by the Root User or by IAM administrator. An IAM administrator is the IAM user created by Root user which has the access to all the services of AWS account, except some specific tasks of Root user like ~
- Closing the account
- Changing the account settings
- Changing support plan
- Adding IAM users to billing section and others( Refer this AWS official page )
Logging into the account using as IAM administrator is always recommended. Here is how you can create an IAM administrator.
Creating your first IAM administrator :
Login as Root user by giving your credentials >> Select IAM services >> Under IAM options choose Users >> Now click on Add users

Now give a name to your user and add the access (refer the picture below) >> Click on Next Permission >> Select Attach an existing policy >> Select AdministratorAccess >> Click on Next and finally click create a user(adding tags is optional) >> Finally on successfully creating the user download the csv file.


Now, let's try to login as admin via the console.
Select IAM user to login >> Provide your Account ID(present in the csv file just downloaded or you can find it at top right corner of your root account) >> Now provide the name and password >> Now you have to set a new password >> And, you are logged in as the Admin.

Creating IAM users as an admin :
As an admin, suppose you have employees joining your company and you have to provide different employees with different resources of AWS. Some only need to use EC2 instances, whereas some only work with EBS. To provide controlled access to your AWS account, you need to create different IAM users and attach only required Policies and share this IAM details with your employees. Creation of users is in the same way as shown above. There are varieties of Existing Policies which you can add based on the access to resources you want to provide. Also, you can create your own policy by clicking on Create new policy in the Set permission page. Your new policy can be in a JSON file.
Creating IAM user groups :
Suppose you have large number of employees in your company. You have to provide each of your employee a controlled access to only use EC2 instances. You start providing each of your employee same access and attach them to the same policies. But why do such a long process when all you need to attach them is to the same policy. Instead of attaching policies to employees one by one, create a User Group. A User group helps to have common policies and you can just add your employees to the group. When any employee leaves, just detach them from the group instead of finding which user to delete.
Here is how you can create a User group:
Find the option of User Groups under IAM services >> Click on Create Group >> Give a name to your group >> Add if any existing user (this is optional) >> Now attach some Policies (this is also optional) >> Now click, Create group.
Now onwards while creating an user instead of attaching individual policies , directly attach them to a User group.

IAM roles :
Another very interesting service of IAM is the IAM roles. Main use of IAM roles in security for the AWS services is to build a safe pipeline between AWS resources:
Create a direct pipeline between EC2 instances and AWS services : Suppose your company requires you to set a connection between EC2 instance and S3 bucket. So, you start by creating a IAM user and attach it with the Existing Policy of AWS S3 Full Access. Now you share the credentials with access key and secret key, and the next day you find one of your employee has accessed your S3 bucket using the credentials via his own laptop!! So, sharing the credentials is not a very secured option to access AWS services like S3 bucket which has important data. In such a case IAM roles come into picture. IAM roles help to create a direct pipeline between both the services without the need to share the credentials and thus a person cannot access the S3 service from his own laptop. This a safer and good approach.
Here is how you can create an IAM role:
Select IAM role under the IAM services >> Now Create a role >> Select Entity as AWS services and choose EC2 >> Now attach S3 full access policy >> Provide a name >> Create role


Now, select your EC2 instance >> Go to Actions >> Security >> Modify IAM role >> Attach the IAM role created

Finally you can access your S3 bucket without any access ID or secret key.
Connect to the EC2 via SSH command providing the Key file >> Directly list out the S3 contents (Syntax - aws s3 ls) >> List out the contents inside S3 (Syntax aws s3 ls s3://s3_bucket_name)

Harden your account
We have learnt how to create an IAM admin account and IAM users with controlled access. Now, we can login as the IAM user and use the AWS resources specific to our needs. However, we still need to protect our account from any kind of security breach. Here are few ways suggested by AWS in which you can Harden your account as a Root user, IAM Admin or IAM User:
(All of the steps below can be implemented by going to IAM Dashboard >> Add MFA)

Creating a strong password :
AWS always encourages to create a strong password. You can click here to generate a Strong password
After creating a strong password, click on the password option and then click on the link given to change the password to a Strong password.

Add a Multi Factor Authentication :
There are three ways provided for Multi Factor Authentication (MFA) by AWS.
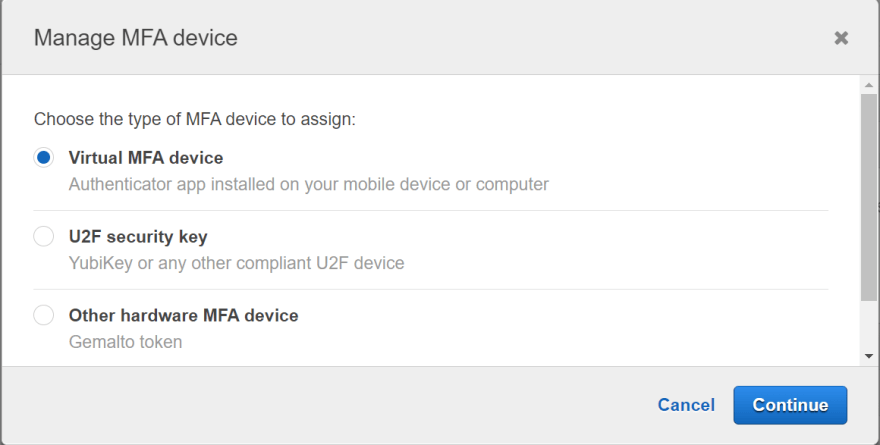
1.MFA virtual device : For adding a Virtual MFA device we will need a authenticator application. The most common one is the "Google authenticator".
Select Virtual MFA >> Click on Show the QR code >> The app will have an option to scan the QR code >> Now a code will be shown >> Write it to the code 1 on your console >> After few seconds next code will be shown >> Assign MFA.
From the next time you login , apart from the password the MFA codes will be asked which will be shown in your app.
----Always remember to take a Screen shot of your QR code , incase your app or phone gets damaged this will help----

2.U2F security key :

This is an U2F security key. It is a kind of USB device. You can add it as an authentication device and while logging in to your account, apart from entering the password, you will need to plug this in.
2.Gemalto token :

Gemalto token is the hardware authenticator in which the codes are shown in the Gemalto token screen. While logging into the account we need to provide these codes.

Top comments (0)