
Validation is very important for any application to get reliable data from the user on any data entry form. The Blazor framework has built-in form validation support which uses data annotations. It also supports the very popular third-party FluentValidation library to solve complex validation requirements.
The Syncfusion Blazor component library offers over 70 responsive and lightweight UI controls for building modern web apps.
In this blog post, we will see how to create an edit form to get employee details with Syncfusion Blazor UI components and apply complex validation using the FluentValidation library.
Prerequisites
Setup Blazor WebAssembly application
First, create a Blazor WebAssembly app and install the following required packages:
- FluentValidation : Install it using the Visual Studio package manager or use the following dotnet CLI command.
[CLI]
dotnet add package FluentValidation
- Syncfusion Blazor packages : Install them using the Visual Studio package manager or use the following dotnet CLI command.
[CLI]
dotnet add package Syncfusion.Blazor
Then, register the Syncfusion Blazor Service and reference the scripts and stylesheets.
Creating a model
Let’s create a new model class file inside the Model folder with the name Employee.
In this class file, add the class definitions for the Countries and Cities classes with the required properties and methods to generate the appropriate data for the dropdown list.
Refer to the following code example.
namespace SyncFluentValidation.Model
{
    public class Employee
    {
        public string FirstName { get; set; }
        public string LastName { get; set; }
        public DateTime? DateOfBirth { get; set; }
        public string Gender { get; set; }
        public decimal? Experience { get; set; }
        public string EmailAddress { get; set; }
        public PermanentAddress PermanentAddress { get; } = new PermanentAddress();
    }
    public class PermanentAddress
    {
        public string AddressLine1 { get; set; }
        public string Country { get; set; }
        public string City { get; set; }
        public string Postcode { get; set; }
    }

    public class Countries
    {
        public string Name { get; set; }
        public string Code { get; set; }

        public List<Countries> GetCountries()
        {
            List<Countries> Country = new List<Countries>
            {
                new Countries() { Name = "Australia", Code = "AU" },
                new Countries() { Name = "United Kingdom", Code = "UK" },
                new Countries() { Name = "United States", Code = "US" },
            };
            return Country;
        }
    }
    public class Cities
    {
        public string Name { get; set; }
        public string Code { get; set; }
        public string CountryCode { get; set; }
        public List<Cities> GetCities()
        {
            List<Cities> CityName = new List<Cities>
            {
                new Cities() { Name = "New York", CountryCode = "US", Code="US-101" },
                new Cities() { Name = "Virginia", CountryCode = "US", Code="US-102" },
                new Cities() { Name = "Washington", CountryCode = "US", Code="US-103" },
                new Cities() { Name = "Victoria", CountryCode = "AU", Code="AU-101" },
                new Cities() { Name = "Tasmania", CountryCode = "AU", Code="AU-102" },
                new Cities() { Name = "Queensland", CountryCode = "AU", Code="AU-103" },
                new Cities() { Name = "London", CountryCode = "UK", Code="UK-101" },
                new Cities() { Name = "Manchester", CountryCode = "UK", Code="UK-102" },
                new Cities() { Name = "Ashford", CountryCode = "UK", Code="UK-103" }
            };
            return CityName;
        }
    }
}
Binding the form validation component
Now, bind the FluentValidator component to replace the default data annotation validation in the Blazor framework. To do so, create the extension methods for EditContext to call the validation logic for FluentValidation.
Validate the edit form UI components using the EditContext events, namely OnValidationRequested for full model validation on form submission and OnFieldChanged for individual field validation on value changes.
Refer to the following code example.
public class FluentValidator<TValidator> : ComponentBase where TValidator : IValidator, new()
{
   private readonly static char[] separators = new[] { '.', '[' };
   private TValidator validator;

   [CascadingParameter] private EditContext EditContext { get; set; }

   protected override void OnInitialized()
   {
       validator = new TValidator();
       var messages = new ValidationMessageStore(EditContext);

       // Revalidate when any field changes, or if the entire form requests validation
       // (e.g., on submit)

       EditContext.OnFieldChanged += (sender, eventArgs)
          => ValidateModel((EditContext)sender, messages);

       EditContext.OnValidationRequested += (sender, eventArgs)
          => ValidateModel((EditContext)sender, messages);
   }

   private void ValidateModel(EditContext editContext, ValidationMessageStore messages)
   {
       var context = new ValidationContext<object>(editContext.Model);
       var validationResult = validator.Validate(context);
       messages.Clear();
       foreach (var error in validationResult.Errors)
       {
           var fieldIdentifier = ToFieldIdentifier(editContext, error.PropertyName);
           messages.Add(fieldIdentifier, error.ErrorMessage);
       }
       editContext.NotifyValidationStateChanged();
   }

   private static FieldIdentifier ToFieldIdentifier(EditContext editContext, string propertyPath)
   {
       // This method parses property paths like 'SomeProp.MyCollection[123].ChildProp'
       // and returns a FieldIdentifier which is an (instance, propName) pair. For example,
       // it would return the pair (SomeProp.MyCollection[123], "ChildProp"). It traverses
       // as far into the propertyPath as it can go until it finds any null instance.

       var obj = editContext.Model;

       while (true)
       {
          var nextTokenEnd = propertyPath.IndexOfAny(separators);
          if (nextTokenEnd < 0)
          {
              return new FieldIdentifier(obj, propertyPath);
          }

          var nextToken = propertyPath.Substring(0, nextTokenEnd);
          propertyPath = propertyPath.Substring(nextTokenEnd + 1);

          object newObj;
          if (nextToken.EndsWith("]"))
          {
              // It's an indexer
              // This code assumes C# conventions (one indexer named Item with one param)
              nextToken = nextToken.Substring(0, nextToken.Length - 1);
              var prop = obj.GetType().GetProperty("Item");
              var indexerType = prop.GetIndexParameters()[0].ParameterType;
              var indexerValue = Convert.ChangeType(nextToken, indexerType);
              newObj = prop.GetValue(obj, new object[] { indexerValue });
          }
          else
          {
              // It's a regular property
              var prop = obj.GetType().GetProperty(nextToken);
              if (prop == null)
              {
                 throw new InvalidOperationException($"Could not find property named {nextToken} on object of type {obj.GetType().FullName}.");
              }
              newObj = prop.GetValue(obj);
          }

          if (newObj == null)
          {
              // This is as far as we can go
              return new FieldIdentifier(obj, nextToken);
          }

          obj = newObj;
        }
    }
 }
Simple validation
FluentValidation works the same as data annotations in Blazor to validate each object. It supports built-in validator rules like NotEmpty, EmailAddress, NotNull, and more.
In the validator, we will create the validation rules for each field of the model object like in the following code example.
public class EmployeeValidator: AbstractValidator<Employee>
{
    public EmployeeValidator()
    {
       RuleFor(e => e.FirstName).NotEmpty();
       RuleFor(e => e.EmailAddress).EmailAddress().NotEmpty();
       RuleFor(e => e.DateOfBirth).NotEmpty();
    }
}
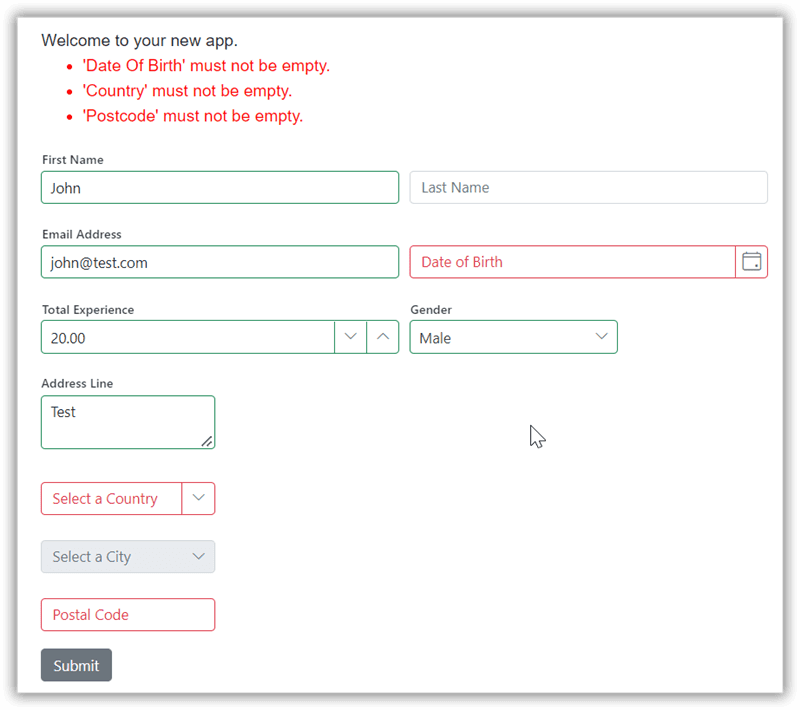
Now, create the EditForm with the Syncfusion Blazor components to design the UI for acquiring employee details like first name, last name, date of birth, and email address.
Refer to the following razor code.
<EditForm Model="EmployeeDetails" OnValidSubmit="SubmitValidForm">
    <div class="form-row">
        <div class="form-group col-md-6">
            <SfTextBox FloatLabelType="FloatLabelType.Auto" Placeholder="First Name" @bind-Value="EmployeeDetails.FirstName"></SfTextBox>
        </div>
        <div class="form-group col-md-6">
            <SfTextBox FloatLabelType="FloatLabelType.Auto" Placeholder="Last Name" @bind-Value="EmployeeDetails.LastName"></SfTextBox>
        </div>
    </div>
    <div class="form-row">
        <div class="form-group col-md-6">
            <SfTextBox FloatLabelType="FloatLabelType.Auto" Placeholder="Email Address" @bind-Value="EmployeeDetails.EmailAddress"></SfTextBox>
        </div>
        <div class="form-group col-md-6">
            <SfDatePicker TValue="DateTime?" FloatLabelType="FloatLabelType.Auto" Placeholder="Date of Birth" @bind-Value="EmployeeDetails.DateOfBirth"> </SfDatePicker>
        </div>
    </div>
    <p>
        <SfButton>Submit</SfButton>
    </p>
</EditForm>
Complex data validation
FluentValidation works well with complex data type validation (child object).
Refer to the following example. Here, the employee permanent address field has a complex validation type.
public class Employee
{
    public string FirstName { get; set; }
    public string LastName { get; set; }
    public DateTime? DateOfBirth { get; set; }
    public string Gender { get; set; }
    public decimal? Experience { get; set; }
    public string EmailAddress { get; set; }
    public PermanentAddress PermanentAddress { get; } = new PermanentAddress();
}
public class PermanentAddress
{
    public string AddressLine1 { get; set; }
    public string Country { get; set; }
    public string City { get; set; }
    public string Postcode { get; set; }
}
Next, create the validation rule for the complex objects. FluentValidation has a SetValidator API to reference the parent class to the child class.
public class EmployeeValidator: AbstractValidator<Employee>
{
   public EmployeeValidator()
   {
      RuleFor(e => e.FirstName).NotEmpty();
      RuleFor(e => e.EmailAddress).EmailAddress().NotEmpty();
      RuleFor(e => e.DateOfBirth).NotEmpty();
      RuleFor(e => e.PermanentAddress).SetValidator(new AddressValidator());
   }
}
public class AddressValidator : AbstractValidator<PermanentAddress>
{
   public AddressValidator()
   {
      RuleFor(address => address.AddressLine1).NotEmpty();
      RuleFor(address => address.Country).NotEmpty();
      RuleFor(address => address.Postcode).NotEmpty();
   }
}
Now, map the complex object model to the EditForm. Refer to the following code example.
<div class="form-row">
 <div class="form-group col-md-3">
    <SfTextBox Multiline="true" FloatLabelType="FloatLabelType.Auto" Placeholder="Address Line" @bind-Value="EmployeeDetails.PermanentAddress.AddressLine1">
    </SfTextBox>
    <SfComboBox TValue="string" TItem="Countries" FloatLabelType="FloatLabelType.Auto" Placeholder="Select a Country" @bind-Value="EmployeeDetails.PermanentAddress.Country" DataSource="@countries">
        <ComboBoxFieldSettings Text="Name" Value="Code"></ComboBoxFieldSettings>
        <ComboBoxEvents TValue="string" TItem="Countries" ValueChange="ChangeCountry"></ComboBoxEvents>
    </SfComboBox>
    <SfDropDownList Enabled="@enableCityDropDown" TValue="string" TItem="Cities" FloatLabelType="FloatLabelType.Auto" Placeholder="Select a City" @bind-Value="EmployeeDetails.PermanentAddress.City" Query="@CityQuery" DataSource="@cities">
        <DropDownListFieldSettings Text="Name" Value="Code"></DropDownListFieldSettings>
    </SfDropDownList>
    <SfTextBox FloatLabelType="FloatLabelType.Auto" Placeholder="Postal Code" @bind-Value="EmployeeDetails.PermanentAddress.Postcode"></SfTextBox>
 </div>
</div>
Conditional validation
Also, you can apply conditional validation using the FluentValidation library. A rule may define multiple fields with When and Unless methods to specify the conditions that decide when the rule should be executed.
In the following code example, check the condition based on the country code. If the country field has the value US , then set the postal code minimum length as 5 and maximum length as 10. Otherwise, set the maximum length as 7 for all other countries.
public AddressValidator()
{
    RuleFor(address => address.AddressLine1).NotEmpty();
    RuleFor(address => address.Country).NotEmpty();
    RuleFor(address => address.Postcode).NotEmpty();
    When(address => address.Country == "US", () => { RuleFor(address => address.Postcode).MinimumLength(5).MaximumLength(10); })
       .Otherwise(()=> {
           RuleFor(address => address.Postcode).MaximumLength(7);
       });
}
GitHub reference
Also, you can download the complete source code for this Blazor FluentValidation example on GitHub.
Conclusion
Thanks for reading! In this blog, we have seen how to create an edit form with Syncfusion Blazor UI components and easily apply complex validation with the FluentValidation library. Try out the steps in this blog post and leave your feedback or questions in the comments section below!
Try our Blazor components by downloading a free 30-day trial or downloading our NuGet package. Feel free to have a look at our online examples and documentation to explore other available features.
You can also contact us through our support forum, support portal, and feedback portal. We are always happy to assist you!

Top comments (1)
Hello
How can I increase the load speed of my web application using SyncFusion components in Blazer Web Assembly?
Is there a solution such as compression or other?