
In part 1 of this 4 part series, you'll learn to model and create content with TakeShape
This is part 1 of a 4 part series. In part 1, we’ll start by creating a new project in TakeShape, modeling some basic content types, and then filling them in. In part 2, we’ll use TakeShape’s static site generator to create the HTML and CSS for the final website. In part 3 (coming soon) we’ll deploy the static site to Netlify. In part 4 (coming soon) you’ll extend your skills even further and learn how to use TakeShape with Gatsby.js.
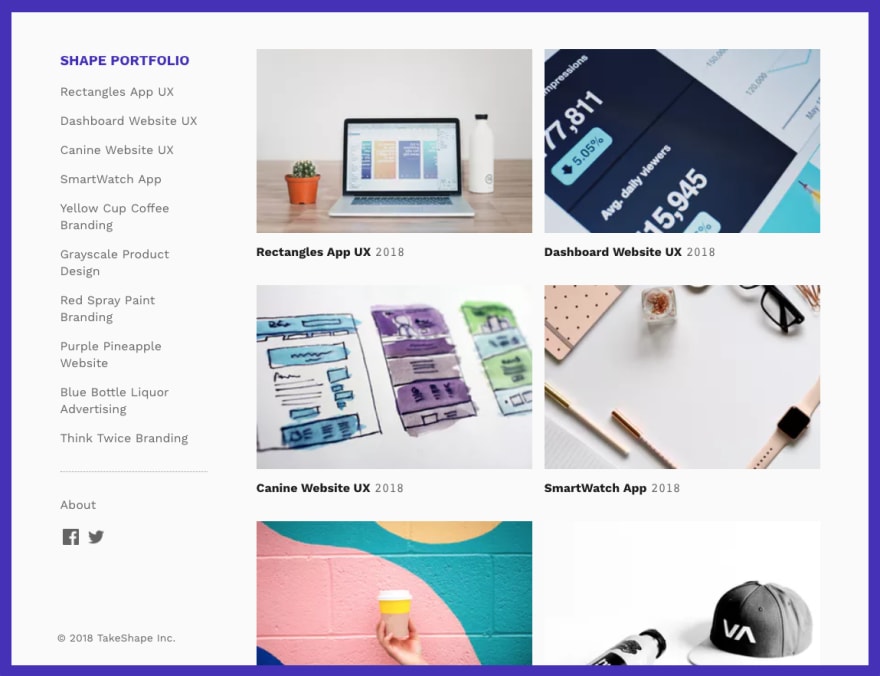
Every web designer needs to have a great portfolio. While services like Squarespace make it easy to build a website using a cookie cutter template, the results all start to look the same. Yet when you design websites for a living, your portfolio should do more than simply catalogue your projects; it should itself demonstrate your craft.
This is where TakeShape comes in! TakeShape is a flexible and easy to use tool that will let you focus on perfecting the unique design of your portfolio instead of wrestling with a server or debugging a database. With TakeShape you can perfect your portfolio in no time at all. Let's get started!
Sign Up For A TakeShape Account
If you don’t have a TakeShape account yet, start by signing up. If you already have an account, log in.
Create A New Blank TakeShape Project
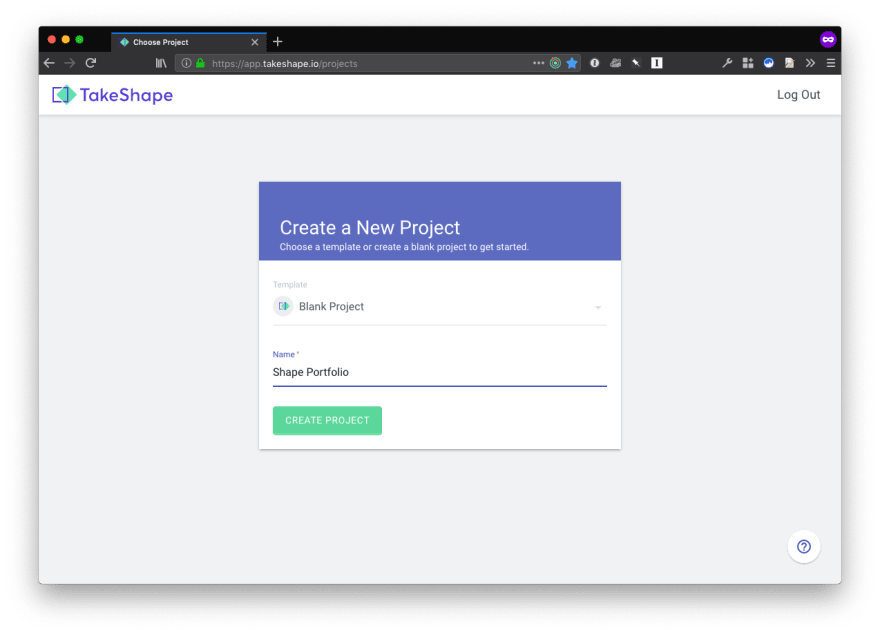
After you log in, create a new project using by selecting the Blank Project template. Then, give your new project a name.
Note If you want to skip ahead to Part 2 and begin building the static website, you can choose the “Shape Portfolio” template instead. We’ll keep going from the blank project so you can see how it’s built.
Create A Content Type
Since the main purpose of your portfolio is to show off your design projects, we’ll start by creating a content type for them.
Click the Add Content Type button in the bottom left of the sidebar, just above your username. You’ll be taken to the “New Content Type” screen. Every content type has a few basic fields you need to fill in before you can start modeling your content.

- Description is an optional, but extremely helpful, field—especially if your content type uses a generic name like “Project.”
- Finally, we’ll keep the Annotation as “Multiple” since we want to include multiple projects in our portfolio. (We’ll create content types with other kinds of Annotation later on.)
Now we can start modeling our Project content type in order to create the fields that every one of your projects will have. TakeShape’s drag-and-drop interface makes it easy to quickly add a variety of fields, creating a rich content type that’s exactly suited to your needs and can be updated if your needs change.
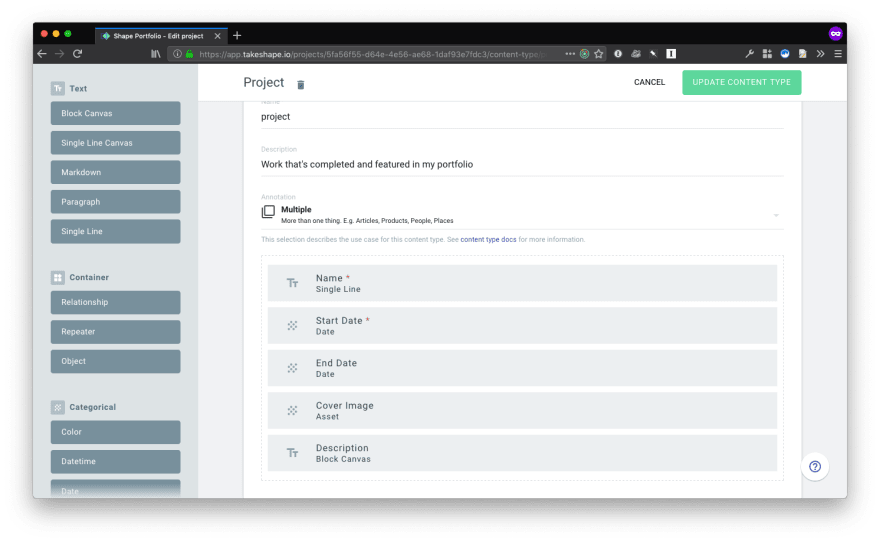
To begin, add the following widgets from the left sidebar by dragging them to the drop zone and configuring them as follows:
- Single Line: In the Title field enter “Name” and check the “Required” box. This needs to be a plain text string because later on you’ll use it to generate the URLs for each project page.
- Date: In the Title field enter “Start Date” and check the “Required” box. This will allow you to sort your projects chronologically.
- Date: In the Title field enter “End Date.” This is an optional field, which will indicate whether you have completed your project or not.
- Asset: In the Title field enter “Cover Image.” This is an optional field, which will visually represent your project in lists and on the project page.
- Block Canvas: In the Title field enter “Description.” This is an optional field, which will allow you to compose your project’s description with rich text and formatting.
Once you’ve finished adding these widgets, click the Create Content Type button to save your new type. After you save, you’ll be taken to the (empty) “Project” page.
Add The First Project To Your Portfolio
Now you can add your projects to your portfolio! Click the green New Project button at the top right.
You’ll see that all the widgets you dragged into the content type now appear as fields ready to accept information. You can give your project a Name, a Start Date, an (optional) End Date, a Cover Image, and a longer Description.
You’ll notice a few fields provide special interfaces for editing their information. For example, when setting the Start Date, a calendar-based date selector will appear. And when adding a Cover Image, the “Asset Library” will slide over from the right. You can upload new images by dragging-and-dropping them into this slide-over; then you can drag-and-drop these images from the “Asset Library” slide-over into the Cover Image field. Finally, the Description field has easy-to-use editing tools that appear when you need them, like when you highlight text or start a new paragraph.
When you’re done adding content, click the green Save button to save the content and return to the list of projects. If you click the down arrow [⌄] next to Save, you’ll see the option “Save and Continue,” which will save the content without returning to the list.
Create The About Page
Next, we want to create an “About” page so you can share a little more information about yourself.
Just like when you created the project content type, click the Add Content Type button in the bottom left of the sidebar, just above your username. Give the content type a Title (in this case, “About”) and you’ll see the Name field automatically populate. You can give it a Description if you’d like. Finally, make sure the Annotation is set to “Single” since you’ll only need one page of this type.
Now, you can add additional fields for your “About” page by dragging-and-dropping some widgets from the left sidebar:
- Block Canvas: In the Title field enter “Biography.” This is an optional field where you can share a little more information about who you are.
- Asset: In the Title field enter “Portrait.” This is an optional field, which you’ll use to save a flattering headshot.
-
Repeater: In the Title field enter “Social Profiles.” The Repeater widget is a little different from other widgets since you put other widgets inside of it. This will let you save several of your social profiles on your “About” page, all with identical fields. Drag-and-drop the following widgets into the Repeater’s drop zone:
- Single Line: In the Title field enter “Profile URL” and check the “Required” box.
- Single Line: In the Title field enter “Social Network” and check the “Required” box.
- Asset: In the Title field enter “Social Network Icon.” This will be an optional field.
When you’re all done, click the green Save Content Type button. You’ll then be taken to your blank “About” page.
Edit The About Page
Editing the content of the “About” page is the same as creating a “Project” page and filling in the fields. In Biography, tell the world your story with rich links, headings, images, and embeds. Upload your handsome mug to the Portrait field. And link to all your social networks using Social Profiles repeater. Since repeaters are new in this walkthrough, we’ll spend a moment on its unique interface.
New repeater entries can be created by clicking on the round plus [+] button. Repeater entries can be edited just like any other field and assets like the Social Network Icon field present the same interface as anywhere else. A special feature of repeater elements is that they can be rearranged, expanded and collapsed. At the top of the repeater field, you can expand-all or collapse-all of the entries with a single click. Play around with the repeater and get a feel for it; it’s a big part of what makes modeling content in TakeShape so powerful.

When you’re done editing the “About” page, click the green Save button. Since the “About” page is a single content type, you won’t be taken back to any kind of list after saving. You’ll stay right on the same content type since it’s the only one of its kind!
Create a Client Taxonomy Content Type
Your design portfolio will include work for a few different clients so you’ll want be able to organize your projects by client. To do this, create a Client Taxonomy content type. Taxonomies are a special Annotation in TakeShape that allows you to easily sort and filter collections.
To create this new content type, follow the same steps as before. Start by clicking the green Add Content Type button at the bottom of the left-hand sidebar. Give your new content type a Title (“Client”), let the Name auto-populate, and then give it a Description like “Clients commission the projects in my portfolio.” Then, change the Annotation from “Multiple” to “Taxonomy.” Finally, add three widgets to the content type:
- Single Line Text: In the Title field enter “Name” and check the “Required” box.
- Single Line Text: In the Title field enter “URL” and check the “Required” box.
- Asset: In the Title field enter “Logo.” This is an optional field.
Then, click the green Save Content Type button. You’ll be taken to an empty list of clients.
Add Clients
Editing a Taxonomy is the same as editing a Multiple content type. Click the Add Client button from the top of the “Client” page. Fill in the available fields, adding your client’s Name, URL, and Logo.
Then save your changes to be taken back to the list of clients. If you’d like to create a bunch of clients without being taken back to the list view each time, you can click Save and add another.
Relate Clients to Projects
There’s one last step to take: you’ll need to update the Project content type to allow clients to be added to projects. On the left sidebar, you should see the list of content types you created. Click the gear icon [⚙] next to the “Project” entry to edit this content type. Drag in a Relationship widget. Give it a Title (“Client”) and a Description, then set the following:
- Set Relationship Type to “Single.” If you want to be able to add multiple clients to a project, choose “Multiple” instead.
- Set Allowed Content Types to “Client.”
- Set Reverse Name to “projects.”

Click the green Update Content Type button.
When you’re ready to add a client to a project, you can search the clients you’ve already created or add a new one. When creating a new client you’ll only be able to edit its required fields, like Name and URL. You can update other client fields, like Logo, after it’s been created.
Finally, when your projects have been associated with clients, you can filter your list of projects by searching for the client’s name in the Filter field at the top of the page. Thanks, Taxonomies!
Now you can create projects and clients, associate them with each other, and organize your portfolio.
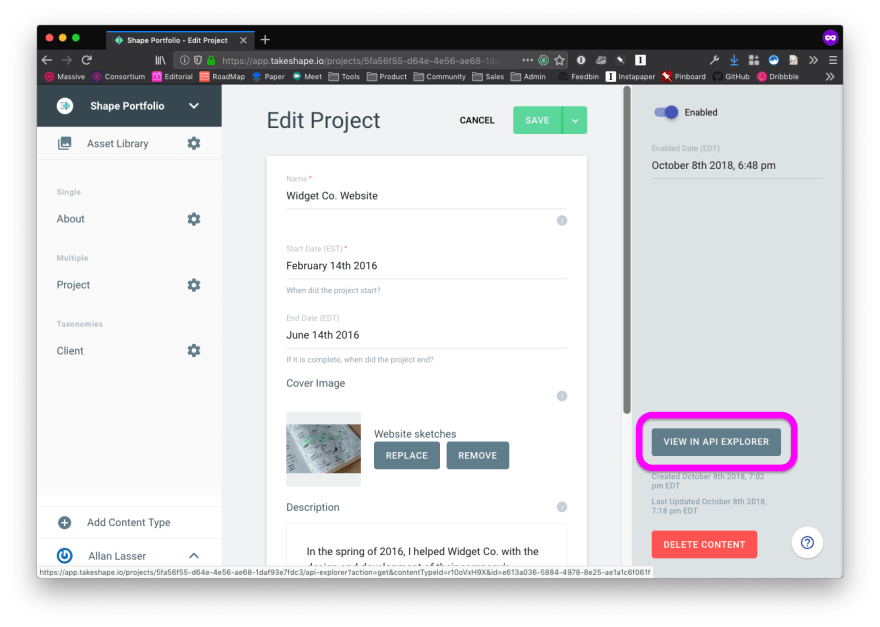
Surprise, You Also Built A GraphQL API!
Now that you’ve modeled your content and created some entries, you can see the API that TakeShape has automatically generated for you. Open your “Project” page from the left sidebar and select any project from the list. Once you’re in the content editor, click the button labelled View in API Explorer on the right side-bar to view the API query. Once the “API Explorer” window is open, click the Play button to see the results for querying for this piece of content. You can also enter the “API Explorer” at any time by choosing it from the drop-down navigation menu at the top of the sidebar.

Create A Static Site
Now that you have a customized CMS for your portfolio project you can easily update your projects and clients. In part 2 you'll create a unique static website to display your projects.
Interested in Creative Tools to Build Custom Websites?
TakeShape is a headless GraphQL CMS and static site generator. At TakeShape we're committed to building the best CMS tools possible for the most creative designers and developers. With our project templates, it's easy to get started. Plus, our pricing is flexible and affordable. Sign up for a free account and spend more time being creative!

Top comments (0)