Installation Steps
- Create two virtual machines in Azure – one for build Server and one is your target server where you wish the UM Server to be installed.
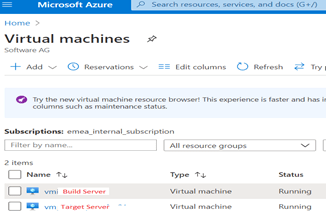 Build Server
• Install Command Central and Platform Manager installed. Enable the Platform Manager & Command Central Ports in both Windows Firewall and Azure Network Security Group.
• System Requirements for Command Central can be found in the Installing Software AG Products documentation.
• Command Central & Platform Manager installer can be downloaded from Empower.
• It can be installed on the build server using the below command
Build Server
• Install Command Central and Platform Manager installed. Enable the Platform Manager & Command Central Ports in both Windows Firewall and Azure Network Security Group.
• System Requirements for Command Central can be found in the Installing Software AG Products documentation.
• Command Central & Platform Manager installer can be downloaded from Empower.
• It can be installed on the build server using the below command
<cceinstaller.exe> –-accept-license -d <installation folder> -c 8190 -C 8191 -s 8192 -S 8193 -p <password>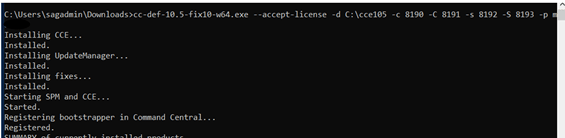 • Recommendation is to have one build server for Production environment and one for non-production environments.
Target Server
• Install Platform Manager on the Target Server.
• Platform Manager can be installed via Command Central (Java8 is prerequisite) or can be directly installed on the VM using the software, which can be downloaded from empower.
• Enable the Platform Manager & SSH Ports in both Windows Firewall and Azure Network Security Group.
• Platform Manager installer can be downloaded from Empower.
• It can be installed on the build server using the below command
• Recommendation is to have one build server for Production environment and one for non-production environments.
Target Server
• Install Platform Manager on the Target Server.
• Platform Manager can be installed via Command Central (Java8 is prerequisite) or can be directly installed on the VM using the software, which can be downloaded from empower.
• Enable the Platform Manager & SSH Ports in both Windows Firewall and Azure Network Security Group.
• Platform Manager installer can be downloaded from Empower.
• It can be installed on the build server using the below command
<cceinstaller.exe> –-accept-license -d <installation folder> -D SPM -s 8192 -S 8193 -p <password> - Login to command central installed in the build server using the below URL
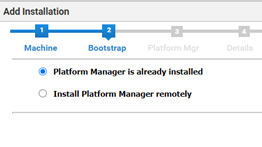
https://<ccehostname>:<cceport>/cce/web. - Navigate to Installations and select “+” to add the target node in Command Central.
- Provide the hostname of the target node and select” Platform Manager is already installed” if SPM is already installed or select “Install Platform Manager remotely” to install SPM.

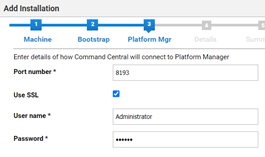
- Provide the Port number, username and password, alias, description and Installation type details.

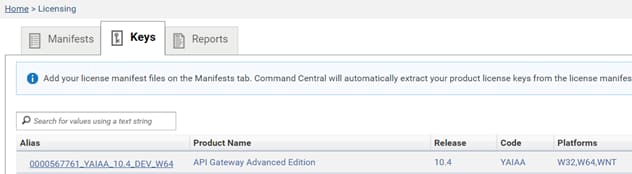
- Once the node is connected in Command Central, upload the desired API Gateway Server YAML template in templates section and also add the API Gateway Server license key under Licensing->Keys tab

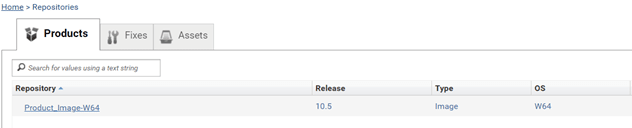
- Upload or download the Product Image repository to Repositories->Products and fixes (if any) to Repositories->Fixes.
- Once all the setup is complete in Command Central, proceed to configuring “Windows Remote Management (WinRm)” on the build server.
- Navigate to Azure Portal “portal.azure.com” and make sure the DNS name is set on the build server. If not set the DNS name.
- Then select PowerShell option in the Azure Portal.
- Enter the below command in PowerShell to enable Remote Connection to VM.
Enable-AzVMPSRemoting -Name ‘<dns name of the vm>' -ResourceGroupName ‘resource group name’ -Protocol https -OsType Windows Azure PowerShell configures the following
• Based on the Operating System, it ensures WinRM (Windows) or SSH (Linux) is setup.
• It ensures Network Security Group rules are in place to allow communication to the target, again based on communications type.
• For Linux VMs, it installs PowerShell core on the target system.
Azure PowerShell configures the following
• Based on the Operating System, it ensures WinRM (Windows) or SSH (Linux) is setup.
• It ensures Network Security Group rules are in place to allow communication to the target, again based on communications type.
• For Linux VMs, it installs PowerShell core on the target system. - Since the protocol used is HTTPs, certificate can be created using the below command.
New-SelfSignedCertificate -DnsName ‘<dns name of the vm>' -CertStoreLocation Cert:\LocalMachine\My
- Next Register the WinRM listener using the below command.
winrm create winrm/config/Listener?Address=*+Transport=HTTPS @{Hostname”<dns name of the vm>”;CertificateThumbprint="<Thumbprint from previous step"}
- If the create listener step throws error with message, listener already exists, then listener can be deleted with the below command and then execute create step again.
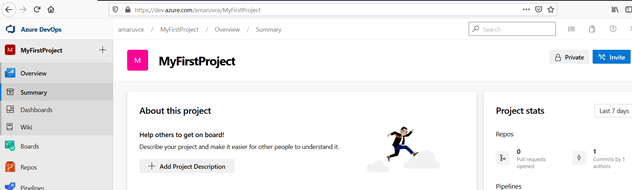
winrm delete winrm/config/Listener?Address=*+Transport=HTTPS - Navigate to dev.azure.com home page and create your project.
- Create a new pipeline, select the desired repository (Azure repo, git, bitbucket, svn etc.) and add an empty/agent job and select “Default” agent pool in the Agent Selection.
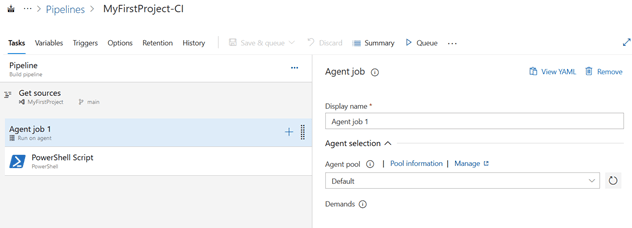
- On the Agent job, select add and Add a “Remote Power shell on Target Machines” step. In the Remote Power shell script, select inline and provide the CCE script to install API Gateway. Script can even be saved in the repo and referred in this task.
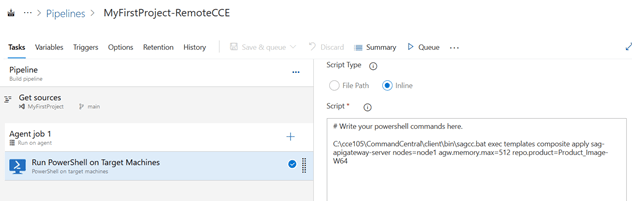 Script Used here is given below
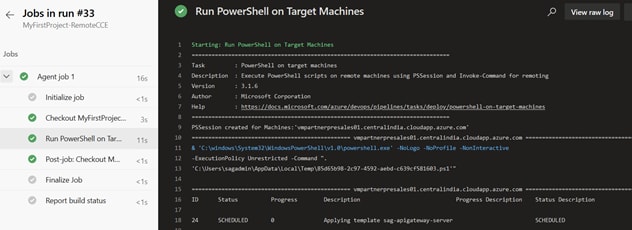
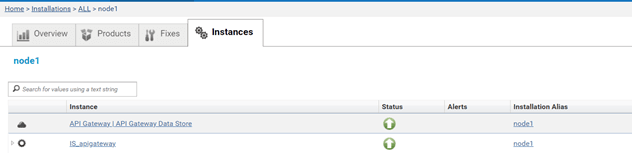
<sagcc.bat absolute path> exec templates composite apply <API Gateway Server YAML Template Alias from CCE> nodes=<node alias> agw.memory.max=<max api gw memory> repo.product=<Product Image alias> - Then execute the pipeline which will schedule the Command Central Job for API Gateway Installation and starts the API Gateway server and Internal Data Store. We can verify the installation in Command Central as shown below.
Notes:
This article provides on basic installation of API Gateway. Additional configuration as needed can be applied in the YAML template.
- Also, additional fixes can be included in the above URL.
- Sync Job can be added while installation to wait for the template execution and validate the installation.
-
Similar steps can be followed for other product installations as well. Sample YAML templates for different product installations can be found in the below git project.

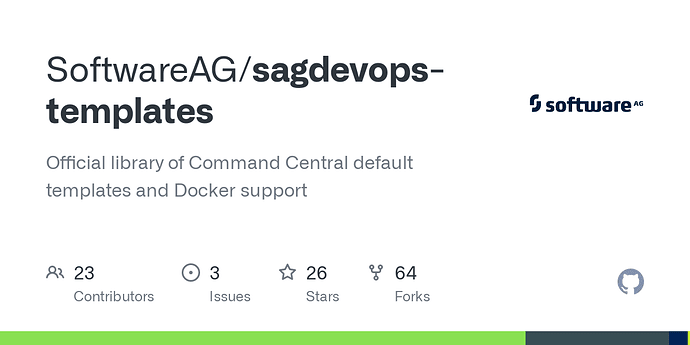
GitHub - SoftwareAG/sagdevops-templates: Official library of Command Central...
Official library of Command Central default templates and Docker support - GitHub - SoftwareAG/sagdevops-templates: Official library of Command Central default templates and Docker support
Official library of Command Central default templates and Docker support
Remote Power Shell Script Invocation is one of the approaches for invoking Command central jobs from Azure pipelines. Additionally, the below approaches can be used for Azure pipeline Integration with Command Central.
- Self-hosted azure pipeline agents on target VM - Install UM using Microsoft Self Hosted Agent
- Command Central REST API Approach - Install IS using CCE REST API Approach
- Command Central CLI docker container

Top comments (0)