A rock, paper, scissor game is usually a hand game played between 2 players normally. But in this online age let's play our part in modifying this hand-based offline game and make it digital.
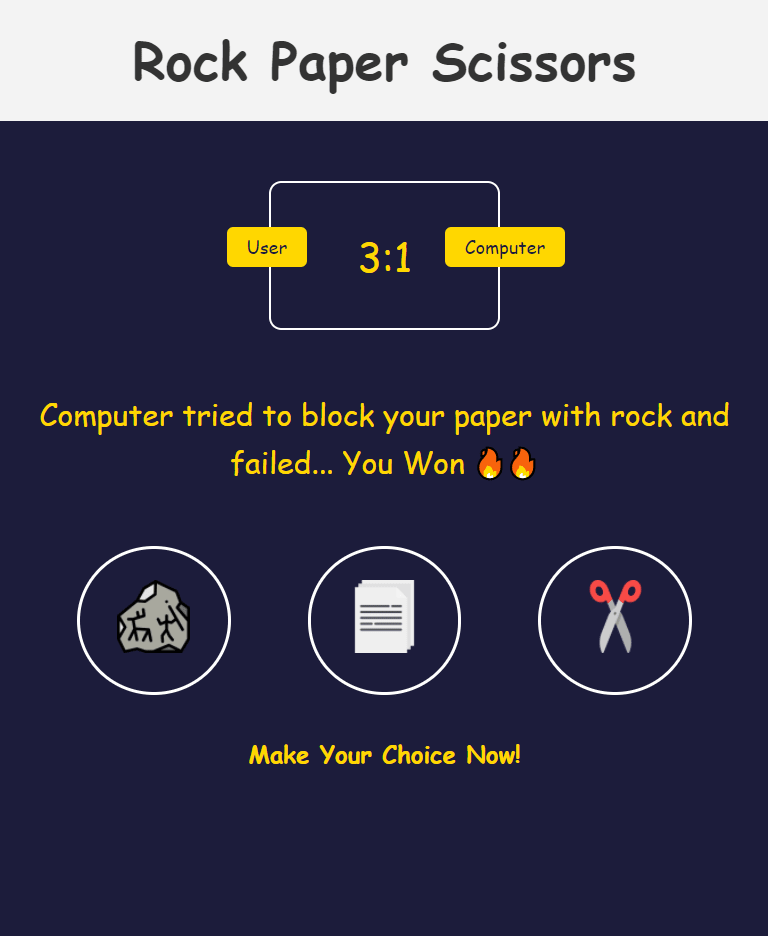
To make this game we'll be using HTML, CSS, and JavaScript. The final game would look something like this:-
To begin with let's start by creating 3 files within your newly created "rock_paper_scissors" folder. The files to be created within the folder are index.html, styles.css, and app.js.
Creating the Markup
Once done with creating the necessary files and folders let's begin by describing the markup/HTML for our page. For this go to your index.html file and layout the structure:-
index.html
<!DOCTYPE html>
<html lang="en">
<head>
    <meta charset="UTF-8">
    <meta http-equiv="X-UA-Compatible" content="IE=edge">
    <meta name="viewport" content="width=device-width, initial-scale=1.0">
    <title>Rock Paper Scissors</title>
</head>

<body>
</body>
</html>
We'll first layout the content for the header of our game, which looks like this:-

Within our 'index.html' inside the body tags add an <header></header> tag. The header in turn will contain a primary heading of "Rock Paper Scissors" within the h1 tag.
<!DOCTYPE html>
<html>
    ...

    <body>
        <header>
            <h1>Rock Paper Scissors</h1>
        </header>
    </body>
</html>
Done with our header we'll now create a section to display the current scores of the user and computer. For that create a section just after our header tag.
<header> .... </header>

<section class="score-board">
    <div class="badge" id="comp-label">Computer</div>
    <div class="badge" id="user-label">User</div>
    <span id="user-score">0</span>:<span id="computer-score">0</span>
</section>
The div's with the badge class will be designed into badges to represent the user's and computer's sides. The span is used to display the score in a single line and will also help later in JavaScript to modify the scores according to the user's choice.
Now we need a section where after every choice we tell the user whether he has won or lost and what was chosen by computer from "rock, paper or scissor". To do this create a div and within that a paragraph to represent the text.
<header> ... </header>
<section class="score-board"></section>

<div class="result">
        <p id="round__result"></p>
        <p id="result__text">To begin choose one from rock, paper or scissor</p>
</div>
Now comes the main part of our markup where we create options from which the user can choose one and the game will progress accordingly. To create this, create another div with a class of choices and within this create 3 more divs with the class of choice. Within each 'choice' div we will add images of rock, paper, and scissors respectively.
<header> ... </header>
<section class="score-board"> ... </section>
<div class="result"> ... </div>

<div class="choices">
        <div class="choice" id="rock">
            <img src="https://tejeshwer25.github.io/Rock_Paper_scissors/images/rock.png" />
        </div>

        <div class="choice" id="paper">
            <img src="https://tejeshwer25.github.io/Rock_Paper_scissors/images/paper.png" />
        </div>

        <div class="choice" id="scissor">
            <img src="https://tejeshwer25.github.io/Rock_Paper_scissors/images/scissor.png" />
        </div>
</div>
Now add a little action text which tells the user what to do.
<header> ... </header>
<section class="score-board"> ... </section>
<div class="result"> ... </div>
<div class="choices"> ... </div>

<div class="action_text">
        <p>Make Your Choice Now!</p>
</div>
Great, we're now done with our HTML, take a look at your page. How does it look?
For now, it might not look great but we've created the basic structure and placed the required elements on our page.
Before applying styling and functionality let's link the CSS and JS files to our HTML file.
<html lang="en">
<head>
    <meta charset="UTF-8">
    <meta http-equiv="X-UA-Compatible" content="IE=edge">
    <meta name="viewport" content="width=device-width, initial-scale=1.0">
    <title>Rock Paper Scissors</title>
    <link rel="stylesheet" href="./styles.css"/>
</head>

<body>

    <script src="./app.js"></script>
</body>
</html>
Adding styles to our page
Now let's make our game look nicer with some CSS styles.
But before we add styles to any of our elements let's reset the default styles provided by the browser using the * selector.
* {
    padding: 0;
    margin: 0;
    box-sizing: border-box;
    line-height: 1.6;
}
In the above styling we give padding and margin of 0 to all our elements, along with that we give it a box-sizing of border-box which specifies that the border and padding for the element should remain in the calculated element width and height.
line-height is specified to be 1.6 which gives all our text a default height of 1.6 units.
First, let's begin with styling our header element.
* { ... }

header {
    padding: 1rem 0rem;
    text-align: center;
    font-size: 1.3rem;
    font-weight: bold;
    background-color: #f3f3f3;
    color: #333;
}
We start with giving the header padding of 1rem from top & bottom which will give our header some space rather than squishing it with the other elements, and then we align the text within it to center.
You might have noticed that other than the header most of our text in the game is of gold color and the background is a bluish color, so rather than separately specifying it for each element we'll provide these styling for the body.
* { ... }

body {
    background-color: rgb(28, 28, 59);
    color: gold;
}

header { ... }
Let's now go for the score-board.
* { ... }
body { ... }
header { ... }

.score-board {
    border: 2px solid white;
    width: 30%;
    margin: 3rem auto;
    border-radius: 10px;
    padding: 1rem 0rem;
    font-size: 2rem;
    position: relative;
    text-align: center;
}
To place the section in the center we first reduce its width to 30% and then give it a margin of 3rem from top & bottom and auto from left-right and that will place it in the center. The positioning is done to be relative because it will help us later in positioning our badges at the required place. Relative positioning keeps our element in it's natural flow but allows us to place it anywhere in the page using top, left, bottom, and right properties.
For now the badges 'User' and 'Computer' might look odd, so let's style them.
.badge {
    font-size: 0.9rem;
    position: absolute;
    background-color: gold;
    color: rgb(28, 28, 59);
    padding: 0.3rem 1rem;
    border-radius: 5px;
}

#comp-label {
    right: -20%;
    top: 30%;
}

#user-label {
    left: -15%;
    top: 30%;
}
The badge class is common to both user and computer labels so we specify the styles common to both of them in the badge selector, this is the major use of classes. For positioning the labels we've also specified the position as an absolute which will allow us to move our labels with respect to the score-board because the score-board was positioned relative(try removing the relative position property from score-board). Next to position these labels to their respective side we specify the top, right, and left properties individually to their IDs.
Now let's style the result text.
.result {
    text-align: center;
    font-size: 1.5rem;
}
For the result, we just align the text to the center and give it a font size of 1.5rem.
Let's now style the choices the user has.
.choices {
    display: flex;
    justify-content: space-evenly;
}
The choices container is given a display flex property so that all the child elements of it are in one line, and to add spacing between each element we give it a justify-content property of space-evenly.
.choice {
    width: 20%;
    text-align: center;
    border: 3px solid white ;
    border-radius: 50%;
    padding: 1.5rem 0rem;
    transition: all 0.5s ease-in-out;
}

.choice:hover {
    border: 3px solid grey;
    cursor: pointer;
    background: rgb(8, 8, 17);
}

.choice > img {
    width: 50%;
}
We then give choice(child of choices) a width of 20% so that our elements do not overflow. The transitioning is given so that when the user hovers on the element the respective hover styling appears with some effects after 0.5s. The image is given a width so that the image remains within its parent div.
Now for a short task, it is now up to you to style the 'action text' at the end.
To make our game responsive we'll now add some media-queries to it.
@media(max-width:700px) {
    .score-board {
        padding: 2rem 0rem;
    }

    #user-label {
        left: -20%;
    }

    #comp-label {
        right: -30%;
    }
}

@media (max-width: 600px) {
    #user-label {
        transform: rotate(90deg);
    }

    #comp-label {
        right: -30%;
        top: 35%;
        transform: rotate(90deg);
    }
}
The first media query will work on devices with a screen width lower than 700px. And for that case, we modify the positioning of our user and computer labels.
The next media query will work on devices with screen widths lower than 600px, and in this, we rotate our labels by 90degrees and again modify their positioning.
Adding functionality using JS
Great, we're done with our markup and we've also styled it. Our game now looks much better, you can check it yourself if you doubt 😁.
Let's now add some functionality to it, but before doing so we'll catch/cache our DOM, which is done in following manner:
const userScore_span = document.getElementById('user-score');
const computerScore_span = document.getElementById('computer-score');
const resultText_p = document.getElementById('result__text');
const roundResult_p = document.getElementById('round_result');
const rock_div = document.getElementById('rock');
const paper_div = document.getElementById('paper');
const scissors_div = document.getElementById('scissor');

let userScore = 0;
let computerScore = 0;
And this is how we cache the DOM, this is helpful as it prevents us from writing the long 'document.getElementById('')' text every time we want to modify the DOM and also improves the performance of our app. Other than caching the DOM we've also specified variables for the user and computer score.
Now let's specify what should happen when our users click on any one choice given to them.
rock_div.onclick = (e) => {
    let result = startGame('rock');
    result_text();
    resultStyle(result, rock_div);
};
paper_div.onclick = (e) => {
    let result = startGame('paper');
    result_text();
    resultStyle(result, paper_div);
};
scissors_div.onclick = (e) => {
    let result = startGame('scissor');
    result_text();
    resultStyle(result, scissors_div);
};
Here we first call the function startGame and pass it the respective argument, and the return value from startGame is stored in result variable. We then call the result_text and resultStyle functions.
Note that this won't work as we have not defined the required functions, so let's first start with the startGame function.
function startGame(userChoice) {
    let compChoice = computerChoice();

    if(userChoice===compChoice) {
        resultText_p.textContent = "It's a draw!!";
        return 'draw';
    }
    else if((userChoice==='rock' && compChoice==='scissor') || (userChoice==='paper' && compChoice==='rock') || (userChoice==='scissor' && compChoice==='paper')) {
        userScore++;
        userScore_span.textContent = userScore;
        resultText_p.textContent = `Computer tried to block your ${userChoice} with ${compChoice} and failed... You Won 🔥🔥`;
        return 'win';
    }
    else if((userChoice==='rock' && compChoice==='paper') || (userChoice==='paper' && compChoice==='scissor') || (userChoice==='scissor' && compChoice==='rock')) {
        computerScore++;
        computerScore_span.textContent = computerScore;
        resultText_p.textContent = `Computer blocked your ${userChoice} with ${compChoice} successfully... You Lost 😭😭` ;
        return 'loss';
    }
}
In the start game we call the computerChoice function which we'll be declaring in a bit, but let's first go through what's happening here.
In startGame we check whether the user has won or not using the if-elseif-else chain, and then according to that, we increment the user or computers score. Along with that we also modify the scores and resultant text in our DOM which will be reflected on our app. And at last, we return a value based on the user's performance which will be stored in the result variable in the onclick event handlers.
Now let's define the computerChoice function.
function computerChoice() {
    let choice = ['rock', 'paper', 'scissor']
    let computerChoice = Math.floor(Math.random() * 3);
    return choice[computerChoice];
}
In this we define an array of choices and then we generate a random number between 0-1 using Math.random(), to keep the number in the range of 0-3 we multiply the result of Math.random() by 3. But the number would still be a decimal number so to make it an integer value we use Math.floor() which will round the number to it's lower integer(2.9 will become 2). Then the choice at that index is retured which is stored in variable compChoice in startGame().
Now let's implement the result_text function.
function result_text() {
    if(userScore >=10) {
        roundResult_p.textContent = "You won previous round";
        userScore = 0;
        computerScore = 0;
    } else if(computerScore >= 10) {
        roundResult_p.textContent = "You lost previous round";
        userScore = 0;
        computerScore = 0;
    }

    setTimeout(() => {roundResult_p.textContent = ""}, 5000)
}
Here we check whether the user or computer has won the previous round and this updates our paragraph with round__result id which was empty initially. And using the setTimeout function we make sure that the text is removed after 5000ms or 5sec.
Let's now make our app better with resultStyle function.
function resultStyle(result, e) {
    if(result === 'win') {
        e.classList.add('win');
        setTimeout(() => {e.classList.remove('win')}, 1000)
    } else if (result === 'draw') {
        e.classList.add('draw');
        setTimeout(() => {e.classList.remove('draw')}, 1000)
    } else {
        e.classList.add('lost');
        setTimeout(() => {e.classList.remove('lost')}, 1000)
    }
}
In this function, we check the result of the user's choice and then apply the class of win, lost, or draw to the choice div accordingly. Then we make sure that the class is removed after an interval of 1 sec using the setTimeout function.
Now to make this function work we'll have to add some more styling at the end of our styles.css.
...
.choices > .win {
    border: 3px solid green;
    box-shadow: 1px 1px 15px green;
}

.choices > .lost {
    border: 3px solid red;
    box-shadow: 1px 1px 15px red;
}

.choices > .draw {
    border: 3px solid yellow;
    box-shadow: 1px 1px 15px yellow;
}
Now you can try the app, it functions pretty well and has some more styling that makes it even better.
So, here we completed our rock paper scissors game. For this project I went through FreeCodeCamp's youtube channel, you can also visit it for more of such amazing contants.

Top comments (0)