
TL;DR
ขอออกตัวก่อนว่า for_each และ count ต่างก็มีความเด่นในตัวเองซึ่งต้องเลือกใช้ให้เหมาะสมตาม Use cases ครับ โดย for_each สามารถใช้ในเคสที่ Advanced ได้ด้วย แต่ถ้าเคสธรรมดาๆใช้ count จะเขียนได้เร็วกว่า
ท่านที่คุ้นกับ Terraform count อยู่แล้ว ข้ามไปอ่าน for_each ได้เลยครับ
Terraform คือ
Infrastructure as Code คือเราสามารถเขียน Infrastructure ที่ต้องการในรูปแบบของ Code(HashiCorp Configuration Language - HCL) จากนั้นใช้ Provider เชื่อมต่อไปยัง Infrastructure ต่างๆ เช่น Cloud เพื่อสั่งการให้สร้าง Infrastructure ตามแบบที่เราระบุไว้ใน Code
การสร้าง Resource
เช่นการสร้าง EC2 สามารถทำได้โดยเขียน Block
resource "aws_instance" <name> {
  ...
}
หากต้องการ EC2 แบบเดียวกัน แต่เพิ่มเป็น 5 Instances สามารถเขียน count = 5 ได้เลยโดยไม่ต้องทำ Block resource ใหม่
resource "aws_instance" <name> {
  count = 5
  ...
}
ทำการรัน จะได้ EC2 จำนวน 5 Instances
ดูตัวอย่างการใช้ count ได้ที่ Create 10 AWS EC2 with Terraform แบบเร็วๆ
ถ้าเราต้องการ EC2 เพิ่มอีก 2 Instances โดยให้มี Atrributes ต่างกัน เช่น
5 Instances แรก กำหนดให้ instance_type = t2.micro
2 Instances ถัดมา กำหนดให้ instance_type = t2.small
จะพบว่าเราไม่สามารถแก้ count จาก 5 เป็น 7 ได้ เพราะจะได้ instance_type เหมือนกันทั้ง 7 Instances
เราอาจเพิ่ม Block ขึ้นมาอีก Block หนึ่งก็ได้ โดยระบุจำนวน Instances และ instance_type ให้ต่างกัน ดังนี้
resource "aws_instance" <name> {
  count = 5
  instance_type = "t2.micro"
  ...
}

resource "aws_instance" <name2> {
  count = 2
  instance_type = "t2.small"
  ...
}
หากต้องการสร้าง resources ที่ Attributes ต่างออกไปจากนี้อีก เช่น instance_type, ami, tag, subnet_id, key_name, etc ก็ต้องสร้าง Block ใหม่เพิ่มเรื่อยๆ
for_each
ต่างจาก count ที่รับค่าเป็น Integer, โดย for_each รับค่าเป็น set หรือ map โดยจะสร้าง Resources ประเภทนั้นๆ ตามค่าใน set หรือ map
HashiCorp: The for_each Meta-Argument
The for_each meta-argument accepts a map or a set of strings, and creates an instance for each item in that map or set.
ในที่นี้ หากเราใช้ set จะไม่รองรับ Use case ที่ต้องการปรับแต่งมากกว่า 1 Attribute จึงต้องใช้ map โดยแต่ละ item ใน map จะเก็บ set ของ Attributes เช่น instance_type, group_name, etc รวมไปถึงจำนวน Instances ที่ต้องการได้อีกด้วย
** ตัวอย่าง map variable ที่ใช้กับ for_each เพื่อสร้าง
Application จำนวน 3 Instances, instance_type = "t2.micro"
Web จำนวน 2 Instances, instance_type = "t2.small
  - local_aws_vm_map  = {
      - application-1 = {
          - group     = "application"
          - index     = 1
          - index_all = 1
          - name      = "application-1"
          - type      = "t2.micro"
        }
      - application-2 = {
          - group     = "application"
          - index     = 2
          - index_all = 2
          - name      = "application-2"
          - type      = "t2.micro"
        }
      - application-3 = {
          - group     = "application"
          - index     = 3
          - index_all = 3
          - name      = "application-3"
          - type      = "t2.micro"
        }
      - web-1         = {
          - group     = "web"
          - index     = 1
          - index_all = 4
          - name      = "web-1"
          - type      = "t2.small"
        }
      - web-2         = {
          - group     = "web"
          - index     = 2
          - index_all = 5
          - name      = "web-2"
          - type      = "t2.small"
        }
    }
สร้าง EC2 instances ตาม local_aws_vm_map ที่กำหนดได้ดังนี้
resource "aws_instance" "aws_vm_map" {
  for_each = local.aws_vm_map
  ami           = var.ubuntu22_ami
  instance_type = each.value.type
  key_name                    = var.key
  subnet_id                   = var.subnet
  associate_public_ip_address = false

  tags = {
    Name    = "${var.prefix}-${each.value.name}"
    Name_without_prefix = each.value.name
    Group   = each.value.group
    Index   = each.value.index
    Index_all = each.value.index_all
    Creator = "Sukkarin"
  }
}
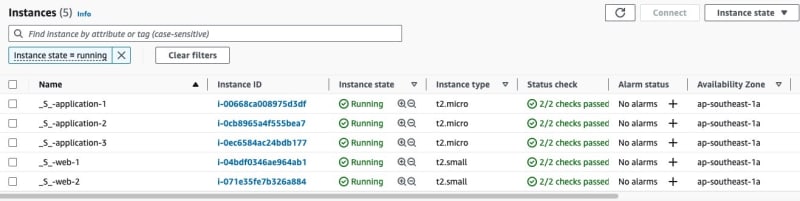
จะได้
Application จำนวน 3 Instances, instance_type = "t2.micro"
Web จำนวน 2 Instances, instance_type = "t2.small"
และมี Attributes, เช่น tag Name, Group, Index, Index_all(Index แบบนับรวม EC2 ทุก Group), etc แตกต่างกันไปในแต่ละ Instances หรือก็คือสามารถกำหนด Attribute ได้ตามต้องการนั่นเอง
แม้ตอนนี้เราสามารถสร้าง EC2 โดยกำหนด Attributes ได้ตามต้องการ แต่ปัญหาจะมาตกอยู่ที่ variable local_aws_vm_map, กรณีเช่นหากต้องการ Application VM จำนวน 100 Instances จะต้องเขียน item ใน map เพิ่ม 100 items, และแต่ละ item จะต้องระบุ Attributes ของ VM นั้นๆ ด้วย
Thanks to Terraform ที่เราสามารถแปลงค่าใน Variable ต่างประเภทไปมาได้, Enumerate ค่าจาก Variable หนึ่ง แยกย่อยลงไปในแต่ละ Items ได้ เคสนี้เราสามารถกำหนด Attributes ของ EC2 ที่ต้องการได้ง่ายมากดังนี้
aws_vm = [
    {
      "group" = "application"
      "count" = 3
      "type"  = "t2.micro"
    },
    {
      "group" = "web"
      "count" = 2
      "type"  = "t2.small"
    }
]
จากนั้นแปลงค่าจาก variable aws_vm ให้เป็น map ชื่อ local_aws_vm_map ซึ่ง Enumerate Attributes ของแต่ละ EC2 Instances ออกมาเรียบร้อยแล้วตามตัวอย่าง variable type map
ทดสอบ เพิ่ม group database กำหนดให้ count = 1 และ type = "t2.medium" ซึ่งใช้งานได้ทันทีโดยไม่ต้องสร้าง aws_instance block เพิ่มอีก
aws_vm = [
    {
      "group" = "application"
      "count" = 3
      "type"  = "t2.micro"
    },
    {
      "group" = "web"
      "count" = 2
      "type"  = "t2.small"
    },
    {
      "group" = "database"
      "count" = 1
      "type"  = "t2.medium"
    }
]
เมื่อทำการแปลงค่าให้ aws_vm ให้เป็น map variable จะได้ดังนี้
local_aws_vm_map = {
  "application-1" = {
    "group" = "application"
    "index" = 1
    "index_all" = 1
    "name" = "application-1"
    "type" = "t2.micro"
  }
  "application-2" = {
    "group" = "application"
    "index" = 2
    "index_all" = 2
    "name" = "application-2"
    "type" = "t2.micro"
  }
  "application-3" = {
    "group" = "application"
    "index" = 3
    "index_all" = 3
    "name" = "application-3"
    "type" = "t2.micro"
  }
  "database-1" = {
    "group" = "database"
    "index" = 1
    "index_all" = 6
    "name" = "database-1"
    "type" = "t2.medium"
  }
  "web-1" = {
    "group" = "web"
    "index" = 1
    "index_all" = 4
    "name" = "web-1"
    "type" = "t2.small"
  }
  "web-2" = {
    "group" = "web"
    "index" = 2
    "index_all" = 5
    "name" = "web-2"
    "type" = "t2.small"
  }
}
terraform apply จะเห็น EC2 instance ใหม่ชื่อ database ถูกสร้างขึ้นมา โดย type="t2.medium"

การแปลงค่า variable จาก aws_vm ไปที่ map variable local_aws_vm_map เพื่อไม่ให้เนื้อหายาวเกินไปขอขึ้นใหม่อีกตอนครับ เพราะมีเรื่อง Variables, function, loop เกี่ยวข้อง, สำหรับ Code ที่ใช้ในการแปลงค่าเป็นโค้ดของผู้เขียนบทความเองตามนี้ครับ
locals {
  # Create "list" of AWS infrastructure resources
  aws_vm_list = distinct(flatten([
    for i_index, i_name in var.aws_vm : [
      for j_index in range(0, i_name.count) : {
        name  = "${i_name.group}-${j_index+1}"
        group = i_name.group
        type  = i_name.type
        index = j_index+1
        #index_all=??
      }
    ]
  ]))

  # Create "map" of AWS infrastructure resources
  aws_vm_map = {for index, i in local.aws_vm_list: i.name => {
        name  = i.name
        group = i.group
        type  = i.type
        index = i.index
        index_all = index+1
  }}
}
First Publicly Published: July 15, 2023
1: ทำไมใช้ for_each แทน count ใน terraform
2: Enumerate the Variables in Terraform.
3: Transform list to map in Terraform

Top comments (0)