
You might have heard of Bun and Appwrite recently.
Bun is a new, faster alternative to NodeJS and NPM.
And Appwrite just launched their Cloud Version, which is a cool and easy-to-configure alternative to Firebase.
So, let's look at how to build a really fast, modern full stack application with :
NextJS, Bun, Appwrite And TailwindCSS
I had built this typing practice website earlier : Typr

It's been 2 years, and it's time to give it an upgrade!!
Typr - Modern Typing Practice built with the power of Appwrite
The first version above, did not have any way to track your progress based on an account. And of course, at that time Neomorphic designs were the trend. And I built it using HTML, CSS and Vanilla Javascript.
But the Typr 2.0 has all the features that were missing earlier.
And how did I build it?
Continue below to find out!! 🤯
Using Bun to create NextJS App
Yes, you read that right! The create-next-app works with Bun. Just use the --use-bun flag :
npx create-next-app@latest typr-next --use-bun
And you use the blazing fast speeds of bun ⚡️.
Choose the options according to you :

You will see a bun.lockb file which is used to store the packages details and their metadata so that when the repository is cloned, the dependencies are installed faster.
The Main Pages
Since I am creating a typing practice website, the most important page is the practice page itself. Naturally, I created it first.
I used API Ninjas to get a few endpoints :
- Quotes
- Facts
- Jokes To create random texts from the real world so users can get used to typing real words and sentences.
A really important feature in the typing page is updating UI as the user types to display what he has typed till now.
For this I created a separate component and passed in 2 parameters :
- Typed Length : This sets the length of the text that needs to be highlighted.
- Original : This takes in the original string that is being typed.
I divide the original into 2 parts : TypedString and UntypedString and display them in different colors :
export default function TyprDisplay({
    text,
    typedLength
}) {
    if (typeof text !== "string") return null;
    const activeText = text.substring(0, typedLength);
    const untyped = text.substring(typedLength);
    return (
        <div className='w-full'>
            <span className='text-white'>{activeText}</span>
            <span className='text-zinc-500'>{untyped}</span>
        </div>
    )
}
And the practice page has some more components like : errors, typed(which is the typed string), score calculator, etc.
Check out the code here(fairly simple to understand).
Appwrite Setup
I know most of you have been waiting for this. So let's dive into Setting up Appwrite Cloud for the App.
1. Head on to : Appwrite Cloud ☁️ and create your account.
Once you have created your account and logged in, you will see a page like this :

Note : You won't see projects, you will see the create project button in the top right corner.
2. Click on the Create Project button
Select the Empty Project option and give a name.
In the next screen, you will see platforms that you would like to create for :

Once you select the platform, follow the guide Appwrite provides for that platform.
3. Hostname and Installation 🛠️
The Setup Guide has the first page as below :

The important thing to note here is : The Hostname during development should be localhost and for different domains, only add the path.domain without the https or subdmains
To install in your Web Projects (ReactJS, NodeJS, NextJS) :
bun install appwrite
The Setup is now complete and you can use Appwrite cloud in your Project.
Using Appwrite for Authentication 🔐
For using Appwrite Cloud in your project, you will need 2 things :
- Project ID, which is displayed in your project dashboard page :

- Appwrite Cloud Endpoint, which is currently the following : ```js
You can also find both of them in the project settings tab :

Once you have these, create a `.env` file and store them there.
For doing any task with Appwrite Cloud, you need to connect to the client. For this use the following code <strong>(Note here that I have abstracted this get client method as this is required in multiple places) </strong> :
```js
import { Client } from "appwrite";
export const getAppwriteClient = () => {
const PROJECT_ID = process.env.NEXT_PUBLIC_APPWRITE_PROJECT_ID;
const client = new Client()
.setEndpoint('https://cloud.appwrite.io/v1') // Your API Endpoint
.setProject(PROJECT_ID); // Your project ID
return client;
}
Now, you can call this function whenever you want to use Appwrite.
For my app, I mainly used 4 Authentication features :
- Creating a User
- Creating a User Session
- Getting the current logged in User
- Deleting current Session
For this the default selections as shown below are enough(the settings tab of the Auth section in the Cloud Dashboard), but Appwrite supports many other OAuth providers that you can explore.

Creating a User or Signing Up
Creating a User is the first step for Authentication, also called Sign Up.
Appwrite Cloud supports Email and Password based Users.
For creating a user, we use the account.create() method.
Note here, that we need the Appwrite client(which we will get from the method we created earlier) and then pass in the client created to Account constructor provided by Appwrite.
We can then use this object to create a new user with the following parameters :
-
Unique IDwhich can be created using theID.unqiue()method provided by Appwrite. - Password
- Name
The following function takes care of this :
export const createUser = async (data) => {
    const {email,
        password,
        name} = data;
    try {
        const client = getAppwriteClient();
        const account = new Account(client);
        if(!email || !password || !name){
            return {
                status : 400,
                message : "Email/Password/Name missing",
                data : null,
                error : new Error("Credentials Missing")
            }
        }
        const result = await account.create(
            ID.unique(),
            email,
            password,
            name
        );
        return {
            status : 201,
            message : "Account Created",
            data : result,
            error : null
        };
    } catch (error) {
        console.log(error);
        if(error.name && error.name==='AppwriteException'){
            return {
                status : error.code,
                message : error.response.message,
                data : null,
                error
            }
        }
        return {
            status : 500,
            message : "Account not created",
            data : null,
            error
        };
    }
}
Creating user Session or Logging In
Once a user is created, you need to create a new session for the user to login. Similar to the above, we use the createEmailSession method for this :
const client = getAppwriteClient();
        const account = new Account(client);
        if(!email || !password){
            return {
                status : 400,
                message : "Email/Password missing",
                data : null,
                error : new Error("Credentials Missing")
            }
        }
        const result = await account.createEmailSession(
            email,
            password,
        );
Getting Current Logged In User
An important thing is that we want to check if there is a user currently logged in.
For this we can use the account.get() method instead of asking the user to login every time they open the website.
const client = getAppwriteClient();
        const account = new Account(client);
        const {name, email, $id} = await account.get();
NOTE : If there is no user currently logged in, this method returns an Appwrite Exception which can be handled in the catch block.
Deleting User Session or Logging Out
An important step is logging out a user once they are done to protect their data. This is also relatively simple and takes place in 2 steps :
- Getting the current
SessionID - And, Deleting the session
const client = getAppwriteClient();
        const account = new Account(client);
        const session = await account.getSession('current')
        const sessionId = session?.$id;
        const response = await account.deleteSession(sessionId);
And their you have it : the complete authentication flow for your website that can be setup in minutes with the user of Appwrite Cloud.
The Authentication flow looks like :

Using Appwrite for Data Management
Appwrite Cloud also provides the functionality to create databases and store data based on our needs.
You can watch the video below or follow the steps below that(Both are same)
Database Setup
Just like the project setup, database setup is also super easy.
1. Create a Database
Before adding data, you need to create a Database for your project.
Head to the Database section and click on Create Database button. Add a name and (optionally) add a custom ID.
2. Create a Collection
Similar to the above, click on the Create Collection button once your database is created. You also have the option to create a custom ID.
3. Creating Attributes 📌
This is a really important step. Without creating the attributes, you will NOT ❌ be able to add new Documents.
You have a few options to select from for your new attributes like :
- URL
- String
- Enum
-
Even Relationships(how cool is that!!) 🤯

Working with Data
You have setup your database and created you collection.
Now let's get to the actual fun part. You will see how easy it is to add and retrieve data from Appwrite Cloud Database.
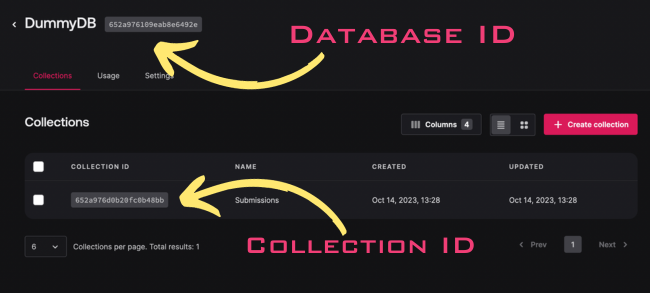
Step 1 : Adding the `Database and Collection IDs` to `env`
Before accessing the Database, you need to get the Database ID and Collection ID from the Dashboard.
It is displayed right beside the Database Name and Collection Name :
Step 2 : Connecting to the Database
Appwrite provides a class called Databases that helps us connect with the Database. But, we need to pass in the client here are well.
const client = getAppwriteClient();
        const databases = new Databases(client);
Step 3 : Creating Documents
After connecting to the Database client and before reading data, we need to create Data.
For this, Appwrite provides us the databases.createDocument method that takes in 4 arguments by default :
- DatabaseID 👉🏻 That we saved in the
envfile. - CollectionID 👉🏻 That we saved in the
envfile. - UniqueID 👉🏻 That helps identify each document, again
ID.unique()can be used here. - Document 👉🏻 Javascript object that contains the actual data.
The complete code for the above looks like this :
const client = getAppwriteClient();
        const databases = new Databases(client);
        const databaseID = process.env.NEXT_PUBLIC_DATABASE_ID;
        const collectionID = process.env.NEXT_PUBLIC_COLLECTION_ID;
        const userId = (await getCurrentUser()).data.userId;
        const doc = await databases.createDocument(databaseID, collectionID, ID.unique(), {
            ...submission,
            owner : userId
        },
            [
                Permission.read(Role.user(userId)),
                Permission.update(Role.user(userId)),
            ]
        );
// way to check if submission was successfull
        if(!doc["$id"]){
            throw new Error("Submission Failed");
        }
📌 NOTE : We are adding Permissions here. along with the document. It is optional and when you don't provide any, the default permissions allow anybody to read the document, but only the user who created it to modify or delete it.
You can read more about Appwrite Permissions here e🔗
Step 4 : Fetching Data
Once you have created data, you can start fetching them.
By default, you do not have any method to fetch only the current user's data. But you can use Queries to modify your results.
For my app, I only need to fetch the current user's data so I used the following query :
[Query.equal("owner", [userId])]
You can read more about Appwrite Queries here 🔗
Also, the complete function to fetch the user's data is :
const client = getAppwriteClient();
        const userId = (await getCurrentUser()).data.userId;
        const databases = new Databases(client);
        const databaseID = process.env.NEXT_PUBLIC_DATABASE_ID;
        const collectionID = process.env.NEXT_PUBLIC_COLLECTION_ID;
        const submissions = await databases.listDocuments(databaseID, collectionID,[Query.equal("owner", [userId])],);
        return {
            status : 200,
            message : "Fetched Submissions",
            submissions,
            error : null
        }
And there you have a full stack web app created easily with the power of Appwrite cloud.
Pricing Options 💰
Currently Appwrite is in beta, but they are soon launching their Pro and Enterprise plans 👇🏻

A huge shoutout to the Appwrite team for building such an awesome Open-Source project.

Top comments (8)
Nice article @thevinitgupta!
Thanks a lot @nathan_tarbert 🙏👍
You're quite welcome @thevinitgupta!
Great article @thevinitgupta!
Thanks Nevo
detailed post !! @thevinitgupta
Bun is taking the 🌎 by storm.
Appwrite simplifies backend development so much! 🚀 From auth **to **databases, it’s all in one place. 💯