Introduction:
Object detection is a pivotal task in the realm of artificial intelligence and machine learning that empowers computers to identify and locate objects within images or videos. This technology has found its applications across a diverse range of fields, from self-driving cars to medical imaging and retail. In this blog post, we will delve into the fascinating world of object detection, understand the key concepts, and explore how AI and machine learning are driving advancements in this field.
Understanding Object Detection:
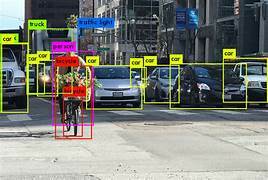
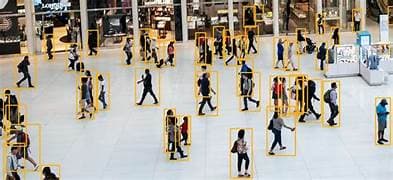
Object detection involves two primary tasks: identifying the presence of objects in an image and localizing their positions using bounding boxes. Traditional computer vision methods often required manual feature engineering, making them laborious and less adaptable to various scenarios. However, the emergence of AI and machine learning has revolutionized this process.
Convolutional Neural Networks (CNNs):
One of the most influential developments in object detection is the utilization of Convolutional Neural Networks (CNNs). CNNs can automatically learn hierarchical features from images, making them highly effective for tasks like object detection. Models like YOLO (You Only Look Once) and Faster R-CNN (Region with CNN) have gained prominence due to their accuracy and speed.

Key Object Detection Architectures:
YOLO (You Only Look Once): YOLO divides an image into a grid and predicts bounding boxes and class probabilities directly. This approach enables real-time object detection and is widely used in applications like surveillance and robotics.
Faster R-CNN: Faster R-CNN introduces the Region Proposal Network (RPN) to efficiently propose potential object regions before classifying and refining their positions. It strikes a balance between accuracy and speed and is suitable for various use cases.
SSD (Single Shot MultiBox Detector): SSD combines multiple feature maps of different scales to predict object classes and locations. It offers a good compromise between speed and accuracy and is commonly used for real-time applications.
Challenges and Advances:
While object detection has come a long way, challenges still persist. Overlapping objects, varying scales, occlusions, and limited training data can affect performance. However, advancements in data augmentation techniques, transfer learning, and larger annotated datasets have mitigated these issues to a great extent.
Applications:
Autonomous Vehicles: Object detection plays a crucial role in enabling self-driving cars to identify pedestrians, vehicles, and obstacles on the road.
Retail and Inventory Management: Retailers utilize object detection to monitor shelf stock, track inventory, and enhance customer experiences through cashier-less checkouts.
Healthcare: Medical imaging benefits from object detection for identifying anomalies in X-rays, MRIs, and CT scans.
Security and Surveillance: Object detection aids in identifying potential threats and intruders in security systems.
Conclusion:
Object detection using AI and machine learning has transformed industries by providing accurate and efficient ways to identify and locate objects within images and videos. The fusion of deep learning, convolutional neural networks, and innovative architectures has paved the way for real-time applications in diverse domains. As technology continues to evolve, we can expect even more sophisticated object detection methods, further expanding its potential across various sectors.
Some code snippets
import cv2
Load the pre-trained model and configuration file
model_config = 'path_to_config_file.cfg'
model_weights = 'path_to_model_weights.weights'
net = cv2.dnn.readNet(model_weights, model_config)
Load class labels (if available)
class_labels = []
with open('path_to_class_labels.txt', 'r') as f:
class_labels = f.read().strip().split('\n')
Load an image
image = cv2.imread('path_to_image.jpg')
Preprocess the image
blob = cv2.dnn.blobFromImage(image, 1.0, (416, 416), (0, 0, 0), True, crop=False)
net.setInput(blob)
Get model output
layer_names = net.getUnconnectedOutLayersNames()
output = net.forward(layer_names)
Iterate through detections and draw bounding boxes
for detection in output:
for obj in detection:
scores = obj[5:]
class_id = np.argmax(scores)
confidence = scores[class_id]
if confidence > 0.5: # Adjust confidence threshold as needed
center_x, center_y, width, height = list(map(int, obj[0:4]))
x = int(center_x - width / 2)
y = int(center_y - height / 2)
cv2.rectangle(image, (x, y), (x + width, y + height), (0, 255, 0), 2)
label = f'{class_labels[class_id]}: {confidence:.2f}'
cv2.putText(image, label, (x, y - 10), cv2.FONT_HERSHEY_SIMPLEX, 0.5, (0, 255, 0), 2)
Display the image with bounding boxes
cv2.imshow('Object Detection', image)
cv2.waitKey(0)
cv2.destroyAllWindows()
Code Explanation:
Import Libraries:
Import the necessary libraries, including OpenCV for image processing and NumPy for numerical operations.
Load Pre-trained Model:
Specify the paths to the model's configuration file (model_config) and weights file (model_weights). These files are typically provided by the model's developers.
Use OpenCV's cv2.dnn.readNet function to load the model.
Load Class Labels:
If your model requires class labels (e.g., "car," "dog"), load them from a text file (path_to_class_labels.txt).
Load an Image:
Load the image you want to analyze by replacing 'path_to_image.jpg' with your image's path.
Preprocess the Image:
Preprocess the image to prepare it for the model:
Convert the image to a blob using cv2.dnn.blobFromImage. This function resizes the image, scales pixel values, and prepares it for input to the neural network.
Set the blob as input to the network.
Get Model Output:
Retrieve the output layers' names using net.getUnconnectedOutLayersNames. These layers contain the detection results.
Use net.forward to obtain the object detection results.
Process Detections:
Loop through the detected objects and filter them based on confidence scores (adjust the threshold as needed).
Extract information about each detected object, such as its class ID, confidence score, and bounding box coordinates.
Draw Bounding Boxes:
For each detected object meeting the confidence threshold, draw a bounding box around it using cv2.rectangle (in green).
Display the class label and confidence score near the bounding box using cv2.putText.
Display Result:
Show the image with bounding boxes and labels using cv2.imshow.
Wait for a key press (cv2.waitKey) and close the window when a key is pressed.
Clean up by destroying any OpenCV windows using cv2.destroyAllWindows.


Top comments (0)