
This blog post was written for Twilio and originally published at the Twilio blog.
As part of ASP.NET Identity, ASP.NET Core provides a bunch of features for account management, authentication, and authorization. ASP.NET Identity also sends emails to confirm email addresses and reset passwords, but it's up to you to implement how those emails are sent.
In this tutorial, you will learn how to send ASP.NET Identity emails using Twilio SendGrid.
Prerequisites
You will need these things to follow along:
- An OS that supports .NET (Windows/macOS/Linux)
- .NET 6 SDK
- A code editor or IDE (I recommend VS Code with the C# plugin, Visual Studio, or JetBrains Rider)
- A Twilio SendGrid account. Sign up here to send up to 100 emails per day completely free of charge.
You can find the source code for this tutorial on GitHub. Use it if you run into any issues, or submit an issue, if you run into problems.
Configure your SendGrid account to send emails
There are two things you need to configure before you can send emails: First, you’ll need to set up Sender Authentication. This will verify that you own the email address or domain that you will send emails from. Second, you’ll need to create a SendGrid API Key with permission to send emails.
Sender Authentication
To quickly get started, you will use Single Sender Verification for this tutorial. This verifies that you own the email address that the application will send emails from. Single Sender Verification is great for testing purposes , but it is not recommended for production.
Twilio recommends Domain Authentication for production environments. An authenticated domain proves to email providers that you own the domain, and removes the "via sendgrid.net" text that inbox providers would otherwise append to your from address.
To set up Single Sender Verification, click the Settings tab in the left menu. Once the settings tab opens, click Sender Authentication.

Then, click Get Started under the Single Sender Verification section.

This opens a form in the right-side panel. Fill out the form with your information and email address.
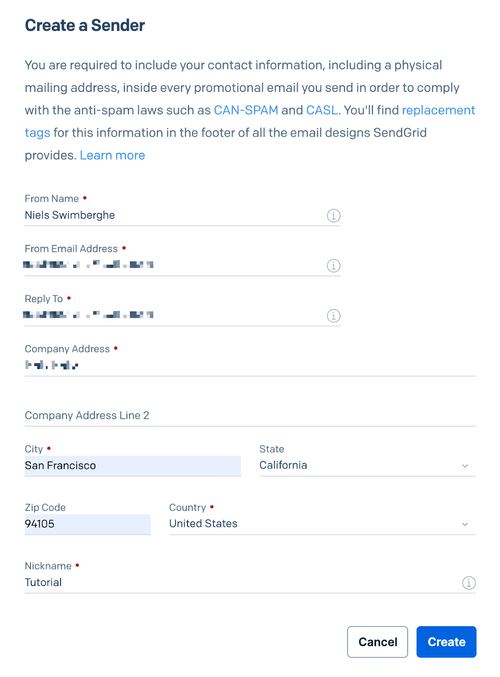
Click Create after filling out the form. Another panel will appear on the right, asking you to confirm your email address in your email inbox.Go to your personal email inbox, open the email from SendGrid, and click Verify Single Sender.

Your email address has been verified. You can now use it to send emails!
Create a SendGrid API key to send emails
Back on the SendGrid website, click API Keys under the Settings tab , then click Create API Key in the top right-hand corner. This opens another form in the right-side panel.
Give your API Key a useful name. You can assign different permissions to the API Key. For optimal security, you should only give the minimum amount of permissions that you need.
Next, click Restricted Access.

Scroll down to the Mail Send accordion item and click on it to reveal the permissions underneath. Drag the slider to the right for the Mail Send permission.

Scroll to the bottom of the form and click Create & View. The API key will now be displayed on your screen.
You will not be able to retrieve the API key again once you leave this screen, so make sure you copy the API Key somewhere safe.

With the sender verified and the API Key created, you’re ready to write some code!
Send Identity emails using Twilio SendGrid
You'll be running a couple commands in this tutorial, but if you prefer using an IDE, there should be equivalent actions for Visual Studio and JetBrains Rider. Open your preferred shell to follow along with the provided commands.
If you already have a web application with ASP.NET Core Identity, skip the next step. In your shell, run the following .NET CLI command to create the project:
dotnet new webapp -o WebAppIdentity -au Individual
This command will generate an ASP.NET Core project with Identity and put it in the WebAppIdentity folder.
Then, navigate to the new project directory in your shell:
cd WebAppIdentity
If you would start the project now, and try to register a new account, the web application will tell you that an email sender has not been configured. Also, it will display a link that would normally be sent to your inbox, to confirm your email, to simulate the process.

However, the real page will be shown when you register the email sender. To do this, you have to first create a class that implements the IEmailSender interface, and then register the class in ASP.NET Core's dependency injection container.
To do this, create a new file in the project's root directory, named SendGridEmailSender.cs, with the following code:
using Microsoft.AspNetCore.Identity.UI.Services;

namespace WebAppIdentity;

public class SendGridEmailSender : IEmailSender
{
  public async Task SendEmailAsync(string toEmail, string subject, string message)
  {
    throw new NotImplementedException();
  }
}
The SendGridEmailSender implements the IEmailSender interface. The interface only expects you to implement one method, SendEmailAsync. This method will be used by ASP.NET Identity to send your emails.
To implement SendEmailAsync method using SendGrid, you'll first need to install the SendGrid library for C# and .NET. Head back to your shell and run the following command to install the library via the SendGrid NuGet package:
dotnet add package SendGrid
Update the SendGridEmailSender.cs file with the following code:
using Microsoft.AspNetCore.Identity.UI.Services;
using SendGrid;
using SendGrid.Helpers.Mail;

namespace WebAppIdentity;

public class SendGridEmailSender : IEmailSender
{
    private readonly IConfiguration configuration;
    private readonly ILogger logger;

    public SendGridEmailSender(IConfiguration configuration, ILogger<SendGridEmailSender> logger)
    {
        this.configuration = configuration;
        this.logger = logger;
    }

    public async Task SendEmailAsync(string toEmail, string subject, string message)
    {
        string sendGridApiKey = configuration["SendGridApiKey"];
        if (string.IsNullOrEmpty(sendGridApiKey))
        {
            throw new Exception("The 'SendGridApiKey' is not configured");
        }

        var client = new SendGridClient(sendGridApiKey);
        var msg = new SendGridMessage()
        {
            From = new EmailAddress("[YOUR_EMAIL_ADDRESS]", "[YOUR_WEBSITE_NAME]"),
            Subject = subject,
            PlainTextContent = message,
            HtmlContent = message
        };
        msg.AddTo(new EmailAddress(toEmail));

        var response = await client.SendEmailAsync(msg);
        if (response.IsSuccessStatusCode)
        {
            logger.LogInformation("Email queued successfully");
        }
        else
        {
            logger.LogError("Failed to send email");
            // Adding more information related to the failed email could be helpful in debugging failure,
            // but be careful about logging PII, as it increases the chance of leaking PII
        }
    }
}
Replace [YOUR_EMAIL_ADDRESS] with the email address you verified with SendGrid earlier, and replace [YOUR_WEBSITE_NAME] with any name. The name will be displayed to the recipient of the emails, so using the name of your website or service would make sense here.
To send emails with SendGrid, you'll need to get the SendGrid API key from the application's configuration, which is why IConfiguration configuration has been added to the constructor parameters. You'll also want to log whether the emails are sent successfully, which is why the ILogger<SendGridEmailSender> logger parameter has been added to the constructor.
Both of these parameters will be injected by ASP.NET Core's dependency injection container, and then stored as fields of the class.
In SendEmailAsync, the SendGrid API key is retrieved from the application's configuration and used to create a new SendGridClient. Then, a SendGridMessage is created, passing in all the parameters passed into the SendGridMessage method.
That message is then sent using the SendGridClient. If the email has been submitted to SendGrid's API successfully, "Email queued successfully" will be logged, otherwise "Failed to send email" is logged as an error.
The project now expects the 'SendGridApiKey' to be configured, but it isn't yet. You could configure the API key in a variety of ways, but because it is a secret, you should avoid storing it in your source code. That's why .NET introduced the Secret Manager tool to store secrets for local development. Initialize the Secret Manager tool for your project by running the following command:
dotnet user-secrets init
Run the following command to configure 'SendGridApiKey' using the Secret Manager:
dotnet user-secrets set SendGridApiKey [YOUR_SENDGRID_API_KEY]
Replace [YOUR_SENDGRID_API_KEY] with the SendGrid API key you took note of earlier.
With the API key configured, the SendGridEmailSender is ready to be registered. Update the Program.cs file to register the SendGridEmailSender as a service:
using Microsoft.AspNetCore.Identity;
using Microsoft.EntityFrameworkCore;
using Microsoft.AspNetCore.Identity.UI.Services;
using WebAppIdentity;
using WebAppIdentity.Data;

var builder = WebApplication.CreateBuilder(args);

// Add services to the container.
var connectionString = builder.Configuration.GetConnectionString("DefaultConnection");
builder.Services.AddDbContext<ApplicationDbContext>(options =>
    options.UseSqlite(connectionString));
builder.Services.AddDatabaseDeveloperPageExceptionFilter();

builder.Services.AddDefaultIdentity<IdentityUser>(options => options.SignIn.RequireConfirmedAccount = true)
    .AddEntityFrameworkStores<ApplicationDbContext>();
builder.Services.AddRazorPages();

builder.Services.AddTransient<IEmailSender, SendGridEmailSender>();

var app = builder.Build();

// Configure the HTTP request pipeline.
if (app.Environment.IsDevelopment())
{
    app.UseMigrationsEndPoint();
}
else
{
    app.UseExceptionHandler("/Error");
    // The default HSTS value is 30 days. You may want to change this for production scenarios, see https://aka.ms/aspnetcore-hsts.
    app.UseHsts();
}

app.UseHttpsRedirection();
app.UseStaticFiles();

app.UseRouting();

app.UseAuthentication();
app.UseAuthorization();

app.MapRazorPages();

app.Run();
That's it!
Save both files and start your project using the .NET CLI:
dotnet run
Take note of the console logs and you’ll see a line with the format: Now listening on: https://localhost:XXXX. Navigate to your web application with this URL in a web browser, click the Register link, fill out the form, and click Register. The next page will tell you to check your email to confirm your account.
Open your email inbox, open the "Confirm your email" email, and click the link in the email to confirm your email address. By clicking the link, your web application will be opened in a new tab and say "Thank you for confirming your email.".

Great job!
Alternatively, you can send emails using SMTP and SendGrid SMTP relay, as shown in this tutorial.
Stop the project by pressing ctrl + c in your shell.
Add SendGridClient to ASP.NET's Dependency Injection container
SendGrid offers an additional package to easily integrate SendGrid into ASP.NET's dependency injection (DI) container. Instead of creating the SendGridClient manually in the SendGridEmailSender class, with this package, you can let the DI container inject an instance of ISendGridClient into the constructor.
Add the SendGrid dependency injection NuGet package using the following command:
dotnet add package SendGrid.Extensions.DependencyInjection
Next, register SendGrid as a service using the builder.Services.AddSendGrid method, by updating the Program.cs file as below:
using Microsoft.AspNetCore.Identity;
using Microsoft.EntityFrameworkCore;
using Microsoft.AspNetCore.Identity.UI.Services;
using SendGrid.Extensions.DependencyInjection;
using WebAppIdentity;
using WebAppIdentity.Data;

var builder = WebApplication.CreateBuilder(args);

// Add services to the container.
var connectionString = builder.Configuration.GetConnectionString("DefaultConnection");
builder.Services.AddDbContext<ApplicationDbContext>(options =>
    options.UseSqlite(connectionString));
builder.Services.AddDatabaseDeveloperPageExceptionFilter();

builder.Services.AddDefaultIdentity<IdentityUser>(options => options.SignIn.RequireConfirmedAccount = true)
    .AddEntityFrameworkStores<ApplicationDbContext>();
builder.Services.AddRazorPages();

builder.Services.AddSendGrid(options =>
    options.ApiKey = builder.Configuration.GetValue<string>("SendGridApiKey")
                     ?? throw new Exception("The 'SendGridApiKey' is not configured")
);
builder.Services.AddTransient<IEmailSender, SendGridEmailSender>();

var app = builder.Build();

// Configure the HTTP request pipeline.
if (app.Environment.IsDevelopment())
{
    app.UseMigrationsEndPoint();
}
else
{
    app.UseExceptionHandler("/Error");
    // The default HSTS value is 30 days. You may want to change this for production scenarios, see https://aka.ms/aspnetcore-hsts.
    app.UseHsts();
}

app.UseHttpsRedirection();
app.UseStaticFiles();

app.UseRouting();

app.UseAuthentication();
app.UseAuthorization();

app.MapRazorPages();

app.Run();
Now, in the SendGridEmailSender.cs file, you can delete the lines to create the SendGridClient and accept an instance of ISendGridClient via the constructor instead. Here's what the updated file looks like:
using Microsoft.AspNetCore.Identity.UI.Services;
using SendGrid;
using SendGrid.Helpers.Mail;

namespace WebAppIdentity;

public class SendGridEmailSender : IEmailSender
{
    private readonly ISendGridClient sendGridClient;
    private readonly ILogger logger;

    public SendGridEmailSender(ISendGridClient sendGridClient, ILogger<SendGridEmailSender> logger)
    {
        this.sendGridClient = sendGridClient;
        this.logger = logger;
    }

    public async Task SendEmailAsync(string toEmail, string subject, string message)
    {
        var msg = new SendGridMessage()
        {
            From = new EmailAddress("[YOUR_EMAIL_ADDRESS]", "[YOUR_WEBSITE_NAME]"),
            Subject = subject,
            PlainTextContent = message,
            HtmlContent = message
        };
        msg.AddTo(new EmailAddress(toEmail));

        var response = await sendGridClient.SendEmailAsync(msg);
        if (response.IsSuccessStatusCode)
        {
            logger.LogInformation("Email queued successfully");
        }
        else
        {
            logger.LogError("Failed to send email");
            // Adding more information related to the failed email could be helpful in debugging failure,
            // but be careful about logging PII, as it increases the chance of leaking PII
        }
    }
}
When you run the project again, you'll see that everything still works, as before, but in addition to injecting ISendGridClient into the SendGridEmailSender class, you can accept ISendGridClient anywhere in your application that supports dependency injection.
Sending identity emails in ASP.NET Core with SendGrid
ASP.NET Core provides a straightforward interface, IEmailSender, to let developers implement their own email integration. When you implement IEmailSender and register it as a service, ASP.NET Core Identity will start using your implementation to send confirmation and password reset emails. You can quickly implement the IEmailSender using SendGrid's .NET library.
Additional resources
Check out the following resources for more information on the topics and tools presented in this tutorial:
Account confirmation and password recovery in ASP.NET Core – If you want to learn more about the emails for confirming email address and recovering password, check out this Microsoft documentation.
SendGrid C# .NET SDK on GitHub – This GitHub repository contains helpful documentation on how to integrate with SendGrid using .NET using SendGrid's .NET library.
Configure Console app on Microsoft Docs – You used environment variables to store the API Key in this tutorial, but it is recommended to use .NET's configuration APIs. Learn how to configure .NET console applications using the host builder.
Source Code to this tutorial on GitHub – Use this source code if you run into any issues, or submit an issue on this GitHub repo if you run into problems.

Top comments (0)