MERN stack is made up of four technologies
- M for MongoDB: MongoDB is a NoSQL database that stores data as JSON objects.
- E for Express: Express is a NodeJS framework that is used for building web and mobile applications.
- R for React: React is frontend framework built by Facebook for building single page applications.
- N for Node: Node is JavaScript backend runtime environment.
To learn the MERN stack we will be developing an Instagram clone from back to front. So we will start with our node backend. This will be a two part tutorial. This article will focus on the backend.
This tutorial assumes you already have NodeJS installed and also have a basic understanding of JavaScript.
Now let's start.
Open your favorite text editor and create a new project directory and name it whatever you want. I am using VS Code but you can use any editor of your choice.
Set up project and install packages
After creating your project directory open the terminal in your project directory and run: npm init -y to generate an empty project without going through an interactive process.
With the project set up, we need to install the following packages, run npm i express mongoose cors dotenv. Express to set up the server and mongoose to serve as a client for mongoDB. Dotenv is be used to store our environmental values. We also install nodemon, run the npm i -D nodemon. This will install nodemon as devDependency, nodemon restarts our server every time it detects changes in any of the project files. You can choose to ignore installing nodemon.
server.js file
Create a server.js file in the main project directory and add the following code.
const express = require("express");
const cors = require("cors");

const app = express();

const port = process.env.PORT || 5000;
app.use(cors());
app.use(express.json());


app.listen(port, () => {
  console.log(`Server running on port: ${port}`);
});
We import express and set up the express server on port 5000 and we also import the cors middleware and use it an express middleware. We will start our sever by running nodemon server.js if you did not install nodemon, then run node server.js
MongoDB Set up
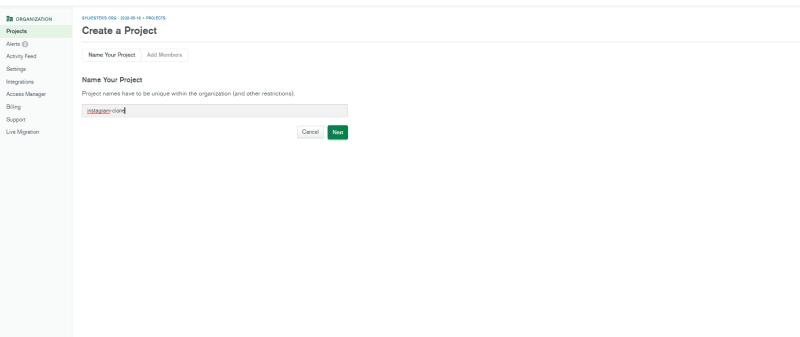
Now before we proceed to anything, we need set up our database to store user, posts and other stuff. So let's go over to mongoDB , create an account if you don't have one already. Create a new project and given it a name

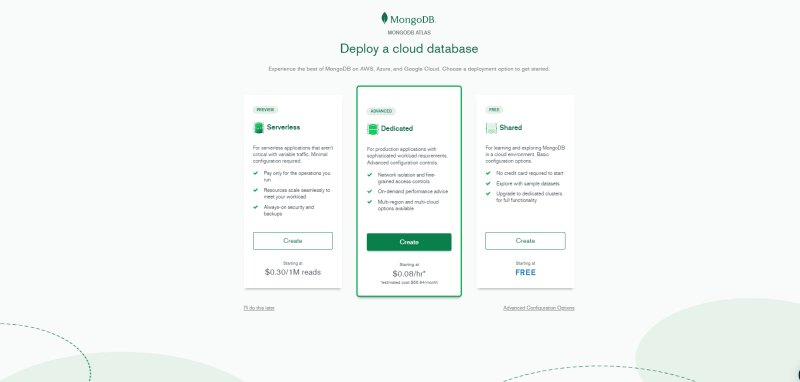
Click on build a database.

Select the free account

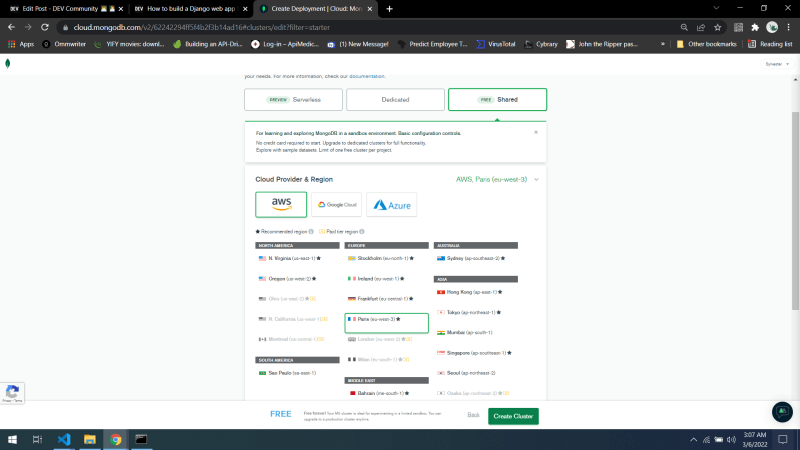
Click on create cluster on next page.

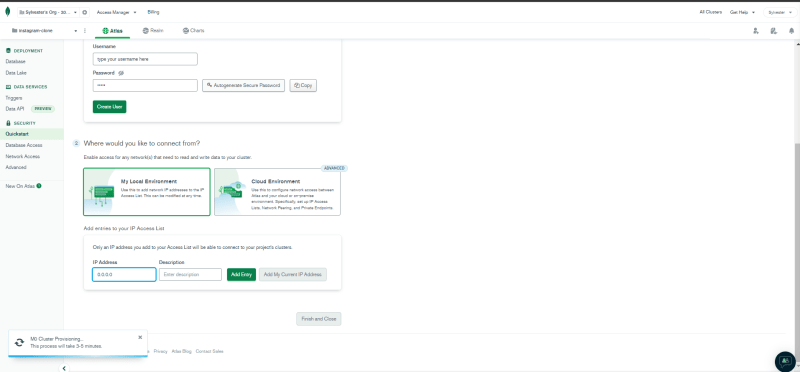
Create the username and password for the database (remember the password, you are going to need it later). Also add the IP address of the your computer, you can add an IP of 0.0.0.0 to allow access from anywhere. After filling fields you click on finish and close to complete the process, it might take a while to complete setting up your cluster.
Connecting MongoDB to our node server
Now that we have our cluster ready, we need to connect our database to the server. On the database deployment page click on connect and click on connect application. Copy the connection string, it should look something like this mongodb+srv://<username>:<password>@cluster0.xzfc0.mongodb.net/<database-name>?retryWrites=true&w=majority
Replace <username>, <password>, <database-name> with the respectively values in your database.
Create .env file
Create an .env file in the project directory.
ATLAS_URI=mongodb+srv://<username>:<password>@cluster0.xzfc0.mongodb.net/<database-name>?retryWrites=true&w=majority
Now we can access the database from anywhere using the process.env.ATLAS_URI
Setting the mongoose client
const express = require("express");
const mongoose = require("mongoose");
const cors = require("cors");
require("dotenv").config();

const app = express();

const port = process.env.PORT || 5000;
app.use(cors());
app.use(express.json());

const uri = process.env.ATLAS_URI;
mongoose.connect(uri, { useNewUrlParser: true });

const connection = mongoose.connection;
connection.once("open", () => {
  console.log("Databse connection established");
});

app.listen(port, () => {
  console.log(`Server running on port: ${port}`);
});
We import the dotenv to allow us to access ATLAS_URI in the .env. Next we connect the mongoose client to to the mongoDB database by passing in the connection string and setting useNewUrlParser: true. Then after, we listen for database connection with once open callback function to signify that a database connection has been established.
Now you are done with the database set up and we can now start writing some code.
Defining the database models.
This is how our application is going to work, first a user creates an account, then they can post an content with an image attached to it, users can also comment on the posts.
Now that we understand how our application works, we can conclude that we need we different document types, one for Users, one for Comments and another for Posts.
Defining the User Model.
//user.model.js
const mongoose = require("mongoose");
const Schema = mongoose.Schema;
const userSchema = new Schema({
  username: {
    type: String,
    required: true,
    trime: true,
    minlength: 3
  },
  password: {
    type: String,
    required: true,
    trime: true,
    minlength: 3
  }
});
const User = mongoose.model("User", userSchema);
module.exports = User;
We start off by creating a models folder in the project directory and then creating a user.model.js file.
We import Schema from mongoose, this will help us define the template Schema for how every user document will look like. The first property in schema is username which he set to required and trim to remove whitespace around the text. We also set the type to String and set a minlength to 3. The same constraint are applied to the password property. After defining the schema we create the User model in the database with mongoose.model("User", userSchema) and then export model for use outside the file.
Defining the Comment model
//comment.model.js
const mongoose = require("mongoose");
const Schema = mongoose.Schema;

const commentSchema = new Schema({
  content: {
    type: String,
    required: true,
    trim: true
  },
  username: {
    type: String
  }
});

const Comment = mongoose.model("Comment", commentSchema);
module.exports = Comment;
Just as we did for the user.model.js file, we will create comment.model.js in the model folder. The comment schema constraints will be similar to those in the user schema.
Defining the Post model.
//post.model.js
const mongoose = require("mongoose");
const Schema = mongoose.Schema;
const postSchema = new Schema({
  caption: {
    type: String
  },
  image: {
    type: String
  },
  comments: [{ type: Schema.Types.ObjectId, ref: "Comment" }],
  username: {
    type: String
  },
  date: {
    type: Date,
    default: Date.now
  }
});

const Post = mongoose.model("Post", postSchema);
module.exports = Post;
We will also create a post.model.js in the models folder. The schema here looks like the previous ones with a few differences so let's address them. The first one, comments, we reference the Comment model and put it in square brackets to signify that anything stored as comments here will be pushed to an array. The date property uses the type Date and set the date when a new instance of the model is created.
Defining the Routes
Now that we have described what each model should look like, we need to set the endpoint for users to be able to make requests to create account, login, add post and also add comments. We will start with defining the user route to register and login.
Defining the user route.
The user route will allow users to create new account and also login, which means we will be dealing with user passwords. User passwords are sensitive and we don't want anyone with access to the database to just login and collect user passwords. So we will use bcryptjs to hash the password and store the returned value in the database along with other user data. We also need to install jsonwebtoken to generate authentication token for login and register sessions. Run the following npm i bcryptjs jsonwebtoken.
bcryptjs uses a secret to decode and encode data. To generate this secret we use the crypto package that comes default with Node. Insert the following anywhere in your server.js.
console.log(require('crypto').randomBytes(64).toString('hex'))
// you can delete this line once the string has been generated
//3f362725c4b4a206be3a7e17b2451d6c274f3b8190a0b7eb642ab53ff3537bb9cc6060913dbc7321dc00fd45158f4c9dffb2c5554ed9b834d0b09fab7a4dd8bc
Copy the generated the text and store it in your .env file.
TOKEN_SECRET=3f362725c4b4a206be3a7e17b2451d6c274f3b8190a0b7eb642ab53ff3537bb9cc6060913dbc7321dc00fd45158f4c9dffb2c5554ed9b834d0b09fab7a4dd8bc
Now we can access the TOKEN_SECRET from anywhere using the process.env.TOKEN_SECRET
Create a router folder and create a users.js file
//users.js
const router = require("express").Router();
const bcrypt = require("bcryptjs");
const jwt = require("jsonwebtoken");
let User = require("../models/user.model");

function generateAccessToken(id, username) {
  return jwt.sign({ id, username }, process.env.TOKEN_SECRET, {
    expiresIn: "3600s"
  });
}


router.route("/register").post((req, res) => {
  const { username, password } = req.body;

  if (!password || !username) {
    return res.status(400).json({ msg: "Please Fill All Fields" });
  }

  const newUser = new User({ username, password });
  User.findOne({ username: username }, (err, user) => {
    if (user) {
      res.send({ message: "User Already Exist" });
    } else {
      bcrypt.genSalt(10, (err, salt) => {
        bcrypt.hash(newUser.password, salt, (err, hash) => {
          if (err) throw err;
          newUser.password = hash;
          newUser.save().then((user) => {
            const token = generateAccessToken(user.id, user.username);
            res.json({
              token,
              user
            });
          });
        });
      });
    }
  });
});

router.route("/login").post((req, res) => {
  const { username, password } = req.body;

  if (!password || !username) {
    return res.status(400).json({ msg: "Please Fill All Fields" });
  }
  User.findOne({ username: username.toLowerCase() }, (err, user) => {
    if (user) {
      bcrypt.compare(password, user.password).then((isMatch) => {
        if (!isMatch)
          return res.status(400).json({ msg: "Invalid Credentials" });

        const token = generateAccessToken(user.id, user.username);

        res.json({
          token,
          user
        });
      });
    }
  });
});

module.exports = router;
Let's break down the code above.
- We first import the
express router,bcryptjsandjsonwebtoken. - Next we define a function to encode the user id and username into the generate token with a lifetime of 3600s (1hr), later when generate the token we will be able decode the token and get back the username and id.
- The first route is a
/register, we destructure the request body to get the username and password. We also check the values of the username and password fields and throw an error if empty. - Store the username and password in the User model we created early, then we will check is the provided username already exists in the database if so then we throw an error.
- Else if the username does not exist in the database, we use the
genSaltmethod ofbcryptjsto generate random bits and add them to our password before hashing it. - After the hash is generated we replace the text password with the hash.
- We call the
generateAccessTokento create a new token for the user and send back the token with the user info. - The next route is the
/loginroute. It is pretty much the as the/registerroute, the only different is that instead generating a salt we compare the password provided by the user with the hash password stored in the database and if there is a match we proceed like we did with the/registerroute. - Lastly, export the user router.
To be able to use the user router, we need to import it in the server.js file.
const usersRouter = require("./routes/users");
app.use("/users", usersRouter);
Defining the auth middleware and the posts route
Now that we have create our users, they need to be able to add posts and also comment on other posts. But will need to only allow authenticated users to be able to perform the previously mentioned functions. So we will need to create an auth middleware to check if the user has a valid token before they can post or make comments.
In the project directory create a middleware folder and add an auth file.
//auth.js
const jwt = require("jsonwebtoken");

module.exports = (req, res, next) => {
  const authHeader = req.headers["authorization"];
  const token = authHeader && authHeader.split(" ")[1];

  if (token === null) return res.sendStatus(401);

  jwt.verify(token, process.env.TOKEN_SECRET, (err, user) => {
    if (err) return res.sendStatus(403);
    req.user = user;
    next();
  });
};
We import the jsonwebtoken and check for an authorization header in the user request and extract the authorization token by splitting the headers, if they is no token an error is thrown. Else we verify the token to check if it has not expired and then execute the next() function to pass control over to the next middleware. We export the function also to allow access from anywhere.
Now back to the post route.
In the routes folder create a post.js file.
//post.js
const router = require("express").Router();
const auth = require("../middleware/auth");
let Comment = require("../models/comment.model");
let Post = require("../models/post.model");
let User = require("../models/user.model");

// get all post
router.get("/", auth, (req, res) => {
  Post.find()
    .sort({ date: -1 })
    .then((posts) => res.json(posts))
    .catch((err) => res.status(400).json("error: " + err));
});
// add a new post
router.route("/add/:id").post(auth, async (req, res) => {
  const { caption, image } = req.body;
  const { id } = req.params;
  const user = await User.findById(id);
  const newPost = new Post({
    caption,
    image,
    username: user.username
  });
  newPost
    .save()
    .then(() => res.json("Post Added"))
    .catch((err) => res.status(400).json(err));
});
//add a comment
router.route("/add-comment/:id/:userId").post(auth, async (req, res) => {
  const { id, userId } = req.params;
  const { content } = req.body;
  const user = await User.findById(userId);

  const newContent = new Comment({
    content,
    username: user.username
  });
  newContent.save().then(() => res.json("Comment Added"));
  Post.findByIdAndUpdate(
    { _id: id },
    { $push: { comments: newContent } },
    (err, data) => {
      if (err) res.status(400).json("error: " + err);
      else res.status(200).json(data);
    }
  );
});

// get a post
router.route("/:id").get(auth, (req, res) => {
  Post.findById(req.params.id, (err, post) => {
    if (err) res.status(400).json("error: " + err);
    else res.status(200).json(post);
  });
});

// get all comments for a post
router.route("/comments/:id").get(auth, (req, res) => {
  Post.findById(req.params.id, (err, post) => {
    if (err) res.status(400).json("error: " + err);
    else res.status(200).json(post.comments);
  });
});
module.exports = router;
The first part of the code import the express, the auth middleware and the various models we will use later.
- The first route is the a get route that returns all the posts in the database sorting it in a descending order date-wise. We pass in the middleware function, to ensure that request is been made by an authenticated user.
- The next route is a post route to add a new post. We destructure the caption and image from the request body and also the id of the username from request params. We use an async function to get the username from the User model and store the new post in the Post model.
- After saving the model, we then save the model instance in the database.
- Next, we define the add a comment, this is also a post request method. We pass in the
idof the post the usernames is commenting anduserIdof the user making the comment. We destructure the req.body to get the content of the user comment and store it the comment model and save it in the database. - After saving the new comment we need to find the specific post the user wants to comment in the database and update by pushing the new comment to its comment array.
- The next route is a get method to fetch single post from the database.
- And the last route is a get method that returns all comment made under a specific post.
- Lastly we export the router.
We use the auth middleware in all the above route to make sure only authenticate can use them.
After exporting the router we will import in our server.js file and define the endpoint to the post router.
const postsRouter = require("./routes/posts");
app.use("/posts", postsRouter);
Defining the comment route
Because the comments are been stored in their own model whenever we make a request in the post router, the comments will be returned as ObjectId, so we will need to define a route to get the actual data from the database.
Create a comment.js file in the routes folder.
const router = require("express").Router();
const auth = require("../middleware/auth");
let Comment = require("../models/comment.model");

router.route("/:id").get(auth, (req, res) => {
  Comment.findById(req.params.id, (err, comment) => {
    if (err) res.status(400).json("error: " + err);
    else res.status(200).json(comment);
  });
});
module.exports = router;
We import the express router, the auth middleware and the Comment model. Then we define a get method fetch a the user comment. And export the router like we did for the other routers.
We import the comment router in the server.js file, now the server.js file should look something like this.
//server.js
const express = require("express");
const mongoose = require("mongoose");
const cors = require("cors");
require("dotenv").config();

const app = express();

const port = process.env.PORT || 5000;
app.use(cors());
app.use(express.json());

const uri = process.env.ATLAS_URI;
mongoose.connect(uri, { useNewUrlParser: true });

const connection = mongoose.connection;
connection.once("open", () => {
  console.log("Databse connection established");
});

const usersRouter = require("./routes/users");
const postsRouter = require("./routes/posts");
const commentRouter = require("./routes/comment");

app.use("/users", usersRouter);
app.use("/posts", postsRouter);
app.use("/comment", commentRouter);

app.listen(port, () => {
  console.log(`Server running on port: ${port}`);
});
Now everything should be working fine and we should be able to login, create an account, add posts and also make comments.
A recap of what we have done so far
- We set up our express server and mongoDB database.
- Next, We generated a jwt secret.
- Then we define the models for the user, comment and post.
- After that we defined the routes for the individual models. This concludes everything we need to do on the backend, next up is the frontend. You get access to the full backend code here


Oldest comments (1)
I'm not sure your Instagram clone will be as popular and feature-rich as the original one. The fact is that the original platform has evolved over many years and has set the standard for quality. All functions are designed and made so you can always get everything you need for your development as a personal brand. There have recently been opportunities for additional popularity growth, e.g., famoid.com/buy-instagram-followers/. I think it is more familiar and convenient for people to use a platform that they already know and understand than to get used to something new.
Some comments have been hidden by the post's author - find out more