I was able to create and evaluate an anomaly detection model in 30 minutes using ADFI( https://adfi.jp ), a cloud platform for image anomaly detection.
It was very useful, so I would like to introduce you how to use it.

What’s ADFI?
ADFI( https://adfi.jp ) is a cloud platform that automatically creates anomaly detection models for images and evaluates their performance.
The AI model we created can be used at any time via the API.
Anyone can try model creation and performance evaluation for free.
There is a charge when using the API.
There are only two things we do with ADFI: “upload training and test images” and “set thresholds”!
Without coding, we can create an image anomaly detection model and perform performance evaluation automatically.
Of course, there is no need to set or tune hyperparameters. Even non-experts can create anomaly detection models.
Anomaly detection methods available in ADFI
The following two methods can be used.
It’s nice to be able to create a deep metric learning model on the cloud even if you don’t have a GPU machine!
MSPC (Multivariate Statistical Process Control)
Only available in cases where the position of the inspection target in the image is fixed.
No anomalous data is required for training.
It is written as “PCA-MSPC” on the ADFI.
Deep Metric Learning
DML is used in cases where MSPC is not available.
Requires 5 or more anomalous data for training.
It is written as “DML” on the ADFI.
The result of creating models on ADFI
I tried several public datasets (MVTec) to measure training time and performance.
There is a limit to the number of images that can be uploaded with the ADFI free plan.
Since it is limited to 100 images per dataset, I uploaded 100 images for training and test.
If paid plan, you can upload up to 2000 images per dataset.
Dataset image examples:

Results of creating anomaly detection model for each dataset with ADFI:

It was amazing results!
What’s more, the training time is so short (about 20 seconds to 10 minutes).
Try using ADFI (Procedure explanation)
1. Create an account and sign in
(1) Press “Sign In / Sign Up” on the upper right of the ADFI website( https://adfi.jp ).
(2) Press “Create a new account”.
(3) Enter the required information such as your email address in the account registration form, check the check box, and press “REGISTRATION”.
(4) A confirmation email will be sent to the registered email address. Click the link in the email to complete the account registration.
(5) Sign in with the registered account.
2. Project creation and dataset creation
(1) On the screen immediately after sign in, click the “NEW PROJECT” button on the upper right to create a new project.
(2) Click the link of the created project name.
(3) There are lists of “Dataset for PCA-MSPC” and “Dataset for DML” at the bottom of the screen where “Project Detail” is displayed, so click the “NEW DATASET” button on the right side of the dataset.
(4) Click the link of the created dataset name.
3. Image upload

(1) Click the “Normal Train image” button to upload normal data for training.
(2) (For DML only) Click the “Abnormal Train image” button to upload anomaly data for training. Press the “Select” button on the right side of the anomaly data to select the area containing anomalies.
(3) Click the “Normal Test image” button to upload normal test data.
(4) Click the “Abnormal Test image” button to upload the anomaly data for testing.
- If you select multiple image files to upload, you can upload multiple images at once.
4. Set the inspection range
The range of the inspection in the image can be optionally set.

(1) Click the “INSPECTION RANGE SETTING” tab.
(2) Drag in the image to set the range to be inspected.
(3) Click the “Save Inspection Range” button.
5. Anomaly detection model creation
Click the “Create AI Model” button to start learning. Wait for a while.
6. Setting the threshold
After learning is complete, you can set thresholds on the “AI MODEL SETTING” tab.
Two threshold values, “Main” and “Sub”, can be set at the same time.
By setting a strict threshold and a loose threshold at the same time when introducing ADFI to a visual inspection system, it is possible to operate such as “if the score of an object is between the two thresholds, it will be checked by human”.
(1) Press the “AI MODEL SETTING” tab.
(2) Click the “Set Auto Threshold” button. The threshold is automatically set.
(3) (If you want to adjust the threshold by yourself) While checking the histogram of the score distribution of the test data, enter an arbitrary value for the threshold and then press the “Save Threshold” button.
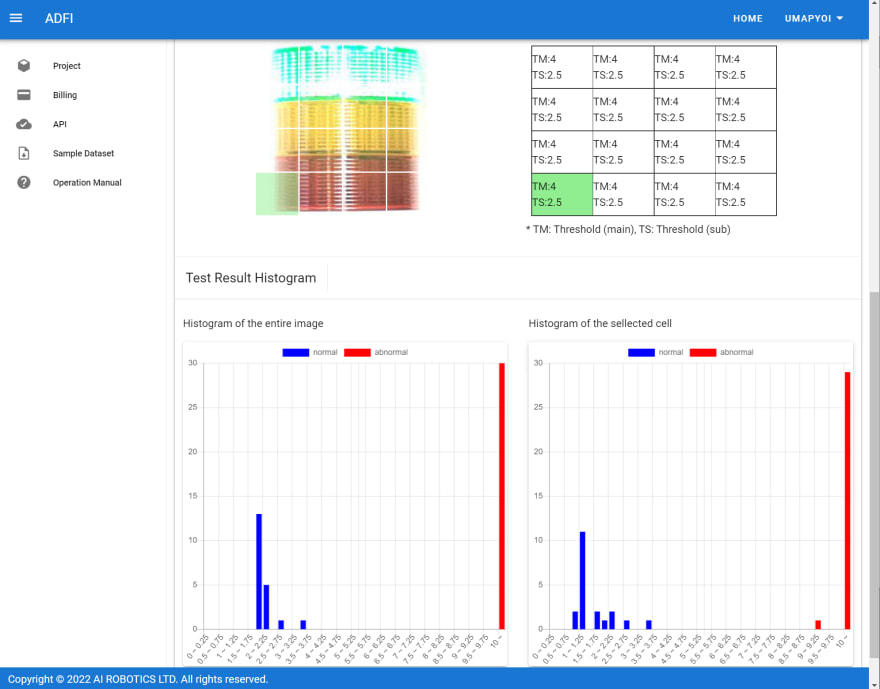
7. Test and confirmation of evaluation results

(1) Press the “TEST” tab.
(2) Click the “TEST” button to display the test results.
(3) Click the “Download” button to download detailed test results for each data in CSV format.
(4) Repeat “6. Setting the threshold” and “7. Test and confirmation of evaluation results” until the result is satisfactory.
Supplement
I found the official operation manual.
If you want to know more, please see here.
Next article
https://dev.to/umapyoi/performance-of-anomaly-detection-cloud-platform-with-mvtec-dataset-4h0n

Top comments (0)