What is a connector?
Teams connectors (or more specifically Office connectors) are inbound webhooks into Microsoft Teams. This means that a connector gives you an URL with which you can post messages in a specified channel at any time.
GitHub for example uses this mechanism to notify your team when a new pull request was accepted into a certain repository, Trello can notify the team about upcoming deadlines. Besides MS Teams, Connectors can also be used in Outlook to notify users via mail.

The basic functionality of a connector
A connector consists (from a developers perspective) of two parts: A configuration page and a backend. The configuration page is displayed directly in Teams and should be used to specify the content that is posted to the channel. So you could for example specify which task lists you want to monitor, about which type of messages you want to be notified, or how often you would like to receive notifications. The second part is the backend. Here you should store the webhook URL and send POST requests to that URL to send messages into the channel.
Configuring your connector for Teams
Besides the implementation itself you will also need a Teams App that the user can install in order to access your connector in the first place. And to create a Teams App, you should use a Teams App. More specifically, App Studio offers you the capabilities to just click through the App creation process and gives you a manifest.json file which contains your app configuration. Although you only need that manifest.json in the end (and you could write it from scratch if you're into that) it is always recommendable to use App Studio. It offers all configuration options available for the manifest and offers built-in error checking.
You will also need to register your connector in the Office 365 connector dashboard. Doing so gives you a connector ID which identifies your connector and gives your users more information about the organization that wants to post content into their channel. Besides some explanatory text for your connector, two settings are especially important: The configuration page (we will hear more about that in the next paragraph) and enabling actions on your card. If you do not enable actions, buttons that post a message to your app won't work (for example, you're posting a message into Teams that reminds you of an important task and you want to offer a button saying "Mark as completed"). When you successfully registered the connector, download the Teams manifest and start right away!
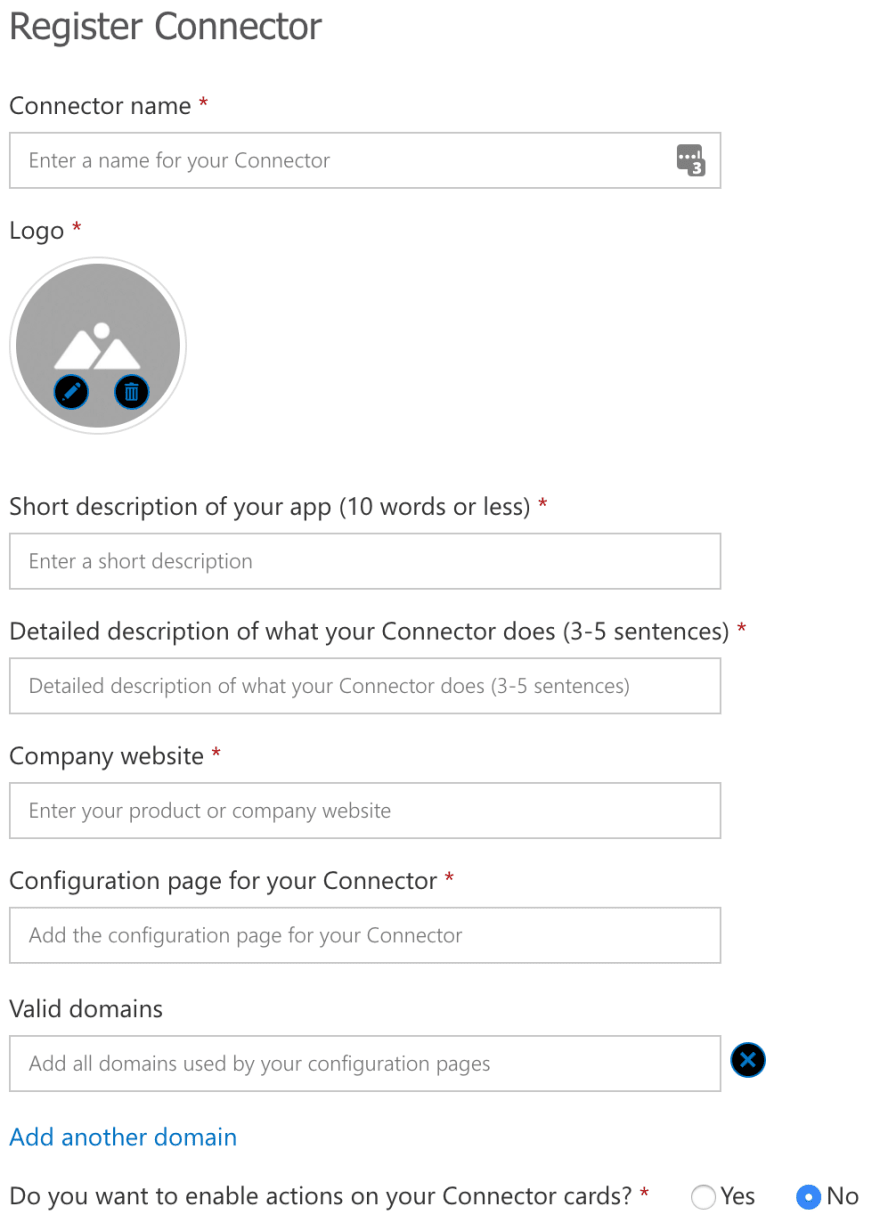
You only have to provide this information to register your connector
The configuration page is a HTML page that you can use to ask the user which data they want to get notified about in their channel. Specifically, you can ask for any information you need from the user, and based on this information you can select which data the channel just subscribed on and therefore which data you will send to the channel. Most of the following guide will be dedicated to writing a configuration page, so let's jump right in.
Developing your first connector
For your first connector, you will need only a configuration page. You can print the webhook URL directly to the configuration page, and then use tools like Postman to send messages to your specified channel. You can find the code for this step here.
To get our webhook URL, we have to register the connector within the channel. We need a Teams app, and this Teams app needs an URL to your configuration page (Note: localhost won't work, for developing you should use tools like ngrok). To interact with Teams from a frontend side, Teams offer the so-called Teams JavaScript SDK. In order to tell Teams if our configuration went successful, we will need the SDK. As we only want a webhook URL in the first step, we don't need any input elements in the HTML. We only need a container to display the webhook URL later on:
<span id="url"></span>.
Now we can start working with the Teams context. Before using the Teams SDK, you always have to initialize it first. You can do this by calling
microsoftTeams.initialize();.
Configuring a connector on the Teams side consists of four steps:
- Providing additional information about your connector
- Receiving the webhook
- Telling Teams what to do when the user hits "Save"
- Enabling the "Save" button
To give Teams more information about your connector, you should call microsoftTeams.settings.setSettings({...}) with the settings JSON object as the parameter. You need to provide these settings:
-
entityId: An unique ID of your connector in the channel. Is needed when you want to reference your connector from within Teams (e.g. you want to create a link to the connector configuration) -
configName: The string that will be displayed to users when they look up their existing connector configurations in Teams -
contentUrl: The URL which is called whenever the user wants to update the configuration
All together, the call could look like this:
microsoftTeams.settings.setSettings({
    entityId: "sampleConn",
    configName: "sampleConfig",
    contentUrl: "https://e6d84899.ngrok.io"
});
Next, we have to receive the webhook URL from Teams. This is actually a very familiar setting: We call microsoftTeams.settings.getSettings((settings) => {...}). In Teams the settings for your webhook are created as soon as you call setSettings(), so only then we can get the connector settings. getSettings() requires a callback that the settings are parsed to. For the moment we only want to print the webhook URL of the settings to the screen, so the call looks like this:
microsoftTeams.settings.getSettings(s => {
    document.getElementById("url").innerText = s.webhookUrl;
});
Though we now got everything we came for, the webhook isn't activated yet. To activate it, we have to save our configuration. This process consists of two steps: First, we specify what should happen when the user clicks on "Save". To do so, we call microsoftTeams.settings.registerOnSaveHandler((saveEvent) => {...}). In the actual handler, we need to at least call saveEvent.notifySuccess(); to tell Teams that our saving process is successfully completed. And second we have to make the "Save" button clickable by calling microsoftTeams.settings.setValidityState(true);. All together, our calls looks like this:
microsoftTeams.settings.registerOnSaveHandler((saveEvent) => {
    saveEvent.notifySuccess();
});
microsoftTeams.settings.setValidityState(true);
And here you go, your first connector is completed! Open Postman, copy your webhook URL into the URL bar, set your body to application/json and POST this message:
{
"text": "Hi I'm a connector test!"
}
Your first connector message now is available in your channel!
Securing the connector: Adding authentication
Now that you are able to play around with your first connector, you got the idea behind connectors. We can now start thinking about building a connector that actually could run in a production environment. From the configuration page, this means one thing above all: Security. We have to make absolutely sure that only authorized users are able to configure connectors. To do this, you should leverage Azure Active Directory (AAD) and log your users in before they are able to make any configurations. An implementation of this step can be found here.
On the HTML side, you have to insert a new button into your page. Teams will spawn a popup if you want to authenticate your current user, and popups that are not triggered by a direct user interaction are usually blocked. In the example the default text is hidden in another div for UI reasons. This leaves you with this code:
<button id="login" onclick="login()">Authenticate before configuring the connector!</button>
<div id="success" style="display: none;">
    Copy your webhook URL from here to POST messages in this channel: <span id="url"></span><br><br>
    Don't forget to click on "Save" to activate your connector.
</div>
Triggering a login in the frontend SDK is pretty intuitive. Just call microsoftTeams.authentication.authenticate({...}) and specify the login URL, the proportions of the popup as well as success / failure callbacks. The only thing you should keep in mind is that the login URL must be on the same URL on which your configuration page is hosted. So you can't directly redirect on example.secureLogin.com if your page runs on mysite.com, but you have to redirect to mysite.com/login first.
function login() {
        microsoftTeams.authentication.authenticate({
            url: window.location.origin + "/login",
            width: 600,
            height: 535,
            successCallback: function (result) {
                console.log(result);
                configure();
            },
            failureCallback: function (reason) {
                console.error(reason);
            }
        });
    }
When a user hits the /login endpoint, the example just redirects that user to the Azure Active Directory login page without any further checks. Creating a backend to support AAD logins is a (quite intuitive and fast) topic on its own, so to not bloat this article you can find instructions for that here. In the end, we get an access_token that contains some user information and enables you to call Microsoft services to get further information about the user. Though many tutorials directly get this token at the client side, this isn't a wise idea. Access tokens are valid for a hour, and whoever possesses such a token has access to sensitive user information. And as the client (more specifically, a browser) can have all kinds of vulnerabilities (like for example malicious add-ins) that could steal anything that goes over the wire, you shouldn't hand out such a sensitive token to your users.
But how do we pass anything to the configuration page anyways? Right now you have a popup where the user can log in, but this isn't your config page. The answer again lies in the Teams SDK: When the login process has finished, you have to redirect your user to a new HTML page that you host. On this page, you initialize the Teams SDK and call microsoftTeams.authentication.notifySuccess({...}) or microsoftTeams.authentication.notifyFailure() respective of if the login process succeeded. You could pass and access token as well as an id token to the client, but in the example implementation all this sensitive information is kept server-side. So you can send back just a placeholder indicating that everything succeeded (given that we won't need to persist the token anyways, you don't need to give some session ID to the client). The example uses ejs which is a very straightforward rendering engine for Node.js that allows to execute JavaScript whilst rendering HTML pages. The final code could look like this:
microsoftTeams.initialize();

        //notifySuccess() closes the popup window and passes the specified information to the configuration page
        //Usually you would pass the tokens in here, but as we don't want to expose user tokens to the client and we only need a proof that the user is who we claims (authentication), we leave these fields empty
        <% if(successfulAuth) { %>
        microsoftTeams.authentication.notifySuccess({
        idToken: "N/A",
        accessToken: "N/A",
        tokenType: "N/A",
        expiresIn: "N/A"
    })
    <% } else { %>
        microsoftTeams.authentication.notifyFailure("User could not be verified");
    <% } %>
Calling this will close the popup and pass the information specified to the client. And just like that, you authenticated your user and made your app a lot safer!
Further steps to an awesome connector
If you now send the webhook URL to your server instead of just displaying it to your user, you took every step to create a solid base for your actual connector logic. Now the actual fun part starts: You have to implement some configuration options for the user to choose from when setting up the connector, store the webhook URL in your backend and trigger some event mechanisms whenever an user should be notified. For storing your connector, you should keep a few things in mind:
- Next to the webhook URL, you should also keep the channel ID to eventually check (via Microsoft Graph) the members of the channel.
- In your backend, you need a scalable and efficient process to trigger messages to the webhook URL. Utilize the Notification Event Pattern or the Observer Pattern and services like Azure Functions or Azure Event Grid.
Congratulations, you are now equipped to build an awesome connector and keep your Teams up-to-date about anything that happens in your application!

Top comments (0)