What is Prisma?
The basic explanation would be: Prisma is an ORM tool for developers to build fast.
A more in-depth explanation would be: Prisma is an extensive ORM tool that helps developers to make database migrations and changes and create extensive queries with basic knowledge of SQL and it's a type-safe database client ❤️.
Prisma supports multiple databases to work with:
- PostgreSQL
- MySQL
- SQLite
- SQL Server
- MongoDB
- CockroachDB
Get Started
Before we start using Prisma all the examples below will be using the "PostgreSQL" database as a setup. But you can use any of the supported databases usage will be the same.
If you would like to see if it's working you can find the Github link at the bottom of the page.
Setup
Let's create our project folder for our example.
mkdir prisma-101
cd prisma-101
And initiate our npm and install our dependencies.
npm init -y
npm install prisma typescript ts-node @types/node --save-dev
npm install @prisma/client
To use the typescript capabilities of Prisma let's set up our tsconfig.json file.
{
  "compilerOptions": {
    "sourceMap": true,
    "outDir": "dist",
    "strict": true,
    "lib": ["esnext"],
    "esModuleInterop": true
  }
}
Let's start using prisma.
npx prisma init
This command will create a folder named "prisma" for you and in that, you can find "schema.prisma" file which will be used for our database schema and migrations.
Schema Explanation
Prisma schema uses its own field types that are mapped to specific database types. All the fields that are mapped, you can find in the link below.
Schema Update
Now let's create our own schema for the example we will be using.
generator client {
  provider = "prisma-client-js"
}

datasource db {
  provider = "postgresql"
  url      = env("DATABASE_URL")
}

model User {
  id String @id @unique @default(cuid())

  email String @unique
  name  String

  Posts Post[]
}

model Post {
  id String @id @unique @default(cuid())

  title   String
  content String

  published Boolean @default(false)

  createdAt DateTime @default(now())
  updatedAt DateTime @updatedAt


  authorId String
  Author   User   @relation(fields: [authorId], references: [id])
}
Prisma init will create a .env file for you to define database connection change it to your postgresql url before moving forward.
Our schema will be looking like this after our changes. The definitions that we have put after field types are called "attribute" for that field. And let's check what they are doing.
id
"id" is used for the defining database "id" field.
default
"default" is used to define a default value for the field if the field has not been specified on creation time.
unique
"unique" attribute is used for defining to specify the field values that will be unique for each row.
updatedAt
"updatedAt" is an attribute used for only "DateTime" field that specifically updates while the row is updated.
relation
"relation" attribute is used for defining relations between Models/Tables.
For more in-depth explanations and other attributes please visit the link below.
Migration of the Schema
After making changes in your schema you need to run the command to create your migrations.
npx prisma migrate dev --name init
This command will create a folder in your "prisma" folder that contains .sql file for migrations and run the migration file through your database and make sure it's on the migrations with the database.
Prisma Usage
Let's start using our generated "prisma" to make queries to our database.
Create a file named "index.ts" and let's add the following code.
import { PrismaClient } from '@prisma/client'

const prisma = new PrismaClient()

async function main() {
  // ... you will write your Prisma Client queries here
}

main()
  .catch((e) => {
    throw e
  })
  .finally(async () => {
    await prisma.$disconnect()
  })
Let's create data for our database, add the following code in the "main"
 await prisma.user.create({
    data: {
      name: "John Doe",
      email: "john.doe@email.com",
      Posts: {
        create: {
          title: "My first post",
          content: "This is my first post",
        },
      },
    },
  });

  await prisma.user.create({
    data: {
      name: "Jane Doe",
      email: "jane.doe@email.com",
      Posts: {
        create: {
          title: "Prisma Intro",
          content: "This is a post about the Prisma",
        },
      },
    },
  });
And let's run our code with
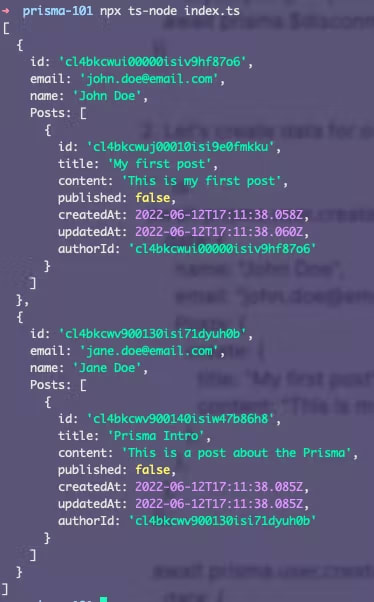
npx ts-node index.ts
This code block will create our users with their posts. And you should see output similar to this.
Let's update Data
Let's add new posts for our user John Doe and edit information for Jane Doe. Replace code in the main with the following code.
  const post = await prisma.post.create({
    data: {
      title: "I love Prisma",
      content: "Introduction to Prisma",
      Author: {
        connect: {
          email: "john.doe@email.com",
          // id: "cl4bkcwui00000isiv9hf87o6"
        },
      },
    },
  });

  const user = await prisma.user.update({
    where: {
      email: "jane.doe@email.com",
    },
    data: {
      name: "Jane East",
    },
  });

  console.dir([post, user], { depth: null });
And again run the script with the same command. npx ts-node index.ts. Example output will be like this.

What we have done?
a. We have created a new Post for Author has the email othe f "john.doe@email.com".
b. We have updated the name of the user where the user's email is "jane.doe@email.com".
if you want to use "id" you can use it as well those 2 fields will be a connection point for your post because those fields are defined as
@unique
Let's use some aggregations.
As I was mentioning Prisma is an extensive ORM tool let's make an example groupBy query to our database by adding the following code.
  const groupBy = await prisma.post.groupBy({
    by: ["authorId"],
    _count: true,
  });

  console.dir(groupBy, { depth: null });
Our example output will be like this.

Wrap up
As we have gone over through our Prisma examples: Prisma is easy to set up and work with and handles migrations for you so that you can focus on your application.
With that, we have finalized our Prisma-101 example. Now you can start using Prisma on your project and enjoy your time.
List of sources
- https://www.prisma.io/docs/getting-started/setup-prisma/start-from-scratch
- https://github.com/Ketcap/prisma-101
Reach Out to Me
For your questions, you can reach out to me in the comments or you can find me on social media.

Top comments (0)