
Token-based authentication on the web is one of those things you know exists, but sometimes you're too scared to implement in your projects.
Authentication for SPA (single page applications) is even more scary, but willing or not you should know a bit of theory to work proficiently with any SDK when the time comes.
In this post I hope to clarify for you the current recommended OAuth 2 flow for single-page applications: authorization code grant with PKCE.
Who should read this post
Frontend developers who already worked with OAuth 2 in the past, and want to learn more about what's behind authorization code grant with PKCE.
Requirements: you know that OAuth 2 is a security protocol for authorization delegation, and you know what an OAuth application is.
If you need a refresh on the basics instead, check out OAuth 2.0 Simplified by Aaron Parecki.
A word of warning
Security on the web is a minefield. First of all, do not use my examples for production code. They serve just as a pointer for helping you understand OAuth 2. I'm not suggesting you write your own OAuth client. Also:
- Don't roll out your own crypto.
- Don't roll out your own authorization servers by hand. Use solid libraries instead.
- Don't use localStorage for saving authorization codes, or worst, tokens.
Enjoy!
Terminology
Albeit boring, to start off we need to outline OAuth 2.0 terminology.
- Resource owner: (simply user from now on) the user who owns permissions on a third-party service. Example: any user who has an account on Github, or Twitter, or on a generic service exposing an API.
- Authorization server: also called AS, is the service which grants access to a client on a resource server on behalf of the user.
- Resource server: the third-party service that the user want to delegate access on. Example: Github, Twitter, Google Drive, or any protected API. Sometimes the resource server and the authorization server run on the same server.
- Client: a single-page application or some leaner JS frontend which needs access to the resource server. Example: a single-page app to display your Github repos.
- Scope: it answers the question "what the client can access on the resource server"?
For simplicity, in the following example we condense resource server and authorization server in a single place.
Let these terms sink in, and once confident head over the next section.
The flow
We are developing a single-page application that eventually will be distributed, but for now should only access a resource on a third-party service on which we have an account.
Here are the steps we need to take to abide to the OAuth 2.0 flow for single-page applications:
0: User registers and logins on the third-party service, creates a new OAuth application. Users obtains client_id.
1: User visits the client, and clicks a link which takes it to the authorization server.
2: The authorization server asks the user which permissions (scope) should delegate to the client.
3: Once the user accepts, the authorization server redirects the user back to the client, with an authorized code attached in the URL.
4: Client uses the authorization code to request an access token from the authorization server.
5: Client sends back the token on each subsequent request to a protected resource on the resource server, until the access token expires.
6: Eventually, client uses a refresh token to request a new access token.
Not covered in this post: scopes, the logout phase, handling of the refresh token.
Let's now see the flow in more detail.
0: User registers and logins to the service
As a prerequisite for the OAuth2.0 flow, the user has to have a registered account on the authorization server. She must also create an OAuth application on the authorization server.
Suppose users want to delegate access to Github to a single-page application she's building. She first registers with Github, maybe she creates a couple of repos, and then she creates a new OAuth application in Settings -> Developer settings -> OAuth apps.
If the user/developer controls also an API, say a Django REST API, with a package like django-auth-toolkit she can configure an OAuth 2.0 provider in a few minutes. Here's for example the admin interface for adding a new OAuth application in Django:
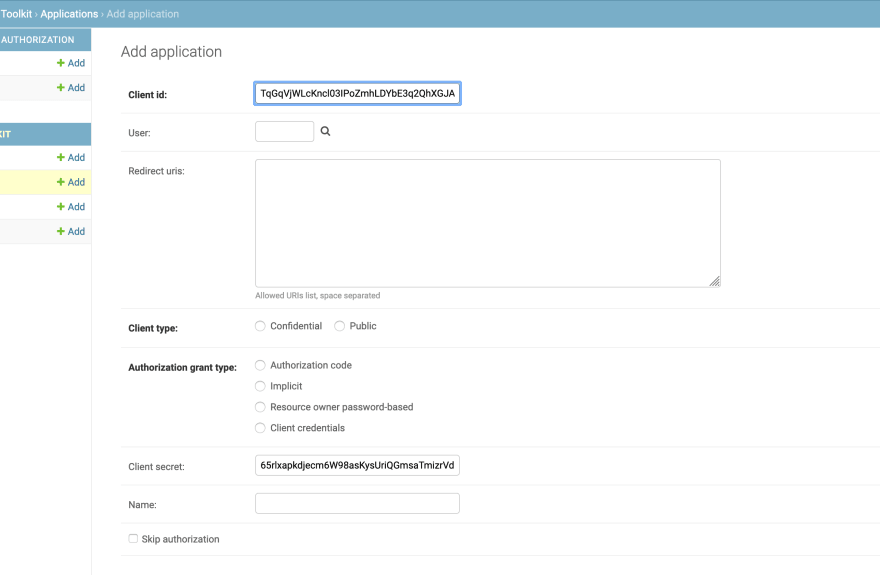
In this phase she also provides one or more redirect_uri, where the authorization server will redirect the user. Once done, the service gives back a client_id code, and optionally a client_secret.
Single-page applications can't safely store a client_secret, so they rely only on client_id and PKCE (more on this later).
Next step: user visits the client, and clicks a link which takes it to the authorization server.
1: User -> Client -> Authorization server
This is the one most important part of the flow.
In this part of the flow, the user visits the client, normally a webpage or a single-page application. There she finds a link to follow, which takes her to the authorization server.
Alongside with the request, the client should pass a bunch of query parameters in the URL. Those are at least:
-
client_id: the id obtained during the OAuth application registration. -
response_type: the grant type. In our case it's authorization code grant type so we useresponse_type=code. -
state: a random string used for CSRF protection. -
code_challenge: part of PKCE, Proof Key for Code Exchange. More on this later. -
code_challenge_method: part of PKCE, the hashing algorithm. redirect_uri
We could also use a scope parameter to narrow down the permissions for the client, not used in this example.
Now assuming:
-
https://client.example/is the client -
https://client.example/authis the client redirect URI -
https://auth.example/oauth/authorizeis the authorization server
The developer can craft the following link in the page:
https://auth.example/oauth/authorize
?client_id=ERPn7zeLvPCnZ1OtF7jxlTiZz0uQjpiWQEdeAUva
&response_type=code
&state=nMdR7oTxgXYr0INLytRi9XH7InnbrNbg
&code_challenge=M5oPBP6RmJPh5QsGtx6ptVH7S2yjqt8sum96jBCyhZg
&code_challenge_method=S256
&redirect_uri=https://client.example/auth
(Note: the client id here has nothing to do with the previous image).
state is a random string, you can generate it with any JavaScript library:
import randomstring from "randomstring";

const state = randomstring.generate();
For Node.js there is randomstring, but on the frontend you need to find something lighter or tree-shakeable.
Next up, where do we get code_challenge? To generate code_challenge we:
- Generate first a
code_verifier. This should be a high entropy string. The longer the string, the better (maximum 128 characters as per spec):
import randomstring from "randomstring";

const state = randomstring.generate();
const code_verifier = randomstring.generate(128);
It's important to remember that code_verifier and state need to persist somewhere in the browser because we need them in the next steps. Persisting these two values is harmless.
You can put them in sessionStorage:
import randomstring from "randomstring";

const state = randomstring.generate();
const code_verifier = randomstring.generate(128);

function saveStateAndVerifier() {
  /*
  Don't overwrite our saved state if location has the state parameter.
  This means we got authorization from the AS, and we need to compare them later.
 */
  if (window.location.search.includes("state")) return;
  const storage = window.sessionStorage;
  storage.clear();
  storage.setItem("state", state);
  storage.setItem("code_verifier", code_verifier);
}

saveStateAndVerifier();
- Then we compute
code_challengestarting fromcode_verifier:
import randomstring from "randomstring";
import { encode as base64encode } from "base64-arraybuffer";

const state = randomstring.generate();
const code_verifier = randomstring.generate(128);

function saveStateAndVerifier() {
  /*
  Don't overwrite our saved state if location has the state parameter.
  This means we got authorization from the AS, and we need to compare them later.
 */
  if (window.location.search.includes("state")) return;
  const storage = window.sessionStorage;
  storage.clear();
  storage.setItem("state", state);
  storage.setItem("code_verifier", code_verifier);
}

saveStateAndVerifier();

async function generateCodeChallenge(codeVerifier) {
  const encoder = new TextEncoder();
  const data = encoder.encode(codeVerifier);
  const digest = await window.crypto.subtle.digest("SHA-256", data);
  const toBase64 = base64encode(digest);
  // you can extract this replacing code to a function
  return base64Digest
    .replace(/\+/g, "-")
    .replace(/\//g, "_")
    .replace(/=/g, "");
}

generateCodeChallenge(code_verifier).then((challenge) => {
  console.log(challenge);
  // whatever you generated, example:
  // M5oPBP6RmJPh5QsGtx6ptVH7S2yjqt8sum96jBCyhZg
});
This is probably the most difficult part. For a complete explanation see "Generating the code challenge for PKCE in OAuth 2".
What matters here is that you're left with a code_challenge, a string like M5oPBP6RmJPh5QsGtx6ptVH7S2yjqt8sum96jBCyhZg. This will be sent later to the authorization server.
Once you have everything you can build the URL:
// These should go in environment variables injected at build time
// I put it here to keep things simple
const client_id = "ERPn7zeLvPCnZ1OtF7jxlTiZz0uQjpiWQEdeAUva"
const redirect_uri = "https://client.example/auth";

// omitted the rest for brevity

generateCodeChallenge(code_verifier).then((challenge) => {
  buildLoginUrl(challenge);
});

// Proto-code. Don't use for production
function buildLoginUrl(challenge) {
  const link = document.querySelector("a");
  const linkValue = new URL("https://auth.example/oauth/authorize");

  const queryParams = {
    client_id,
    response_type: "code",
    state: state,
    code_challenge: challenge,
    code_challenge_method: "S256",
    redirect_uri
  };

  for (const param in queryParams) {
    linkValue.searchParams.append(param, queryParams[param]);
  }

  link.setAttribute("href", linkValue);
}
At the end it should translate to something along these lines:
<!DOCTYPE html>
<html lang="en">
<head>
    <meta charset="UTF-8">
    <title>OAuth 2.0 in Single-Page Applications for Mere Mortals</title>
</head>
<body>
<a href="https://auth.example/oauth/authorize
?client_id=ERPn7zeLvPCnZ1OtF7jxlTiZz0uQjpiWQEdeAUva
&response_type=code
&state=nMdR7oTxgXYr0INLytRi9XH7InnbrNbg
&code_challenge=M5oPBP6RmJPh5QsGtx6ptVH7S2yjqt8sum96jBCyhZg
&code_challenge_method=S256
&redirect_uri=https://client.example/auth">LOGIN</a>
</body>
</html>
You can see an example of this first step any time you're about to log in on a service with "Login with GitHub" or "Login with Google". In most frameworks this is called social authentication.

Who codes this part? This part of the flow is a responsibility for the frontend developer. In most cases, it is recommended to use the SDK provided by your authentication provider.
Next step: authorization server asks the user for permissions.
2. Authorization server asks the user for permissions
As a prerequisite for this step, the user must be logged in the third-party service. If that's the case, the user is presented with a screen which asks for permissions on the resource server:

This is again an example with django-oauth-toolkit.
Remember: here we condense resource server and authorization server in a single place, but in the real world this is not always the case.
If the user gives consent, the authorization server redirects the user to the redirect_uri specified in step 0.
Who codes this part? This part of the flow is a responsibility for the backend developer who should prepare an OAuth 2.0 capable server using proven and tested packages.
Next step: authorization server redirects the user back to the client.
3. Authorization server -> Client -> User
Once the user authorizes the client, the authorization server redirects the user to the redirect_uri provided in step 0 during the OAuth application registration, in our example https://client.example/auth.
The redirect URL will carry in addition an authorization code as a query parameter, as well as state:
https://client.example/auth
?code=l2Z1DNMaiJWZEa3iZJsChdUeKraG3k
&state=nMdR7oTxgXYr0INLytRi9XH7InnbrNbg
A couple of important points:
- Don't save the authorization code in
localStorage, there's no need. - You can notice how
statefrom this request is the samestatewe computed in step 1.
In this step we need to compare the state we get from the authorization server, and the state we saved in sessionStorage in step 1.
If they are not the same, we must alt the flow:
const currentLocation = new URL(window.location.href);
const stateFromLocation = currentLocation.searchParams.get("state");

if (window.sessionStorage.getItem("state") !== stateFromLocation){
    throw Error("Probable session hijacking attack!");
}
Who codes this part? This part of the flow is a responsibility for the frontend developer who ensures that the redirect URI is accessible.
Next step: client uses the authorization code to request an access token from the authorization server.
4. Client uses the authorization code to request access token
At this point the JavaScript client has everything in place for requesting an access token.
This request should reach the authorization server at https://auth.example/oauth/token by the means of a application/x-www-form-urlencoded POST request.
There are a lot of things that need to go in the request body. Namely:
-
client_id: we have this from the beginning. -
grant_type: this should beauthorization_code. -
state: we saved this insessionStorage, step 1. -
code: we get this from the current location. -
code_verifier: : we saved this insessionStorage, step 1. -
redirect_uri: we have this from the beginning.
To get the access token, the developer crafts a function which runs right after the redirect flow. The following code is a loose idea of how it should look like:
// Proto-code. Don't use for production
function getToken() {
  const tokenEndpoint = new URL(
    "https://auth.example/oauth/token"
  );

  const currentLocation = new URL(window.location.href);
  const authorizationCode = currentLocation.searchParams.get("code");
  const stateFromLocation = currentLocation.searchParams.get("state");
  const initialCodeVerifier = window.sessionStorage.getItem("code_verifier");

  // This is a good place for checking the state too
  if (window.sessionStorage.getItem("state") !== stateFromLocation){
    throw Error("Probable session hijacking attack!");
  }

  const queryParams = {
    client_id,
    grant_type: "authorization_code",
    state: stateFromLocation,
    code: authorizationCode,
    code_verifier: initialCodeVerifier,
    redirect_uri
  };

  for (const param in queryParams) {
    tokenEndpoint.searchParams.append(param, queryParams[param]);
  }

  fetch(`${tokenEndpoint.origin}${tokenEndpoint.pathname}`, {
    method: "POST",
    body: tokenEndpoint.searchParams,
    headers: {
      "Content-Type": "application/x-www-form-urlencoded",
      Accept: "application/json"
    }
  }).then(/* more later */)
}
Here we get state and code from the current location, we check that the previous state and the state from the authorization server match.
Next up, we build the query parameters, and we send the POST request. The authorization server must allow CORS for this to work.
If everything goes well, the authorization server responds with a Bearer access token, and a refresh token. Here's an example of response:
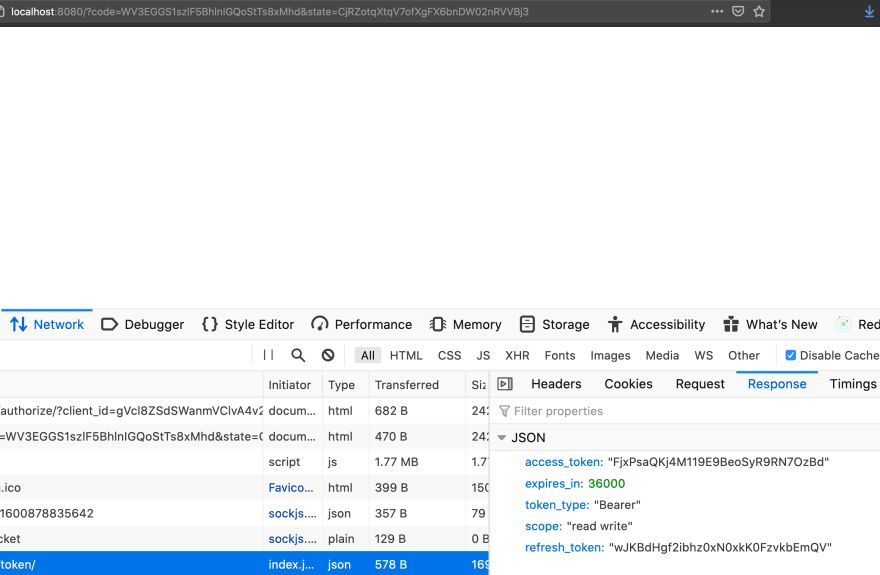
Who codes this part? The frontend developer puts together the logic for building the POST request. In most cases, it is recommended to use the SDK provided by your authentication provider. The backend developer ensures that the authorization server exposes the appropriate CORS headers.
Next step: Client uses the access token to access a protected resource.
5. Client sends the token to access a protected resource
This is probably the "easiest" part. In the getToken() function we add a minimal logic for saving the JSON response, which now holds access and refresh token, as well as the expiration. Here's only the relevant snippet:
let tokens = null;

function getToken() {
// omit

  fetch(`${tokenEndpoint.origin}${tokenEndpoint.pathname}`, {
    method: "POST",
    body: tokenEndpoint.searchParams,
    headers: {
      "Content-Type": "application/x-www-form-urlencoded",
      Accept: "application/json"
    }
  })
    .then(response => {
      if (!response.ok) throw Error(response.statusText);
      return response.json();
    })
    .then(json => {
      // save the tokens
      tokens = json;
    });
}
In $insertYourFrameworkHere you will save these tokens in the ephemeral state of the application.
Next up, we send the access token on each subsequent request to the resource server (a REST API for example), until the token expires.
To do so, we pass an Authorization header with the bearer token. For example, we might want to fetch a list of resources on a button click:
const button = document.querySelector("button");
button.addEventListener("click", fetchData);

function fetchData() {
  fetch("https://auth.example/api/customers/", {
    headers: {
      Authorization: `Bearer ${tokens.access_token}`
    }
  }).then(/* do stuff with the response */);
}
We imagined from the beginning that in our example the resource server, and the OAuth 2 authorization server live on the same machine. Hence, we call the API at https://auth.example/api/customers/.
Who codes this part? The frontend developer puts together the logic for handling the access token. The backend developer ensures that the REST API (resource server in our case) exposes the appropriate CORS headers.
What's next?
At this point we have a minimal working implementation of a rudimentary Auth 2 client. But we lack logout, scope handling, and the logic for using the refresh token.
Authorization providers like AWS or Okta have already solved this problem for us, and that's what most companies use in the real world.
If anything, hopefully you learned something new, and the theory behind authorization code grant with PKCE.
Wrapping up
OAuth 2 is hard, there are a lot of ways you can shoot yourself in the foot. In the frontend, always program defensively. In particular:
- Use the OAuth SDK from your authorization provider.
- Don't roll out your own crypto.
- Don't use localStorage for saving the authorization code, even if it's temporary.
- Don't save the access token, or the refresh token in
localStorage! - Again, use the OAuth SDK from your authorization provider.
- Again, don't roll out your own crypto.
On the backend, don't venture in reinventing the wheel. There are solid, battle-tested libraries for building OAuth 2 authorization servers.
Have fun!
Further resources
- OAuth 2.0 Simplified by Aaron Parecki covers ins and outs of OAuth 2.0 in clear, simple steps.
My book Decoupled Django, (Apress, May 2021) covers OAuth 2 for Django APIs with Single-page applications. Stay tuned on my Telegram channel for previews and excerpts from the book!

Oldest comments (0)