Intro
In this section we are going to explore the client-side code of the project, that is all the code under the client folder. The main parts of the client are:
-
index.html- This is where the canvas lives along with the options dialog -
connector.js- Responsible for the client-server communication -
snake-engine.js- Manages the game -
lib/- Include some helper classes
The index file
The html in the index.html files is very simple
<body>
<div style="float: left">
    <canvas id="boardPane" width="500px" height="500px"></canvas>
</div>
<div style="display: inline-block; margin-left: 10px">
    <div id="settingsGrid"></div>
    <input type="button" id="btnConnect" value="Connect" />
</div>
</body>
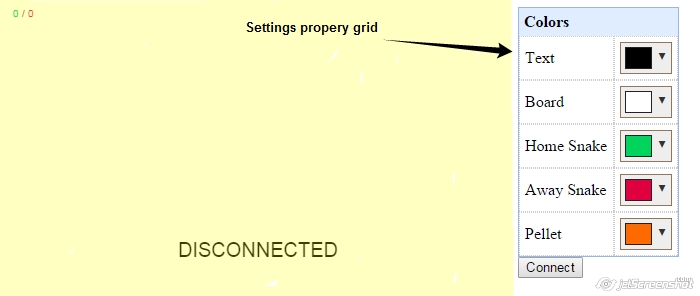
There are only 3 components: the canvas (yellow area), the settings property grid, and the connect button.
For the property grid I am using my jqPropertyGrid which easily displays a JSON object in an editable property gird, using this code only:
// Create a game-settings object
var settings = {
    textColor: '#000000',
    boardColor: '#ffffff',
    homeSnakeColor: '#00D45C',
    awaySnakeColor: '#E00040',
    pelletColor: '#FF6A00'
};

// The settings metadata for the jqPropertyGrid
var settingMeta = {
    textColor: {group: 'Colors', name: 'Text', type:'color'},
    boardColor: {group: 'Colors', name: 'Board', type:'color'},
    homeSnakeColor: {group: 'Colors', name: 'Home Snake', type:'color'},
    awaySnakeColor: {group: 'Colors', name: 'Away Snake', type:'color'},
    pelletColor: {group: 'Colors', name: 'Pellet', type:'color'}
};

// Init the settings property grid
$('#settingsGrid').jqPropertyGrid(settings, settingMeta);
Clicking the Connect button will create a new instance of SnakeEngine, passing it the canvas, a Connector object, and the settings from the property grid:
$('#btnConnect').click(function() {
    // For simplicity just check if WebSocket is a function
    if (typeof WebSocket !== 'function') {
        alert('No WebSocket support in this browser :(');
        return;
    }

    // Get the canvas element and the game settings
    var canvas = document.getElementById('boardPane');
    var settings = $('#settingsGrid').jqPropertyGrid('get');

    // Create the connector and the game object
    var connector = new VYW.Connector(location.host);
    var game = new VYW.SnakeEngine(canvas, connector, settings);

    // Remove the focus from the connect button
    this.blur();
});
The Connector
The connector is responsible for the communication with the server, it lets the client send data to the server, and pass messages from the server to the client. All communication is done via WebSocket.
In the constructor we create a websocket and register to the socket events:
function Connector(host) {
    if (typeof host !== 'string' || !host) {
        throw new Error('host is mandatory');
    }

    var self = this;

    // Create a new WebSocket and register to its events
    this.socket = new window.WebSocket('ws://' + host);
    this.socket.onopen = function() {
        // "raise" the onConnected event
        self.onConnected();
    };

    this.socket.onclose = function() {
        self.disconnect(Connector.DisconnectReason.SocketDisconnect);
    };

    this.socket.onerror = function() {
        self.disconnect(Connector.DisconnectReason.SocketError);
    };

    this.socket.onmessage = function(msg) {
        self.handleMessage(msg.data);
    };
}
The DisconnectReason enum is declared on the constructor function so it will be accessible by the clinet:
Connector.DisconnectReason = {
    InvalidMessage: 0,
    SocketDisconnect: 1,
    SocketError: 2
};
Connector Events
The connector exposes to the client different events, the events are just empty functions that are defined on the connector object, and the client could override those methods if it wants:
// Those functions should be overridden by those who are interested
// We could use event emitter but no real need so save the performance...
Connector.prototype.onConnected = function() {};
Connector.prototype.onDisconnect = function(reason) {};
Connector.prototype.onPendingMatch = function() {};
Connector.prototype.onGetReady = function(readyMessage) {};
Connector.prototype.onSteady = function(steadyMessage) {};
Connector.prototype.onGameStart = function() {};
Connector.prototype.onGameUpdate = function(data) {};
Connector.prototype.onGameOver = function(reason, winningPlayerIndex) {};
As it says in the comment above, we could have used the event emitter pattern, but this is not necessary as we know there will be only 1 component interested in these evens, so we save some performance by not doing so.
Handling server messages
When the connector receives a message from the server it tries to decode it (using the Protocol class discussed in the previous post), and then raise the appropriate event to the client, if for some reason it can't decode the message, it immediately disconnect and stop the game:
Connector.prototype.handleMessage = function(data) {
    if (!data) {return;}

    // Parse the message and make sure we got something
    var message = VYW.Protocol.parseMessage(data);
    if (message === null) {
        this.disconnect(Connector.DisconnectReason.InvalidMessage);
        return;
    }

    // Raise the appropriate event based on the message type
    switch (message.type) {
        case VYW.Protocol.Messages.Pending:
            this.onPendingMatch(message);
            break;
        case VYW.Protocol.Messages.Ready:
            this.onGetReady(message);
            break;
        case VYW.Protocol.Messages.Steady:
            this.onSteady(message);
            break;
        case VYW.Protocol.Messages.Go:
            this.onGameStart();
            break;
        case VYW.Protocol.Messages.Update:
            this.onGameUpdate(message);
            break;
        case VYW.Protocol.Messages.GameOver:
            this.onGameOver(message);
            break;
        default:
            this.disconnect(Connector.DisconnectReason.InvalidMessage);
    }
};
The SankeEngine
The snake engine is where everything really happens in the client, it is responsible for handling all the messages from the server, update the game current state (snakes, pellets, score etc), draw the game onto the canvas, handle keyboard input and handle swipe events (for mobile).
The Constructor
In the constructor we create all the objects we would need, "register" to the connector events and register to input (keyboard/swipe) events:
function SnakeEngine(canvas, connector, settings) {
    this.canvas = canvas;
    this.connector = connector;
    this.graphics = new VYW.Graphics(canvas);
    this.settings = new VYW.GameSettings(settings);

    // Game objects
    this.board = null;
    this.snake1 = null;
    this.snake2 = null;
    this.pellets = [];
    this.gameState = new VYW.GameState(this.settings);

    // Bind to connector events
    this.connector.onConnected = this.handleConnectedMessage.bind(this);
    this.connector.onDisconnect = this.handleDisconnectMessage.bind(this);
    ...
    ...

    // Bind to the window key-down event
    win.onkeydown = this.handleKeyDown.bind(this);

    // Bind to touch events on the canvas
    this.swipeTrackingData = null;
    canvas.addEventListener('touchstart', this.handleTouchStart.bind(this));
    canvas.addEventListener('touchmove', this.handleTouchMove.bind(this));
    canvas.addEventListener('touchend', this.handleTouchEnd.bind(this));
}
Handling server messages
In general, server messages represent a change in the game state, some changes do not require any special processing, while others do.
Fo example, in the steady message we just do:
SnakeEngine.prototype.handleSteadyMessage = function(steadyMessage) {
    this.gameState.state = VYW.GameState.GameState.Steady;
    this.gameState.startIn = steadyMessage.timeToStart;
};
But lets take a look at two more interesting messages, the ready message, and the update message.
In the ready message we get the initial state of all the game objects: the client player index (whether it is player 1 or player 2), the board dimensions, the snakes initial location and the snakes size.
Note in the code below that we change the canvas size according the board size we got from the server, so the size we have in the index.html file is irrelevant.
Also note that data is the info we got from the server.
/**
 * Handles a ready message from the server
 * @param {GetReadyMessage} data
 */
SnakeEngine.prototype.handleReadyMessage = function(data) {
    // Set some game data
    this.gameState.state = VYW.GameState.GameState.Ready;

    // Set this client player index (either he is player1 or player2)
    this.gameState.playerIndex = data.playerIndex;

    // Create the board and adjust canvas size
    this.board = new VYW.Board(data.board.width, data.board.height, data.board.cellSize, this.settings.boardColor);
    this.canvas.width = data.board.width;
    this.canvas.height = data.board.height;

    // Create the snakes (we assume the home player is snake1, will switch color later if not)
    this.snake1 = new VYW.Snake(data.snake1.x, data.snake1.y, data.board.cellSize, data.snake1.size, data.snake1.direction, this.settings.homeSnakeColor);
    this.snake2 = new VYW.Snake(data.snake2.x, data.snake2.y, data.board.cellSize, data.snake2.size, data.snake2.direction, this.settings.awaySnakeColor);

    // If the home snake is not player1 switch.
    if (data.playerIndex !== 1) {
        this.snake1.color = this.settings.awaySnakeColor;
        this.snake2.color = this.settings.homeSnakeColor;
    }
};
In the update message we update the scores, snakes and pellets.
Currently updating the pellets is done by creating a new pellets array on each update, this is not efficient and can be improved, but for the sake of simplicity (and laziness) will keep the code as is:
/**
 * Handles update message
 * @param {UpdateMessage} data - Some game data from the server
 */
SnakeEngine.prototype.handleGameUpdateMessage = function(data) {
    // Update game data
    this.gameState.player1Score = data.player1Score;
    this.gameState.player2Score = data.player2Score;
    this.gameState.timeToEnd = data.timeToEnd;

    // Update snake direction and size
    this.snake1.direction = data.player1Direction;
    this.snake1.update(data.player1Size);
    this.snake2.direction = data.player2Direction;
    this.snake2.update(data.player2Size);

    // Update pellets
    if (data.pellets) {
        this.pellets = [];
        for (var i = 0; i < data.pellets.length; ++i) {
            var loc = this.board.toScreen(data.pellets[i]);
            this.pellets.push(new VYW.Pellet(loc, this.settings.pelletColor));
        }
    }
};
Drawing the game
Every once in a while we need to draw the game on the canvas. Because snake is a simple game and changes occur only in the update message we get from the server, we could have drawn the game after processing the update message. But that is not the practice generally used in games, we need to let the framework tell us when it is the best time to draw, in the browser we do that by calling to the window.requestAnimationFrame method (MDN), this method gets a callback which will be called when the browser is ready to paint.
In our draw method we go over all the game objects and call their draw method, and at the end call requestAnimationFrame again in order to be called when the browser is ready to draw the next frame.
SnakeEngine.prototype.draw = function() {
    // Important to clear the canvas first...
    this.graphics.clear();

    // Draw the game objects
    if (this.board) { this.board.draw(this.graphics); }
    if (this.snake1) { this.snake1.draw(this.graphics); }
    if (this.snake2) { this.snake2.draw(this.graphics); }
    if (this.gameState) { this.gameState.draw(this.graphics); }

    for (var i = 0; i < this.pellets.length; ++i) {
        this.pellets[i].draw(this.graphics);
    }

    // No need to reload the draw timer if we are disconnected or game over.
    if (this.gameState &&
        (this.gameState.state === VYW.GameState.GameState.Disconnected ||
         this.gameState.state === VYW.GameState.GameState.GameOver)) {
        return;
    }

    // Let the browser call the draw method again when available
    win.requestAnimationFrame(this.draw.bind(this));
};
Graphics class
Drawing on a Canvas element is quite simple, but in order to make things easier I decided to copy the idea of a Graphics class from .NET, which will expose drawing methods like drawRectangle, drawText etc.
Below is the Graphics ctor, it just gets the canvas element and get the drawing context from it:
function Graphics(canvas) {
    if (!canvas || canvas.nodeName.toLowerCase() !== 'canvas') {
        throw new Error('canvas is mandatory and must be a canvas element');
    }

    this.canvas = canvas;
    this.context = this.canvas.getContext('2d');
}
Then we expose the methods we need, for example here is the drawRectangle
/**
 * Draws a rectangle
 * @param {Rectangle} rect - The rectangle to fill
 * @param {string} [color='#000000'] - The rectangle color
 */
Graphics.prototype.drawRectangle = function(rect, color) {
    this.context.beginPath();
    this.context.rect(rect.x, rect.y, rect.width, rect.height);
    this.context.strokeStyle = color || DEFAULT_COLOR;
    this.context.stroke();
};
In the SnakeEngine ctor we create an instance of the Graphics class and pass it to the game objects where needed (take a second look at the snippet above of SnakeEngine.prototype.draw), for example here is the draw method of the Board class:
Board.prototype.draw = function(graphics) {
    graphics.fillRectangle(this.rectangle,  this.color);
    graphics.drawRectangle(this.rectangle, this.borderColor);
};
User input
The user can control the snake by using the arrow keys on the keyboard, or by swiping on the screen (on mobile).
Keyboard input
On the SnakeEngine ctor we have registered to the window's onkeydown event, then on each key stroke we first check the keyCode of the pressed key and see if it is an arrow key, then we verify the new direction (snake can't make 180 degree turns) and if all is well we build a changeDirection message and send it to the server.
win.onkeydown = this.handleKeyDown.bind(this);

SnakeEngine.prototype.handleKeyDown = function(e) {
    var newDir = null;
    // Get the new direction per key code
    switch (e.keyCode) {
        case VYW.KeyCodes.Left:
            newDir = VYW.Protocol.Direction.Left;
            break;
        case VYW.KeyCodes.Right:
            newDir = VYW.Protocol.Direction.Right;
            break;
        case VYW.KeyCodes.Up:
            newDir = VYW.Protocol.Direction.Up;
            break;
        case VYW.KeyCodes.Down:
            newDir = VYW.Protocol.Direction.Down;
            break;
    }

    if (!newDir) {
        return;
    }

    // Find the home snake (whose keyboard input we handle) current direction, if it is the same stop.
    var homeSnakeDir = this.gameState.playerIndex === 1 ? this.snake1.direction : this.snake2.direction;
    if (newDir === homeSnakeDir) {
        return;
    }

    // Make sure we can do the change (can't do 180 degrees turns)
    if (newDir === VYW.Protocol.Direction.Right && homeSnakeDir === VYW.Protocol.Direction.Left) {
        return;
    } else if (newDir === VYW.Protocol.Direction.Left && homeSnakeDir === VYW.Protocol.Direction.Right) {
        return;
    } else if (newDir === VYW.Protocol.Direction.Up && homeSnakeDir === VYW.Protocol.Direction.Down) {
        return;
    } else if (newDir === VYW.Protocol.Direction.Down && homeSnakeDir === VYW.Protocol.Direction.Up) {
        return;
    }

    // Build a message and send it
    var msg = VYW.Protocol.buildChangeDirection(newDir);
    this.connector.send(msg);
};
Swipe input
On mobile we want to control the snake using swipe actions, the canvas doesn't expose any swipe events, we have to recognize it on our own using the following touch events: touchstart (fired when the user first touches the screen), touchmove (fired on each finger move) and touchend (fired when the user raises the finger), so first we register to those events:
canvas.addEventListener('touchstart', this.handleTouchStart.bind(this));
canvas.addEventListener('touchmove', this.handleTouchMove.bind(this));
canvas.addEventListener('touchend', this.handleTouchEnd.bind(this));
Now the logic is as follows:
On touchstart we take the touch location (x/y) and store it in some object as startX/Y, then on each touchmove event we store the current location as endX/Y, finally on the touchend event we compare the start location with the end location in order to classify the swipe into an up/down/right/left move.
On horizontal swipes the absolute value endX - startX would be greater than the absolute of endY - startY, and vice versa for vertical moves, that is how we classify a swipe into an horizontal/vertical move.
After we know that, we compare the relevant end point with the relevant start point (x or y) in order to know if the swipe was up/down/right/left, so on swipe to the right endX > startX.
I believe the code will explain it better than me, note that we store the swipe start/end locations in the swipeTrackingData object. Also note that the event argument of a touch event exposes a touches array, this is for multi-touch support, since we don't do multi-touch we care only about the first finger (touches[0])
SnakeEngine.prototype.handleTouchStart = function(event) {
    // We care only about the first finger (meaning swipeTrackingData must be null)
    var touch = event.touches[0];
    if (!touch || this.swipeTrackingData !== null) {
        return;
    }

    // Create a new swipeTrackingData
    this.swipeTrackingData = {startX: touch.clientX, startY: touch.clientY};
};

SnakeEngine.prototype.handleTouchMove = function(event) {
    // Don't let others handle the event
    event.preventDefault();

    // Make sure we still have 1 finger (might be redundant but whatever)
    var touch = event.touches[0];
    if (!touch) {
        return;
    }

    // Update the swipe tracking end location
    this.swipeTrackingData.endX = touch.clientX;
    this.swipeTrackingData.endY = touch.clientY;
};

SnakeEngine.prototype.handleTouchEnd = function(event) {
    // Make sure we got some data
    if (!this.swipeTrackingData || isNaN(this.swipeTrackingData.endX) || isNaN(this.swipeTrackingData.endY)) {
        this.swipeTrackingData = null;
        return;
    }

    // Now we need to determine what is the swipe direction, it will never be a straight line, we check
    // what axis had the most move
    var horizontalMove = this.swipeTrackingData.endX - this.swipeTrackingData.startX;
    var verticalMove = this.swipeTrackingData.endY - this.swipeTrackingData.startY;

    // We give horizontal move the benefit in case they are equal
    var keyCode = '';
    if (Math.abs(horizontalMove) >= Math.abs(verticalMove)) {
        // This was horizontal move, check direction
        keyCode = horizontalMove > 0 ? VYW.KeyCodes.Right : VYW.KeyCodes.Left;
    } else {
        // This was vertical move, check direction
        keyCode = verticalMove > 0 ? VYW.KeyCodes.Down : VYW.KeyCodes.Up;
    }

    // Fake a KeyDown event
    this.handleKeyDown({keyCode: keyCode});

    this.swipeTrackingData = null;
};
End of Part III
That's pretty much all there is for the client code, in the next post we are going to explore the server-side code, where we actually manage the game...

Latest comments (0)