Goal
The goal of this tutorial is how to build a simple CRUD app in React to connect with Firestore.
I am breaking it down into several sections:
Table of Contents
Prerequisites
A basic understanding of HTML, CSS, and JavaScript are needed for this tutorial. Also your favorite code editor (I'm using VS Code) I will do my best to show everything else.
Firestore
According to Google...
Firestore is a fast, fully managed, serverless, cloud-native NoSQL document database that simplifies storing, syncing, and querying data for your mobile, web, and IoT apps at global scale.
- First things first, head to https://firebase.google.com/ login, and click "Get started"
- Click "Add Project", follow the steps, and then "Create Project". You should be met with a "Your new project is ready".
- You should then end up on your console.

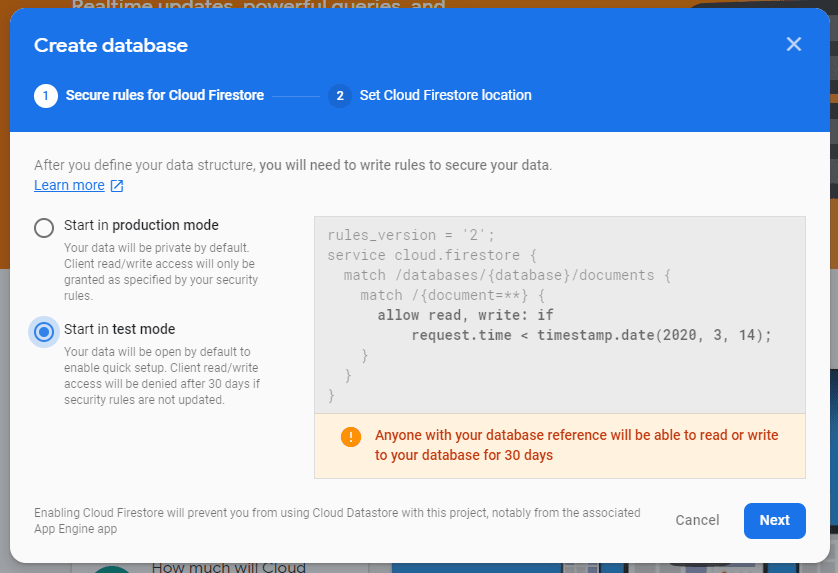
- In the left-hand column click on "Database", then under Cloud Firestore click "Create Database"

- Then select "Start in test mode", and click "Next", and select Cloud Firestore location. I just chose somewhere close to me. I'm on the East Coast so
us-east1is appropriate. Then click "Done". After a minute, your new Firestore database will be initialized.
Gatsby
Head over to https://www.gatsbyjs.org/docs/quick-start and complete the quick start guide:
- Open up your code editor and go to the command line.
- Install the Gatsby CLI with
npm install -g gatsby-cli - Create a new site with
gatsby new CRUD-tutorial https://github.com/gatsbyjs/gatsby-starter-hello-world - Change directory into the new site
cd CRUD-tutorial - Start the development server with
gatsby develop - Fire it up by going to
http://localhost:8000/ - This should complete the Gatsby setup.

Now we are going to start editing. In the file explorer expand your site, select
srcthen selectindex.jsSince everything in the
src/pagesfolder renders in the webpage we're going to just use theindex.jsfile to create our CRUD app.
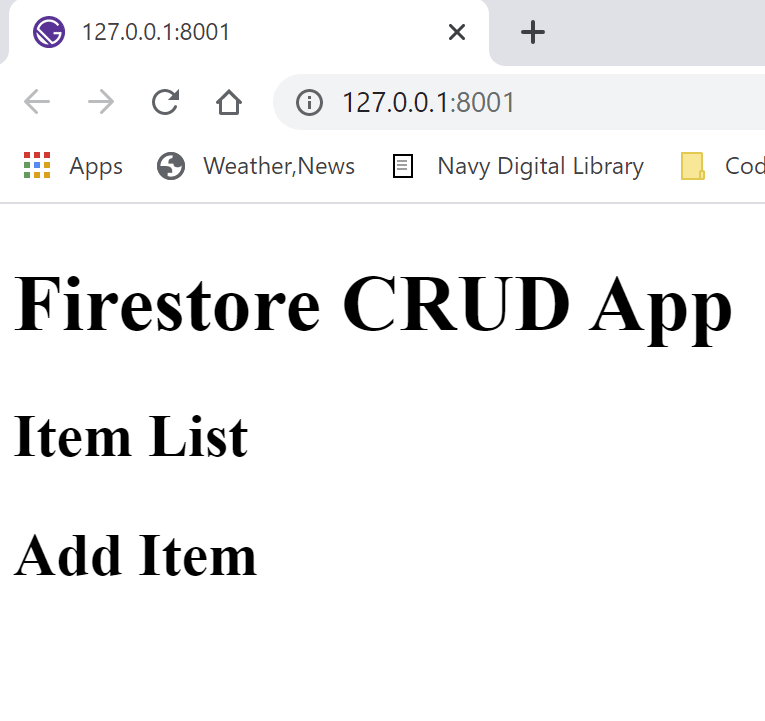
index.js
import React from "react"

export default () => (
  <div>
    <h1>Firestore CRUD App </h1>
    <h2>Item List</h2>
    <h2>Add Item</h2>
  </div>
)
Create a
componentsfolder within thesrcfolder and create a couple components nameditemlist.jsxandfirestore.js.Now we are going to head back to our Firebase console and add Firebase to our app to make it talk to our Firestore database. Click on your project then click on "</>" under "Get started by adding Firebase to your app".

- Register your app.
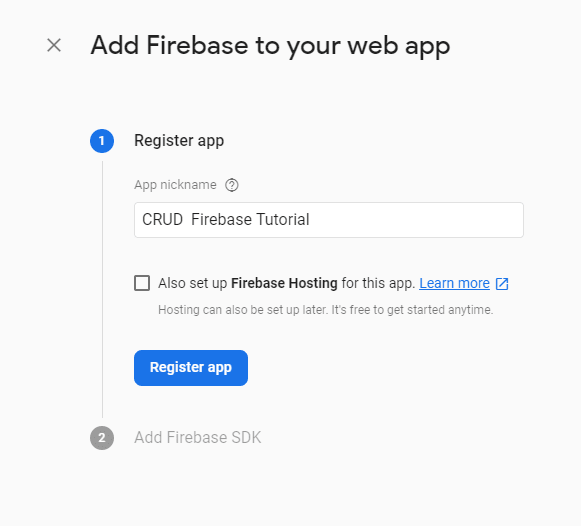
- Then "Add Firebase SDK". Copy everything in between the second
<script>tags.

I edited out the API key for obvious reasons.
From the command line, stop your development server (CRTL+C on Windows) and install the
firebasedependency usingnpm install firebaseGo back to the
firebase.jsfile we created earlier and paste the apiKey and all other configuration information to it.
firebase.js
import firebase from "firebase/app"
import 'firebase/firestore'

var firebaseConfig = {
  apiKey: "hidden",
  authDomain: "crud-tutorial.firebaseapp.com",
  databaseURL: "https://yourfirebaseURL.firebaseio.com",
  projectId: "crud-tutorial",
  storageBucket: "hidden",
  messagingSenderId: "hidden",
  appId: "hidden",
  measurementId: "hidden",
}
// Initialize Firebase
firebase.initializeApp(firebaseConfig)

//firebase.analytics()

export default firebase
Don't forget to import firebase from "firebase/app", import 'firebase/firestore' & export default firebase
We're going to import Firebase from this file rather than from the Firebase so we can keep using our configured version. We've also loaded all the data and all the files and all the magic that makes it so we can use the Firestore project.
Hop over to out
index.jsandimport firebase from "./components/firebase"
Testing Firestore
Now we're going to test to see if Firestore functionality works. It's a little hacky but it'll give us a positive outcome:
index.js
import React from "react"
import firebase from "./components/firebase"

export default () => {
  firebase
    .firestore()
    .collection("items")
    .add({
      name: "Heineken",
      type: "beer",
      qty: 5,
      description:
        "Pale lager beer with 5% alcohol by volume produced by the Dutch brewing company Heineken International",
    })
    .then(ref => {
      console.log("Added document with ID: ", ref.id)
    })

  return (
    <div>
      <h1>Firestore CRUD App </h1>
      <h2>Item List</h2>
      <h2>Add Item</h2>
    </div>
  )
}
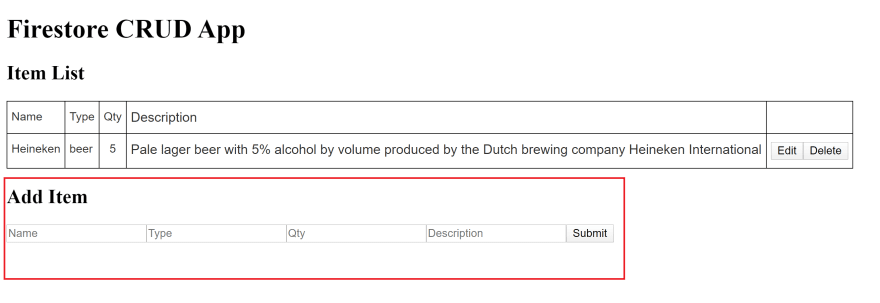
As you can see below, it worked!


As you can see I created a collection named "items" with the fields of "name", "type", "qty", & "description". Now that we know it worked we can go ahead and delete firebase.firestore()... code. It was only a proof of concept to make sure we were hooked up to Firestore.
Display Data
Now that we know we can communicate with our Firestore, we are going to display the data automagically in our browser. Head over to our itemlist.jsx and create a table. I used an HTML table generator for it to make it easy and style-able. It should look something like this:
itemlist.jsx
import React from 'react'

const ItemList = () => {
  return (
<table className="tg">
  <tbody>
    <tr>
      <th className="tg-ycr8">Name</th>
      <th className="tg-ycr8">Type</th>
      <th className="tg-i81m">Qty</th>
      <th className="tg-a02x">Description</th>
      <td class="tg-6hdc"></td>
    </tr>
  </tbody>
  <tbody>
    <tr>
      <td className="tg-ycr8"></td>
      <td className="tg-ycr8"></td>
      <td className="tg-i81m"></td>
      <td className="tg-ycr8"></td>
      <td class="tg-6hdc">
        <button>Edit</button>
        <button>Delete</button>
      </td>
    </tr>
  </tbody>
</table>
)
}
export default ItemList
This is how we read what is in our Firestore. We are going import useState and useEffect from React as well as firebase from the firebase.js component we made earlier.
import React, { useState, useEffect } from "react"
import firebase from "./firebase"
import "../styles/global.css"
We want to pull both of them together so we'll create a custom hook. That way we abstract our API call to Firestore.
const useItems = () => {
/*
We use the useState() hook, to set initial state of our data to an empty array
*/
  const [items, setItems] = useState([])
    useEffect(() => {
    firebase
    //Accesses your Firestore database
      .firestore()
    //Access the "items" collection
      .collection("items")
    //You can "listen" to a document with the Firebase onSnapshot() method.
      .onSnapshot(snapshot => {
    /*
    The returned snapshot sends us back the id and the document data. So we map through it.
     */
        const listItems = snapshot.docs.map(doc => ({
        /*
        Map each document into snapshot
        id and data are pushed into items array
        spread operator merges data to id. What is happening is the JavaScript object is being called.
        */
             id: doc.id,
          ...doc.data(),
        }))
    //Now we set items equal to items we read from the Firestore
        setItems(listItems)
      })
      return items
    }, []) //The empty array, as a second argument, is imperative as it allows the API call to be used once. If we didn't have it it would constantly run over and over.
That's it for the custom API call. Now we can use it in our ItemList component:
itemlist.jsx
const ItemList = () => {
  /* We assign the useItem() API to a variable named listItem */
  const listItem = useItems()
  return (
    //Headings for the table.
    <table className="tg">
      <tbody>
        <tr>
          <td className="tg-ycr8">Name</td>
          <td className="tg-ycr8">Type</td>
          <td className="tg-i81m">Qty</td>
          <td className="tg-a02x">Description</td>
        </tr>
      </tbody>
      /*
      We are going to map through the data object and assign it to each row.
      */
      {listItem.map(item => (
        <tbody key={item.id}>
          <tr>
            <td className="tg-ycr8">{item.name}</td>
            <td className="tg-ycr8">{item.type}</td>
            <td className="tg-i81m">{item.qty}</td>
            <td className="tg-a02x">{item.description}</td>
          </tr>
        </tbody>
      ))}
    </table>
  )
}
export default ItemList
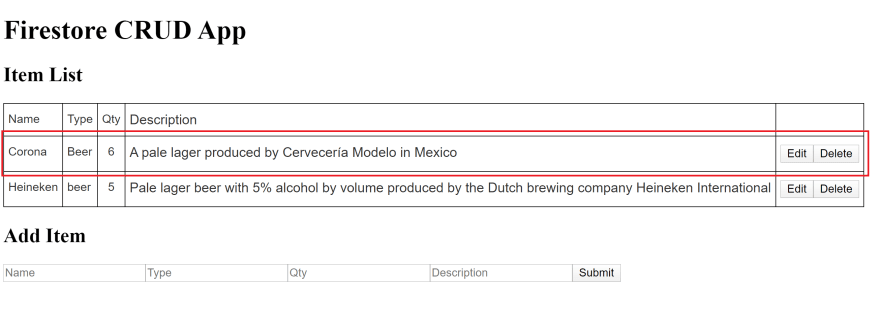
Here is the final result of the ItemList.
itemlist.jsx
import React, { useState, useEffect } from "react";
import firebase from "./firebase";
import "../styles/global.css";
const useItems = () => {
  const [items, setItems] = useState([]); //useState() hook, sets initial state to an empty array
  useEffect(() => {
    firebase
      .firestore() //access firestore
      .collection("items") //access "items" collection
      .onSnapshot(snapshot => {
        //You can "listen" to a document with the onSnapshot() method.
        const listItems = snapshot.docs.map(doc => ({
          //map each document into snapshot
          id: doc.id, //id and data pushed into items array
          ...doc.data() //spread operator merges data to id.
        }));
        setItems(listItems); //items is equal to listItems
      });
  }, []);
  return items;
};

const ItemList = () => {
  const listItem = useItems();
  return (
    <table className="tg">
      <tbody>
        <tr>
          <td className="tg-ycr8">Name</td>
          <td className="tg-ycr8">Type</td>
          <td className="tg-i81m">Qty</td>
          <td className="tg-a02x">Description</td>
        </tr>
      </tbody>
      {listItem.map(item => (
        <tbody key={item.id}>
          <tr>
            <td className="tg-ycr8">{item.name}</td>
            <td className="tg-ycr8">{item.type}</td>
            <td className="tg-i81m">{item.qty}</td>
            <td className="tg-a02x">{item.description}</td>
          </tr>
        </tbody>
      ))}
    </table>
  );
};
export default ItemList;

The final piece of the puzzle for reading data is something called unsubscribing. It is a very important concept when reading data because when we open a connection to Firebase we are opening an active websocket to the Firestore database. When we unsubscribe after the component is rendered we are in effect closing the connection to Firestore. Here is the code for that:
import React, { useState, useEffect } from "react"
import firebase from "./firebase"
import "../styles/global.css"
const useItems = () => {
  const [items, setItems] = useState([])
  useEffect(() => {
    //added variable unsubscribe
    const unsubscribe = firebase
      .firestore()
      .collection("items")
      .onSnapshot(snapshot => {
        const listItems = snapshot.docs.map(doc => ({
          id: doc.id,
          ...doc.data(),
        }))
        setItems(listItems)
      })
      //called the unsubscribe--closing connection to Firestore.
    return () => unsubscribe()
  }, [])
  return items
}

const ItemList = () => {...}
export default ItemList
Adding Data
To add data we are going to need to create a form to add data to.
Create a new .jsx file in the ./src/components folder and name it additemform.jsx
import React, { useState } from "react"
import firebase from "firebase"

const AddItemForm = () => {

  return (
    <form>
      <input name="name" type="text" />
      <input name="type" type="text" />
      <input name="qty" type="number" />
      <input name="description" type="text" />
      <button>Submit</button>
    </form>
  )
}
export default AddItemForm
Import the AddItemForm component to the index.js page.
import React from "react"
//import firebase from "./components/firebase"
import ItemList from "./components/itemlist"
>>>>>>>import AddItemForm from './components/additemform'
import "./styles/global.css"
export default () => {
  return (
    <div>
      <h1>Firestore CRUD App </h1>
      <h2>Item List</h2>
      <ItemList />
      <h2>Add Item</h2>
>>>>>><AddItemForm />
    </div>
  )
}
Go back to the additemform.jsx file and add the following:
import React, { useState } from "react"
import firebase from "firebase"

const AddItemForm = () => {
  //useState() hook captures the value from the input value
  const [name, setName] = useState("")
  const [type, setType] = useState("")
  const [qty, setQty] = useState(null)
  const [description, setDescription] = useState("")

  /* The onSubmit function we takes the 'e'
    or event and submits it to Firebase
    */
  const onSubmit = e => {
    /*
    preventDefault is important because it
    prevents the whole page from reloading
    */
    e.preventDefault()
    firebase
      .firestore()
      .collection("items")
      .add({
        name,
        type,
        qty,
        description,
      })
      //.then will reset the form to nothing
      .then(() => setName(""), setType(""), setQty(''), setDescription(""))
  }

  return (
    <form onSubmit={onSubmit}>
      <input placeholder="Name"
        value={name}
        name="name"
        /* onChange takes the event and set it to whatever
        is currently in the input. 'e' is equal to the event
        happening. currentTarget.value is what is inputted
         */
        onChange={e => setName(e.currentTarget.value)}
        type="text"
      />
      <input placeholder="Type"
        value={type}
        name="type"
        onChange={e => setType(e.currentTarget.value)}
        type="text"
      />
      <input placeholder="Qty"
        value={qty}
        name="qty"
        onChange={e => setQty(e.currentTarget.value)}
        type="number"
      />
      <input placeholder="Description"
        value={description}
        name="description"
        onChange={e => setDescription(e.currentTarget.value)}
        type="text"
      />
      <button>Submit</button>
    </form>
  )
}
export default AddItemForm
Let's see if it works:

It does!
Deleting Data
The third piece of the puzzle with CRUD is deleting data. In one of our previous components, I mentioned that that Edit and Delete buttons were not going to work yet. We're going to attach the Delete button so it'll now remove items from your firestore with a click. To delete a document item, use the delete() method. Open the file itemlist.jsx and add the following below the useItems function:
itemlist.jsx
const deleteStorage = (id) => {
    firebase
      .firestore()
      .collection("items")
      .doc(id)
      .delete()
}
Then on the Delete button add this:
<button onClick={() => deleteItem(item.id)}>Delete</button>
If you test it you can see that the previous item we added it now deleted.
...and that's it for deleting an item on your list.
Edit Data
Now comes the pièces de résistance of this article. Up to this point, all of the functions could be easily be found on the web. For some reason, many people have skipped this part - updating a Firestore database using CRUD operations. Being a new developer, I could understand why; it's not an easy task, at least for new developers. For me, creating, reading, and deleting data is pretty straight forward. Each one of them requires one function. Editing/Updating requires several functions to work together. First you have to put your component in edit mode. Next you have to find what item you want to update. Finally, you get to use the function made to update to update your document. We'll start with step one: Edit mode.
Edit Mode
First we'll start with creating an updateitem.jsx file in the component folder. Then we'll add some boilerplate to it to make it work with React. The Update and Cancel buttons are inoperable until we hook them up to some functionality:
import React from "react"

const UpdateItem = () => {
  return (
    <>
      <h2>Update Item</h2>
      <form>
        <label htmlFor="Update Item">Update Item:</label>
        <input type="text" name="name" />
        <input type="text" name="type" />
        <input type="number" name="qty" />
        <input type="text" name="description" />
        <button>Update</button>
        <button>Cancel</button>
      </form>
    </>
  )
}
export default UpdateItem
Go ahead and import this component to the index.js file in the pages folder. Notice that I put it above the <AddItemForm />. This is important and will be shown why in a couple steps.
index.js
import React from "react"
//import firebase from "./components/firebase"
import ItemList from "./components/itemlist"
import AddItemForm from "./components/additemform"
import "./styles/global.css"
import UpdateItem from "./components/updateitem"
export default () => {
  return (
    <div>
      <h1>Firestore CRUD App </h1>
      <h2>Item List</h2>
      <ItemList />
      <h2>Add Item</h2>
      <UpdateItem />
      <AddItemForm />
    </div>
  )
}
In the index.js file add three useState hooks. One to determine whether we are in edit mode and another for the current item and another for initial item state. First, import useState from 'react'. Next, right above the return statement in index.js add the following:
index.js
import React, { useState } from "react"

export default () => {
  /*
  We don't know what is going to be edited so we set an
  empty set for the <UpdateItem /> form
  */
  const initialItemState = [
    { id: null, name: "", type: "", qty: "", description: "" },
  ]
  /*
  Make a state for whether or not edit mode is turned on.
  It will begin as false.
 */
  const [editing, setEditing] = useState(false)

  /*
  Apply the empty initialItemState from above to a
  currentItem state. currentItem will be used for
  editing individual items.
  */
  const [currentItem, setCurrentItem] = useState(initialItemState)

  return (...)
}
We're going to set up an edit mode now. In the index.js file let's add a function to turn editing on and off. We are also going to add a ternary operation. Also add props to the ItemList and UpdateItem components. We will be accessing these in the next step.
index.js
  const editItem = () => {
    setEditing(true)
  }
  return (
    <div>
      <h1>Firestore CRUD App </h1>
      <h2>Item List</h2>
      /*
      Prop passed from the ItemList component
      */
      <ItemList editItem={editItem} />
      <h2>Add Item</h2>
      /*
      We add a ternary operator to switch
      between the UpdateItem form
      and the AddItemForm.
      */
      {editing ? <UpdateItem setEditing={setEditing} /> : <AddItemForm />}
    </div>
  )
}
This is where it starts getting a little tricky. Open the itemlist.jsx file and add an onClick to the Edit button. Additionally, we have to pass a prop to the index.js file to talk to the editItem() function we created above.
const ItemList = ({ editItem }) => {...
  /*
  We pass the editItem prop to the index.js file.
  */
  <button onClick={() => editItem()}>Edit</button>

  ...}
Open up the updateitem.jsx file and add an onClick() function to the Cancel button. Also add a setEditing prop as an argument to the UpdateItem component.
const UpdateItem = ({setEditing}) => {

  return (...
    <button onClick={()=>setEditing(false)}>Cancel</button>
  ...)
Up to this point we have covered Edit Mode.
- Created an update item form.
- Added several setState hooks to the
index.jsfile. - Wrote an
editItemfunction. - Added functionality to the
EditandCancelbuttons.
Turning Edit Mode on and off should now work.
What are we editing?
How does React know what item we want to update? Just because we selected the Edit button on the item we want to update, it doesn't mean we are updating that item. We have to set that item as the item we want to update. Open updateitem.jsx and import useState and useEffect. We are going to useState to set the item , and useEffect to perform side effects. The Effect Hook lets you perform side effects in function components:
itemlist.jsx
import React, { useState, useEffect } from "react";
/*
So far we have passed the setEditing prop to index.js.
Now we are going to pass the currentItem prop.
*/
const UpdateItem = ({ setEditing, currentItem }) => {
/*
Sets the state of the item to the current item
*/
const [item, setItem] = useState(currentItem);
/*
Side effect is that without UseEffect if you start editing one item,
then try to switch to another item, nothing will happen.
The component is already open, and although the state
on the parent has changed, it's not registered down to the props.
We want to let the UpdateItem form component know the props have changed.
With the Effect Hook, we create a callback function that updates the item
state with the new prop thats being sent through.
*/
useEffect(() => {
setItem(currentItem);
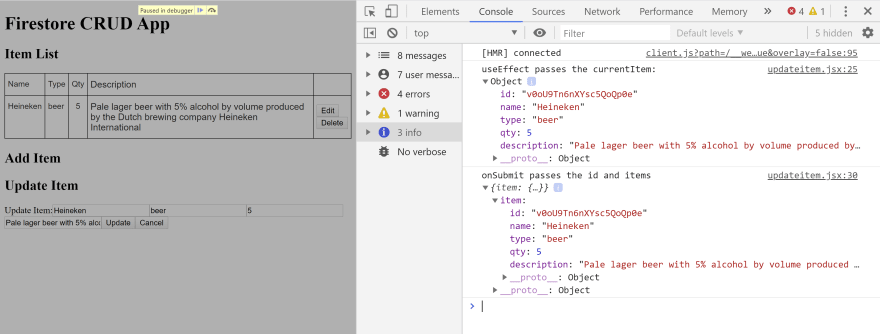
//Added console.log to show what the current item is and that it has passed
console.log("useEffect passes the currentItem: ", currentItem);
}, [currentItem]);
const onSubmit = e => {
e.preventDefault();
//When you click the submit button you can see what it being passed.
console.log("onSubmit passes the id and items", { item });
};
return (
<>
<h2>Update Item</h2>
<form onSubmit={onSubmit}>
<label htmlFor="Update Item">Update Item:</label>
/* Sets the value in the input boxes to the value you want to edit */
<input type="text" name="name" value={item.name} />
<input type="text" name="type" value={item.type} />
<input type="number" name="qty" value={item.qty} />
<input type="text" name="description" value={item.description} />
<button>Update</button>
<button onClick={() => setEditing(false)}>Cancel</button>
</form>
</>
);
};
export default UpdateItem;
In the file itemlist.jsx we also need to add an argument to the Edit button:
<button onClick={() => editItem(item)}>Edit</button>
The index.js file also needs some added props and we also need to set the current item in the editItem function:
index.js
export default () => {...

  const editItem = (item) => {
    setEditing(true)
    setCurrentItem({
      id: item.id,
      name: item.name,
      type: item.type,
      qty: item.qty,
      description: item.description,
    })
  }
  return (...
<UpdateItem setEditing={setEditing} currentItem={currentItem} />
...)
If you run gatsby develop now, you will see that we can turn on editing mode, and the app recognizes what item we are editing. Open up the developer tools for your favorite browser (Press F12 or, if you're on Mac, then Cmd+Opt+J).
Almost done!
Update Function
Here is the final piece of the updating/editing puzzle for us. In index.js we are going to write a function to send information to Firebase. We are passing two arguments to it: the current item that we are are using to update and the updated item we want to send to replace the current item. I added a console.log() to show that the item is actually sent to Firestore. We are also going to add one more prop to <UpdateItem />
index.js
const updateItem = ({ currentItem }, updatedItem) => {
  console.log(
    "It sends the item to the updated item function:",
    updatedItem,
    currentItem.id
  );
  //When the Update button is pressed, it turns off editing
  setEditing(false)
  firebase
    .firestore()
    .collection("items")
    .doc(currentItem.id)
    .update(updatedItem);
};

<UpdateItem
  setEditing={setEditing}
  currentItem={currentItem}
  updateItem={updateItem}
/>;
Finally, we add an onChange event handler function to each input in updateitem.jsx.
const UpdateItem = ({ setEditing, currentItem, updateItem }) => {...

  const onChange = e => {
    const { name, value } = e.target
    setItem({ ...item, [name]: value })
  }
  }

  return (
    <>
      <h2>Update Item</h2>
      <form onSubmit={onSubmit}>
        <label htmlFor="Update Item">Update Item:</label>
        <input type="text" name="name" value={item.name} onChange={onChange} />
        <input type="text" name="type" value={item.type} onChange={onChange} />
        <input type="number" name="qty" value={item.qty} onChange={onChange} />
        <input
          type="text"
          name="description"
          value={item.description}
          onChange={onChange}
        />
        <button>Update</button>
        <button onClick={() => setEditing(false)}>Cancel</button>
      </form>
    </>
  )
...}
Wrapping it up
Don't worry if you're a little lost. I just wanted to fully explain the functionality of everything instead of just blasting an answer at you. I figure working things out is the best way to learn a concept. It took me two hours, on my own to understand the Create, Read, and Delete concepts but took me two days or about 16 hours to figure out the Updating part. I really have to give it up for Tania Rascia for her wonderful tutorials. Her website is pretty awesome and you can learn a lot from her with a lot of concepts. I am sure there is going to be some experts coming on here telling me I could've done it better this way but as I am a n00b, I figured it out this way, and with more expereience and practice I will find better ways to do things. Ff you want a challenge you could try useReducer(). I would love to see a tutorial on that using Firestore.
Here is the final code for all components and pages:
index.js
import React, { useState } from "react";
import firebase from "./components/firebase";
import ItemList from "./components/itemlist";
import AddItemForm from "./components/additemform";
import "./styles/global.css";
import UpdateItem from "./components/updateitem";
export default () => {
  const initialItemState = [
    { id: null, name: "", type: "", qty: "", description: "" }
  ];

  const [editing, setEditing] = useState(false);

  const [currentItem, setCurrentItem] = useState(initialItemState);

  const editItem = item => {
    setEditing(true);
    setCurrentItem({
      id: item.id,
      name: item.name,
      type: item.type,
      qty: item.qty,
      description: item.description
    });
  };

  const updateItem = ({ currentItem }, updatedItem) => {
    console.log(
      "It send the item to the updated item function:",
      updatedItem,
      currentItem.id
    );
    setEditing(false);
    firebase
      .firestore()
      .collection("items")
      .doc(currentItem.id)
      .update(updatedItem);
  };

  return (
    <div>
      <h1>Firestore CRUD App</h1>
      <h2>Item List</h2>
      <ItemList editItem={editItem} />
      <h2>Add Item</h2>
      {editing ? (
        <UpdateItem
          setEditing={setEditing}
          currentItem={currentItem}
          updateItem={updateItem}
        />
      ) : (
        <AddItemForm />
      )}
    </div>
  );
};
itemlist.jsx
import React, { useState, useEffect } from "react";
import firebase from "./firebase";
import "../styles/global.css";
const useItems = () => {
  const [items, setItems] = useState([]); //useState() hook, sets initial state to an empty array
  useEffect(() => {
    const unsubscribe = firebase
      .firestore() //access firestore
      .collection("items") //access "items" collection
      .onSnapshot(snapshot => {
        //You can "listen" to a document with the onSnapshot() method.
        const listItems = snapshot.docs.map(doc => ({
          //map each document into snapshot
          id: doc.id, //id and data pushed into items array
          ...doc.data() //spread operator merges data to id.
        }));
        setItems(listItems); //items is equal to listItems
      });
    return () => unsubscribe();
  }, []);
  return items;
};
const deleteItem = id => {
  firebase
    .firestore()
    .collection("items")
    .doc(id)
    .delete();
};
const ItemList = ({ editItem }) => {
  const listItem = useItems();
  return (
    <table className="tg">
      <tbody>
        <tr>
          <td className="tg-ycr8">Name</td>
          <td className="tg-ycr8">Type</td>
          <td className="tg-i81m">Qty</td>
          <td className="tg-a02x">Description</td>
          <td class="tg-6hdc"></td>
        </tr>
      </tbody>
      {listItem.map(item => (
        <tbody key={item.id}>
          <tr>
            <td className="tg-ycr8">{item.name}</td>
            <td className="tg-ycr8">{item.type}</td>
            <td className="tg-i81m">{item.qty}</td>
            <td className="tg-a02x">{item.description}</td>
            <td class="tg-6hdc">
              <button onClick={() => editItem(item)}>Edit</button>
              <button onClick={() => deleteItem(item.id)}>Delete</button>
            </td>
          </tr>
        </tbody>
      ))}
    </table>
  );
};
export default ItemList;
additemform.jsx
import React, { useState } from "react";
import firebase from "firebase";

const AddItemForm = () => {
  //useState() hook captures the value from the input value
  const [name, setName] = useState("");
  const [type, setType] = useState("");
  const [qty, setQty] = useState(null);
  const [description, setDescription] = useState("");

  /* The onSubmit function we takes the 'e'
    or event and submits it to Firebase
    */
  const onSubmit = e => {
    /*
    preventDefault is important because it
    prevents the whole page from reloading
    */
    e.preventDefault();
    firebase
      .firestore()
      .collection("items")
      .add({
        name,
        type,
        qty,
        description
      })
      //.then will reset the form to nothing
      .then(() => setName(""), setType(""), setQty(""), setDescription(""));
  };

  return (
    <form onSubmit={onSubmit}>
      <input
        placeholder="Name"
        value={name}
        name="name"
        //onChange take the event and set it to whatever is currently in the input.
        //e is equal to the event happening
        //currentTarget.value is what is inputted
        onChange={e => setName(e.currentTarget.value)}
        type="text"
      />
      <input
        placeholder="Type"
        value={type}
        name="type"
        onChange={e => setType(e.currentTarget.value)}
        type="text"
      />
      <input
        placeholder="Qty"
        value={qty}
        name="qty"
        onChange={e => setQty(e.currentTarget.value)}
        type="number"
      />
      <input
        placeholder="Description"
        value={description}
        name="description"
        onChange={e => setDescription(e.currentTarget.value)}
        type="text"
      />
      <button>Submit</button>
    </form>
  );
};
export default AddItemForm;
updateitem.jsx
import React, { useState, useEffect } from "react";

/*
So far we have passed the setEditing prop to index.js.
Now we are going to pass the currentItem prop
*/
const UpdateItem = ({ setEditing, currentItem, updateItem }) => {
  /*
  Sets the state of the item to the current item
  */
  const [item, setItem] = useState(currentItem);

  /*
  Side effect is that without UseEffect if you start editing one item,
  then try to switch to another item, nothing will happen.
  The component is already open, and although the state
  on the parent has changed, it's not registered down to the props.
  We want to let the UpdateItem form component know the props have changed.
  With the Effect Hook, we create a callback function that updates the item
  state with the new prop thats being sent through.
  */
  useEffect(() => {
    setItem(currentItem);
    console.log("useEffect passes the currentItem: ", currentItem);
  }, [currentItem]);

  const onSubmit = e => {
    e.preventDefault();
    console.log("onSubmit passes the id and items", item);
    updateItem({ currentItem }, item);
  };

  const onChange = e => {
    const { name, value } = e.target;
    setItem({ ...item, [name]: value });
  };

  return (
    <>
      <h2>Update Item</h2>
      <form onSubmit={onSubmit}>
        <label htmlFor="Update Item">Update Item:</label>
        <input type="text" name="name" value={item.name} onChange={onChange} />
        <input type="text" name="type" value={item.type} onChange={onChange} />
        <input type="number" name="qty" value={item.qty} onChange={onChange} />
        <input
          type="text"
          name="description"
          value={item.description}
          onChange={onChange}
        />
        <button>Update</button>
        <button onClick={() => setEditing(false)}>Cancel</button>
      </form>
    </>
  );
};
export default UpdateItem;
firebase.js
import firebase from "firebase/app"
import "firebase/firestore"

const firebaseConfig = {
  apiKey: "your own api key",
  authDomain: "info fom firebase",
  databaseURL: "https://your-link-to-firebase-project.firebaseio.com",
  projectId: "info fom firebase",
  storageBucket: "info fom firebase",
  messagingSenderId: "info fom firebase",
  appId: "info fom firebase",
  measurementId: "info fom firebase",
}

// Initialize Firebase
firebase.initializeApp(firebaseConfig)

export default firebase
global.css (For minor styling of table)
.tg {
  border-collapse: collapse;
  border-spacing: 0;
  border-color: #000000;
}
.tg td {
  font-family: Arial, sans-serif;
  font-size: 14px;
  padding: 10px 5px;
  border-style: solid;
  border-width: 1px;
  overflow: hidden;
  word-break: normal;
  border-color: #000000;
  color: #333;
  background-color: #fff;
}
.tg th {
  font-family: Arial, sans-serif;
  font-size: 14px;
  font-weight: normal;
  padding: 10px 5px;
  border-style: solid;
  border-width: 1px;
  overflow: hidden;
  word-break: normal;
  border-color: #000000;
  color: #333;
  background-color: #f0f0f0;
}
.tg .tg-ycr8 {
  background-color: #ffffff;
  text-align: left;
  vertical-align: top;
}
.tg .tg-a02x {
  font-size: 100%;
  background-color: #ffffff;
  text-align: left;
  vertical-align: top;
}
.tg .tg-i81m {
  background-color: #ffffff;
  text-align: center;
  vertical-align: top;
}
Did you like what you read? Want to see more?
Let me know what you think about this tutorial in the comments below.
As always, a donation to Vets Who Code goes to helping veteran, like myself, in learning front end development and other coding skills. You can donate here: VetsWhoCode
Thanks for your time!

Top comments (8)
Has anyone had this error before ?
I only get it when I have the firebase config file. I comment it out and then after i run gatsby develop and wait for it to build ill uncomment it and it'll work.
What a detailed guide to set up a new project! Awesome work
I also found a great tool to work with Firestore refiapp.io/. It takes me lots of time on creating new documents on Web but this tool is really help
Check firefoo.app/ as well
This was awesome. I understood step by step and it works.
Thank you for share your knowledge and talent.
Awesome 😎 thanks!
Thanks for writing this!
Can you consider lerna.js.org/
Thank you very helpful