
Introduction
In Vets Who Code we have a pretty solid curriculum where we teach from the basics to the more advanced. Week 1 of training involves the command line, VS Code, Markdown, and Git. This tutorial is on the basics of Git. Last time I explained to you about creating a repo, clone a repo, creating a new branch, adding, committing, pushing changes, and making a pull request. You can read about that here:

This article I am going to explain forking a repo, making changes, and doing a pull request. The reward for completing this tutorial is a free Vets Who Code sticker 🙌 The same ones here. Act fast! We only have 25 to give away!
Table of Contents
Requirements
- Node JS 8 or later installed locally.
- VS Code or another code editor.
- npm — npm is distributed with Node.js - which means that when you download Node.js, you automatically get npm installed on your computer.
- A Github account.
Fork a Repo
A fork is a copy of a repository. Forking a repo allows someone to freely make changes to their own copy of a program without affecting the old repo. You can pretty much fork any open source project on Github. There are several reasons to fork a repo:
- You are working on a program and you come across a bug in it. If the repo is available, you can fork it to propose changes related to fixing a bug instead of submitting a bug report.
- You can use someone elses project as a starting point for your own.
Instructions
To start go to https://github.com/gixxerblade/vwc-sticker-giveaway click fork.

Go to your page on Github. It'll be github.com/your-username and then go to the repo you just forked.
Click the green labeled Clone or download and copy the link that that starts with git@github:your-username/...

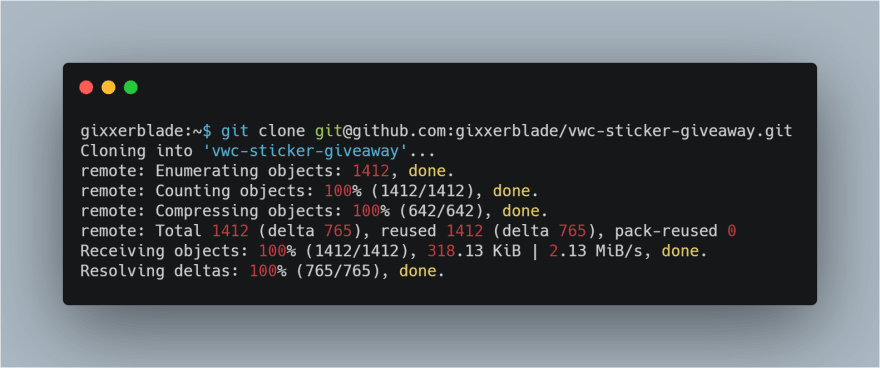
Open your code editor, open up your terminal and type git clone <the link from the previous step>
You'll see Github perform some actions in your terminal:
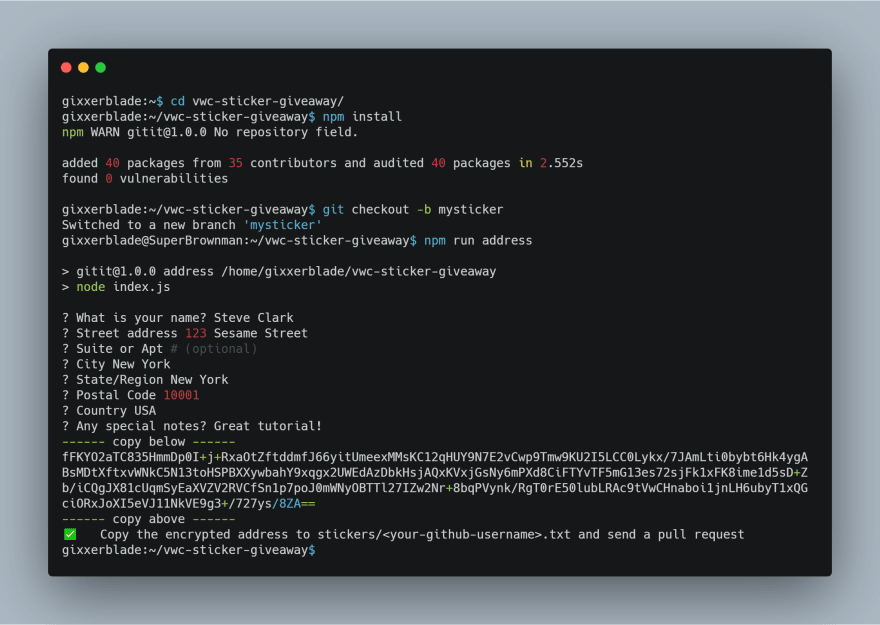
Next you'll cd <name of the folder you just cloned into>. cd just means change directory
Type npm install — npm install installs all the dependencies a program needs based on the package.json file and puts them in the node_modules folder in your directory.
Type git checkout -b mysticker
git checkout -b something-here creates a new branch as we discussed in the previous tutorial.
Type npm run address and follow the prompts. Please make sure to enter your address carefully (so I know where to send the sticker to!)
Copy the encrypted address to a new file in /stickers/<your-github-username>.txt
Type git add . && git commit -m <your-message>
Type git push origin mysticker
When you're done, your terminal should look similar to this:
Open new pull request on Github like we went through in the last lesson.
Wait a few weeks for your sticker.
Wrapping it up
You just learned how to fork a repo. I hope you enjoyed this tutorial. If you did please give me a ❤️. I like doing these tutorials beacuse they reinforce stuff that I have learned (and continue to learn).
Vets Who Code
Did you like what you read? Want to see more?
Let me know what you think about this tutorial in the comments below.
As always, a donation to Vets Who Code goes to helping veterans, like myself, in learning front end development and other coding skills. You can donate here: VetsWhoCode or go here to buy some Vets Who Code swag
Thank you for your time!

Top comments (0)