
Docker-Blog
Running Three Tier Application using Docker
To run Three Tier Application using Docker, we need to first create a Full Stack Project. We can use any of our Full Stack Project but if we don't have one then we can use someone else project also. Here, I have used a very easy simple project on GitLab. The link to this project is https://gitlab.com/nanuchi/developing-with-docker. This project is made using HTML, CSS, JavaScript, Express and MongoDB.
Architecture Of Our Project

First you need to clone the Project Repository from the link using command
git clone https://gitlab.com/nanuchi/developing-with-docker
Files Present in Current Cloned Project


To run a Three Tier Application, we need to run three Docker Containers simultaneously. So, it is necessary to run all these containers inside a network to avoid their interaction with other containers.
-
So, Network can be created by using the following command after starting the Docker Engine with name mongo-network
docker netowrk create mongo-network

You can see all the networks using the command:
docker network ls
. Now, we need to pull the image of MongoDB from DockerHub and make container from it. Then we need to run this container in the network to access MongoDB Database using Docker Container.

- To pull MongoDB image from DockerHub and run it as container we need to execute the command
docker run -p 27017:27017 -e MONGO_INITDB_ROOT_USERNAME=admin -e MONGO_INITDB_ROOT_PASSWORD=password --network=mongo-network --name=vikasmongodb -d mongo

Here, the mongo image will be automatically pull from the DockerHub to run the Container in detachable mode with name vikasmongodb in the network mongo-network. The Container will be running on the default 27017 port. You can check all the running containers using command
docker ps
. Environment Variables Username and Password are also passed to run the container. Similarly, we will be creating another container of Express by pulling its image from the DockerHub.
- Express Container can be run by using the follow command
docker run -p 8081:8081 -e ME_CONFIG_MONGODB_ADMINUSERNAME=admin -e ME_CONFIG_MONGODB_ADMINPASSWORD=password -e ME_CONFIG_MONGODB_SERVER=vikasmongodb --network=mongo-network --name=vikasmongo-express -d mongo-express

Here, the container with name vikasmongo-express is made to connect the MongoDB Database with the Frontend of the project in Docker. As explained above, the container will run on 8081 port. The environment variables Username and Password are passed of the MongoDB to access the Database along with the container name of the MongoDB in the Server Environment variable. The container will be running on the same network as the above container.
- Now, open the link in your browser
localhost:8081and create two databases my-db and user-accounts.
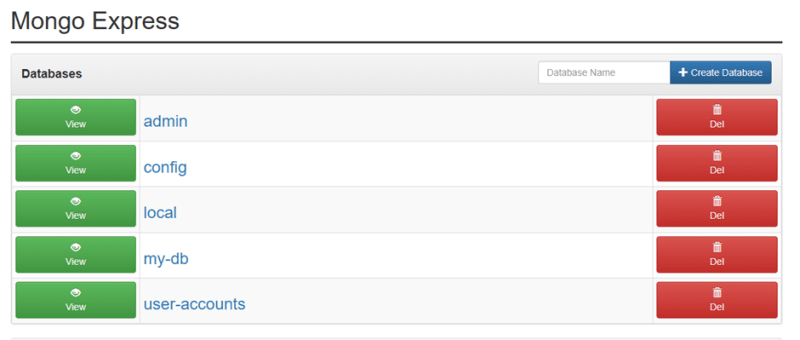
Creating these two databases is necessary as the Frontend will be requiring these while running. Also, we need to change the MongoDB URL mentioned in the server.js file as we will be running MongoDB using Docker instead of Local Machine.
- Naviagate to the
server.jsfile in the project and replacemongoUrlLocalandmongoUrlDockerwith the following valuemongodb://admin:password@vikasmongodb:27017

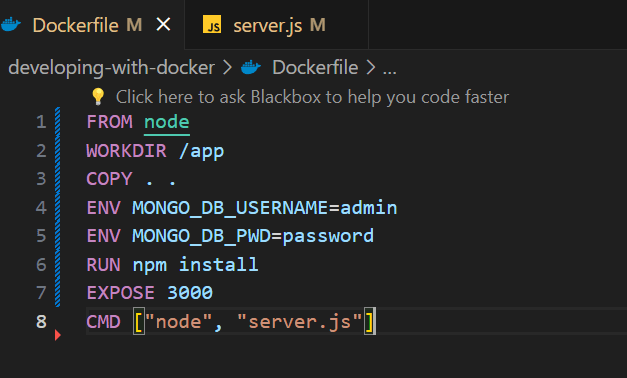
- Now, we need to delete the Dockerfile already provided in the project and create a new Dockerfile inside the
appfolder of the project with the following commandsFROM node WORKDIR /app COPY . . ENV MONGO_DB_USERNAME=admin ENV MONGO_DB_PWD=password RUN npm install EXPOSE 3000 CMD ["node", "server.js"]
Now, we need to create a Docker Image by building the Docker file to run it as a container in the network.
- Open the CMD Terminal inside the
appfolder of the project and run the commanddocker build -t 21bcp379-assignment

The execution of the above command will generate a Docker Image with name 21bcp379-assignment and it will take some time for it. After the Image is created we need to Run it as a Docker Container.
- To run the Image as a Docker Container run the command
docker run -d -p 3000:3000 --network=mongo-network --name=21bcp379-app 21bcp379-assignment
After the above command is executed, it will run a Docker Container in detachable mode with name 21bcp379-assignment in the same network.
- Now, open the following link on you browser
localhost:3000and you will see a webpage running.
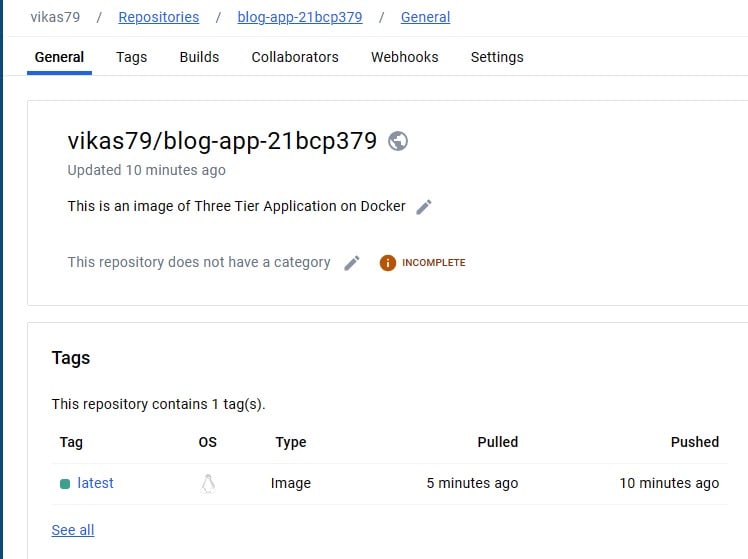
- To push the Docker Image of the project run the command
docker tag 21bcp379-app vikas79/blog-app-21bcp379and thendocker push vikas79/blog-app-21bcp379
That's it now you can see your image on docker hub repoistory

Top comments (0)