
This post demonstrates how to write a shader to simulate the screen saver of macOS Monterey.
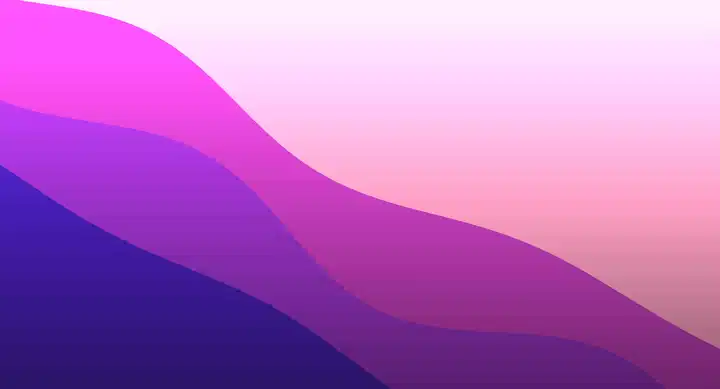
All codes of this tutorial are uploaded to shadertoy. You can try the shader online: https://www.shadertoy.com/view/7tGfWm
Before we start, I want you to have some basic concepts about GLSL. If you do, it may be easier to understand the code. And you can safely skip the code. I'll make the principle clear.
Draw a wave
The image is composited with multiple waves. Let's draw a wave in a shader. Lets create a new project in Shadertoy.

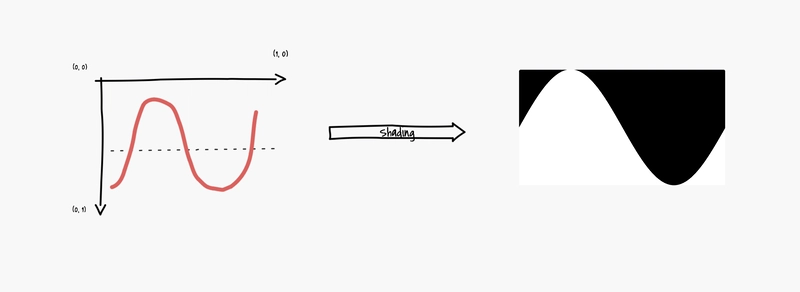
The shader we are going to write is called “fragment shader”. It’s a program to evaluate the color of every image pixel. The first parameter fragCoord indicates the coordinates of the pixel to evaluate. Because the coordinates of the pixel depend on the device, we need to normalize the coordinate from 0 to 1 first.

This procedure is done by one line of code:
// Normalized pixel coordinates (from 0 to 1)
vec2 uv = fragCoord/iResolution.xy;
If we want to draw a wave, we should find a function to represent the wave. Of course, we use trigonometric functions. We use sine here.
vec3 sin_shape(in vec2 uv, in float offset_y) {
  // Time varying pixel color
  float y = sin((uv.x * 3.14 * 2.0));

  float y0 = step(0.0, y - uv.y * 2.0 + offset_y);
  return vec3(y0, y0, y0);
}


void mainImage( out vec4 fragColor, in vec2 fragCoord )
{
    // Normalized pixel coordinates (from 0 to 1)
    vec2 uv = fragCoord/iResolution.xy;

    vec3 col = sin_shape(uv, 1.0);

    // Output to screen
    fragColor = vec4(col,1.0);
}
Add some noise
The waves we drew are dull. We need to make them more fun. So I decided to add some "noise" to it.

vec3 noised_sin_shape(in vec2 uv, in float offset_y) {
  // Time varying pixel color
  float y = sin(uv.x * 3.14 * 4.0 + iTime * -0.6);

  float x = uv.x * 8.;
  float a=1.;
    for (int i=0; i<5; i++) {
        x*=0.53562;
        x+=6.56248;
        y+=sin(x)*a;
        a*=.5;
    }

  float y0 = step(0.0, y - uv.y * 4.0 + offset_y);
  return vec3(y0, y0, y0);
}

void mainImage( out vec4 fragColor, in vec2 fragCoord )
{
    // Normalized pixel coordinates (from 0 to 1)
    vec2 uv = fragCoord/iResolution.xy;

    vec3 col = noised_sin_shape(uv, 1.0);

    // Output to screen
    fragColor = vec4(col,1.0);
}
Composition
In the final image, we got three waves painted in different colors. We should find a way to composite three waves(even more). Currently, we can know if a pixel is in the region of a wave by the result of the sine function. Things got complicated when we got three waves. We need to write a lot of if/else statements to determine the colors. And this method doesn't scale. We need a mathematical way to solve this problem.
Math is an abstract tool of reality. Imagine if you want to draw this picture with brushes and paints. How will you paint?
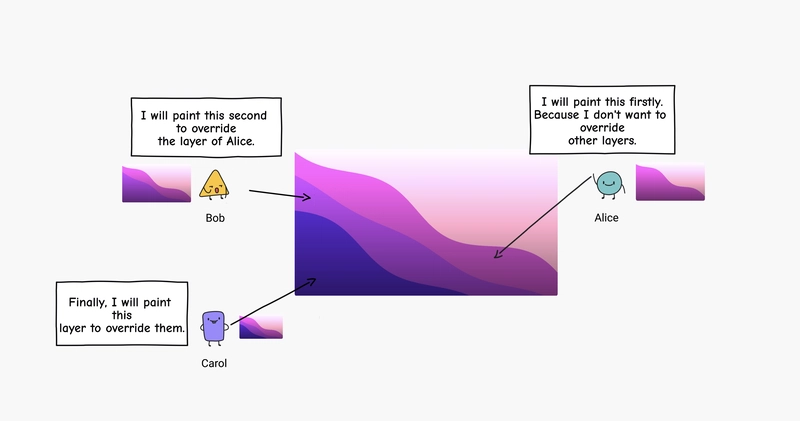
When we draw an image with brushes and paints, we draw the layers one by one. So how about using the thickness of the paints to determine the waves?

The value of the grayscale is like to represent "the thickness of the paints". And we can use the grayscale to determine which color to show.
vec3 sin_shape(in vec2 uv, in float offset_y) {
  // Time varying pixel color
  float y = sin((uv.x + iTime * -0.06 + offset_y) * 5.5);

  float x = uv.x * 8.;
  float a=1.;
    for (int i=0; i<5; i++) {
        x*=0.53562;
        x+=6.56248;
        y+=sin(x)*a;
        a*=.5;
    }

  float y0 = step(0.0, y * 0.08 - uv.y + offset_y);
  return vec3(y0, y0, y0);
}

vec2 rotate(vec2 coord, float alpha) {
  float cosA = cos(alpha);
  float sinA = sin(alpha);
  return vec2(coord.x * cosA - coord.y * sinA, coord.x * sinA + coord.y * cosA);
}

vec3 scene(in vec2 uv) {
    vec3 col = vec3(0.0, 0.0, 0.0);
    col += sin_shape(uv, 0.3) * 0.2;
    col += sin_shape(uv, 0.7) * 0.2;
    col += sin_shape(uv, 1.1) * 0.2;

    vec3 fragColor;

    if (col.x >= 0.6 ) {
      fragColor = vec3(0.27, 0.11, 0.64);
    } else if (col.x >= 0.4) {
      fragColor = vec3(0.55, 0.19, 0.69);
    } else if (col.x >= 0.2) {
      fragColor = vec3(0.68, 0.23, 0.65);
    } else {
      fragColor = vec3(0.86, 0.57, 0.68);
    }
    return fragColor;
}

void mainImage( out vec4 fragColor, in vec2 fragCoord )
{
    fragCoord = rotate(fragCoord + vec2(0.0, -300.0), 0.5);
    // Normalized pixel coordinates (from 0 to 1)
    vec3 col0 = scene((fragCoord * 2.0)/iResolution.xy);
    vec3 col1 = scene(((fragCoord * 2.0) + vec2(1.0, 0.0))/iResolution.xy);
    vec3 col2 = scene(((fragCoord * 2.0) + vec2(1.0, 1.0))/iResolution.xy);
    vec3 col3 = scene(((fragCoord * 2.0) + vec2(0.0, 1.0))/iResolution.xy);

    // Output to screen
    fragColor = vec4((col0 + col1 + col2 + col2) / 4.0,1.0);
}
Adjust the view
Now, we are very close to the final image. We need to adjust the view and the parameters to make it closer.

vec2 rotate(vec2 coord, float alpha) {
  float cosA = cos(alpha);
  float sinA = sin(alpha);
  return vec2(coord.x * cosA - coord.y * sinA, coord.x * sinA + coord.y * cosA);
}
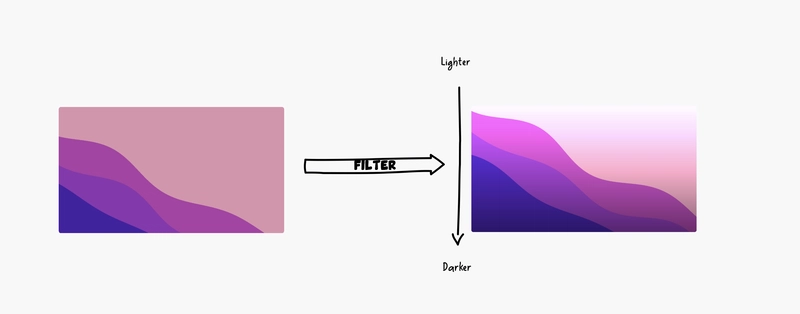
After rotating the camera, it's very close now. But it looks very dull, and it can't express the beautiful view of the Monterey. I guess we miss some details. I think it's the gradient of colors. So I add a filter to it and it's better now.
We got the final image of this tutorial probably. But it needs to be better. The curve of the wave is not smooth enough. We have yet to finish a procedure every gamer knows: anti-aliasing.

Anti-aliasing
There are a lot of ways to implement anti-aliasing. We use a straightforward method there: supersampling. There are still a lot of patterns of supersampling. We use the simplest one: mix four pixels into one.

Imagine we draw a 4x bigger size image of the screen. And we mix 4 pixels into one. Then we got a smooth curve.

Animation
If we want to generate the animation of the waves, we can use the time as the parameter of the sine function to make the wave move. In shadertoy, the time is passed by a global variable called iTime.

Conclusion
Finally, we use less than 100 lines of code to implement this. There are some math concepts, but it's pretty easy. But it's funny and beautiful. There's still a gap between this toy and the official Apple screen saver because we don't have a 3D model. Alternatively, we use 2D shapes to implement. It's simple and fun. That's the point.

Top comments (1)
Apply your GLSL skills to the V Shader Hackathon, running until 22 May 2025!
Create unique Shader art to win up to $1000 – organized in partnership with Gamedevjs.com
How to join: medium.com/vsystems/13-26-april-cr...
Any questions? Join our community!