
Are you starting out a career in DevOps and not sure if networking knowledge is necessary? Or perhaps you’re a veteran DevOps practitioner looking to get more knowledge about computer networks? Regardless of your background or current expertise, the information in this article will help you learn the basics of networking for a successful career in DevOps—because yes, DevOps engineers should be familiar with the core elements of networking.
Consider this article a resource of essential knowledge that breaks down everything you need to know about networking as a DevOps engineer.
This includes topics like the OSI model and the main protocols of TCP/IP. DevOps engineers must know how to calculate subnet sizes and understand the basics of routing. In addition, it is essential for a DevOps engineer to know how to debug using network tools like Ping, Traceroute, and Telnet.
Read along as I break down these skills for you, and return to this article when you need a refresher—this is your one-stop shop for everything DevOps Networking.
OSI Model
The Open Systems Interconnection (OSI) model is a set of standards that defines how computers communicate over a network. In the OSI model, data flow gets broken down into seven layers that build upon each other. Each layer uses data from the layer before it and serves a specific purpose in the broader network communication.
The OSI model works from the bottom up, beginning from layer 1 (Physical) and ending with the top layer 7 (Application). The top layer is the most direct point of user interaction with the OSI model—if you’re reading this article on a device, you’re working on the 7th layer at this very moment.

I break down each layer below:
Layer 1: Physical
The Physical layer handles raw data within physical media. That raw data is made up of bit of information and the Physical layer converts those into electrical signals that define certain aspects of a piece of physical media. For example, Physical layer specifications may define aspects like voltage levels, transmission distances, and cable standards. You find Physical-layer specifications in technologies like Bluetooth and Ethernet.
Layer 2: Data Link
The Data Link layer takes data in the form of electrical signals (frames) and delivers them across members (nodes) of a single network. Data Link frames only operate on a local network and do not cross the boundaries into other networks.
The Data Link layer can also detect and recover transmission errors by attaching extra information containing an error detection code to a given frame. When that frame is sent across the network, its receiver checks the received frame by matching the extracted data with the code.
Layer 3: Network
A Network describes the entire ecosystem of subnetworks and other networks that are all connected to each other via special hosts called gateways or routers. The Network layer works with routes (paths from one network to another). The Layer determines the most effective route to convey information. Sometimes, the message you’re trying to send is particularly large. In this case, the network may split it into several fragments at one node, send them separately, and reassemble them at the destination node.
Layer 4: Transport
The Transport layer protocols provide host-to-host communication services for applications. It is responsible for connection-oriented communication, reliability, and flow control. Connection-oriented communication uses a pre-established connection between hosts as a pathway for communicating between applications. Some protocols of the Transport layer are connection-oriented, but some protocols of this layer are not connection-oriented and instead transfer data end-to-end without the need for connection.
Layer 5: Session
The Session layer controls connections, whether that’s keeping an eye on possible connection losses or temporarily closing or re-opening connections depending on their frequency of use. The protocols of the Session layer try to recover any connection losses when they happen. It also optimizes connections: if a connection is not used for a long period, Session-layer protocols may close it and re-open it later. These protocols also provide synchronization points in the stream of exchanged messages, or in other words, spots for large messages to momentarily regather and make sure they’re all on the same page.
Layer 6: Presentation
The Presentation layer also called a Syntax layer, ensures that the recipient of the information can read and understand what it receives from another system; the information is presented in a legible way. Processes such as data encoding, compression, and encryption happen on this layer.
Layer 7: Application
The OSI model’s top and final layer is the Application layer. The Application layer displays the data in the correct format to the end-user—you! This includes technologies such as HTTP, DNS, FTP, SSH, and much more. Almost everyone interacts with the protocols of the Application layer on a day-to-day basis (not just you DevOps engineers).
TCP/IP
What is TCP/IP, and how is it different from OSI?
The OSI model explained above is great for developing a theoretical understanding of a networking stack, but it’s a challenging model to use in practice. Instead, nowadays we use the Transmission Control Protocol/Internet Protocol (TCP/IP) Model. This model has a similar layered structure, but it’s less complicated.
TCP/IP combines the three top levels of OSI (Application, Presentation, and Session) into a single Application layer in TCP. The two bottommost layers of OSI (Data Link and Physical) become the Network Interface layer in TCP.
The final result of these mergers is a 4-layer TCP/IP model. From the bottom up, those are Network Interface, Network, Transport, and Application.
It is important to keep this difference in mind as you encounter networking scenarios

One of the most important layers to understand in the TCP/IP model is the Application layer. This layer is responsible for process-to-process communication over an IP network. Each application in this layer is defined using a numerical specification called a Request for Comment (RFC). For example, HTTP, which is a protocol on the Application layer, is defined by RFC number 7231.
The other layer of the TCP/IP model that requires particular special attention is the Transport layer because it introduces several important networking concepts.
TCP vs UDP
The Transport layer of the TCP/IP model uses two major protocols: TCP and UDP. You should understand the differences between them.
TCP is a connection-oriented protocol. This means that it first establishes a link between the source and destination before it sends data. Once the connection has been made, then TCP breaks down large data sets into smaller packets, sends them along the connection, and ensures data integrity throughout the entire process. TCP is a preferred protocol when data integrity is critical, such as in any transactional system.
UDP in turn is not connection-oriented. UDP starts transmitting data immediately, without waiting for connection confirmation from the receiving side. Even though some data loss can happen, UDP is most often used in cases where speed is more important than perfect transmission, such as in voice or video streaming.
Ports and Protocols
The Transport layer of TCP/IP also introduces the concept of ports. TCP ports are labeled with specific port numbers, digital identifiers match the information received from the network with the proper process needed to process that data.
Here are some examples of the most used ports:
| Port Number | Process | What it’s used for |
|---|---|---|
| 22 | SSH | Secure shell, remote access, and file transfer |
| 53 | DNS | Resolving domain names into IP addresses |
| 80 | HTTP | Serving web pages |
| 443 | HHTPs | Serving web pages in a secure manner |
| 3306 | MySQL | Database connections |
While many ports are non-privileged,—anyone can use them without special permission—some require root permissions. Ports 1-1023 are called “well-known ports” and require root permissions before a server can listen to them. It’s a good practice to avoid running web servers as root, assign minimal permissions to services, and use nonprivileged ports when possible. That’s why sometimes we can see ports 8080 for HTTP and ports 6433 for HTTPS—they’re non-privileged.
IP Subnetting, CIDR
The most critical component of networking is the IP address. Every time you surf the internet, your browser is connected to its remote server using an IP address. You cannot use the internet or network without one.
An IP address is a 32-bit number divided into four 8-bit sections called octets. It can be represented in both decimal and binary formats. An IP address may contain a subnetwork that’s different from the host. The address comes with a subnet mask that distinguishes the part of the IP address that is the network and the part that is the host address.
For example, given an IP address of 192.168.12.20 with the subnet mask of 255.255.255.0, 192.168.12 represents a network address and .20 represents a host address. The concept of a netmask leads us to the idea of classful addressing, which divides the 32-bit IP address into 5 sub-classes.
In classful addressing, all IP addresses have an 8-bit, 16-bit. or 24-bit network prefix. Class A has an 8-bit long network ID and a 24-bit host ID. There are over 16 million class A addresses. Class B has network and host IDs of 16 bits each—there are 65,535 class B addresses. Class C holds the smallest networks—254 addresses. Each Class C network ID is 24 bits long with an 8-bit long host.
When ordering IP addresses, you want to keep in mind the size of your network and order a class that fits your needs. It’s conceptually easy to do this when you have very large or small networks. But problems arise in the middle when you’re in between Class B and C: you need more than 254 addresses but less than 65,535.
Let’s use an example. Let’s assume that you need 1000 addresses in your network. It’s more than 254, so you have to go with the next largest class—Class B. But now you’re only occupying 1,000 addresses and left with 65,000 unused ones. It doesn’t make sense. One solution to this could be to use multiple class C ranges. But having a huge number of small networks makes routing overly complicated! In our search for a new solution to this IP trolley problem, we’ve started to break networks using Classless Inter-Domain Routing.
Instead of having network classes with fixed sizes, network administrators are allowed to move the subnet boundary to anywhere inside the parent network. In other words, we are no longer limited by 8-bit, 16-bit, or 24-bit netmasks.
Let’s go back to our example. Imagine that we have an address that gives us 254 hosts..but we want 300 hosts. Using the old solution, you could get two Class C ranges (making your life more complicated). Now with Classless Interdomain Routing, instead of getting an additional Class C network, we can simply decrease our netmask bits by one and get a network that has 510 hosts. That’s much more reasonable!
The table below outlines the most common combination of addresses and netmasks and important details about them.
| Prefix | Netmask | Number of addresses | Relation to class | Comment |
|---|---|---|---|---|
| /32 | 255.255.255.255 | 1 | Class C/256 | Single host in a network |
| /25 | 255.255.255.128 | 128 | Class C/2 | |
| /24 | 255.255.255.0 | 256 | Class C | |
| /23 | 255.255.254.0 | 512 | Class C*2 | |
| /16 | 255.255.0.0 | 65,536 | Class C*256 = Class B | |
| /15 | 255.254.0.0 | 131,072 | Class B*2 | |
| /8 | 255.0.0.0 | 16,777,216 | Class B*256 = Class A | |
| /0 | 0.0.0.0 | 4,294,967,296 | Class A*256 | 0.0.0.0/0 means entire internet. Often used in public firewall rules |
Routing
So how do we get a packet of information from a host on one network to a host in another? In one word: Routing.

Think about a route as a path. Different routes lead to different destinations and are used when trying to reach certain targets. It’s like driving. If your destination is a residence in a quiet neighborhood, you’ll take a local road. If you want to go the mall a few towns over, you may take a state highway. But if you want to road trip across the country, you’ll hop onto the interstate.
We use tables to help us determine the routes we want to take. This screenshot demonstrates a typical route table in AWS:
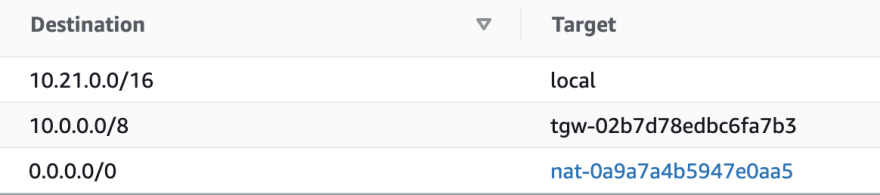
When making a routing decision, more narrow rules are evaluated first:
If a packet destination is in a range of 10.21.0.0/16 – it will remain in a local network (your neighborhood).
If a packet destination is in a range of 10.0.0.0/8 – it will be sent to the transit gateway (TGW) interface (your state highways).
If a packet destination does not fall in any of these ranges, the widest one is evaluated which is 0.0.0.0/0 which means it is internet traffic. And the packet will be redirected to the Network Address Translation (NAT) interface (hello, I-95!).
Domain Name System (DNS)
DNS Overview
As discussed previously, computers tell each other apart using IP addresses. Humans, on the other hand, identify things with names. Humans and computers have to interact, but it would be really hard for humans to interpret IP addresses and impossible for computers to communicate with names. This is where the Domain Name System (DNS) comes it. The DNS merges the needs of both parties, converting human-readable domain names into computer-friendly IP addresses and vice versa.
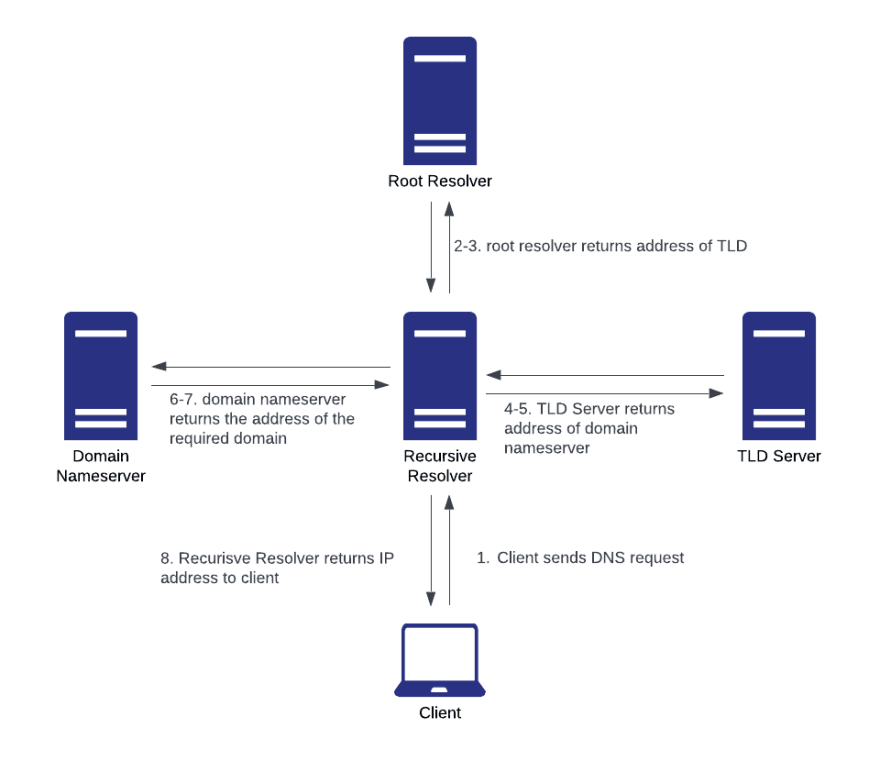
To better understand how this system works, let’s walk through the process of retrieving an IP address from a web browser request using the DNS lookup process.
- Client initiates a query to a Recursive Resolver.
- The Recursive Resolver connects to a Root Server.
- The Root Nameserver then responds to the resolver with the address of a Top Level Domain (TLD) Server (such as .com or .net)
- The Root Resolver makes a request to the TLD Server.
- The TLD Server returns the IP address of the Domain Nameserver, which stores the information about the requested domain.
- The Recursive Resolver sends a query to the Domain Nameserver.
- The IP address for the requested domain is returned to the Recursive Resolver from the Domain Nameserver.
- The Recursive Resolver provides the client with the IP address of the requested domain.
The visual below also explains how this works. It’s a lot like a game of telephone that translates information back and forth from computer to human language until it reaches its final desired form.
Domains, Zones, and Delegation
A domain is a self-contained network on the internet. There are many domains and each can have subdomains and more below them.
The easiest way to visualize domains is as a tree with nodes. The top-level namespace (the DNS root zone) is the highest hierarchical level of the DNS and is divided into top-level domains such as .com .gov and .io. Each TLD of that tree represents a domain and all subdomains below it. For example, example.com is a subdomain of the .com domain. You can keep breaking these domains and subdomains down, like folders and subfolders within a file system.
Different organizations on different domains. For example, the root domain is owned by the organization called ICANN, while Verisign controls the .com domain. But ownership is not a simple split. The root domain includes all domains on the internet, including the .com domain. It’s like ICANN owns the entire tree while Verisign owns one branch of it…but the branch is still part of the larger tree.
So how can Verisign own that branch? The answer is delegation. The delegation process allows an organization that owns a domain to give control over a subdomain to another organization.
Delegation is done via Nameserver (NS) records. When a domain owner delegates a subdomain to another organization, they create an NS record. The NS record indicates the new owner of the subdomain and directs all communications related to that domain to the servers of that organization. The organization controlling these servers is technically a domain owner. It continues as more nameservers are built and subdomains delegated.
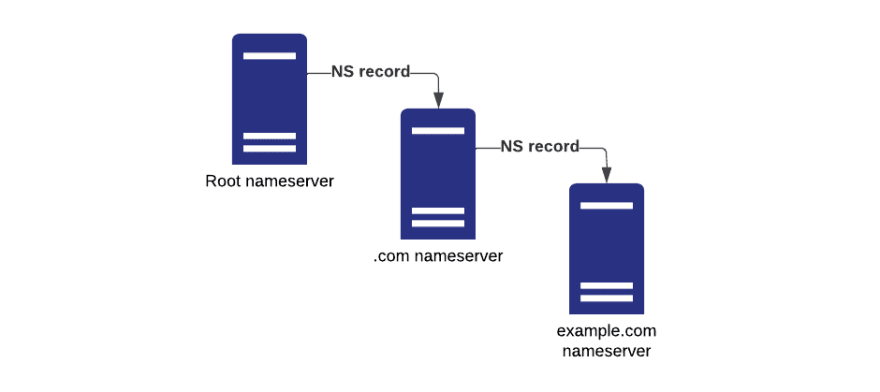
To make things clearer, let’s consider a simplified example.
- ICANN manages a root nameserver (in fact there are multiple root nameservers across the globe).
- Verisign builds their own nameserver and asks ICANN to delegate control over the .com zone to them.
- ICANN creates an NS record that points to the nameserver owned by Verisign. Now, any time a client contacts them for the .com domain, they are redirected to Verisign’s server.
- You start a company called “Example Ltd” and you want to register your own domain, example.com, in a .com zone.
- You build your own nameserver and ask Verisign to delegate control over example.com to you.
- Verisign creates similar NS records on their nameserver which delegates control over the example.com domain to “Example Ltd.” Now, you control that domain.
DNS record types
DNS records, also known as zone files, provide information about a domain. This includes the IP address that is associated with this domain and how to handle queries for it. Each DNS record has a time-to-live setting (TTL) which indicates how often a DNS server will refresh it.
Below are the most commonly used types of DNS records and their meaning.
| Type | Name | Description |
|---|---|---|
| A | Host address | The most basic and the most commonly used DNS record. It translates human-friendly domain names into computer-friendly IP addresses. |
| AAAA | IPv6 host address | Same as A but for IPv6 (a host address that can have more than one IP address). |
| CNAME | Canonical name for an alias | Maps a name to another name. It should only be used when there are no other records on that name. |
| ALIAS | Auto resolved alias | Maps a name to another name, but can coexist with other records on that name. |
| MX | Mail eXchange | Specifies the e-mail server(s) responsible for a domain name. |
| NS | Name Server | Identifies the DNS servers responsible for a zone. One NS record for each DNS server in a zone. |
| TXT | Descriptive Text | Holds general information about a domain name such as who is hosting it, contact person, phone numbers, etc. Widely used for domain ownership verification. |
HTTP
HTTP Methods
You’ve probably heard about Hypertext Transfer Protocol, also known as HTTP. HTTP allows you to interact with Web pages, HTML documents, and APIs. It is the foundation of any data exchange on the Internet. A typical DevOps engineer works with HTTP every day and should have a solid knowledge of this protocol.
As a DevOps engineer, you should know what an HTTP request is, the various HTTP request methods that exist, and how they are different from each other.
An HTTP request is a request message from a client to a server asking for access to a resource.
There are 7 main HTTP request methods:
| Name | Desription |
|---|---|
| GET | Requests the data of an object. The data entity is returned in a response body. |
| HEAD | Identical to GET, but without a response body. More for meta information or testing. |
| POST | Submits a change to an object. |
| PUT | Replaces an object. |
| PATCH | Updates an object. |
| OPTIONS | Describes the communication options for an object. |
| DELETE | Deletes an object. |
Response codes indicate whether a request was completed successfully or failed. You’ve probably seen them floating around in pop culture references or been on the receiving end of a hyperlink that goes nowhere.

There are 4 categories of HTTP responses:
200s: Successful responses
300s: Redirects
400s: Client errors
500s: Server errors
Take a look at some of the most common response codes:
| Code | What It’s Telling | What it Means |
|---|---|---|
| 200 | OK | Request succeeded. |
| 302, 307 | Found, Temporary Redirect | The URI of the requested resource has been changed temporarily. |
| 301, 308 | Moved Permanently, Permanent Redirect | The URI of the requested resource has been changed permanently. |
| 400 | Bad Request | The server can’t understand the request being sent. |
| 401 | Unauthorized | The client must authenticate itself before sending the request. |
| 403 | Forbidden | The client does not have enough permission to access the content. |
| 404 | Not Found | The server can’t find the requested resource. |
| 408 | Request Timeout | The response was sent to an idle connection and the server wants to terminate it. |
| 418 | I am a Teapot | The server refuses to brew coffee because it is, permanently, a teapot. |
| 500 | Internal Server Error | The server does not know how to handle a request. |
| 502 | Bad Gateway | The server you are trying to access is a gateway or a reverse proxy (it sits between the client and an actual server that serves the page). You get this error when the gateway gets an incorrect response from a source server. |
| 503 | Service Unavailable | The server can’t process the request. This usually happens when a server is down or overloaded. |
| 504 | Gateway timeout | Similar to 502, the gateway can’t get a response in time. |
HTTP Headers
HTTP headers allow the client to add additional information to a request for purposes such as authentication, caching, and specifying the type of client device sending the request. Headers are widely used to control traffic and implement features such as canary releases, blue-green deployments, and a/b testing.
Headers fall into 4 general contexts:
General Header: A header that works for both response and requests messages.
Request Header: A header that only applies to request messages from a client.
Response Header: A header that only applies to responses from a server.
Entity Header: A header that gives information about the entity itself or the resource requested.
Headers are case-insensitive in the structure Name: Value.
Network Troubleshooting Tools
ping
The easiest tool to test internet network connections is ping. It uses the ICMP protocol’s ECHO_REQUEST datagram to obtain an ICMP ECHO_RESPONSE from a remote host. The Ping command is integrated into all versions of Windows, so all you need to do to start using it is open up your command prompt or application.
To troubleshoot using ping, first, run it on your own network (the local host) to ensure that your internet network interface works. This is as easy as opening up the command prompt and typing “ping www.google.com”. Then, as you troubleshoot, you can ping hosts and gateways further and further in the network to try and diagnose the location of connectivity problems.
When you ping, you get information back, including the percentage of lost packets and average round-trip latency.
traceroute
Sometimes a network is particularly slow, and you want to track the routes of your packets or identify which gateway is causing delays. It can be challenging to do this manually, which is where the traceroute command comes in handy.
“traceroute” is a diagnostic command (also sometimes written as “tracert”) that can show you possible routes across an IP network and calculate any transit delays in that route. Whereas the ping command only shows a final round trip time for packets to go from host to destination and back, traceroute calculates the total time spent establishing a connection by adding up the mean respective round trip times for each subsequent node along a given route.
The overarching goal of traceroute for troubleshooting is to launch User Datagram Protocol (UDP) probes of increasing time to live (TTL) until the Internet Control Message Protocol (ICMP) sends a “time exceeded” message back. The “time exceeded” message is an indicator that the packet has reached a router along the root. The process increases TTL by one each time until the “port unavailable” message bounces back—indicating either the end of the destination or that the maximum TTL is reached.
The probes always start by sending a packet with TTL=1. Every time a packet hits a router, it lowers the TTL by 1, so we know that when we get a time exceeded message it is because TTL is at 0; we have reached another stop along the route. Thus, the probe increases TTL by one setting every time, slowly adding hops along the route until the destination is found or the maximum number of hops is hit. At the end of it all, you receive information about the specific path a packet follows and each route along the way.
The report you receive shares the following information:
The Time to Live
The IP addresses of each stop in the route—each gateway that has responded to the probe
The round trip time for each router along the route
This is valuable information for knowing an exact route and troubleshooting any speed and network issues. But one of the most valuable tools in traceroute is that the report specifically marks with an asterisk (*) for any router on the route that does not send a response within the time limit. Now, you know exactly where to look to troubleshoot.
Here’s an example of a report output from a traceroute command. Take a close look at it.
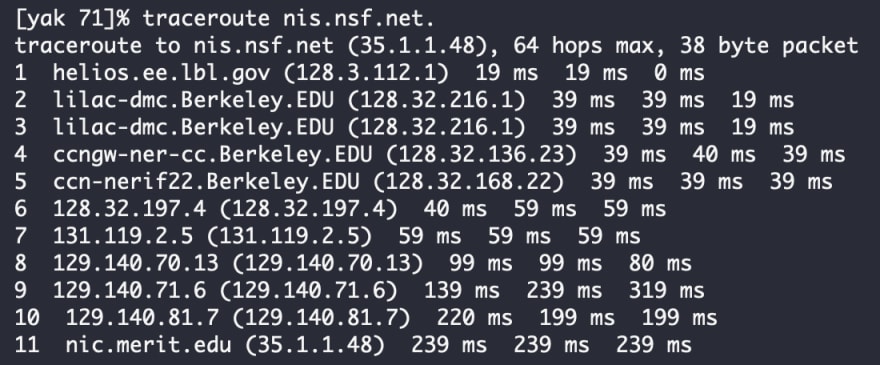
You may notice that lines 2 and 3 are identical. This is an example of a buggy kernel in the second hop that forwards packets with zero TTL – lbl.csam.arpa .
As you can see, traceroute can give you a lot of really helpful diagnostic information quickly and simply. However, it does have limitations. Some networks don’t provide address-to-name translations. When those appear on your report, you have to guess the path that packets take cross-country. This happens in the report sample above at hop number 6 with IP address 128.32.197.4, a router along the NSFNet, which doesn’t give you the named translation.
Overall, though, traceroute is a commonly used diagnostic tool and one that you will use often in your DevOps career.
telnet
One important caveat to tools like ping and traceroute? A server responding to traceroute or ping does not necessarily mean that it is operational.
Imagine that we have a virtual machine with an Apache HTTP server on it. This means that in order to load web pages, the machine needs to have the Apache daemon up and running. If it’s not running, although the virtual machine may be responsive to ping requests, we will not be able to load anything.
On the flip side, if a server does not respond to ping, – it’s not necessarily down. Some system administrators configure their firewalls to drop all ping requests, so you’d get no response from the server. But the server behind this firewall can still be reachable via other protocols.
Because of these limitations to traceroute and ping, you want to be able to test whether or not the protocol you’re using will allow you to establish a network connection. Telnet is a command that can help with this.
Historically, telnet was used as a command-line interface for accessing remote servers. However, because telnet does not encrypt the data, it is not secure to use it for remote access and has since been replaced by SSH.
But telnet is still helpful. Nowadays, we can use telnet to test if one host can establish a network connection using a certain protocol.
A telnet command testing the connection to google.com at port 443, for example, looks like this:
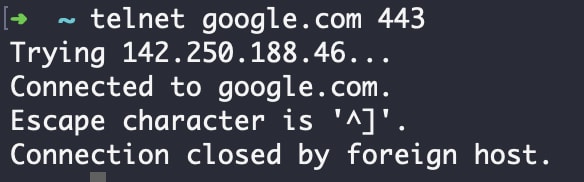
As you can see above, the command succeeded, which means that a connection is allowed between our local machine and a remote system on a given port.
curl
As a DevOps engineer, you’re frequently going to have to transfer data, and that means you should know how to use curl. curl is an open-source data transfer tool that supports multiple Application-layer protocols. It’s most commonly used for sending HTTP requests, which are requests for access to a resource on a server. curl is freely available and may already be on your system. If it isn’t, you can easily install it.
The most basic way to use curl is to perform an HTTP GET request (remember from our table earlier in this article that this is a request for a resource (HTTP) that returns the entire entity in the response (GET).
The basic syntax is: .
curl http://example.com
This will send an HTTP GET request to the example.com host.
If you’re checking an exact response code and only want to see response headers, you can use curl -I. The syntax looks like this in our example:
curl -I http://example.com
By default, curl uses the HTTP GET method. If you wanted to use another method to return a certain type of response, you can use the -X flag in your curl command followed by the type of request that you want. For example,
curl -X POST http://example.com
sends a curl HTTP POST (not GET) request (submitting a change to an object—in this case, a change to http://example.com).
curl is the master of data transfer, and we can even download files/store a file’s response with curl by using the -o flag. Syntax for this may look something like this:
curl http://example.com/faile -o output.file.
There are other curl commands, too. Explore curl more deeply on the site for the curl project, where you’ll find a plethora of helpful (and totally free) resources. Once you’re familiar with the tool, you’ll be able to use it to accomplish a number of programming tasks.
dig
The next tool to learn is “dig”, not “how to dig”, but just “dig” – which stands for Domain Information Groper.

It is used for troubleshooting Domain Name System (DNS) problems and verifying DNS records. dig performs DNS Lookups and then shows you the answers returned from the name server(s).
The basic syntax of dig for a DNS record lookup is [dig] [domain name]. This will make an NS query and return the “A record”—Address record—for a given domain name.
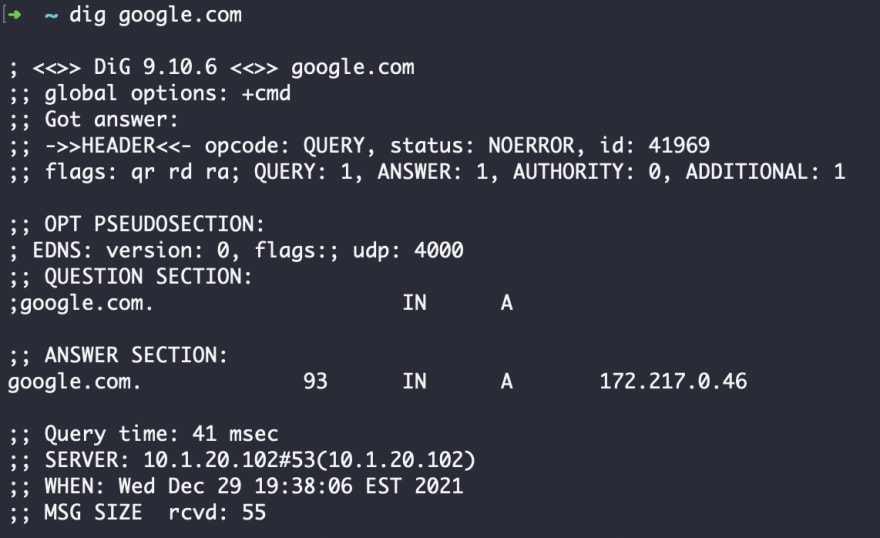
Let’s break down this example by looking up the DNS record for the domain google.com. At the top, you can see the request: dig google.com. In the ANSWER section of the response, you get a number of pieces of information:
The queried server (google.com)
TTL ( in this case 93)
Query class (IN= internet)
Query type (A= address)
The IP address for the queried domain (172.217.0.46)
So there you have it—the google.com DNS record is associated with the IP address 172.217.0.46.
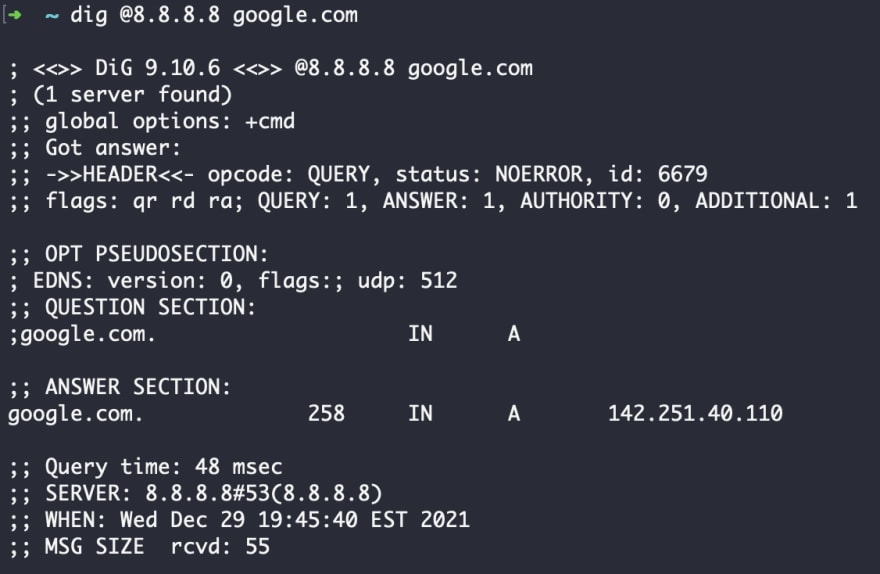
Like with curl, the dig has a default method. By default, dig will attempt to query each server specified using the /etc/resolv.conf file, the automatic file type for configuring DNS name servers. But in some cases, you may want to send queries to a specific DNS server. You can do this with the @ flag.
This example checks the DNS record for google.com on specifically the 8.8.8.8 server. As you can see, it returns a different ANSWER from the /etc/resolv.conf file used in the default above.
By default, dig also returns an ANSWER of a A record (address). But you can also check different types of DNS records using the -t option. The syntax for this would look like:
dig -t [record type] [domain name]
The example below specifics the TXT record for the google domain.

Other dig record types you may want to specifically query:
MX record- mail exchanger, tells you what mail server accepts email messages for a given domain name
NS record- all authoritative servers for a domain name
ALL- all DNS records for a domain name
Dig is a great tool for DevOps engineers to have in their toolbox because it helps you troubleshoot for your name servers, double-check records, and trace IP addresses and their domain names, among other things.
netstat
netstat is a command that shows you specific information about the communications between your local machine and other machines/devices on the network. Netstat shows active TCP connections as well as ports on which the server is listening. It is useful when you need to see which network services are running on a local machine.
In the example below, we can discover that there is an apache web server listening on the default HTTP port.

In the above example, the command netstat -lp shows only listening servers (-l flag)and their program name (-p flag). Other netstat flag commands include:
-a: all active ports
-n: only numerical IP addresses and ports
-f: whenever possible, provide all names of foreign connections
-o: show process ID
-r: routing table
nmap
The next tool to become familiar with as a DevOps engineer is nmap. nmap, or “network mapper”, is also a free, open-source tool like netstat. A use case for nmap is almost identical to that for netstat, with one minor difference. When you’re using netstat, you have to log into a server. But nmap scans all servers in a network.
nmap sends raw IP packets to determine the hosts available on a given network, what services are offered by these hosts, and what operating systems they are running. System administrators use nmap for tasks such as network inventory and security audits—sometimes known as “white hat” hacking because it identifies vulnerabilities in order to secure and resolve them. However, this tool is also widely used by “black hat” hackers, who use the information provided to exploit vulnerabilities in the network. Because of this potential, some cloud providers do not allow nmap to run on their networks.
In many ways, DevOps engineers are white hat hackers—troubleshooters, security protectors, and network experts. To demonstrate how nmap can be useful for us, let’s go through a simple scenario.
Assume we gained SSH (Secure Shell Protocol) access to an unknown server. Our goal is to find out what else is running on the network.
First, let’s find out the IP of our server and the IP range of our network using our address.
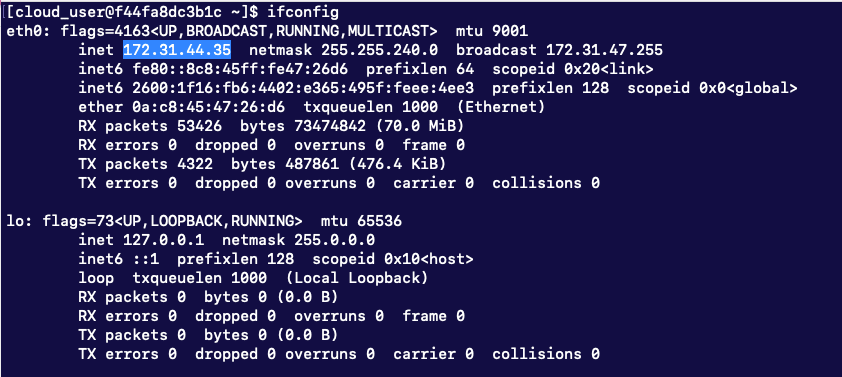
Our IP address is 172.31.44.35 and 255.255.240.0 netmask corresponds to /20
Now that we know this information, we can initiate a nmap ping scan using the following command:
nmap -sn 172.31.44.35/20
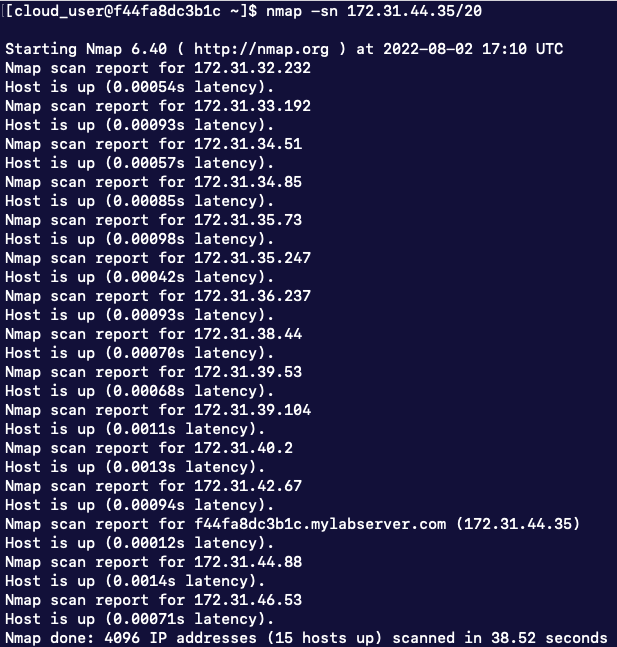
We can see now that there are 15 hosts in the specified subnet.
Let’s test one of these hosts and find out which ports it is listening to. You can do this using the command below:
nmap -A 172.31.36.237

The nmap command helps us see that the there is an SSH and HTTP processes listening to ports on this server.
Since we know that a curl is a great tool for HTTP, we can then try obtaining the webpage using curl.

Or we can establish an ssh connection, another portocol which is used multiple times throught a typical day in life of a DevOps engineer.
ssh
SSH stands for Secure Socket Shell, or just Secure Shell. It’s a network protocol that allows you to log into remote machines and execute commands on them. When you’re logging into remote machines, you can’t always trust the network that you’re using to do so. SSH makes this process safer by encrypting all data, allowing secure communications via an untrusted network. This us hekoful when you’re working with sensitive information (yours or a client’s) or need to troubleshoot an unfamiliar network.
The basic syntax to launch SSH is:
[ssh] [user_name@hostname] or [ssh] [user_name@ipaddress]
See how I’ve used it below.
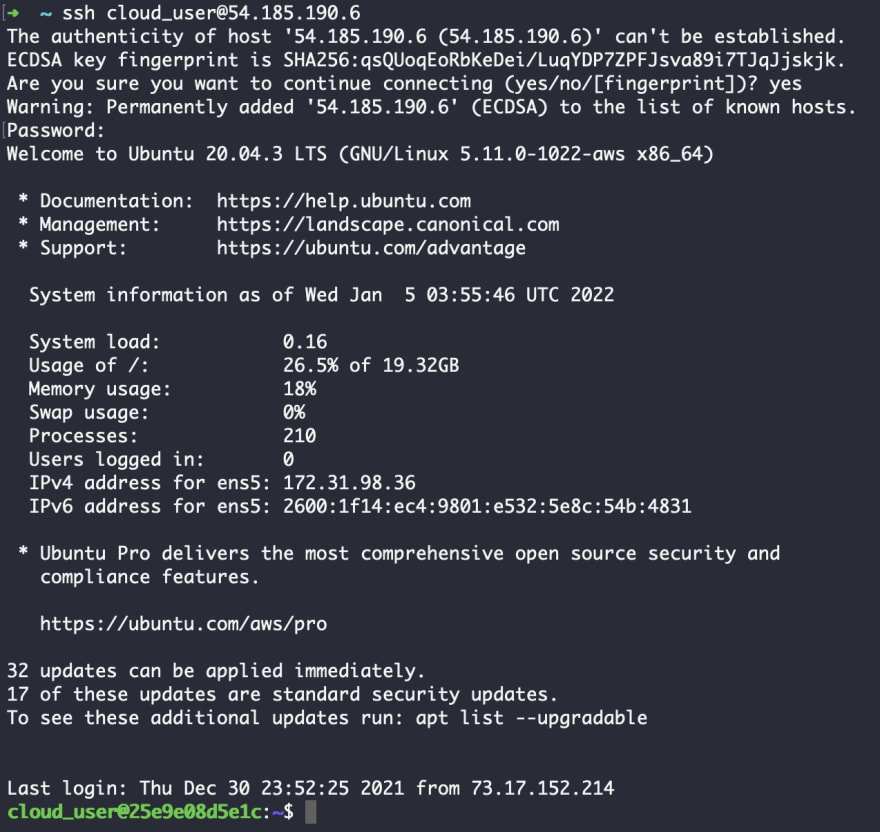
After you run the command, the remote server will ask you to provide a password. This is a basic authentication option. However, the more secure best practice is to use a passwordless option whenever possible.
scp
The final command that you’ll find helpful is SCP (Secure Copy Protocol). SCP is a similarly secure way to execute actions between a local and remote host, but instead of connecting to a server and executing commands, it transfers files.
See below the syntax for SCP:

Putting the Toolbox Together
So you’ve arrived at the end of this article—now what? You just took in a lot of information on a lot of different networking topics. What to do with this new knowledge?
Think of each section of this article as a different tool in your DevOps toolbox. Each one has a unique design, function, and use case. As a DevOps engineer, you will find yourself needing to execute certain tasks that may require networking. Knowing what each of these tools does, and the basics of what networking is in the first place will help you assess what must be done to accomplish a task.
Let’s do a quick overview of what you learned today.
- DevOps engineers do need to know some networking skills!
- There are 7 layers to the OSI model of a network that build upon each other.
- Knowing OSI is helpful for understanding exactly what networking is, but OSI is complicated—the TCP/IP model helps by condensing some layers, and it’s what we primarily use.
- TCP is a connection-oriented protocol on the transfer layer (use for security); UDP is also on the transfer layer but it’s connectionless (use for speed)
- TCP ports use digital identifiers to identify the right type of process for a command.
- IP addresses are necessary to use the internet. Some IP addresses are a combination of host and network; the subnet mask breaks apart which is which.
- There are 5 classes of IP addresses, each with different lengths for prefixes and a predetermined amount of addresses under that class.
- Classless Interdomain Routing is a solution to the problem of non-ideal numbers of IP addresses—by removing classes, it removes the need for specific caps on totals.
- Routing is the process of sending information over a network.
- The DNS network translates computer language to human language and gives names to domains across the network. You can do lookups to find the IP address associated with a certain DN.
- Domains are owned, but an owner can delegate certain parts to new owners. HTTP allows you to interact with web pages, files, etc. on a network. It works by sending out a certain type of command/request. In return, you can get a response code that tells you the status of your request.
- There are a number of helpful tools to troubleshoot networks (Ping, traceroute, telnet, curl, dig, netstat, nmap, and SSH are the ones shared in this article). They are all commands with a certain syntax that accomplish a troubleshooting task. Now you’ve got your tools, you know what they do, and the next step is practicing. Play around with what you’ve learned in this article. If you’re excited about these concepts and want to learn more, consider seeking the advice of an expert mentor.
Put your tools in your toolbox and carry them with you to your next DevOps job.
Apply for individual mentorship 👉 https://yourdevopsmentor.com/apply/
Connect with me on LinkedIn 👉 https://www.linkedin.com/in/vladimir-mukhin-devops/
Follow me on Twitter 👉 https://twitter.com/vmukhindevops/
DevOps career blog 👉 https://yourdevopsmentor.com/blog/
Originally published on https://yourdevopsmentor.com/

Top comments (0)