
Did you ever need a way to detect when an answering machine was on a voice call? No? Thats ok. I did!
Prerequisites
This post assumes you have basic Python experience, as well as having a very basic understanding of machine learning. We'll go over a few basic concepts on machine learning, and we have linked to more resources throughout this post.
A few weeks ago, I received a request from one of our sales engineers about an answering machine detection service for a client. They wanted a way to send a message to a answering machine when the call went to voicemail.
I've done some research on this, and it does seem possible, but I couldn't find anything on HOW this was done. So I decided to figure it out...
The first thought was to build a machine learning model that detects when the beep sound in an answering machine is heard. In this post, we'll go over how the model was trained and deployed into a application.
Training Data
Before we can start building a machine learning model, we need to have some data. For this problem, we need to have a bunch of audio files with the answering machine beep sounds, like this:
Beep sound 1
or this:
Beep sound 2
We also need to include samples that don't include the beep sound:
Non-Beep sound 1
or this:
Non-Beep sound 2
Since this kind of data doesn't seem to exist on the internet, we needed to gather as many samples as possible of beeps and other sounds from calls, in order to train our model. To do this, I built a webpage that allows anyone to record their voicemail greeting message.
When you call the Nexmo number, the application will create an outbound call to the same number. When the call is received, you just need to send the call directly to voicemail. From there, we record the call using the record action and save the file into a Google Cloud Storage bucket. After gathering a lot of examples, we can start looking at the data.
In any machine learning project, one of the first things to do is to look at the data and make sure it's something we can work with.
Since it's audio, we can't look at it directly, but we can visualize the audio files using a mel-spectrogram, which looks like this:

A mel-spectrogram shows a range of frequencies (lowest at the bottom of the display, highest at the top) and shows how loud events are at different frequencies. In general, loud events will appear bright and quiet events will appear dark.
We'll need to load a few files of both types of sounds, plot them, and see how they look. To show the mel-spectrogram, we'll use a Python package called Librosa to load the audio recording, then plot the mel-spectrogram using matplotlib, another Python package to plot charts and graphs.
import glob
import librosa
import matplotlib.pyplot as plt
%matplotlib inline

def plot_specgram(file_path):
  y, sr = librosa.load(file_path)
  S = librosa.feature.melspectrogram(y=y, sr=sr, n_mels=128,fmax=8000)
  plt.figure(figsize=(10, 4))
  librosa.display.specshow(librosa.power_to_db(S,ref=np.max),y_axis='mel', fmax=8000,x_axis='time')
  plt.colorbar(format='%+2.0f dB')
  plt.title(file_path.split("/")[-2])
  plt.tight_layout()

sound_file_paths = [
                    "answering-machine/07a3d677-0fdd-4155-a804-37679c039a8e.wav",
                    "answering-machine/26b25bb7-6825-43e7-b8bd-03a3884ed694.wav",
                    "answering-machine/2a685eda-8dd9-4a4d-b00e-4f43715f81a4.wav",
                    "answering-machine/55b654e5-7d9f-4132-bc98-93e576b2d665.wav",
                    "speech-recordings/110ac98e-34fa-42e7-bbc5-450c72851db5.wav",
                    "speech-recordings/3840b850-02e6-11e9-aa3d-ad1a095d8d72.wav",
                    "speech-recordings/55b654e5-7d9f-4132-bc98-93e576b2d665.wav",
                    "speech-recordings/81270a2a-088b-4e3c-9f47-fd927a90b0ab.wav"
                    ]

for file in sound_file_paths:
  plot_specgram(file)
Let's see what each audio file looks like.
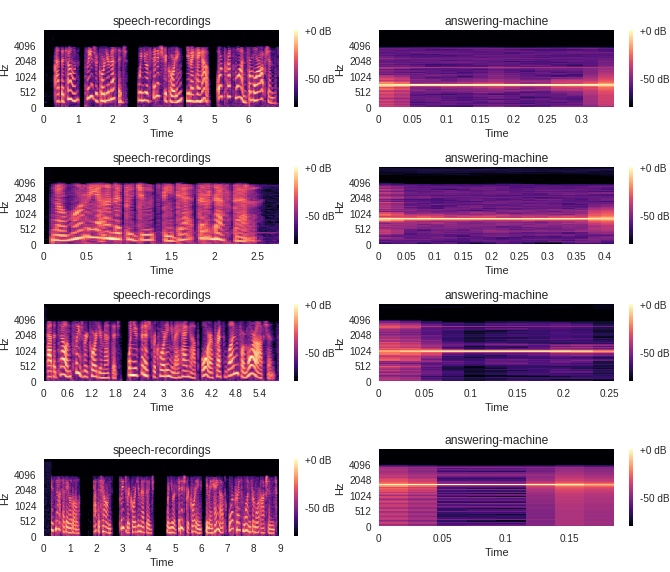
You can clearly tell which audio file is a beep and which is just speech.
Before we train our model, we will take all the recordings that we have for both beeps and non-beeps, which are labeled as speech, and convert each recording into a vector of numbers, since our model will only accept numbers, not images.
To compute the data, we'll use the mel-frequency cepstral coefficients (MFCCs) of each sample. Then, we'll save this value into a csv so that we do not have to re-compute the MFCC's over again.
For each audio sample, the csv will contain the path to the audio sample, the label of audio sample(beep, or speech), the MFCC, and the duration of the audio sample (using the get_duration function in librosa). We also tried a few other audio characteristics including chroma, contrast and tonnetz). However, these features were not used in the latest version of the model.
Let's now take a look at the first 5 rows of the csv, just to see what the data looks like.
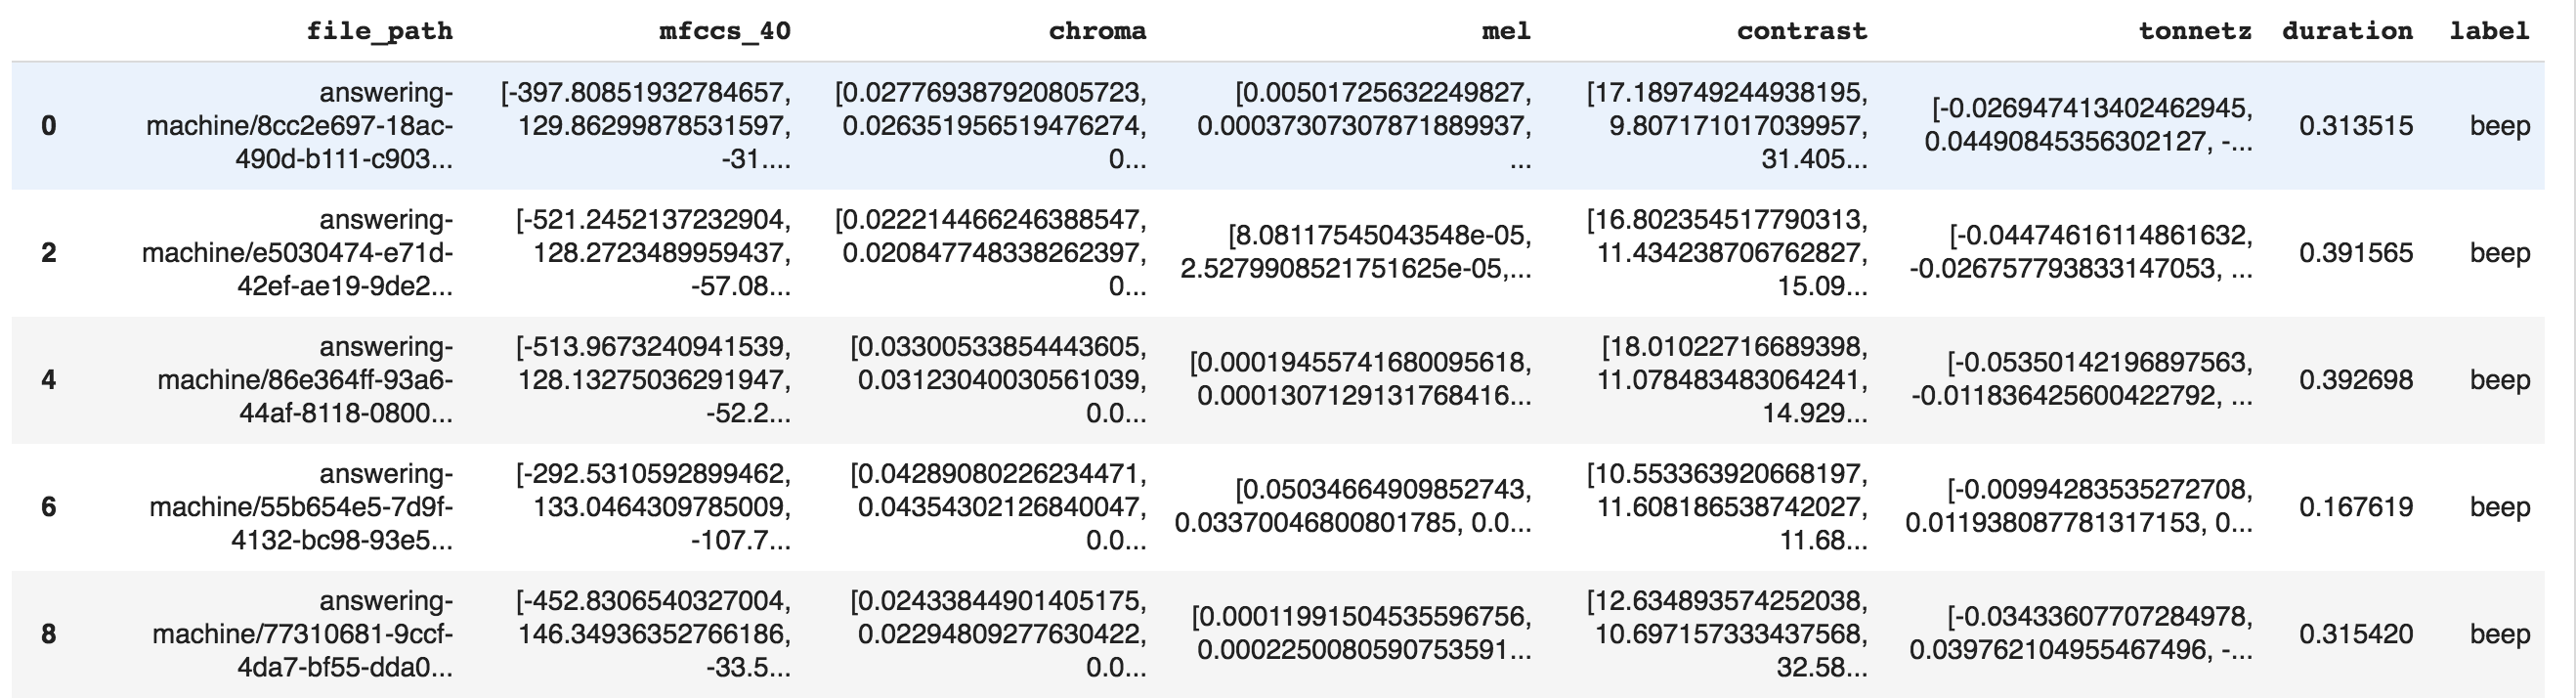
Each row contains a 1 dimension vector of each of the audio features. This is what we'll use to train our model.
Training
Now we'll take this data and train a model with it. We'll be using the Scikit-learn package to do our training. Scikit-learn is a great package that allows you to build simple machine learning models without having to be a machine learning expert.
For each model, we took our dataframe, which contained the label of each audio file, (beep, speech), with the MFCC for each sample, split it into a train and test dataset, and ran each model through the data.
def train(features, model):
  X, y = generateFeaturesLabels(features)
  X_train, X_test, y_train, y_test = train_test_split(X, y, test_size=0.33, random_state=42)

  model.fit(X_train, y_train)
  print("Score:",model.score(X_test, y_test))

  cross_val_scores = cross_val_score(model, X, y, cv=5, scoring='f1_macro')
  print("cross_val_scores:", cross_val_scores)
  print("Accuracy: %0.2f (+/- %0.2f)" % (cross_val_scores.mean(), cross_val_scores.std() * 2))

  predictions = model.predict(X_test)

  cm = metrics.confusion_matrix(y_test, predictions)
  plot_confusion_matrix(cm, class_names)

  return model
The function train takes a list of features that we want to use, which is just MFCC of the audio sample, as well as the model we want to train on. Then we print our score, which is how well the model performed. We also print the cross validation score. This makes sure that our model was trained correctly. The plot_confusion_matrix function plots a confusion matrix that shows exactly what the model got correct and incorrect.
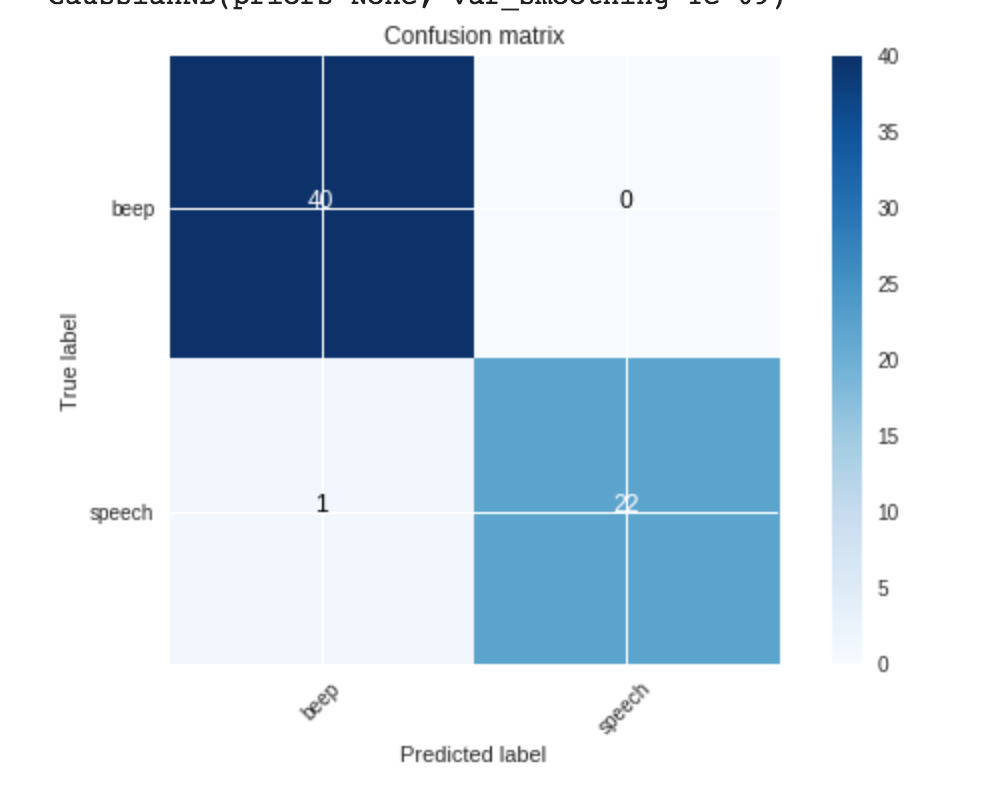
We then tried the following models and included their accuracy (0-100% score on how well the model did).
- RandomForestClassifier 97% accuracy
- LogisticRegression 96% accuracy
- Support Vector Machines 84% accuracy
- Gaussian Naive Bayes 98%
All these models performed very well, except Support Vector Machines. The best was Gaussian Naive Bayes, so we will use that model. In our Confusion Matrix from above, out of the 67 examples, 40 samples that were predicted as a beep were actually beeps, and 22 samples that were predicted to be speech were, in fact, speech examples. However, 1 example that was predicted to be a beep was actually speech.
After we have our model, we need to save it to a file, then import this model into our VAPI application.
import pickle
filename = "model.pkl"
pickle.dump(model, open(filename, 'wb'))
Building the Application
The last part is to now integrate our model into a VAPI application.
Source
When building an application, you have to first create a Nexmo application and purchase a Nexmo number.
We'll build an application that lets a user dial a Nexmo number. We'll then ask the user to enter a phone number to call. Once that number is entered, we'll connect that call into the current conversation and connect to our websocket. Using Nexmo websockets, we are able to stream the audio call into our application.
First, we need to load our model into our application.
loaded_model = pickle.load(open("models/model.pkl", "rb"))
When the user first dials the Nexmo number, we return a NCCO with the following:
class EnterPhoneNumberHandler(tornado.web.RequestHandler):
    @tornado.web.asynchronous
    def get(self):
        ncco = [
              {
                "action": "talk",
                "text": "Please enter a phone number to dial"
              },
              {
                "action": "input",
                "eventUrl": ["https://3c66cdfa.ngrok.io/ivr"],
                "timeOut":10,
                "maxDigits":12,
                "submitOnHash":True
              }

            ]
        self.write(json.dumps(ncco))
        self.set_header("Content-Type", 'application/json; charset="utf-8"')
        self.finish()
We first send a Text-To-Speech action into the call asking the user to enter a phone number. When the phone number is entered, we get those digits from the https://3c66cdfa.ngrok.io/ivr url.
class AcceptNumberHandler(tornado.web.RequestHandler):
    @tornado.web.asynchronous
    def post(self):
        data = json.loads(self.request.body)
        ncco = [
             {
             "action": "connect",
              "eventUrl": ["https://3c66cdfa.ngrok.io"/event"],
               "from": NEXMO_NUMBER,
               "endpoint": [
                 {
                   "type": "phone",
                   "number": data["dtmf"]
                 }
               ]
             },
              {
                 "action": "connect",
                 "eventUrl": ["https://3c66cdfa.ngrok.io/event"],
                 "from": NEXMO_NUMBER,
                 "endpoint": [
                     {
                        "type": "websocket",
                        "uri" : "ws://3c66cdfa.ngrok.io/socket",
                        "content-type": "audio/l16;rate=16000"

                     }
                 ]
               }
            ]
        self.write(json.dumps(ncco))
        self.set_header("Content-Type", 'application/json; charset="utf-8"')
        self.finish()
After the phone number is entered, we will receive a callback from the https://3c66cdfa.ngrok.io/ivr url. Here we take the phone number the user entered from data["dtmf"] and perform a connect action to that phone number, then perform another connect action into our websocket. Now our websocket is able to listen in on the call.
As the call is streamed into the websocket, we need to capture chunks of speech using Voice Activity Detection, save into a wave file, and make our predictions on that wav file using our trained model.
class AudioProcessor(object):
    def __init__(self, path, rate, clip_min, uuid):
        self.rate = rate
        self.bytes_per_frame = rate/25
        self._path = path
        self.clip_min_frames = clip_min // MS_PER_FRAME
        self.uuid = uuid
    def process(self, count, payload, id):
        if count > self.clip_min_frames:  # If the buffer is less than CLIP_MIN_MS, ignore it
            fn = "{}rec-{}-{}.wav".format('', id, datetime.datetime.now().strftime("%Y%m%dT%H%M%S"))
            output = wave.open(fn, 'wb')
            output.setparams((1, 2, self.rate, 0, 'NONE', 'not compressed'))
            output.writeframes(payload)
            output.close()
            self.process_file(fn)
            self.removeFile(fn)
        else:
            info('Discarding {} frames'.format(str(count)))
    def process_file(self, wav_file):
        if loaded_model != None:
            X, sample_rate = librosa.load(wav_file, res_type='kaiser_fast')
            mfccs = np.mean(librosa.feature.mfcc(y=X, sr=sample_rate, n_mfcc=40).T,axis=0)
            X = [mfccs]
            prediction = loaded_model.predict(X)
            if prediction[0] == 0:
                beep_captured = True
                print("beep detected")
            else:
                beep_captured = False

            for client in clients:
                client.write_message({"uuids":uuids, "beep_detected":beep_captured})

        else:
            print("model not loaded")
    def removeFile(self, wav_file):
         os.remove(wav_file)
Once we have a wav file, we use librosa.load to load in the file, and then use the librosa.feature.mfcc function to generate the MFCC of the sample. We then call loaded_model.predict([mfccs]) to make our prediction. If the output of this function is 0, a beep was detected. If it outputs 1, then it's speech. We then generate a JSON payload of whether a beep was detected, and the uuids of the conversation. This way, our client application can send a TTS into the call, using the uuids.
Websocket Client
The final step is to build a client that connects to the websocket, observes when a beep is detected, and sends a TTS into the call, when the voicemail is detected.
First, we need to connect to the websocket.
ws = websocket.WebSocketApp("ws://3c66cdfa.ngrok.io/socket",
on_message = on_message,
on_error = on_error,
on_close = on_close)
ws.on_open = on_open

ws.run_forever()
Next, we just listen for any incoming message from our websocket.
def on_message(ws, message):
    data = json.loads(message)
    if data["beep_detected"] == True:
        for id in data["uuids"]:
            response = client.send_speech(id, text='Answering Machine Detected')

        time.sleep(4)
        for id in data["uuids"]:
            try:
                client.update_call(id, action='hangup')
            except:
                pass<a href="https://www.nexmo.com/wp-content/uploads/2019/02/amd-confusion-matrix.png"><img src="https://www.nexmo.com/wp-content/uploads/2019/02/amd-confusion-matrix-600x300.png" alt="" width="300" height="150" class="alignnone size-medium wp-image-28012" /></a>

<a href="https://www.nexmo.com/wp-content/uploads/2019/02/amd-df.png"><img src="https://www.nexmo.com/wp-content/uploads/2019/02/amd-df-600x300.png" alt="" width="300" height="150" class="alignnone size-medium wp-image-28015" /></a>

<a href="https://www.nexmo.com/wp-content/uploads/2019/02/amd-eda.jpg"><img src="https://www.nexmo.com/wp-content/uploads/2019/02/amd-eda-600x300.jpg" alt="" width="300" height="150" class="alignnone size-medium wp-image-28018" /></a>
We'll parse the incoming message as JSON, then check the beep_detected property is True. If it is, then a beep was detected. We will then send a TTS into the call saying 'Answering Machine Detected', then perform a hangup action into the call.
Conclusion
We've shown how we built a answering machine detection model with 96% accuracy, using a few audio samples of beeps and speech in order to train our model. Hopefully, we've shown how you can use machine learning in your projects. Enjoy!

Top comments (0)