
The State Management Goes Wild
his is the final article of the series where we explore Redux and its boundaries. In the previous articles, we first dived into the main principles of the Redux, then we tried to move things around and conceptually move Redux from one side to another.
This article is all about hands-on experience, and by the end of it, we will have a working application that will follow the design we settled before.
Enough talking let's get down to business.
Feel free to pull complete application code from Github.
Given
Let's quickly go over the design. The main connection points are Redux and React, they will talk via WebSocket. React components will dispatch actions, those will be processed by Redux, which in its order will push the updated state back to the React.
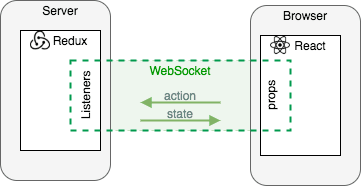
Client-side
Well, you know it, it will be React. We will try to consume create-react-script to quickly set up everything we need and don't waste time configuring Webpack, Babel and other 1001 libraries we need to make those two work together.
Server-side
Since Redux is a JavaScript library, it makes sense to take a JavaScript-based backend environment. You got it again, it will be NodeJS.
ℹ️ At the time I'm writing this article NodeJS just included experimental support for ECMAScript modules.
We will configure it globally for the whole back-end application with setting "type": "module" in the root of the server-side package.json.
Note: This feature is available starting from version 13, so try to run node -v in your terminal, and if it is lower make sure to update it.
We spoke about the mythical immutability by convention, mythical because it is not a real thing 🦄🙃. Therefore we will use immutable.js to keep our state truly immutable.
In between
We will be using WebSocket as a communication protocol between client and server. Probably the most popular library for that matter is socket.io.
We figured out all the main tech choices. Let's look at how dependencies sections from both package.json files will look alike
back-end:
"dependencies": {
    "immutable": "^4.0.0-rc.12",
    "redux": "^4.0.5",
    "socket.io": "^2.3.0"
  }
front-end:
"dependencies": {
    "react": "^16.13.0",
    "react-dom": "^16.13.0",
    "react-scripts": "0.9.x",
    "socket.io-client": "^2.3.0"
  }
Plan
We will kick things off by implementing a Tic Tac Toe game in pure React. It will be based on the React tutorial. The first iteration won't support a multi-browser multiplayer. Two players will be able to play, but in the same browser window, since the state will be local for the browser window.
After we will add back-end with Redux Store and move logic from the front-end components to back-end reducing functions. With all the logic gone, we will do a bit of housekeeping and make sure that all components are stateless/pure.
And finally, we will connect front-end and back-end with socket.io and enjoy a multi-browser multiplayer 🎮.
Step I. Pure React Implementation
TLDR; You can find complete code for this step here.
This example is based on the react intro tutorial, so if you'd like to go through the step-by-step process, feel free to jump there. We'll go through the most important bits here.
The whole application is assembled from three main components, which are Game, Board, and Square. As you can imagine the Game contains one Board and the Board contains nine Square's. The state floats from the root Game component through the Board props down to the Square's props.

Each Square is a pure component, it knows how to render itself based on the incoming props/data. Concept is very similar to pure functions. As a matter of fact, some components are pure functions.
// .\front-end\index.js

function Square(props) {
  return (
    <button className="square" onClick={props.onClick}>
      {props.value}
    </button>
  );
}
The Board is also pure component, it knows how to render squares and pass state down there.
// .\front-end\index.js

class Board extends React.Component {
  renderSquare(i) {
    return (
      <Square
        value={this.props.squares[i]}
        onClick={() => this.props.onClick(i)}
      />
    );
  }

  render() {
    return (
      <div>
        <div className="board-row">
          {this.renderSquare(0)}
          /* ... render 8 more squares */
        </div>
      </div>
    );
  }
}
And finally the state orchestrator, the Game component. It holds the state, it calculates the winner, it defines what will happen, when user clicks on the square.
// .\front-end\index.js

class Game extends React.Component {
  constructor(props) {
    super(props);
    this.state = {
      history: [{
        squares: Array(9).fill(null),
      }],
      stepNumber: 0,
      xIsNext: true,
    };
  }

  jumpTo(step) {
    /* jump to step */
  }

  reset() {
    /* reset */
  }

  handleClick(i) {
    /* handle click on the square */
  }

  render() {
    /* check if we have a winner and update the history */

    return (
      <div className="game">
        <div className="game-board">
          <Board
            squares={current.squares}
            onClick={(i) => this.handleClick(i)}
          />
        </div>
      </div>
    );
  }
}
Step II. Adding Server-Side and Redux
TLDR; You can find complete code for this step here
Well, I guess this is it, the moment we've all been waiting for. The moment when we will marry the Redux and NodeJS app 🙌.
The State 🌳
We will follow the Redux best practices and first define how the state tree will look alike. We will base it on the state model which we used in the previous step.

On the first level, we have
- the turn indicator "is X next?", which determines whether it is X or O turn;
- the step #, which is essentially a move counter, showing current step
- the winner, true if the winner was identified
- the history, snapshot of Squares on each move
Each node in the History represents a collection of Squares, each Square has an index and one of three states "_", "X" and "O".
Let's try to model how initial state might look like
const INITIAL_STATE = {
      history: [{
        squares: Array(9).fill(null),
      }],
      stepNumber: 0,
      xIsNext: true,
    };
  }
In the first article, we spoke about immutability and particularly about immutable.js. This is the place we are going to utilize it. We will mostly use List and Map objects, for the sake of this example. Now let's compare to how the state initialization will look like after we applied immutable.js
const INITIAL_STATE = Map({
  history: List([
    Map({
      squares: List([
        null, null, null,
        null, null, null,
        null, null, null
      ]),
  })]),
  stepNumber: 0,
  xIsNext: true,
  winner: false
});
A bit more code, yet it is a fair trade, taking into account that all operations will automatically produce a new immutable instance of the state in the most efficient manner.
Something like const newState = state.set('winner', true); will produce new state object. How cool is that?
Actions
Now that we know the shape of the state, we can define allowed operations. And no surprises here either. We will re-use the same operations we used in the front-end and transfer them into actions. Hence there will be three main actions
-
PERFORM_MOVEto perform a move, action will carry a box index that move was made for -
JUMP_TO_STEPto enable time-traveling, this action will carry step number to which the user wants to jump to -
RESETresets the whole game progress to the initial empty board
Reducers
We have actions, we have a state...

Now we need to connect them.
Before we start it is worth mentioning that Reducer is responsible for setting the initial state, we will use the initial state we defined before. And just set it if nothing was passed (this is handled for us)
// .\back-end\src\reducer.js

const INITIAL_STATE = Map({
  history: List([
    Map({
      squares: List([
        null, null, null,
        null, null, null,
        null, null, null
      ]),
  })]),
  stepNumber: 0,
  xIsNext: true,
  winner: false
});

...

export default function reducer(state = INITIAL_STATE, action) {
  switch (action.type) {
  case 'PERFORM_MOVE':
    /* todo */

  case 'JUMP_TO_STEP':
    /* todo */

  case 'RESET':
    /* todo */
  }

  return state;
}
Let's go over reducing functions one by one.
PREFORM_MOVE On every move we will first check if the move is legit, meaning that we might already have a winner and the game is over or the user tries to hit filled box. If any of these happens we will return the same state with no modifications.
Checks are done, the move is legit, we perform actual move depending on whether it should be "X" or "O". After we made a move we need to check whether it was a winning move or not.
And finally update state.
// .\back-end\src\reducer.js

function performMove(state, boxIndex){
  const history = state.get('history');
  const current = history.last();
  let squares = current.get('squares');
  let winner = state.get('winner');

  if(winner || squares.get(boxIndex)) {
    return state;
  }

  squares = squares.set(boxIndex, state.get('xIsNext') ? 'X' : 'O');

  winner = calculateWinner(squares);

  return state
    .set('history', state
      .get('history')
      .push(Map({ squares: squares }))
    )
    .set('stepNumber', history.size)
    .set('xIsNext', !state.get('xIsNext'))
    .set('winner', winner);
}
JUMP_TO_STEP To perform a time-travel we need to reverse the history to the step we want to move to and update current step number with a new value. And of course return new state.
// .\back-end\src\reducer.js

function jumpToStep(state, step){
  return state
    .set('history', state.get('history').take(step + 1))
    .set('stepNumber', step)
    .set('xIsNext', (step % 2) === 0)
    .set('winner', false);
}
RESET Reset is pretty much like a JUMP_TO_STEP, with only difference that we are jumping back to the very first step. After we are done, we return a new state.
// .\back-end\src\reducer.js

function reset(state){
  return state
    .set('history', state.get('history').take(1))
    .set('stepNumber', 0)
    .set('xIsNext', true)
    .set('winner', false);
}
Now we constructed all necessary reducing functions, we can put together the reducer.
// .\back-end\src\reducer.js

export default function reducer(state = INITIAL_STATE, action) {
  switch (action.type) {
  case 'PERFORM_MOVE':
    return performMove(state, action.boxIndex);

  case 'JUMP_TO_STEP':
    return jumpToStep(state, action.step);

  case 'RESET':
    return reset(state);
  }

  return state;
}
Create Store
We have everything we need and it is time to create a new redux store based on the freshly created reducer
// .\back-end\index.js

import redux from 'redux';
import server from './src/server.js';
import reducer from './src/reducer.js';

const store = redux.createStore(reducer);
server.startServer(store);
Step III. Connecting client and server
TLDR; You can find complete code for this step here.
This is the last step. It is mostly about connecting two points, client-server and deduplicate the logic.
Connection
First, we will configure the connection on both ends. Before performing any configuration let's figure out how does socket.io works.
The first-class citizens in the socket.io library are events. You can emit or subscribe to event on both sides.
Which kind of events we need? I think we already have an answer to this question. Let's get back to our design diagram.

We need to push state from the server to clients and actions from the clients to the server. Translating it to socket.io language we need to have a state-changed event that we will emit on the server and subscribe to on the client. And we need to have an action event that we will emit on the client and subscribe to it on the server.
So far so good, the only bit missing is the connection. We need to pass the current state to any new socket connection to our server. Luckily this is built-in functionality. We have a connection event that will be triggered every time a new connection appears. So all we need is subscribe to it.
This should do for our design and data transition needs.
Now let's do actual configuration. We'll start with the server. First, we will subscribe to any new connection, after connection happens we immediately emit a state-change event on that socket to transfer the latest state from the Redux Store. Then we will also subscribe to an action event from the same socket and once an event will arrive we will dispatch the whole object into the Redux Store. That'll provide a complete setup for the new socket connection.
To maintain the rest of the connections up to date we will subscribe to the Redux Store changes, using Listener callback. Every time the change will appear we will broadcast a state-change event to all connected sockets
// ..\back-end\src\server.js

function(store) {
    console.log("Let the Game begin");

    const io = new Server().attach(8090);

    store.subscribe(
      () => io.emit('state-change', store.getState().toJS())
    );

    io.on('connection', (socket) => {
      console.log('New Connection');

      socket.emit('state-change', store.getState().toJS());
      socket.on('action', store.dispatch.bind(store));
    });
  }
Moving to the client-side, first thing we need to set up a way to receive fresh state. We will subscribe to the state-changed event for that matter and pass received state execute the ReactDOM.render(<Game gameState={newState} />, ...);. Don't worry, calling ReactDOM.render() multiple times, absolutely fine from the performance perspective, it will have the same performance implication as calling setState inside the component.
Finally, we define the dispatch callback which takes action object as a parameter and emit an action event through the socket connection.
// .\front-end\index.js

const socket = io("http://localhost:8090");
socket.on('state-change', state =>
  ReactDOM.render(
    <Game
      dispatch={(action) => socket.emit('action', action)}
      gameState={state}
    />,
    document.getElementById('root')
  )
);
That's it, that'll be our communication framework. Now we need to pull the right string in the right moment.
Cleanup
The logic moved to the back-end reducing functions. This fact allows us to make our front-end completely stateless and pure. All our react components are now only data-containers. The state itself and the interaction rules (reducing functions) are stored on the back-end.
If we look back on the data-transition diagram we can notice that in reality Square and Board components were already pure, now it is just a matter of making the root component, Game pure as well.

After a bit of refactoring the code will look as following
// .\front-end\index.js

/* Square and Board were not changed */

class Game extends React.PureComponent {

  jumpTo(step) {
    this.props.dispatch({type: 'JUMP_TO_STEP', step});
  }

  reset() {
    this.props.dispatch({type: 'RESET'});
  }

  handleClick(boxIndex) {
    this.props.dispatch({type: 'PERFORM_MOVE', boxIndex: boxIndex})
  }

  render() {
    const { history, stepNumber, xIsNext, winner } = this.props.gameState
    const current = history[stepNumber];
    const status = winner
      ? 'Winner: ' + winner
      : 'Next player: ' + (xIsNext ? 'X' : 'O');

      const moves = history.map((step, move) => {
        /* time travelling */
      });

    return (
      <div className="game">
        <div className="game-board">
          <Board
            squares={current.squares}
            onClick={(i) => this.handleClick(i)}
          />
        </div>
        <div className="game-info">
        <div><button onClick={() => this.reset()}>Reset the Game</button></div>
        <div>{status}</div>
          <ol>{moves}</ol>
        </div>
      </div>
    );
  }
}
That's all folks
Please find the complete code example in my GitHub repo.
In a course of three articles, we have proposed a hypothesis, that Redux might be used as a state management tool on the back-end and distribute the state across multiple front-ends, we've built a design prototype to facilitate the experiment. And finally, we've built a proof of concept tic-tac-toe application that proved our design prototype hence proved that the hypothesis was correct.
There are multiple ways to optimize and improve this code example, we mentioned a few.
You are more than welcome to express your thoughts in a form of comments or commits.

Top comments (0)