
For the next phase in this series, we'll learn how to make a CLI app to perform CRUD operations, i.e, Creating, Retrieving, Updating and Deleting data. We'll use Firebase to store our data.
What we'll create
A contacts app with the following functionality:
# add a new contact with name=Peter and mobile=01034512
$ contacts add Peter --mobile 01034512
Contact Peter added!
{ 'mobile': '01034512' }
# view all contacts
$ contacts list
Here's a list of all your contacts:
{ ...  # list of all contacts }
# view single contact
$ contacts view Peter
{ 'mobile': '01034512' }

$ contacts view Meg
The contact you searched for doesn't exist
# update mobile number for Peter
$ contacts update Peter --mobile 00000
Contact updated!
{ 'mobile': '00000' }
# delete the contact Peter
$ contacts delete Peter
Contact deleted!
This post is a bit long. If you just want to take a look at the code or see how the app works, check out the repo.
Setting up Firebase
As mentioned earlier, Firebase will be used to store our data. To set up the database, sign in on Firebase using your google account.
After signing in successfully, click on the Go to console button on the top right. There, you can create a new project. Follow the required steps to create a new project.
Once the project is created, you'll see a Develop sidebar on the left. Click on Database to set up the database. Cloud Firestore will be displayed as the first option but that's not what we'll be using. Scroll down and you'll see a Realtime Database option. Click on Create database. Next, you'll be presented with the security options.
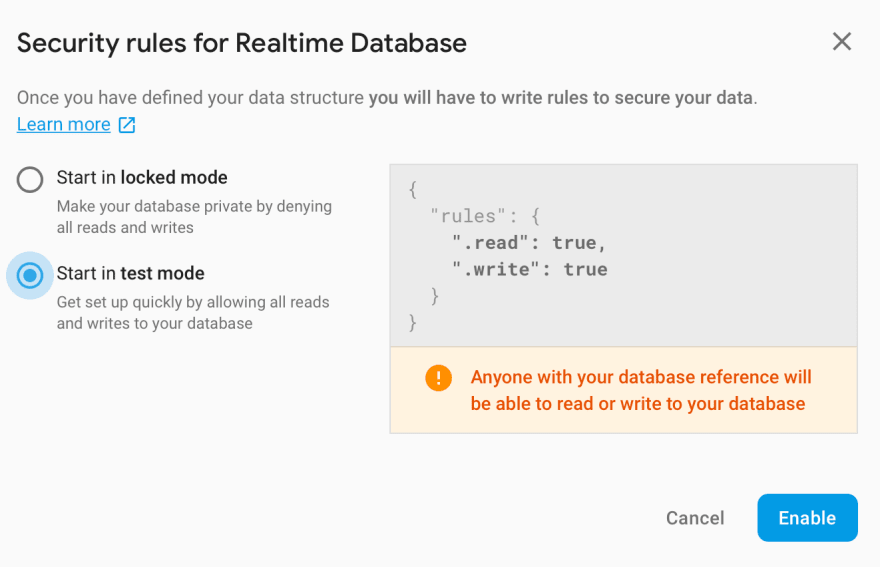
Since we'll not be handling authentication, choose Start in test mode for the security rules. Your database is now created 🎉
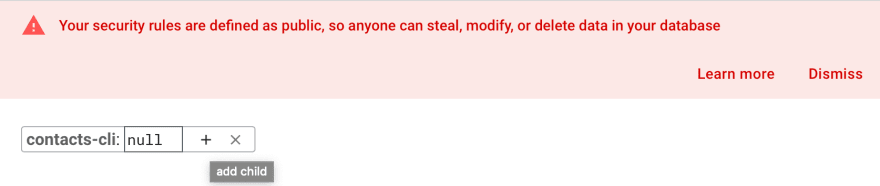
Now for the final step in setting up the database, click on the little plus sign + to add a new child node called contacts. This will hold our contacts (obviously 😅). Also, add a test contact just to see how the database will be structured.

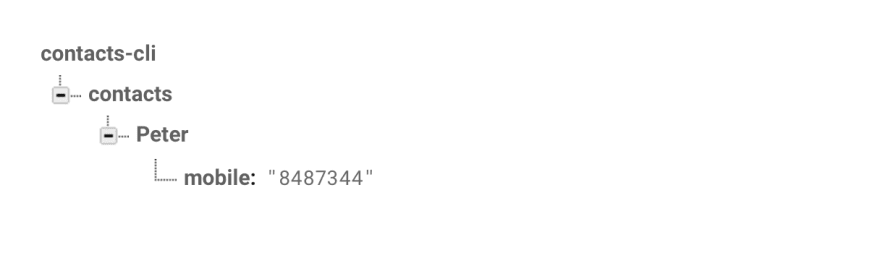
The database should now look like this:
App setup
We've already gone through the basics of setting up in previous posts so I won't go into much detail on that. Here are the steps:
$ mkdir contacts-cli

$ cd contacts-cli

$ virtualenv env

$ . env/bin/activate

(env) $ mkdir app

(env) $ touch app/__init__.py

(env) $ touch setup.py

(env) $ touch .env
.env
This is where the api endpoint url will be stored. Firebase provides a REST API for the database so that's what we'll use. If you already followed the steps and created the database, just grab the link provided at the top of the database and set it in your .env file.
export URL=https://[YOUR_PROJECT_ID].firebaseio.com
Make sure to run . .env to load your environment variables, otherwise URL will be None.
setup.py
To learn more about the setup file, you can go back to this post.
from setuptools import setup, find_packages

setup(
        name="contacts",
        py_modules=find_packages(),
        install_requires=[
            "Click",
            "requests",
            ],
        entry_points="""
        [console_scripts]
        contacts=app:cli
        """,
        )
Then run pip install --editable . in your terminal to install the app.
app/__init__.py
import click

@click.group(invoke_without_command=True)
@click.pass_context
def cli(ctx):
    if ctx.invoked_subcommand is None:
        click.echo("Welcome to the contacts app 🥳")
        click.echo("Run contacts --help for options.")
We need to use @click.group to allow us to include sub-commands.
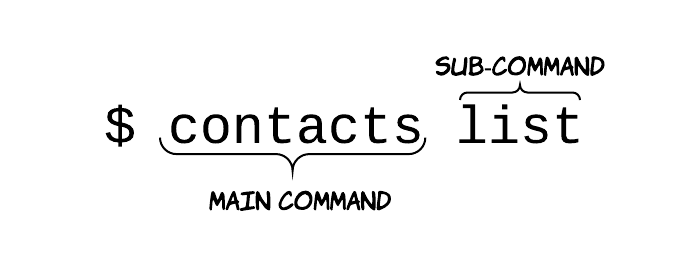
If the main command is invoked without any sub-command, a welcome message is shown. How does the main command know if a sub-command has been passed in or not? By looking at the context. if ctx.invoked_subcommand is None, then no sub-command has been passed - show the welcome message.
Everything is setup now, so we can start working on the functionality.
Creating contacts
import os
import requests
import click

...

@cli.command()
@click.argument('name')
@click.option('--mobile', '-m', required=True)
def add(name, mobile):
    """
    Add a new contact
    """
    response = requests.put('{}/contacts/{}.json'
                            .format(os.getenv('URL'), name),
                            json={'mobile': '{}'.format(mobile)})
    click.echo('Contact {} added!'.format(name))
    click.echo(response.json())
You'll notice that I used PUT for the request instead of POST. I did this to avoid generating unique IDs for my data on Firebase. Feel free to use POST instead and see how you can work with the generated UIDs.
The add command takes two parameters - a name argument, and a mobile option. Both are required. Running contacts add --help shows us what options we have.
(env) $ contacts add --help

Usage: contacts add [OPTIONS] NAME

  Add a new contact

Options:
  -m, --mobile TEXT  [required]
  --help             Show this message and exit.
Let's add a new contact:
(env) $ contacts add Chris -m 34243234
Contact Chris added!
{'mobile': '34243234'}

Getting all contacts
...

@cli.command()
def list():
    """
    View all contacts
    """
    response = requests.get('{}/contacts.json'
                            .format(os.getenv('URL')))
    click.echo('Here\'s a list of all your contacts:')
    click.echo(response.json())
The list command simply does a GET request on the contacts node and returns the result.
(env) $ contacts list
Here's a list of all your contacts:
{'Chris': {'mobile': '34243234'}, 'Peter': {'mobile': '8487344'}}
Getting one contact
...

@cli.command()
@click.argument('name')
def view(name):
    """
    View single contact
    """
    response = requests.get('{}/contacts/{}.json'
                            .format(os.getenv('URL'), name))
    if not response.json():
        click.echo("The contact you searched for does'nt exist")
    else:
        click.echo(response.json())
The view command is similar to list, except it takes a name argument and adds it to the url to return the contact for that name only. If the name doesn't exist in the database, null is returned. We take advantage of that in the if block to return the appropriate response.
(env) $ contacts view Peter
{'mobile': '8487344'}

(env) $ contacts view Meg
The contact you searched for doesn't exist
Updating a contact
...

@cli.command()
@click.argument('name')
@click.option('--mobile', '-m', required=True)
def update(name, mobile):
    """
    Update contact
    """
    response = requests.patch('{}/contacts/{}.json'
                              .format(os.getenv('URL'), name),
                              json={'mobile': '{}'.format(mobile)})
    click.echo('Contact updated!')
    click.echo(response.json())
This works exactly the same to the create command, except we're using PATCH instead of PUT (which apparently, doesn't make any difference here. Making a PATCH on a non-existent node creates it, just like PUT would do. Try it out.)
(env) $ contacts update Peter -m 552
Contact updated!
{'mobile': '552'}
And finally, deleting a contact
Similar to the view command. The only change we'll make is using DELETE instead of GET.
...

@cli.command()
@click.argument('name')
def delete(name):
    """
    Delete contact
    """
    requests.delete('{}/contacts/{}.json'
                    .format(os.getenv('URL'), name))
    click.echo('Contact deleted!')
null is returned on successful deletion so we don't require to return response. The request is called directly, and a success message is shown afterwords. This can be done better but it'll do for now.
(env) $ contacts delete Peter
Contact deleted!
I meant to cover exporting (writing) the data to a local JSON file or SQLite database, but this post is already too long 😅. These are interesting things to try if you want to learn more.
In the next post, we'll add tests to the app using pytest.

Top comments (0)