
Update: The game is no longer live, but you can still find the code here.
Ever since I've first tried out the Oculus Quest 2 during Christmas last year, I've played around with the idea to create VR content. In January, I bought a headset and started experimenting with different kinds of ways to be creative. I launched myself into apps like Tilt Brush and Gravity Sketch but quickly realized I find it difficult to start painting/modeling cool things from scratch. I'm a web developer, my skill is to be creative with code, so I switched gears and started coding a VR game that runs in the browser.
The result is a virtual reality experience built with BabylonJS which you can play. In this post, I would like to share the challenges I ran into while building it. First, I describe the development process by talking about the technology used, the game plan, level design, and physics work. Next, I dive deep into my attempts to create a great user experience for throwing objects in VR. Finally, I present some tips for debugging a web VR project like mine. Also, the game is open source and can be found on GitHub. Thanks for taking a look!

Table of contents
Technology
When building content for the Oculus Quest 2, you have the choice between creating a native app or a web app. For a native app, I looked into Unreal Engine, Unity, and Godot Engine. I think either of these is a great choice, but building an awesome native experience requires a reasonable desktop machine and PC VR capabilities. I have a MacBook and a wifi router, so my setup is not ideal (yet). Besides, I liked to be able to 'ship' my game as quickly as possible without the hassle of going through a review and publishing process. So, I opted to build a web experience. The current VR standard for the web is called WebXR, and many frameworks have already implemented a large chunk of the API.
Since I'm a big Poimandres fan I looked into react-xr, and it was very easy to get a first WebXR project up and running. Unfortunately, there are many dependencies in the ecosystem which slowed me down: react-xr is built on top of react-three-fiber which is built on top of Three.js, and physics is enabled by use-cannon which is built on top of cannon-es. For a long time I was running into issues and helping fix them with a couple of pull requests, and ultimately it was preventing me from working on the actual project. Still, Poimandres is a great community and I got a lot of inspiration from the content being shared in the discord.
I ended up creating my game in BabylonJS. It's a very accessible and feature-rich framework that is quite mature in the WebXR and physics domain. Again, I stumbled upon some bugs but the forum has been very helpful in getting through the prototyping phase. In hindsight, I realize that WebXR is still fairly new, and the entire web and 3D landscape are constantly evolving. Because of this, any development on top of this is not going to be a smooth ride, but it helped me grow as a developer.
Game plan
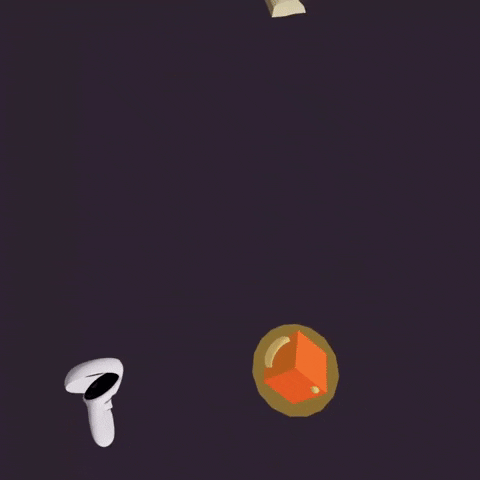
I like virtual reality in that it can present the player with familiar laws of nature and sandbox environments. I had the idea of doing something fun with physics, like throwing a ring onto a stick and earning points, which became the basis of my early prototyping.

The idea was that the player should go through a series of throwing challenges and earn points to progress. Ultimately, ring and stick collisions were a bit too difficult to start with. I simplified my idea by having the player throw balls into a rectangular bucket which is far easier to model in a physics engine.
The intended audience of my game would be players with a VR headset, but since a web application allows for all kinds of visitors with a browser, I wanted to enable interactions for both desktop and mobile users. Initially, I had the goal of allowing non-VR users to play the full game, but I settled with very minimal interaction with the scene.
I have a full-time job and it quickly turned out to be infeasible to implement all the game ideas in a couple of months, so I had to scrap a lot of them. First I was just working on the project in my spare time, but after a while, I decided to dedicate a full day a week to making progress.
Level design
I don't want to really call it a level, but it's a scene nonetheless. With the main game idea in mind, I wanted to build a room-scale scene with some interesting stuff to look at and possibly interact with and started to search online for some assets to use. I was looking for something low-poly so that I wouldn't have to worry about performance anytime soon.
I quickly stumbled upon this office scene by Haykel Shaba, but I had trouble importing it into BabylonJS with proper lighting and coordinates. At this point, I figured I needed to learn Blender, create a scene from scratch, and only after I got the core gameplay elements working I retried importing the assets I had acquired.

I did like the idea of using at least one custom-made prop and I turned to Gravity Sketch to create something in Virtual Reality. I shot some reference photos of a nice-looking plant, imported these in VR space, and started modeling. The technique used was to first sketch out a rough outline of the plant and then fill in the shapes with low poly 3d shapes and colors.

I had a bunch of wild ideas for different throwing challenges but, to keep this project relatively small, decided to stick to a very basic game and a call-out for players to improve their score. This way, a player can grow a sense of pride and accomplishment by playing my game.
Physics
Integrating physics into the scene was a challenging part. The two major javascript physics libraries seem to be ammo.js and cannon-es, and they both come with limitations. For example, with ammo.js you won't get any rolling friction and with cannon-es there are issues with compound bodies. I decided to go with ammo.js because of the latter and simulate rolling friction with linear damping.
It was a major task to come up with a workflow to setting up a scene in Blender and getting it to work in VR with a physics system. For example; BabylonJS comes with a left-handed coordinate system by default but most other 3D coordinate systems (like Blender's) are right-handed. Also, there are not many best practices or documentation available about exporting and importing scenes with physics, you have to figure this out yourself.

To solve the coordinate system problem I eventually found that BabylonJS has a simple switch called scene.useRightHandedSystem, but not after struggling with negative scaling due to coordinate conversions. In the end, I tag meshes in Blender with an object name and custom properties, export the scene to a gltf binary format with metadata, and then import the scene with a little loop to automatically attach physics to each node.
VR Throwing
The core interaction in my game is a targeted throw of an object in VR. I completely underestimated how hard it is to make this feel right, and it took me a lot of thinking, searching, reading, and many failed attempts before I felt happy about the implementation.
Throwing in VR can be broken up into two steps. The first part is grabbing the object with the controller (or your hands) and holding it. The second part is releasing the object with a momentum. My first guess was that I could do both parts with a single solution.
Physics joints (attempt #1)
I started initial prototyping with react-xr and cannon-es. I created a sphere body, the position of which was updated every frame based on the controller position. Next, I added a cube with a box body. When grabbing the cube, a lock joint between the two objects is created to allow the ball to closely follow the controller and create momentum. When releasing the grip, the joint is removed and any existing momentum on the box remains, allowing it to fly in the throwing direction. It worked!
const rightController = useController("right");

const [sphereRef, sphereApi] = useSphere(() => ({
    mass: 0,
    args: 0.1,
    position: [-2, 1, -10],
}));

useFrame(({ clock }) => {
    const { position, rotation } = rightController.grip;
    sphereApi.position.set(position.x, position.y, position.z);
    sphereApi.rotation.set(rotation.x, rotation.y, rotation.z);
})

const [boxRef, boxApi] = useBox(() => ({
    mass: 0.01,
    args: [0.1, 0.1, 0.1],
    position: [2, 1, -10]
}));

useLockConstraint(sphereRef, boxRef);
The problem with this approach, however, is a consistent lag between the controller and the object when moving it around. This is because the joint is not instantaneous. Rather, it creates a force between the two objects when the joint is not aligned, and this force takes a bit of time to apply. You can also spot a little bit of lag between the controller and sphere body because of update timing. I can do better than this!
Parenting (attempt #2)
When starting with BabylonJS and struggling to add physics to imported models, I learned about parenting objects. This way, the object always stays in the same spot relative to the controller. When releasing the object, the ball is unparented and a physics object is added with a set linear velocity.
I found multiple ways to get the linear velocity: you can calculate it by hand, you can use the linear velocity from XRPose, or you can get the linear velocity estimation from the BabylonJS physics controllers feature. At the time of writing, the XRPose linear velocity is relatively new and only supported in the Oculus Browser, so I stuck with the latter.
// When grabbed
ball.setParent(controller.grip);

// When released
ball.setParent(null);
ball.physicsImposter = new PhysicsImposter(...);
ball.physicsImposter.setLinearVelocity(controllerImposter.getLinearVelocity());
Again, success! This time the object tracks the controller very well, but the solution is still lacking. For example, if you naturally flick your wrist right before the throw, you don't see the increase in velocity that you would expect. This is because the solution does not take rotation into account.
Angular velocity (attempt #3)
There are two components to dealing with rotation; first, any angular velocity should directly be copied to the object. Secondly, if there is a distance between the controller and the object, the combination is like a centrifuge and adds to the linear velocity. Implementing this takes a little bit of math.
const v = controllerImposter.getLinearVelocity();
const w = controllerImposter.getAngularVelocity();
const r = ball.position.subtract(controllerImposter.getObjectCenter());

ball.physicsImpostor.setLinearVelocity(v.add(w.cross(r)));
ball.physicsImpostor.setAngularVelocity(w);
This is great! It feels a lot better but it's hard to get a consistent throw. I reasoned that this is because the measured linear and angular velocity is probably very noisy and susceptible to errors, and any small error in the angular velocity is magnified in the resulting linear velocity.
Smoothing (attempt #4)
Signal noise can be mitigated by smoothing the data. There are many ways to do this, but I decided to go for exponential smoothing since it is easy to implement and easy to adjust its strength. The basic formula is:
// Initial frame
let lv = new Vector3(0, 0, 0);
const factor = 0.8;

// Every frame
const cv = controllerImposter.getLinearVelocity();
lv = lv + factor * (cv - lv);
To decide on the best smoothing factor I created an XR Throw Lab (inspired by the VR Throw Lab I found for Unity), the code can be found here.

With a factor of 0.8, the throwing was a lot more consistent, but still, I wasn't happy. Especially after I transferred the implementation to my game I couldn't seem to land the ball in the bucket as much as I should have. Maybe because smoothing introduces a bit of lag and the throwing action happens very rapidly. Later on, I realized I made an error in porting my code, but I was already working on the next solution.
Linear regression (final attempt)
I couldn't seem to get a reliable estimate of the controller velocity, but do I really need it? In my initial period of research on VR throwing, I stumbled upon this article by Charlie Deck. In it, he explains how he finally used linear regression to improve his VR throwing action. It flew over my head at the time but now I was trying to understand what it meant, and I think the approach is rather elegant.
I took some more inspiration from this StackOverflow post although I had to approach things differently for my problem. I sample the object position and keep track of the last 6 positions and frame times. Then, I use linear least-squares regression to determine a mathematical trendline through the points, from which I can derive the object velocity directly.
To understand the algorithm, I first implemented linear regression from scratch for a linear trendline, including a test suite because I wanted to catch coding errors early on. This worked very well already, but I moved on to a quadratic trendline to also account for controller acceleration. For this, I used the mathjs library to make life easier.
function linearRegressionQuadratic(positions: number[][], frametimes: number[]): number[][] {
    const X = frametimes.map((t) => [1, t, t * t]);
    const Xt = math.transpose(X);
    const theta = math.multiply(math.multiply(math.inv(math.multiply(Xt, X)), Xt), positions);
    return theta;
}

// positions and frametimes are recorded in a circular buffer
const theta = linearRegressionQuadratic(positions, frametimes);

// the trendline is then expressed as follows
position = theta[0] + theta[1]*t + theta[2]*t*t
I then realized that the second term of theta is the velocity at t=0, this means that I can center the entries of frametimes around the last frame time (the moment of release) and read the velocity directly from theta[1], awesome!
onst [vx, vy, vz] = theta[1];
const linearVelocity = new Vector3(vx, vy, vz);

ball.physicsImpostor.setLinearVelocity(linearVelocity);
ball.physicsImpostor.setAngularVelocity(controllerImposter.getAngularVelocity());
As you can see, the angular velocity is still copied from the previous estimate, but there's no need to be accurate with it.
In retrospect
I'm very happy with my solution and the mathematical optimization to arrive at a throwing velocity. Still, there are improvements to make. During the time I was writing this blog, I was also going through a developer commentary of Half-Life Alyx, and interestingly I stumbled upon a section where they talk about the difficulties of throwing in VR. In it, they also mention that throwing in VR is very sensitive to noise in velocity and acceleration.
My current implementation feels pretty solid, but I haven't had many playtesters and by now I'm probably pretty biased to my implementation. There's probably a lot of other ways to do it, and I'm very curious. If you have any ideas, comment on this post or answer my stack exchange question! I got some feedback saying that it takes some getting used to that the ball is placed on top of the controller. It's probably much better to base all calculations on the center of gravity of the controller, but fortunately, that would be very easy to change!
Debugging tips
Developing content for virtual reality headsets can be cumbersome, especially if you don't have a PC VR link like me. I would write a bit of code, put on the headset and try it out, put it off and code some more, put on the headset and try again, rinse and repeat. Sometimes I would awkwardly peek beneath the headset to make a little change. Near the end of the project, I had quite a workflow going where I could test most of the stuff on the desktop. Before I end this article, I want to share with you some debugging tips that I learned during this project:
- Use HTTPS in development. With create-react-app and vite-js you have an HTTPS option to allow a connection from your headset to your local server, allowing you to test the application straight from the developer server.
- Download and install the Oculus Developer Hub. It gives you the ability to set up a wireless ADB connection and a bunch of other useful tools, like file transfer and video streaming.
- With ADB connected you can debug the Oculus Browser with your local machine since it is based on Chromium. With the app open in your headset, navigate to Inspect with Chrome Developer Tools on your desktop and open the remote tab.
- Use a state machine for your game. I'm a very big fan of state machines for many reasons, but when debugging it makes it very easy to put your game in a specific initial state. This way, you don't have to repeatedly go through the motions to arrive at the moment where you want to test.
- Get a hold of the WebXR emulator extension. It is limited in features but it does allow you to enter VR in a desktop browser and test your application with some basic inputs. With tip 4, this is very powerful and you can test a lot before actually putting on the headset.
Conclusion
Even though I'm now finished with the development of the game, there are many things left to improve like gameplay and sound design. I don't plan to continue work on this project as I have more promising ideas I would like to pursue. During the project, I ran into many issues because WebXR is still in its infancy. The code is a mess and there are a few bugs, but still, I'm very happy with the result.
Thank you a lot for your interest! If you have questions, comments, ideas for debugging, anything else, let me know! I would love to hear from you.

Top comments (0)