
Hi everyone today I will create a todo app named wolf_todo to help everyone get a quick refresher or learn the basics of Vue.
So you can make the most out of this weekend event hosted by Vue Mastery.
For readers that didn't have time the event link is here event link
Section 1
Create wolf_todo using the vue-cli
Required for this tutorial to be able to follow along:
vue-cli installed version 3.5.0 or latest
some knowledge of javascript will certainly help(but not required)
VSCodium(VSCode without telemetry), any other editor
Without further ado let's start:
- Navigate to where you would liuke to have the project saved, for me:
cd ~/Codes
- let's start the vue cli and generate(create our project)
vue create wolf_todo
Vue CLI v4.2.3
? Please pick a preset: (Use arrow keys)
❯ default (babel, eslint)
  Manually select features
Your version of Vue CLI may be different than mine Dear Reader, so there is no problem.
- Select:
Manually select features
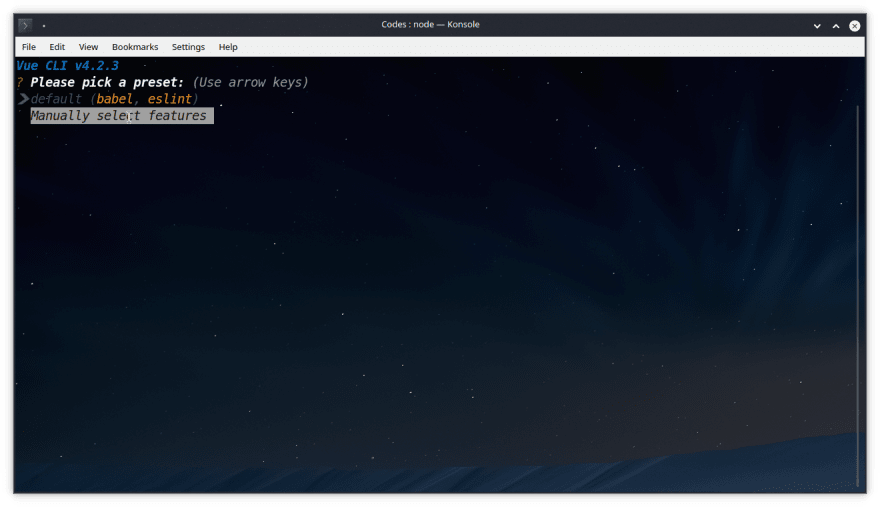
- Press
Enter
Now the following screen appears, you can select features with the Space key.
Make the following selections
Vue CLI v4.2.3
? Please pick a preset: Manually select features
? Check the features needed for your project:
 ◉ Babel
 ◯ TypeScript
 ◯ Progressive Web App (PWA) Support
 ◉ Router
 ◉ Vuex
❯◉ CSS Pre-processors
 ◉ Linter / Formatter
 ◯ Unit Testing
 ◯ E2E Testing

Press Enter
We arrive here now
Vue CLI v4.2.3
? Please pick a preset: Manually select features
? Check the features needed for your project: Babel, Router, Vuex, CSS Pre-processors, Linter
? Use history mode for router? (Requires proper server setup for index fallback in production) (Y/n)
Type: y
What is history mode?
History mode in vue will allow us to have the folloing links(urls)
localhost:8080/aboutinstead oflocalhost:8080/#/about
Moving forward(progressing):
Vue CLI v4.2.3
? Please pick a preset: Manually select features
? Check the features needed for your project: Babel, Router, Vuex, CSS Pre-processors, Linter
? Use history mode for router? (Requires proper server setup for index fallback in production) Yes
? Pick a CSS pre-processor (PostCSS, Autoprefixer and CSS Modules are supported by default):
  Sass/SCSS (with dart-sass)
❯ Sass/SCSS (with node-sass)
  Less
  Stylus
Select Sass/SCSS (with node-sass)

Press Enter
the following options appear
Vue CLI v4.2.3
? Please pick a preset: Manually select features
? Check the features needed for your project: Babel, Router, Vuex, CSS Pre-processors, Linter
? Use history mode for router? (Requires proper server setup for index fallback in production) Yes
? Pick a CSS pre-processor (PostCSS, Autoprefixer and CSS Modules are supported by default): Sass/SCSS (with node
-sass)
? Pick a linter / formatter config:
  ESLint with error prevention only
  ESLint + Airbnb config
❯ ESLint + Standard config
  ESLint + Prettier
Select ESLint + Standard config
Press Enter
Vue CLI v4.2.3
? Please pick a preset: Manually select features
? Check the features needed for your project: Babel, Router, Vuex, CSS Pre-processors, Linter
? Use history mode for router? (Requires proper server setup for index fallback in production) Yes
? Pick a CSS pre-processor (PostCSS, Autoprefixer and CSS Modules are supported by default): Sass/SCSS (with node
-sass)
? Pick a linter / formatter config: Standard
? Pick additional lint features: (Press <space> to select, <a> to toggle all, <i> to invert selection)
❯◉ Lint on save
 ◯ Lint and fix on commit
Now, keep the default and press Enter
Vue CLI v4.2.3
? Please pick a preset: Manually select features
? Check the features needed for your project: Babel, Router, Vuex, CSS Pre-processors, Linter
? Use history mode for router? (Requires proper server setup for index fallback in production) Yes
? Pick a CSS pre-processor (PostCSS, Autoprefixer and CSS Modules are supported by default): Sass/SCSS (with node
-sass)
? Pick a linter / formatter config: Standard
? Pick additional lint features: (Press <space> to select, <a> to toggle all, <i> to invert selection)Lint on sav
e
? Where do you prefer placing config for Babel, ESLint, etc.? (Use arrow keys)
❯ In dedicated config files
  In package.json
Also, keep the default and press Enter
You should have something like this Dear Reader

When asked to save this preset type n
We are done, now vue-cli will generate our vue project for us.
If all goes well you should have the following
Vue CLI v4.2.3
✨  Creating project in /home/dan/Codes/wolf_todo.
🗃  Initializing git repository...
⚙️  Installing CLI plugins. This might take a while...

yarn install v1.20.0
info No lockfile found.
[1/4] Resolving packages...
[2/4] Fetching packages...
info fsevents@1.2.11: The platform "linux" is incompatible with this module.
info "fsevents@1.2.11" is an optional dependency and failed compatibility check. Excluding it from installation.


success Saved lockfile.
Done in 23.18s.
🚀  Invoking generators...
📦  Installing additional dependencies...

yarn install v1.20.0
[1/4] Resolving packages...
[2/4] Fetching packages...
info fsevents@1.2.11: The platform "linux" is incompatible with this module.
info "fsevents@1.2.11" is an optional dependency and failed compatibility check. Excluding it from installation.
[3/4] Linking dependencies...
[4/4] Building fresh packages...
success Saved lockfile.
Done in 16.36s.
⚓  Running completion hooks...

📄  Generating README.md...

🎉  Successfully created project wolf_todo.
👉  Get started with the following commands:

 $ cd wolf_todo
 $ yarn serve
Section 2
Building our wolf todo app
Section Navigation
Let's follow the last suggestions from the vue-cli and import our project:
I am using VScodium so I will type:
cd wolf_todo
codium .
Fell free to use any editor you would like Dear reader
Now in VSCODIUM in the terminal type: yarn serve
Open your browser and navigate to http://localhost:8080/
The Home and About links work so play with them a bit, noticed that we have the links without(urls) #, that is thanks to history mode.
Back to our editor
Subsection 1 Tail Wind
Tail Wind
We need to setup tail wind, it is the framework Vue mastery uses in a lot of thier courses.
Type in vscodium terminal or the root of our project(~/Codes/wolf_todo)
yarn add tailwindcss
Now create a postcss.config.js in the root of our app here:
~/Codes/wolf_todo/postcss.config.js
module.exports = {
  plugins: [
    // ...
    require('tailwindcss'),
    require('autoprefixer'),
    // ...
  ]
}
Now create the style folder with our main css like this: ~/Codes/wolf_todo/src/assets/style/main.css
js`
@import "tailwindcss/base";
@import "tailwindcss/components";
@import "tailwindcss/utilities";
Now let's add in ~/Codes/wolf_todo/src/main.js`
import './assets/styles/index.css';
To stop our server in the terminal, press Ctrl +C or Command +C

To be able to make some changes to tail wind we can also run this
npx tailwind init
We have succesfuly configured tail wind.
Let's add our project to git using hub.
Hub github wrapper that let's you create projects with ease on Github from the terminal. I have an article here for more details hub article
So type in the root of our project ~/Codes/wolf_todo in the terminal:
hub init
Reinitialized existing Git repository in /home/dan/Codes/wolf_todo/.git/
hub create
Updating origin
https://github.com/wolfiton/wolf_todo
hub add . ✔ took 16s at 09:35:35
~/Codes/wolf_todo on master +2 hub commit -m "Vue - Tail wind setup" ✔ at 09:43:45
[master 670b972] Vue - Tail wind setup
2 files changed, 10 insertions(+)
create mode 100644 postcss.config.js
create mode 100644 src/assets/style/main.css
push --set-upstream origin master
Subsection 2 Wolf Todo
Wolf Todo
Vue uses components to display elements on page.
Vue is started in /src/main.js, here we import everything we wnat to use with Vue globally(we use a lot and wnat to be available to all other components).
Wolfiton, what is a component?!
Components have the following structure:
Component sample code
<template>
    Here goes the html with vue
</template>

<script>
    here goes te javascript for this component
</script>

<style>
    style speicifc to that componenet like a special title
</style>
So as you can see Dear Reader the component is an eelement that contains vue code html and style.
To offer a more concrete example we will create our app and go through all this.
Let's start our wolf_todo now
Open ~/Codes/wolf_todo/src/components/HelloWorld.vue
<template>
  <div class="hello">
    <h1>{{ msg }}</h1>
    <p>
      For a guide and recipes on how to configure / customize this project,<br>
      check out the
      <a href="https://cli.vuejs.org" target="_blank" rel="noopener">vue-cli documentation</a>.
    </p>
    <h3>Installed CLI Plugins</h3>
    <ul>
      <li><a href="https://github.com/vuejs/vue-cli/tree/dev/packages/%40vue/cli-plugin-babel" target="_blank" rel="noopener">babel</a></li>
      <li><a href="https://github.com/vuejs/vue-cli/tree/dev/packages/%40vue/cli-plugin-router" target="_blank" rel="noopener">router</a></li>
      <li><a href="https://github.com/vuejs/vue-cli/tree/dev/packages/%40vue/cli-plugin-vuex" target="_blank" rel="noopener">vuex</a></li>
      <li><a href="https://github.com/vuejs/vue-cli/tree/dev/packages/%40vue/cli-plugin-eslint" target="_blank" rel="noopener">eslint</a></li>
    </ul>
    <h3>Essential Links</h3>
    <ul>
      <li><a href="https://vuejs.org" target="_blank" rel="noopener">Core Docs</a></li>
      <li><a href="https://forum.vuejs.org" target="_blank" rel="noopener">Forum</a></li>
      <li><a href="https://chat.vuejs.org" target="_blank" rel="noopener">Community Chat</a></li>
      <li><a href="https://twitter.com/vuejs" target="_blank" rel="noopener">Twitter</a></li>
      <li><a href="https://news.vuejs.org" target="_blank" rel="noopener">News</a></li>
    </ul>
    <h3>Ecosystem</h3>
    <ul>
      <li><a href="https://router.vuejs.org" target="_blank" rel="noopener">vue-router</a></li>
      <li><a href="https://vuex.vuejs.org" target="_blank" rel="noopener">vuex</a></li>
      <li><a href="https://github.com/vuejs/vue-devtools#vue-devtools" target="_blank" rel="noopener">vue-devtools</a></li>
      <li><a href="https://vue-loader.vuejs.org" target="_blank" rel="noopener">vue-loader</a></li>
      <li><a href="https://github.com/vuejs/awesome-vue" target="_blank" rel="noopener">awesome-vue</a></li>
    </ul>
  </div>
</template>

<script>
export default {
  name: 'HelloWorld',
  props: {
    msg: String
  }
}
</script>

<!-- Add "scoped" attribute to limit CSS to this component only -->
<style scoped lang="scss">
h3 {
  margin: 40px 0 0;
}
ul {
  list-style-type: none;
  padding: 0;
}
li {
  display: inline-block;
  margin: 0 10px;
}
a {
  color: #42b983;
}
</style>
Change it to this
<template>
  <div class="hello">
    <h1>WOLF TODO</h1>
  </div>
</template>

<script>
export default {
  name: 'HelloWorld'
}
</script>

<!-- Add "scoped" attribute to limit CSS to this component only -->
<style scoped lang="scss">

</style>
Save now type in the root of our project in the terminal
yarn serve
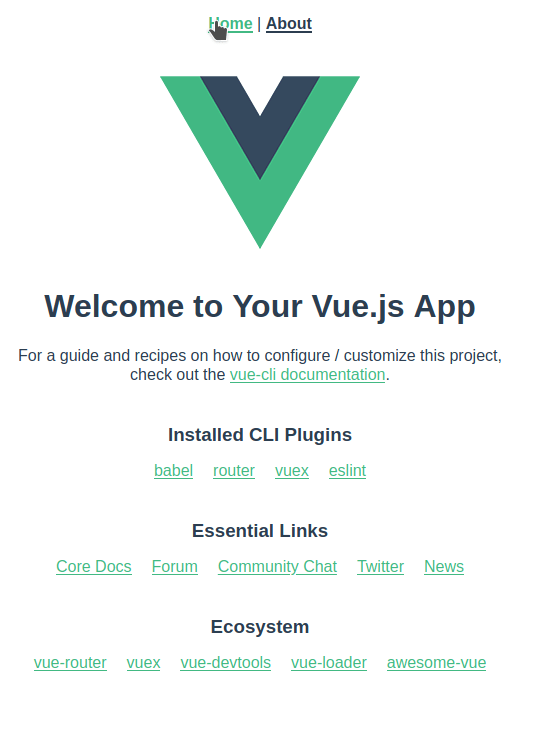
You should see this, also it's auto reloads on save. Try to chnage something then save and you will see the change instantly.

A good start but where does the vue logo image come from and the home and about links Wolfiton?!
The logo comes from the App.vue component and the links comes from our router that takes the responsibility to manage links.
App.vue location /home/dan/Codes/wolf_todo/src/App.vue
Router location /home/dan/Codes/wolf_todo/src/router/index.js
Let's take a closer look at /home/dan/Codes/wolf_todo/src/App.vue
<template>
  <div id="app">
    <div id="nav">
      <router-link to="/">Home</router-link> |
      <router-link to="/about">About</router-link>
    </div>
    <router-view/>
  </div>
</template>

<style lang="scss">
html{
//cool background
background: rgb(7,71,27);
background: linear-gradient(90deg, rgba(7,71,27,1) 0%, rgba(34,148,69,1) 50%, rgba(7,71,27,1) 100%);
}
#app {
  font-family: Avenir, Helvetica, Arial, sans-serif;
  -webkit-font-smoothing: antialiased;
  -moz-osx-font-smoothing: grayscale;
  text-align: center;
  color: #2c3e50;
}

#nav {
  padding: 30px;

  a {
    font-weight: bold;
    color: #2c3e50;

    &.router-link-exact-active {
      color: #42b983;
    }
  }
}
</style>
Our nav with links is here
<div id="nav">
 <router-link to="/">Home</router-link> |
 <router-link to="/about">About</router-link>
 </div>
<router-link to="/">Home</router-link>
router-link is similar with but the main difference is that router link doesn't need to reload the page to show content.
<router-view/>
detects what content it should show using the link that is visited in our case is home so it shows the content of the HelloWorld.vue
That is located here /home/dan/Codes/wolf_todo/src/components/HelloWorld.vue
Hey Wolfiton but how About the About page content where does that come from?
It comes from here /home/dan/Codes/wolf_todo/src/views/About.vue
<template>
  <div class="about">
    <h1>This is an about page</h1>
  </div>
</template>
As we can see Dear Reader the views can have a template or a component as we will see a bit further down once we open up the Home.vue.
Let's open Home.vue /home/dan/Codes/wolf_todo/src/views/Home.vue
<template>
  <div class="home">
    <img alt="Vue logo" src="../assets/logo.png">
    <HelloWorld msg="Welcome to Your Vue.js App"/>
  </div>
</template>

<script>
// @ is an alias to /src
import HelloWorld from '@/components/HelloWorld.vue'

export default {
  name: 'Home',
  components: {
    HelloWorld
  }
}
</script>
<img alt="Vue logo" src="../assets/logo.png">
 <HelloWorld msg="Welcome to Your Vue.js App"/>
Our logo and Hellow World component that we changed earlier.
Reminder: Our Hello World component content looks like this
<template>
  <div class="hello">
    <h1 class="highlight-title">WOLF TODO</h1>
  </div>
</template>

<script>
export default {
  name: 'HelloWorld'
}
</script>

<!-- Add "scoped" attribute to limit CSS to this component only -->
<style scoped lang="scss">
  .highlight-title:hover{
    cursor: pointer;
  }
</style>
Change the Home to this
<template>
  <div class="home">
    <img alt="Vue logo" src="../assets/logo.png">
    <HelloWorld/>
  </div>
</template>

<script>
// @ is an alias to /src
import HelloWorld from '@/components/HelloWorld.vue'

export default {
  name: 'Home',
  components: {
    HelloWorld
  }
}
</script>
We are ready now to create our wolf todo app.
Head over to /home/dan/Codes/wolf_todo/src/components/HelloWorld.vue
Replace everything with this
<template>
  <div class="w-full max-w-xs text-center mx-auto">
    <form @submit.prevent="addTask"
    class="bg-white shadow-md rounded px-8 pt-6 pb-8 mb-4">
      <h1 class="highlight-title p-4">WOLF TODO</h1>
      <input class="shadow appearance-none border rounded py-2 px-3 text-
      gray-700 leading-tight text-center"
      type="text" v-model="task"
      name="task"
      placeholder="Add Task"/>
      <button class="bg-gray-300 hover:bg-gray-400 text-gray-800 font-bold py-2 px-4 rounded inline-flex items-center" type="submit">Add Task</button>
      <h1 class="p-4">TASKS</h1>
      <div v-for="(getTask, index) in tasks" :key="index" class="text-gray-700 text-sm font-bold">
      <span >
          {{ getTask }}
      </span>
    </div>
    </form>
  </div>
</template>

<script>
export default {
  name: 'HelloWorld',
  data () {
    return {
      tasks: [
        'Create a todo app',
        'Listen to music',
        'Drink tea'
      ],
      task: ''
    }
  },

  methods: {
    addTask () {
      this.tasks.push(this.task)
    }
  }
}
</script>

<!-- Add "scoped" attribute to limit CSS to this component only -->
<style scoped lang="scss">
  .highlight-title:hover{
    cursor: pointer;
  }
</style>
The following paragraphs below are explanations, please don't change the code in any way. They have been added to show what the code does.
So let's start with
<form @submit.prevent="addTask"
 class="bg-white shadow-md rounded px-8 pt-6 pb-8 mb-4">
 <h1 class="highlight-title p-4">WOLF TODO</h1>
 <input class="shadow appearance-none border rounded py-2 px-3 text-
 gray-700 leading-tight text-center"
 type="text" v-model="task"
 name="task"
 placeholder="Add Task"/>
 <button class="bg-gray-300 hover:bg-gray-400 text-gray-800 font-bold py-2 px-4 rounded inline-flex items-center" type="submit">Add Task</button>
 </form>
A lot of code at first view, but that is because of tailwind classes let's simplify everthing a bit .
What I am going to show you si for explanations only don't change your code in HelloWorld.vue!
To better explain the code I eliminated the css classes:
 <form @submit.prevent="addTask">
 <h1>WOLF TODO</h1>
 <input type="text" v-model="task" name="task" placeholder="Add Task"/>
 <button  type="submit">Add Task</button>
 </form>
Much better right?
So we have the input:
<input type="text" v-model="task" name="task" placeholder="Add Task"/>
We use v-model to tell View to listen for changes(when a change occurs Vue will now) and update the page instantly
On the form we have this strange:
<form @submit.prevent="addTask"></form>
The @submit.prevent="addTask" will stop the form from leaving the page and reload it.
addTask is a function that will run once the form gets submitted
It looks like this:
addTask () {
      this.tasks.push(this.task)
    }
It will add our task that we wrote in the input and place it in our tasks array at the end.
What is an array or a list?
Arrays are used to store multiple values in a single variable.
So instead of
task-1 = 'Create a todo app',

task-2 = 'Listen to music',

task-3 = 'Drink tea'
We can use
tasks:  [

'Create a todo app',

'Listen to music',

'Drink tea'

]
Much easier to keep tracks of things this way
Now we can get our tasks using:
<h1 class="p-4">TASKS</h1>
 <div v-for="(getTask, index) in tasks" :key="index" class="text-gray-700 text-sm font-bold">
 <span >
 {{ getTask }}
 </span>
 </div>
This v-for="(getTask, index) in tasks" :key="index" will get all our tasks and putem in getTask.
And it will run as many times as there are tasks so at first run getTask will have the value of 'Create a todo app',,
The second time getTask = Listen to muisc
The third time = Drink tea
So when we add a new task using the input the getTask will get the value of that input and run for the fourth time.
As an exmaple we add in the input 'Learn Vue' and press enter or the add task button
The folowing things will happen:
addTask function will run
`Learn Vue' will be added to the tasks array
tasks: [
'Create a todo app',
'Listen to music',
'Drink tea',
'Learn Vue'
]
- Vue detects the change and makes getTask to have the value of 'Learn Vue' and adds it to our page.
So using {{ getTask }} we say to show the value of getTask
Now getting back to our app let's run yarn serve and see tha app in action.
yarn serve
You should see

it works! Congratulations Dear reader you now have a simple todo app in vue with tailwindcss.
Stop the server using Ctrl + c or Command + c
In the project root in the terminal let's add all our changes to git:
hub add .

hub commit -m "Finished Wolf Todo"

hub push
I hope you enjoyed this tutorial Dear reader.
If you also find it useful, share it with others on social.
Credits:

Top comments (0)