

Phase 1 HTML
Don't spend months here.
Learn enough to create a webpage without copying a template.
Learn:
html
head
body
h1-h6
p
div
span
a
img
ul / ol / li
table
form
input
textarea
select
button
label
Also understand:
attributes
id
class
forms
links
images
semantic HTML
Practice project #1
Build:
Simple Airbnb Listing Page
Example:
Beautiful Apartment
[ IMAGE ]
Ahmedabad, Gujarat
₹3,000 / night
2 bedrooms
1 bathroom
WiFi
Kitchen
[ Reserve ]
No JavaScript.
No database.
No backend.
Just HTML.
Setup VSCode on your system.

Install both live server


First HTML Page

HTML Comments
When writing HTML, you may want to leave notes for yourself or other developers.
These notes are called comments.
Comments are useful for:
- Explaining what a section of code does
- Providing context for other developers
- Leaving reminders
- Making code easier to understand and maintain
The important part is:
Comments are not displayed on the webpage.
The browser reads them but ignores them when rendering the page.
HTML Comment Syntax
An HTML comment starts with <!-- and ends with -->.
<!-- This is a simple comment -->
Anything written between these two markers is treated as a comment.
For example:
<p>Welcome to my website!</p>

<!-- This paragraph displays a welcome message -->
The webpage will only display:
Welcome to my website!
The comment will not appear on the rendered page.
Multiline Comments
HTML comments can also span multiple lines.
<!--
This is a multiline comment.
The browser will ignore everything
written inside these comment markers.
-->
This can be useful when you want to explain a larger section of HTML.
Are HTML Comments Completely Hidden?
Not exactly.
Although comments don't appear on the rendered webpage, they are still present in the HTML source sent to the browser.
Anyone can inspect them.
To view the source of a webpage:
- Open the webpage in your browser.
- Right-click anywhere on the page.
- Select View Page Source.
Or use the keyboard shortcut:
Ctrl + U
On macOS:
Cmd + U
You can then search the source code and find the comments.
Important
Don't put passwords, API keys, private information, or secrets inside HTML comments.
For example, never do this:
<!--
Database password: MySecretPassword123
-->
The comment isn't visible on the webpage, but it can still be seen in the page source.
Practice Exercise
Now let's see HTML comments in action.
Task
- Open the provided HTML page.
- Find the paragraph
<p>tag. - Add an HTML comment below the paragraph tag.
For example:
<p>This is my paragraph.</p>

<!-- This is my first HTML comment -->
- Save the HTML file.
- Open the rendered webpage in your browser.
- Right-click the page and select View Page Source.
- Find the comment you added.
Notice the difference:
Rendered webpage:
This is my paragraph.
Page source:
<p>This is my paragraph.</p>

<!-- This is my first HTML comment -->
The browser doesn't display the comment, but the comment is still present in the source.


Lab Note
The goal isn't just to know the syntax.
The goal is to understand what the browser does with HTML comments.
Tags in HTML
Tags are fundamental building block of HTML file which tell browser how webpage should appear and behave.
Let's go to example.com website and view page source.


Blue one's are HTML Tags.
Only Information browser is getting from remote computer is a text document but it has to construct UI which might have favicon,title,animations,layout,colors etc.
So we need to deliver a lot of information like what is animation/colors/content/font-size,font-family,font-type/link & where link is pointing to ?
Thus we use HTML.
Eg:
title tag is responsible for:


we have lot of tags. p tag for pargraph. div tag for division,etc.
Say Hello to HTML Elements
Your First HTML Element
You’ll begin by creating a simple web page using HTML. You can write and edit your code directly in the code editor provided on this page.
Look at the code in your editor:

<h1>Hello</h1>
This is an HTML element.
Most HTML elements have two parts:
- An opening tag
- A closing tag
Opening Tag
An opening tag looks like this:
<h1>
Closing Tag
A closing tag looks like this:
</h1>
The main difference is the forward slash / in the closing tag.
So:
<h1>Hello</h1>
means:
-
<h1>→ opening tag -
Hello→ element content -
</h1>→ closing tag
Complete the Challenge
For this challenge, modify the existing <h1> element so that its text says:
Hello World
Your final code should be:
<h1>Hello World</h1>
That’s it. You’ve just created your first HTML element with the correct content.

Create a Headline with the h2 Element
In the next few tasks, we’ll build an HTML5 CatPhotoApp step-by-step, adding new elements and features as we go.
Understanding the h2 Element
The h2 element is used to create a level-two heading on a web page.
HTML headings help organize the structure of your webpage.
A common heading structure looks like this:
<h1>Main Heading</h1>
<h2>Subheading</h2>
<h3>Another Subheading</h3>
The h1 element is generally used for the main heading, while h2 is commonly used for subheadings.
HTML also provides:
h3h4h5h6
These elements represent different levels of headings and subheadings.
Complete the Challenge
You already have an h1 element containing:
<h1>Hello World</h1>
Now, add an h2 element directly below it.
The h2 should contain the text:
CatPhotoApp
Your final code should look like this:
<h1>Hello World</h1>
<h2>CatPhotoApp</h2>
This creates your second HTML element and adds a level-two heading to the page.


Anchor Tag
The <a> element, also called the anchor element, is used to create hyperlinks in HTML.
It can link to:
- Web pages
- Files
- Email addresses
- A specific location on the same page
- Other destinations that can be accessed through a URL
The href Attribute
The href attribute specifies where the link should take the user.
For example:
<a href="https://example.com">Visit Example</a>
Here:
-
<a>→ opening anchor tag -
href="https://example.com"→ destination of the link -
Visit Example→ clickable text -
</a>→ closing anchor tag
The content inside the <a> element should clearly describe where the link will take the user.
If an href attribute is present, the link can also be activated using the Enter key when the anchor element has keyboard focus.

Write an anchor tag below linking to https://google.com
<a href="https://google.com">Google</a>


Block-Level and Inline Tags in HTML
The <p> element is commonly used to display paragraph text on a webpage.
The letter p stands for "paragraph."
Creating a Paragraph
You can create a paragraph element like this:
<p>I'm a p tag!</p>
A paragraph element has:
-
<p>→ opening tag -
I'm a p tag!→ paragraph content -
</p>→ closing tag
Complete the Challenge
You already have an h2 element on your webpage.
Now, create a <p> element directly below the h2 element.
The paragraph should contain the text:
Hello Paragraph
Your code should look like this:
<h2>CatPhotoApp</h2>
<p>Hello Paragraph</p>
HTML Naming Convention
As a standard convention, HTML tags are written in lowercase.
Use:
<p></p>
Instead of:
<P></P>
Following lowercase conventions makes your HTML code consistent and easier to read.


Why HTML tags exist?
Button Tag. You can go ahead and click on screen.

We can pretty much customize almost every single aspect of HTML tags through CSS.When we use CSS we can make h6 tag as big as h1 & h1 tag as small as h6.We can reverse behaviour right away with CSS.
We can create div as button and button as div. Button is also inline element because text continues.

why don't we have all tag as div only ? because HTML was built to have semantics. Visually it can be identified which is largest heading, which is smallest heading ? but code should also be able to tell that without actually being parsed into webpage.Why so? because of accessibility reasons.
when you have h1 on page that means that is important heading.Your browser knows that accessibility readers or people who are disable
know that it is important heading.
similarly for button your accessibility reader know that it can be clicked.your browser won't be able to tell that to reader.
Lot of interactivity can be added with button with javascript.
we can attach event handlers. when we click on button turn h1 tag to red or h2 tag should disappear or h3 tag should change to bigger font size.
Image Tag
Images are integral part of communication and how we perceive the world.
So HTML allows to embed image directly with ease of single HTML tag.
img tag is inline and self-closing tag.

width and height attribute in html image tag works for legacy reasons but it's good if it's done with CSS.
With HTML few tags are deprecated. eg: center tag highlighting has stopped working.Browsers till support it so text got in center.Instead of using this HTML tag, CSS should be used.

Video (video) tag
Support of videos were very bad in terms of how browser could play them.Images and text were fine.You had to install/download adobe flash player/codex around 2005-2006.
since then there are new standards of video that allows us to transfer video more effeciently.
But support of video in browsers have majorly improved.
Browsers now allow you to embed video natively.
Unlike image tag, video tag are not self closing.
Embed this video
https://www.w3schools.com/html/mov_bbb.mp4


it almost look like image and we can't do anything no play pause button.
write attribute controls and not necessary to give it value.

Now video plays.
raw mp4 video link was embedded this is not case with youtube link. Youtube link is link of webpage it cannot play it.
for youtube link copy embedded snippet whole iframe thing.
Table (table) tag
organization of data in proper way


now for understanding purpose using css for border


Fun part of table is you can spawn certain cells to have multiple rows or coloumn

so remove 1 td in this tr.


now remove third value td of next row tr

You can scale upto page size,pretty awsome layouts can be created with sidebar,content area and header.Problem with it is it is very much hard to make it responsive.
Responsive webpage is adjusting its layout automatically with screen size.it works properly on desktops,mobile phones and tablets.
Thus table tag should not use for creating layouts but ony when tabular representation is needed.
Create a Text Field
Now let’s start creating a web form.
The <input> element is used to collect information from users.
Creating a Text Input
To create a text field, use the input element with the type attribute set to text:
<input type="text">
The type="text" attribute tells the browser that you want a field where the user can enter text.
Unlike many HTML elements, the <input> element does not need a separate closing tag. It is a self-closing element.
Complete the Challenge
Create an <input> element with the type set to text.
Place it below your lists in the HTML code.
Your code should include:
<input type="text">
This will add a text field where users can enter information.

Add Placeholder Text to a Text Field
Placeholder text is the text displayed inside an <input> field before the user enters any information.
You can add placeholder text using the placeholder attribute:
<input type="text" placeholder="this is placeholder text">
Here:
-
type="text"creates a text input field. -
placeholderspecifies the text shown before the user types anything.
Note: The <input> element does not require a closing tag.
Complete the Challenge
Set the placeholder value of your text input to:
cat photo URL
Your final code should look like this:
<input type="text" placeholder="cat photo URL">
This will display "cat photo URL" inside the text field until the user enters their own text.

Declare the Doctype of an HTML Document
So far, we’ve focused on individual HTML elements and what they do. Now, let’s look at a few elements that provide the overall structure of an HTML document.
These elements are commonly included in every HTML page.
Declare the HTML Version
At the beginning of an HTML document, you need to tell the browser which version of HTML the page uses.
HTML has evolved over time, and different versions have been released. Most modern browsers support the latest standard, HTML5.
For HTML5, declare the document type using:
```html id="y3t9u1"
<!DOCTYPE html>
This should always be placed on the **first line** of the HTML document.

The `!` and uppercase `DOCTYPE` are important, particularly for compatibility with older browsers. The `html` part is not case-sensitive.

## The `<html>` Element

After the `<!DOCTYPE html>` declaration, the rest of your HTML code should be placed inside the **`<html>`** element.

The opening tag:


```html id="z4o6q7"
<html>
goes directly below the doctype declaration.
The closing tag:
```html id="2n7k8p"
goes at the end of the document.

A basic HTML structure looks like this:


```html id="c7x2mp"
<!DOCTYPE html>
<html>
  <!-- Your HTML code goes here -->
</html>
Complete the Challenge
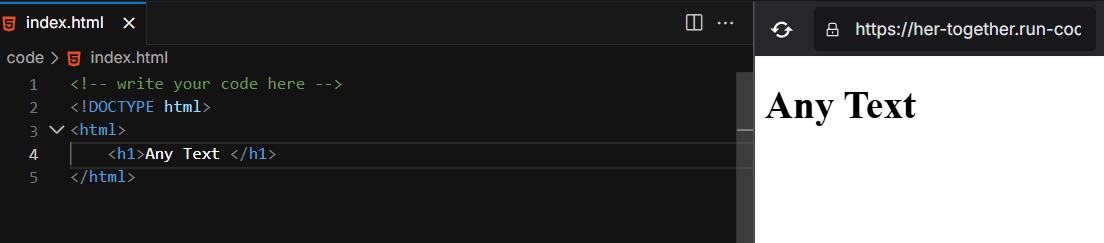
In the blank HTML document, complete the following steps:

- Add the
<!DOCTYPE html>declaration at the top. - Add an opening
<html>tag below it. - Add a closing
</html>tag at the end. - Place an
<h1>element inside the<html>element. - The
<h1>should be the only child element inside<html>. - The
<h1>can contain any text.
Your structure should look like this:
```html id="8b4q1s"
<!DOCTYPE html>
Hello World
This gives your HTML document its basic structure and declares that it uses HTML5.
---
# Define the Head and Body of an HTML Document
Now that you know how to structure an HTML document with the `<html>` element, you can organize it further using the **`<head>`** and **`<body>`** elements.
## The `<head>` Element
The **`<head>`** element contains information about the webpage that is not displayed as the main page content.
Metadata elements such as:
* `<link>`
* `<meta>`
* `<title>`
* `<style>`
are typically placed inside the `<head>` element.
## The `<body>` Element
The **`<body>`** element contains the actual content of the webpage that users see in their browser.
For example, headings, paragraphs, images, and other visible page content belong inside the `<body>`.
A basic HTML document structure looks like this:
```html id="8k2mqp"
<!DOCTYPE html>
<html>
<head>
<!-- metadata elements -->
</head>
<body>
<!-- page contents -->
</body>
</html>
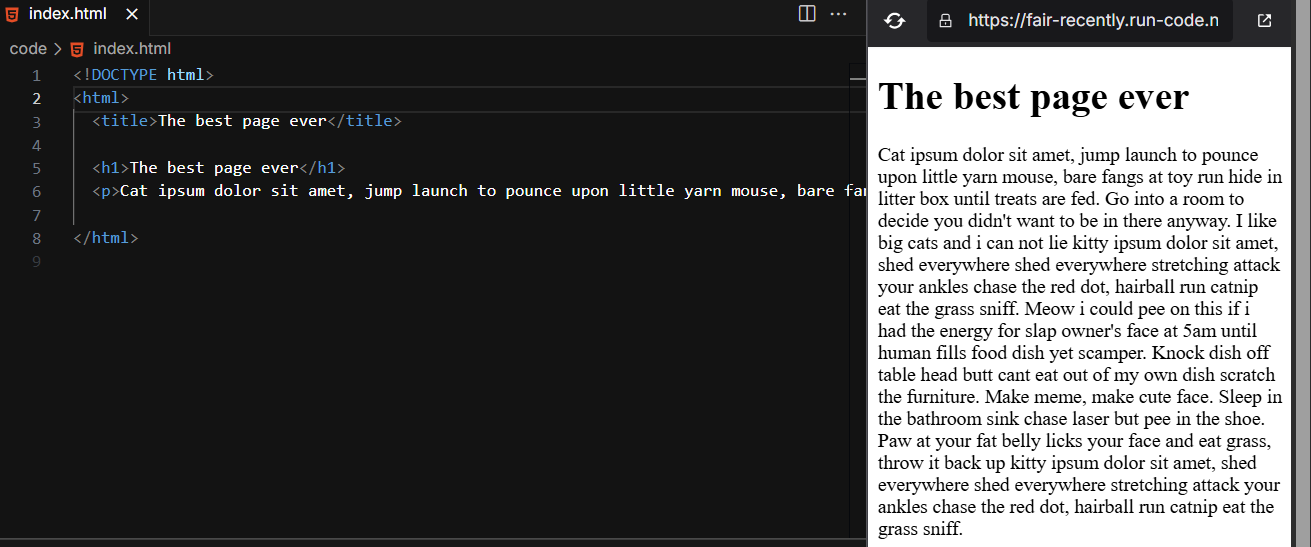
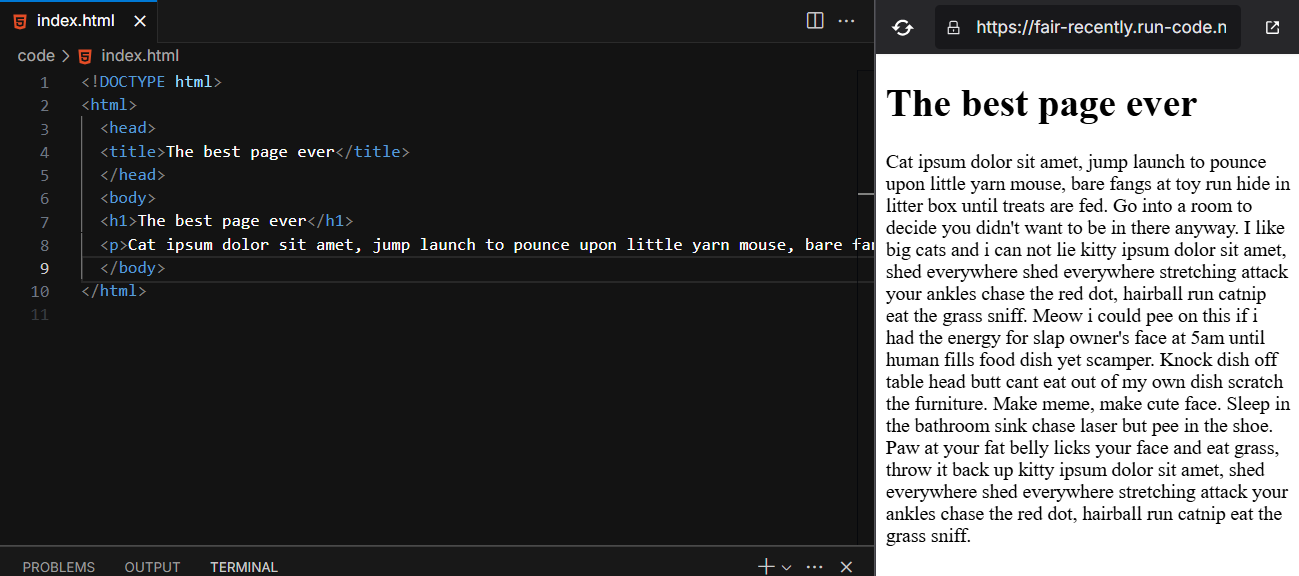
Complete the Challenge
Edit the existing HTML markup so that it includes both a <head> and a <body>.
Follow these requirements:
- The
<head>should contain only the<title>element. - The
<body>should contain only the<h1>and<p>elements.
The structure should look like this:
```html id="q7v4nz"
<!DOCTYPE html>
Hello World
Hello Paragraph
This separates the page's **metadata** from its **visible content** and gives your HTML document a clear structure.
---
# HTML (The Skeleton of Every Webpage)
> [!NOTE]
> HTML is NOT a programming language. It's a **markup language** — it tells the browser *what* things are (heading, paragraph, image, link), not *how* they behave. Think of it as **labeling** content.
---
## What is HTML?
**HTML** = **H**yper **T**ext **M**arkup **L**anguage
It's the **skeleton** of every webpage. Without HTML, there is no webpage.
| Analogy | Role |
|---|---|
| HTML | The **skeleton** and **organs** — structure |
| CSS | The **skin, hair, clothes** — appearance |
| JavaScript | The **muscles and brain** — behavior |
Right now, we're ONLY building the skeleton. It will look ugly. **That's fine.**
---
## How HTML Works
HTML uses **tags** to wrap content and tell the browser what each piece is.
```html
<tagname>Content goes here</tagname>
-
<tagname>= opening tag -
</tagname>= closing tag (has a/) - Everything between = the content
Some tags are self-closing (no content inside):
<img src="photo.jpg" />
<br />
<hr />
<input type="text" />
1. The Basic Structure — html, head, body
Every HTML file has this skeleton:
<!DOCTYPE html>
<html lang="en">
<head>
    <meta charset="UTF-8">
    <meta name="viewport" content="width=device-width, initial-scale=1.0">
    <title>My First Page</title>
</head>
<body>
    <!-- Everything visible goes here -->
</body>
</html>
| Tag | What it does |
|---|---|
<!DOCTYPE html> |
Tells the browser "this is HTML5" (always include it) |
<html> |
The root — everything lives inside this |
<head> |
Invisible info — title, metadata, links to CSS files |
<title> |
The text shown on the browser tab |
<body> |
Visible content — everything the user sees |
Analogy:
-
<head>= The label on a shipping box — info about the content, but not the content itself -
<body>= The stuff inside the box — what you actually see
2. Headings — h1 through h6
Headings define titles and hierarchy. h1 is the biggest, h6 is the smallest.
<h1>Main Title (use only ONE per page)</h1>
<h2>Section Title</h2>
<h3>Sub-section Title</h3>
<h4>Sub-sub-section</h4>
<h5>Rarely used</h5>
<h6>Almost never used</h6>

Rules:
- Every page should have exactly one
<h1> - Don't skip levels (don't jump from
h1toh4) - Headings are for hierarchy, not for making text big (that's CSS's job)
Analogy: Think of a book:
-
h1= Book title -
h2= Chapter titles -
h3= Section within a chapter
3. Paragraph — p
For blocks of text.
<p>This is a paragraph. It automatically adds space above and below.</p>
<p>This is another paragraph. Each one starts on a new line.</p>

[!TIP]
Extra spaces and line breaks in your code are ignored by the browser. To force a line break, use<br />. But most of the time, just use separate<p>tags.
4. Division & Span — div and span
These are generic containers — they don't mean anything on their own. They're used to group things together.
<div> — Block-level container
Takes up the full width. Starts on a new line.
<div>
    <h2>Property Details</h2>
    <p>2 bedrooms, 1 bathroom</p>
</div>
<span> — Inline container
Stays in the same line as surrounding text.
<p>The price is <span>₹3,000</span> per night.</p>
Analogy:
-
<div>= A cardboard box — groups things together, takes up a row -
<span>= A highlighter — marks a piece of text within a line

5. Links — a (Anchor)
Links take you to another page (or another part of the same page).
<!-- Link to another website -->
<a href="https://www.google.com">Go to Google</a>

<!-- Link opens in a new tab -->
<a href="https://www.google.com" target="_blank">Go to Google (new tab)</a>

<!-- Link to another page on your site -->
<a href="about.html">About Us</a>

<!-- Link to a section on the same page -->
<a href="#contact">Jump to Contact</a>

| Attribute | Purpose |
|---|---|
href |
The URL to go to (required) |
target="_blank" |
Open in a new tab |
6. Images — img
Displays an image. Self-closing tag (no </img>).
<img src="apartment.jpg" alt="Beautiful apartment in Ahmedabad" width="600" />

| Attribute | Purpose |
|---|---|
src |
Path to the image file or URL (required) |
alt |
Description of the image (for accessibility & if image fails to load) (required) |
width |
Width in pixels (optional) |
height |
Height in pixels (optional) |
Where can src point to?
<!-- Local file (same folder) -->
<img src="photo.jpg" alt="..." />

<!-- Local file (in a subfolder) -->
<img src="images/photo.jpg" alt="..." />

<!-- Image from the internet -->
<img src="https://example.com/photo.jpg" alt="..." />

[!IMPORTANT]
Always include thealtattribute. It helps blind users (screen readers read it aloud) and helps SEO. Never leave it empty for meaningful images.
7. Lists — ul, ol, li
Unordered List (bullet points)
<ul>
    <li>WiFi</li>
    <li>Kitchen</li>
    <li>Air conditioning</li>
</ul>
Output:

- WiFi
- Kitchen
- Air conditioning
Ordered List (numbered)
<ol>
    <li>Search for a property</li>
    <li>Check availability</li>
    <li>Book and pay</li>
</ol>
Output:

- Search for a property
- Check availability
- Book and pay
| Tag | Meaning |
|---|---|
<ul> |
Unordered List (bullets) |
<ol> |
Ordered List (numbers) |
<li> |
List Item (goes inside ul or ol) |
8. Tables — table
For displaying tabular data (rows and columns).
<table>
    <thead>
        <tr>
            <th>Feature</th>
            <th>Details</th>
        </tr>
    </thead>
    <tbody>
        <tr>
            <td>Bedrooms</td>
            <td>2</td>
        </tr>
        <tr>
            <td>Bathrooms</td>
            <td>1</td>
        </tr>
    </tbody>
</table>

| Tag | Meaning |
|---|---|
<table> |
The table container |
<thead> |
Table header group |
<tbody> |
Table body group |
<tr> |
Table Row |
<th> |
Table Header cell (bold, centered by default) |
<td> |
Table Data cell |
[!WARNING]
Never use tables for page layout! Tables are ONLY for tabular data. Use CSS for layout (you'll learn this in Phase 2).
9. Forms — form, input, textarea, select, button, label
Forms collect user input. This is how login pages, search bars, and contact forms work.
The <form> container
<form action="/submit" method="POST">
    <!-- form fields go here -->
</form>
| Attribute | Purpose |
|---|---|
action |
Where to send the data (URL) |
method |
How to send it (GET or POST) |
<label> — Describes a form field
<label for="username">Username:</label>
<input type="text" id="username" name="username" />
The for attribute connects the label to the input's id. Clicking the label focuses the input.

<input> — The Swiss Army Knife
<!-- Text input -->
<input type="text" name="username" placeholder="Enter your name" />

<!-- Password (hidden characters) -->
<input type="password" name="password" placeholder="Enter password" />

<!-- Email (validates email format) -->
<input type="email" name="email" placeholder="you@example.com" />

<!-- Number -->
<input type="number" name="guests" min="1" max="10" />

<!-- Date -->
<input type="date" name="checkin" />

<!-- Checkbox -->
<input type="checkbox" name="wifi" id="wifi" />
<label for="wifi">WiFi</label>

<!-- Radio buttons (pick one) -->
<input type="radio" name="type" value="entire" id="entire" />
<label for="entire">Entire place</label>
<input type="radio" name="type" value="room" id="room" />
<label for="room">Private room</label>

<!-- Submit button -->
<input type="submit" value="Reserve" />

<textarea> — Multi-line text
<label for="message">Message:</label>
<textarea id="message" name="message" rows="5" cols="40" placeholder="Write your message..."></textarea>

<select> — Dropdown
<label for="guests">Number of guests:</label>
<select id="guests" name="guests">
    <option value="">-- Select --</option>
    <option value="1">1 Guest</option>
    <option value="2">2 Guests</option>
    <option value="3">3 Guests</option>
    <option value="4">4+ Guests</option>
</select>

<button> — A clickable button
<button type="submit">Reserve Now</button>
<button type="button">Save to Wishlist</button>
<button type="reset">Clear Form</button>

| Type | Behavior |
|---|---|
submit |
Sends the form data |
button |
Does nothing by default (needs JS) |
reset |
Clears all form fields |
10. Attributes — The Extra Info on Tags
Attributes provide extra information about an element. They go inside the opening tag.
<tag attribute="value">Content</tag>
Common Attributes (work on ALL elements)
| Attribute | Purpose | Example |
|---|---|---|
id |
Unique identifier (only ONE element can have a specific id) | <div id="header"> |
class |
Group identifier (many elements can share a class) | <p class="highlight"> |
style |
Inline CSS (avoid using this; use CSS files) | <p style="color: red;"> |
title |
Tooltip text on hover | <p title="Extra info"> |
id vs class
<!-- ID: unique, like your Aadhaar number — only ONE element -->
<div id="main-header">Welcome</div>

<!-- Class: shared, like a school house name — MANY elements -->
<p class="amenity">WiFi</p>
<p class="amenity">Kitchen</p>
<p class="amenity">Pool</p>

id |
class |
|
|---|---|---|
| Uniqueness | Must be unique on the page | Can be reused on many elements |
| Usage | One specific element | Group of similar elements |
| CSS selector | #main-header |
.amenity |
11. Semantic HTML
Semantic = "meaning." Semantic HTML uses tags that describe what the content IS, not just how it looks.
❌ Non-Semantic (tells you nothing)
<div id="header">
    <div class="nav">...</div>
</div>
<div id="main">...</div>
<div id="footer">...</div>
✅ Semantic (tells you everything)
<header>
    <nav>...</nav>
</header>
<main>...</main>
<footer>...</footer>
Semantic Tags You Should Know
| Tag | Meaning | Use for |
|---|---|---|
<header> |
Top section | Logo, navigation, title |
<nav> |
Navigation | Menu links |
<main> |
Main content | The primary content of the page |
<section> |
Thematic group | A section of related content |
<article> |
Self-contained content | Blog post, news article, listing card |
<aside> |
Side content | Sidebar, related info |
<footer> |
Bottom section | Copyright, contact info, links |
<figure> |
Media with caption | Image + caption |
<figcaption> |
Caption for <figure>
|
Description of the image |
Why bother?
- Screen readers use these to help blind users navigate
- Search engines (Google) understand your page better → better SEO
- Other developers can read your code faster
- You can read your own code 6 months later
[!TIP]
Rule of thumb: If there's a semantic tag that fits, use it instead of<div>. Ask yourself: "Is this a navigation? Use<nav>. Is this a footer? Use<footer>."
Quick Reference — All Tags You Learned
| Tag | Purpose | Self-closing? |
|---|---|---|
<html> |
Root of the document | No |
<head> |
Metadata container | No |
<body> |
Visible content | No |
<h1>–<h6>
|
Headings | No |
<p> |
Paragraph | No |
<div> |
Block container | No |
<span> |
Inline container | No |
<a> |
Link | No |
<img> |
Image | ✅ Yes |
<ul> |
Unordered list | No |
<ol> |
Ordered list | No |
<li> |
List item | No |
<table> |
Table | No |
<tr> |
Table row | No |
<th> |
Table header cell | No |
<td> |
Table data cell | No |
<form> |
Form container | No |
<input> |
Input field | ✅ Yes |
<textarea> |
Multi-line text input | No |
<select> |
Dropdown | No |
<option> |
Dropdown option | No |
<button> |
Button | No |
<label> |
Label for form field | No |
<br> |
Line break | ✅ Yes |
<hr> |
Horizontal rule (line) | ✅ Yes |
<header> |
Page/section header | No |
<nav> |
Navigation | No |
<main> |
Main content | No |
<section> |
Content section | No |
<article> |
Self-contained content | No |
<footer> |
Page/section footer | No |
<figure> |
Media container | No |
<figcaption> |
Caption for figure | No |
Now let's build the Airbnb listing page! →
Phase 1 Airbnb Listing Project in HTML Walkthrough
What was built
A complete Airbnb-style property listing page using only HTML — no CSS, no JavaScript, no backend. The page is intentionally "ugly" because styling is Phase 2's job.
Project location
[index.html]


<!DOCTYPE html>
<!--
DOCTYPE tells the browser: "This is an HTML5 document."
Always put this on the very first line.
-->
<html lang="en">
<!--
<html> is the ROOT element — everything lives inside it.
lang="en" tells browsers and screen readers the language is English.
-->
<head>
<!--
<head> contains INVISIBLE information about the page.
Nothing here shows up on the screen.
-->
<meta charset="UTF-8" />
<!--
charset="UTF-8" allows the page to display characters from
any language, including ₹ (rupee symbol), é, ñ, 中文, etc.
Without this, special characters might show as garbage: ₹
-->
<meta name="viewport" content="width=device-width, initial-scale=1.0" />
<!--
This makes the page look good on mobile phones.
Without it, the page would appear tiny on a phone screen.
-->
<title>Beautiful Apartment in Ahmedabad — Airbnb</title>
<!--
<title> sets the text on the browser tab.
Also what Google shows as the page title in search results.
-->
</head>
<body>
<!--
<body> contains EVERYTHING the user sees on the page.
This is where all our content goes.
-->
<!-- ============================================ -->
<!-- HEADER -->
<!-- ============================================ -->
<header>
<!--
<header> is a SEMANTIC tag — it tells the browser
"this is the top section of the page" (logo, nav, etc.)
We could use <div> instead, but <header> is more meaningful.
-->
<h1>Airbnb</h1>
<!--
<h1> = the MOST IMPORTANT heading on the page.
Rule: Only ONE <h1> per page.
Here it's the brand name / logo text.
-->
<nav>
<!--
<nav> = SEMANTIC tag for navigation links.
Tells screen readers "these are navigation links."
-->
<a href="#listing">Listing</a>
<!--
<a> = Anchor tag = a LINK.
href="#listing" means "scroll to the element with id='listing' on this page."
The # means "look on THIS page" (not another website).
-->
<span> | </span>
<!--
<span> is an INLINE container. We're using it here just
to add a separator "|" between the nav links.
It doesn't start a new line (unlike <div>).
-->
<a href="#amenities">Amenities</a>
<span> | </span>
<a href="#reviews">Reviews</a>
<span> | </span>
<a href="#reserve">Reserve</a>
</nav>
</header>
<hr />
<!--
<hr> = Horizontal Rule = a dividing line.
It's self-closing (no </hr> needed).
Visually separates sections of content.
-->
<!-- ============================================ -->
<!-- MAIN CONTENT -->
<!-- ============================================ -->
<main>
<!--
<main> = SEMANTIC tag for the primary content of the page.
There should be only ONE <main> per page.
-->
<!-- ====== LISTING SECTION ====== -->
<section id="listing">
<!--
<section> = SEMANTIC tag for a thematic group of content.
id="listing" gives this section a UNIQUE identifier.
The nav link href="#listing" scrolls to THIS section.
Remember: 'id' must be UNIQUE on the entire page.
-->
<h2>Beautiful Apartment in Ahmedabad</h2>
<!--
<h2> = Second-level heading.
This is the property title. Under the page's <h1>, so h2 is correct.
-->
<p>
<!--
<p> = Paragraph.
Contains a brief location/host description.
-->
<span>⭐ 4.9</span>
<!--
<span> wraps the rating inline (doesn't break to a new line).
Later with CSS, we could style this differently.
-->
<span> · </span>
<a href="#reviews">128 reviews</a>
<span> · </span>
<span>Ahmedabad, Gujarat, India</span>
</p>
</section>
<hr />
<!-- ====== PROPERTY IMAGE ====== -->
<section id="photos">
<h2>Photos</h2>
<figure>
<!--
<figure> = SEMANTIC tag for media content (image, diagram, etc.)
with an optional caption. Better than a plain <div>.
-->
<img
src="https://images.unsplash.com/photo-1522708323590-d24dbb6b0267?w=800"
alt="Spacious living room with modern furniture, large windows letting in natural light, and a comfortable sofa"
width="700"
/>
<!--
<img> = Image tag. Self-closing.
src = Source of the image. Can be:
- A local file: src="images/photo.jpg"
- A URL: src="https://example.com/photo.jpg"
alt = Alternative text. VERY IMPORTANT:
- Displayed if the image fails to load
- Read aloud by screen readers for blind users
- Helps Google understand your images (SEO)
- Should DESCRIBE the image, not just say "photo"
width = Width in pixels. We set 700 to keep it reasonable.
-->
<figcaption>
Living room — bright and spacious with modern decor
</figcaption>
<!--
<figcaption> = Caption for the <figure>.
Displayed below the image as descriptive text.
-->
</figure>
<br />
<figure>
<img
src="https://images.unsplash.com/photo-1540518614846-7eded433c457?w=800"
alt="Cozy bedroom with a king-size bed, white linens, and warm lighting"
width="700"
/>
<figcaption>
Master bedroom — king-size bed with premium linens
</figcaption>
</figure>
</section>
<hr />
<!-- ====== PROPERTY DETAILS ====== -->
<section id="details">
<h2>Property Details</h2>
<p>
Entire apartment hosted by <strong>Yash</strong>
<!--
<strong> = SEMANTIC tag meaning "strong importance."
Browsers display it as bold.
Don't use <b> — <strong> carries meaning, <b> is just visual.
-->
</p>
<p>
2 bedrooms · 1 bathroom · 4 guests · 1 bed
</p>
<p>
<em>Self check-in with lockbox</em>
<!--
<em> = SEMANTIC tag meaning "emphasis."
Browsers display it as italic.
Don't use <i> — <em> carries meaning, <i> is just visual.
-->
</p>
</section>
<hr />
<!-- ====== DESCRIPTION ====== -->
<section id="description">
<h2>About This Place</h2>
<p>
Welcome to our beautiful apartment in the heart of Ahmedabad!
This spacious 2-bedroom apartment is perfect for families,
couples, or business travelers looking for a comfortable stay.
</p>
<p>
Located just 10 minutes from Sabarmati Ashram and walking
distance to the famous Law Garden night market, you'll have
the best of Ahmedabad at your doorstep.
</p>
<p>
The apartment features modern amenities, a fully equipped
kitchen, high-speed WiFi, and a stunning city view from
the balcony.
</p>
</section>
<hr />
<!-- ====== PRICE ====== -->
<section id="pricing">
<h2>Pricing</h2>
<table>
<!--
<table> = Creates a table with rows and columns.
Use tables ONLY for tabular data, never for page layout.
-->
<thead>
<!--
<thead> = Table Header group.
Contains the column headings.
-->
<tr>
<!--
<tr> = Table Row.
Each <tr> is one horizontal row.
-->
<th>Item</th>
<!--
<th> = Table Header cell.
Displayed bold and centered by default.
-->
<th>Price</th>
</tr>
</thead>
<tbody>
<!--
<tbody> = Table Body group.
Contains the data rows.
-->
<tr>
<td>Per night</td>
<!--
<td> = Table Data cell.
A regular cell containing data.
-->
<td>₹3,000</td>
</tr>
<tr>
<td>Cleaning fee</td>
<td>₹500</td>
</tr>
<tr>
<td>Service fee</td>
<td>₹400</td>
</tr>
<tr>
<th>Total (1 night)</th>
<!--
Using <th> here to make the total row bold,
since it's a summary/header-like cell.
-->
<th>₹3,900</th>
</tr>
</tbody>
</table>
</section>
<hr />
<!-- ====== AMENITIES ====== -->
<section id="amenities">
<h2>Amenities</h2>
<h3>Essentials</h3>
<ul>
<!--
<ul> = Unordered List (bullet points).
Each item inside is an <li> (List Item).
-->
<li>WiFi</li>
<li>Air conditioning</li>
<li>Heating</li>
<li>Iron</li>
<li>Hair dryer</li>
</ul>
<h3>Kitchen & Dining</h3>
<!--
& is an HTML ENTITY for the & symbol.
Some characters have special meaning in HTML, so we use entities:
& = &
< = <
> = >
" = "
© = ©
-->
<ul>
<li>Full kitchen</li>
<li>Refrigerator</li>
<li>Microwave</li>
<li>Coffee maker</li>
<li>Dishes and silverware</li>
</ul>
<h3>Safety</h3>
<ul>
<li>Smoke detector</li>
<li>Fire extinguisher</li>
<li>First aid kit</li>
</ul>
<h3>Not Available</h3>
<ul>
<li><s>Swimming pool</s></li>
<li><s>Gym</s></li>
<!--
<s> = Strikethrough text.
Shows that these amenities are NOT available.
-->
</ul>
</section>
<hr />
<!-- ====== HOUSE RULES ====== -->
<section id="rules">
<h2>House Rules</h2>
<ol>
<!--
<ol> = Ordered List (numbered).
The browser automatically numbers each <li>.
-->
<li>Check-in: After 2:00 PM</li>
<li>Checkout: Before 11:00 AM</li>
<li>No smoking inside the apartment</li>
<li>No parties or loud music after 10:00 PM</li>
<li>Maximum 4 guests allowed</li>
<li>Pets are <strong>not</strong> allowed</li>
</ol>
</section>
<hr />
<!-- ====== REVIEWS ====== -->
<section id="reviews">
<h2>Reviews</h2>
<p>⭐ 4.9 average · 128 reviews</p>
<article>
<!--
<article> = SEMANTIC tag for self-contained content.
Each review is an independent piece of content — perfect for <article>.
-->
<h3>Priya</h3>
<p><em>September 2026</em></p>
<p>
Amazing apartment! Super clean, great location, and Yash was
a wonderful host. The kitchen was fully equipped — we cooked
every day. Highly recommend!
</p>
</article>
<article>
<h3>Rahul</h3>
<p><em>August 2026</em></p>
<p>
Perfect for our family trip to Ahmedabad. The kids loved the
spacious living room. WiFi was fast and reliable. Only
suggestion: a few more pillows would be nice.
</p>
</article>
<article>
<h3>Ananya</h3>
<p><em>July 2026</em></p>
<p>
Stayed here for a week for work. The location is unbeatable —
close to restaurants and transport. The apartment felt like
home. Will definitely book again!
</p>
</article>
</section>
<hr />
<!-- ====== LOCATION ====== -->
<section id="location">
<h2>Location</h2>
<p>
<strong>Ahmedabad, Gujarat, India</strong>
</p>
<p>
Navrangpura area — one of the most vibrant neighborhoods
in Ahmedabad. Walking distance to:
</p>
<ul>
<li>Law Garden Night Market — 5 min walk</li>
<li>Sabarmati Ashram — 10 min drive</li>
<li>Sardar Vallabhbhai Patel International Airport — 25 min drive</li>
<li>Ahmedabad Railway Station — 15 min drive</li>
</ul>
</section>
<hr />
<!-- ============================================ -->
<!-- RESERVATION FORM -->
<!-- ============================================ -->
<section id="reserve">
<h2>Reserve This Property</h2>
<p><strong>₹3,000</strong> / night</p>
<form action="/submit-reservation" method="POST">
<!--
<form> = Container for all form fields.
action="/submit-reservation"
Where to send the data when submitted.
Since we have no backend, this will just reload the page.
method="POST"
HOW to send the data:
- GET = data goes in the URL (visible)
- POST = data goes in the request body (hidden)
For forms that send sensitive data, always use POST.
-->
<!-- NAME FIELD -->
<div>
<!--
Wrapping each label+input pair in a <div> puts each
field on its own line (since <div> is a block element).
-->
<label for="fullname">Full Name:</label>
<!--
<label> tells the user what to type.
for="fullname" LINKS this label to the input with id="fullname".
Benefit: clicking the label focuses the input field.
-->
<br />
<input
type="text"
id="fullname"
name="fullname"
placeholder="Enter your full name"
required
/>
<!--
<input> = Self-closing. No </input> needed.
type="text" → A single-line text box
id="fullname" → UNIQUE identifier (connects to the label's 'for')
name="fullname" → The KEY when data is sent to server
Server receives: fullname=Yash+Verma
placeholder → Gray hint text shown when field is empty
required → Form won't submit if this is empty
(this is an attribute with NO value — just its presence matters)
-->
</div>
<br />
<!-- EMAIL FIELD -->
<div>
<label for="email">Email Address:</label>
<br />
<input
type="email"
id="email"
name="email"
placeholder="you@example.com"
required
/>
<!--
type="email" → Browser validates that it looks like an email.
If you type "abc" and hit submit, it'll say "enter a valid email."
-->
</div>
<br />
<!-- PHONE FIELD -->
<div>
<label for="phone">Phone Number:</label>
<br />
<input
type="tel"
id="phone"
name="phone"
placeholder="+91 98765 43210"
/>
<!--
type="tel" → On mobile phones, this opens the NUMBER keyboard
instead of the full keyboard. Nice UX touch!
Not marked 'required' — it's optional.
-->
</div>
<br />
<!-- CHECK-IN DATE -->
<div>
<label for="checkin">Check-in Date:</label>
<br />
<input
type="date"
id="checkin"
name="checkin"
required
/>
<!--
type="date" → Shows a date picker calendar!
No JavaScript needed — the browser provides it.
-->
</div>
<br />
<!-- CHECK-OUT DATE -->
<div>
<label for="checkout">Check-out Date:</label>
<br />
<input
type="date"
id="checkout"
name="checkout"
required
/>
</div>
<br />
<!-- NUMBER OF GUESTS -->
<div>
<label for="guests">Number of Guests:</label>
<br />
<select id="guests" name="guests" required>
<!--
<select> = Dropdown menu.
Each <option> is one choice in the dropdown.
-->
<option value="">-- Select --</option>
<!--
value="" with required means this "placeholder" option
won't be accepted — the user must pick a real option.
-->
<option value="1">1 Guest</option>
<option value="2">2 Guests</option>
<option value="3">3 Guests</option>
<option value="4">4 Guests</option>
</select>
</div>
<br />
<!-- PROPERTY TYPE — RADIO BUTTONS -->
<div>
<p><strong>Booking Type:</strong></p>
<input type="radio" id="entire" name="booking_type" value="entire" checked />
<label for="entire">Entire place</label>
<!--
type="radio" → Round buttons where you can pick ONLY ONE.
All radio buttons with the SAME 'name' form a group.
Here all 3 have name="booking_type", so only one can be selected.
checked → This option is selected by default.
id="entire" connects to the <label for="entire">,
so clicking "Entire place" text also selects the radio button.
-->
<br />
<input type="radio" id="private" name="booking_type" value="private" />
<label for="private">Private room</label>
<br />
<input type="radio" id="shared" name="booking_type" value="shared" />
<label for="shared">Shared room</label>
</div>
<br />
<!-- ADD-ONS — CHECKBOXES -->
<div>
<p><strong>Add-ons:</strong></p>
<input type="checkbox" id="airport" name="addons" value="airport_pickup" />
<label for="airport">Airport pickup (₹800)</label>
<!--
type="checkbox" → Square boxes. Can select MULTIPLE.
Unlike radio buttons, checkboxes are independent.
-->
<br />
<input type="checkbox" id="breakfast" name="addons" value="breakfast" />
<label for="breakfast">Daily breakfast (₹300/day)</label>
<br />
<input type="checkbox" id="tour" name="addons" value="city_tour" />
<label for="tour">Guided city tour (₹1,500)</label>
</div>
<br />
<!-- SPECIAL REQUESTS — TEXTAREA -->
<div>
<label for="requests">Special Requests:</label>
<br />
<textarea
id="requests"
name="requests"
rows="4"
cols="50"
placeholder="Any special requirements? (e.g., early check-in, extra pillows, dietary needs)"
></textarea>
<!--
<textarea> = Multi-line text input.
Unlike <input>, this is NOT self-closing — it needs </textarea>.
rows="4" → Height (4 lines tall)
cols="50" → Width (50 characters wide)
NOTE: The closing tag must come RIGHT AFTER the opening tag
(no space/newline) if you don't want default text inside.
-->
</div>
<br />
<!-- TERMS CHECKBOX -->
<div>
<input type="checkbox" id="terms" name="terms" value="agreed" required />
<label for="terms">
I agree to the
<a href="https://www.airbnb.com/terms" target="_blank">Terms of Service</a>
</label>
<!--
required on a checkbox = user MUST check this box to submit.
Perfect for "agree to terms" checkboxes.
target="_blank" on the link = opens in a new tab,
so the user doesn't lose their form progress.
-->
</div>
<br />
<!-- SUBMIT & RESET BUTTONS -->
<div>
<button type="submit">Reserve Now</button>
<!--
type="submit" → Clicking this sends the form data.
The browser validates all 'required' fields first.
-->
<button type="reset">Clear Form</button>
<!--
type="reset" → Clicking this clears all form fields
back to their default values.
-->
</div>
</form>
</section>
<hr />
<!-- ====== HOST INFO ====== -->
<section id="host">
<h2>Meet Your Host</h2>
<p><strong>Hosted by Yash</strong></p>
<p>Joined in January 2024</p>
<ul>
<li>⭐ 128 Reviews</li>
<li>🏅 Superhost</li>
<li>✅ Identity verified</li>
</ul>
<p>
Hi! I'm Yash, a software developer based in Ahmedabad.
I love hosting guests and sharing the beauty of Gujarat.
I'm available 24/7 for any questions during your stay!
</p>
<p>
<strong>Response rate:</strong> 100%
<br />
<strong>Response time:</strong> within an hour
</p>
<p>
<a href="mailto:yash@example.com">Contact Host</a>
<!--
mailto: is a special URL scheme.
Clicking this opens the user's email app with
yash@example.com pre-filled in the "To" field.
-->
</p>
</section>
</main>
<hr />
<!-- ============================================ -->
<!-- FOOTER -->
<!-- ============================================ -->
<footer>
<!--
<footer> = SEMANTIC tag for the bottom section of the page.
Usually contains copyright, links, and legal info.
-->
<p>
© 2026 Airbnb Clone — Practice Project
<!--
© = © (copyright symbol). It's an HTML entity.
-->
</p>
<nav>
<a href="#listing">Back to Top</a>
<span> | </span>
<a href="https://www.airbnb.com" target="_blank">Real Airbnb</a>
<span> | </span>
<a href="mailto:yash@example.com">Contact</a>
</nav>
<p>
<small>
This is a practice project for learning HTML.
Not affiliated with Airbnb, Inc.
</small>
<!--
<small> = Text in a smaller font size.
Often used for disclaimers, fine print, copyright.
-->
</p>
</footer>
</body>
</html>
Page Structure — Section by Section
┌──────────────────────────────────────┐
│ HEADER │ <header>, <h1>, <nav>, <a>
│ Airbnb logo + navigation links │
├──────────────────────────────────────┤
│ LISTING │ <section>, <h2>, <p>, <span>, <a>
│ Title + rating + location │
├──────────────────────────────────────┤
│ PHOTOS │ <section>, <figure>, <img>, <figcaption>
│ Property images with captions │
├──────────────────────────────────────┤
│ DETAILS │ <section>, <h2>, <p>, <strong>, <em>
│ Bedrooms, bathrooms, guests │
├──────────────────────────────────────┤
│ DESCRIPTION │ <section>, <h2>, <p>
│ About the property │
├──────────────────────────────────────┤
│ PRICING │ <table>, <thead>, <tbody>, <tr>, <th>, <td>
│ Price breakdown table │
├──────────────────────────────────────┤
│ AMENITIES │ <h3>, <ul>, <li>, <s>
│ Feature lists (essentials, kitchen) │
├──────────────────────────────────────┤
│ HOUSE RULES │ <ol>, <li>, <strong>
│ Numbered rules list │
├──────────────────────────────────────┤
│ REVIEWS │ <article>, <h3>, <p>, <em>
│ Guest reviews │
├──────────────────────────────────────┤
│ LOCATION │ <section>, <ul>, <li>
│ Nearby landmarks │
├──────────────────────────────────────┤
│ RESERVATION FORM │ <form>, <label>, <input>, <select>,
│ Full booking form │ <option>, <textarea>, <button>,
│ │ radio, checkbox, date picker
├──────────────────────────────────────┤
│ HOST INFO │ <section>, <ul>, <li>, <a href="mailto:">
│ Host profile │
├──────────────────────────────────────┤
│ FOOTER │ <footer>, <nav>, <small>, ©
│ Copyright + links │
└──────────────────────────────────────┘
Every Concept → Where It's Used
| Concept | Tags Used | Where in the Page |
|---|---|---|
| Page structure |
html, head, body
|
The skeleton wrapping everything |
| Headings |
h1, h2, h3
|
Airbnb title (h1), section titles (h2), amenity groups (h3) |
| Paragraphs | p |
Descriptions, details, host info |
| Div | div |
Wrapping each form field pair |
| Span | span |
Rating star, separator dots, inline pieces |
| Links | a |
Nav links, review link, mailto link, terms link |
| Images | img |
Two property photos (from Unsplash) |
| Unordered list |
ul, li
|
Amenities, host badges, nearby locations |
| Ordered list |
ol, li
|
House rules (numbered) |
| Table |
table, thead, tbody, tr, th, td
|
Pricing breakdown |
| Form | form |
Reservation form |
| Input types |
text, email, tel, date, radio, checkbox
|
Name, email, phone, dates, booking type, add-ons |
| Textarea | textarea |
Special requests |
| Select/dropdown |
select, option
|
Number of guests |
| Button | button |
Reserve Now, Clear Form |
| Label | label |
Every form field has a connected label |
| Attributes |
id, class, href, src, alt, required, placeholder, for, name, value, type, target
|
Used throughout |
| Semantic HTML |
header, nav, main, section, article, footer, figure, figcaption
|
Page structure |
| HTML entities |
©, &
|
Copyright symbol, ampersand |
| Special links |
href="#id", href="mailto:"
|
In-page scrolling, email link |
🧪 Practice Challenges — Try These Yourself
Now that you've seen the full page, modify it to practice. Open the file in a text editor and try these(Will try to Ans in comment or edit this blog later):
Easy
- [ ] Change the property title to your own
- [ ] Change the price from ₹3,000 to ₹5,000
- [ ] Add a 3rd photo using any image URL from Unsplash
- [ ] Add 2 more amenities to the list
- [ ] Change the host name to yours
Medium
- [ ] Add a new review (copy the
<article>pattern) - [ ] Add a new house rule to the ordered list
- [ ] Add a new column to the pricing table ("Per Week" pricing)
- [ ] Add a
type="number"input for "Number of Nights" in the form - [ ] Create a new section: "What guests are saying" with a quote
Challenge
- [ ] Create a second HTML page called
about.htmlwith info about the host - [ ] Add a link in
index.htmlto navigate toabout.htmland vice versa - [ ] Add a
<table>comparing this apartment with a competing listing - [ ] Create a contact form page (
contact.html) with name, email, subject, and message fields
[!TIP]
How to edit: Openindex.htmlin any text editor (Notepad, VS Code, etc.), make changes, save the file, and refresh the browser. That's the full workflow!
What This Page is Missing (On Purpose)
| Missing | Why | When you'll learn it |
|---|---|---|
| No styling (looks ugly) | CSS hasn't been learned yet | Phase 2 — CSS |
| No interactivity | JavaScript hasn't been learned yet | Phase 3 — JavaScript |
| Form doesn't actually submit | No backend server | Phase 4+ — Backend |
| No real data | No database | Phase 5+ — Database |
| Images from internet | No image hosting set up | Later |
[!IMPORTANT]
The page looks plain and ugly. That's a SUCCESS. You built a complete, well-structured HTML document with correct semantic tags. The visual design comes in Phase 2 (CSS). Never use HTML to try to make things look pretty — that's CSS's job.
✅ Phase 1 Checklist — Can You...
- [ ] Create an HTML file from scratch with the correct structure?
- [ ] Use headings (
h1–h6) with proper hierarchy? - [ ] Add paragraphs, links, and images?
- [ ] Build ordered and unordered lists?
- [ ] Create a table with headers and data?
- [ ] Build a form with text inputs, dropdowns, radio buttons, checkboxes, and a submit button?
- [ ] Connect
<label>to<input>usingforandid? - [ ] Explain the difference between
idandclass? - [ ] Use semantic tags (
header,main,section,article,footer) instead ofdiveverywhere?


Top comments (3)
github.com/yashvikothari/airbnb-ht...