
Introduction
One of the most exciting aspects of working with computers all day is the potential to automate. Unlike the most mundane real-life tasks we have to drag ourselves through each day, computers permit us to live a power fantasy, one where we dictate the terms and they do our bidding, over and over with nary a complaint. As we realize this power fantasy, let's be what's called a taskmaster.
Python is an extremely powerful language, partly due to the plethora of modules available to import and use. As taskmasters, we begin by installing and using the Python module PyAutoGUI. While this module is powerful in its own right, when used in conjunction with various other modules, anything can be automated. As programmers, UI testing is the first thing that comes to mind. For our purposes here, we will restrict ourselves to a very simple application, one that solves a gripe I have with Slack.
Now Slack is a godsend for more reasons than one. However, I find the way Slack handles status quite bothersome. I step away from my computer often during the workday. Give Slack 10 minutes and it changes my status to away. I am, however, very much available as I have my mobile phone on me. If I were to step away to take a break, I already have the ability to change my status to indicate so. We can write a simple program using PyAutoGUI to work around this issue.
PyAutoGUI is a Python automation module used to simulate a click, key press, scroll, etc. These actions can be combined in any order and in conjunction with other Python modules, they can detect and react to just about any change in the GUI of the Operating System. For instance, the dinosaur mini-game bundled with Google Chrome can be completely automated just using PyAutoGUI as it’s all about detecting change and reacting to it with key presses.
Python - i_am_never_away
Dependencies:
- Python3
- Modules: PyAutoGUI and Time
- Basic understanding of Python syntax
Installation
Windows:
pip install pyautogui
Linux and Mac:
pip3 install pyautogui
Some known issues:
If you are running OSX El Capitan and have problems installing pyobjc, try:
MACOSX_DEPLOYMENT_TARGET=10.11 pip install pyobjc
Linux additionally requires:
sudo apt-get install scrot
sudo apt-get install python3-tk
sudo apt-get install python3-dev
Implementation
For an easy to read and summarized document on the module and its syntax, please refer to: https://www.youngwonks.com/resources/pyautogui-cheatsheet
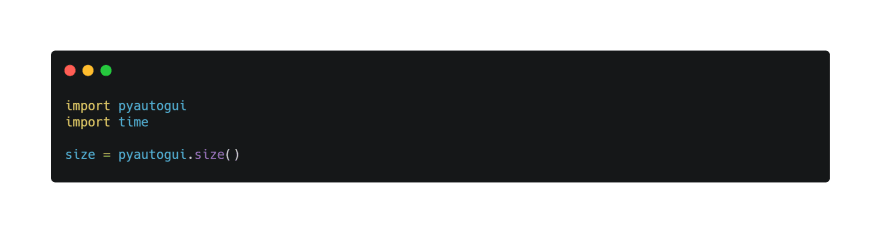
Step I - Importing the Required Modules
We start by importing PyAutoGUI and time.

Step II - Making the Program Dynamic
The program has to work for any machine with well, Slack installed, irrespective of the display resolution. Therefore, in order to make the program dynamic, we must first obtain the display’s resolution.
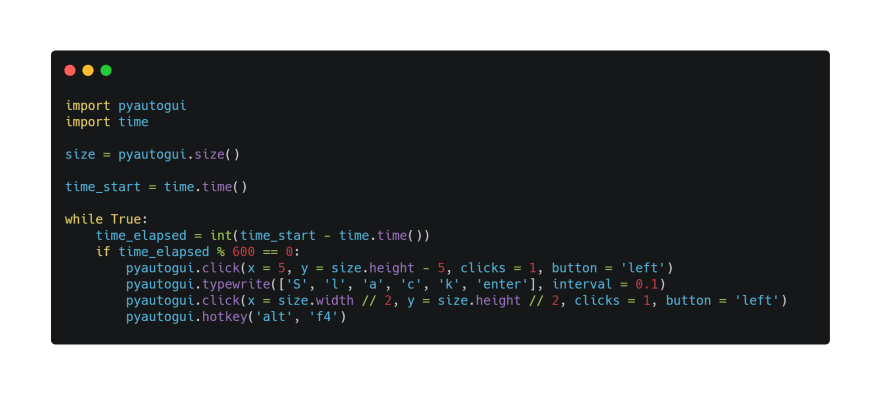
Step III - Clicking the Start Button
While we can simply press the left Windows key on the keyboard to summon the start menu, it’s not always reliable, especially when coupled with other key inputs due to conflicts between key- press time intervals and the amount of time it takes for the start menu to appear and be ready to detect key presses. Considering the start button is always on the bottom-left corner, we can simply click it.

Step IV - Opening Slack
Now that we have the start menu up, we can type Slack and hit enter on the keyboard. This is guaranteed to open Slack as among search results, installed applications have the highest precedence. In order to quicken this process, the interval has been set to 0.1s.

Step V - Clicking on the Screen
A simple click anywhere within the Slack window should now ensure that the status is changed to available. In order to avoid mis-clicks, we'll click right smack at the center of the screen.

Step VI - Closing Slack
With the status now changed, we can close the Slack window. Triggering hotkeys
straightforwardly would’ve been rather tedious, as the correct combination of key press and key release has to be simulated in the right order. Luckily, PyAutoGUI provides an easier alternative, the hotkey() function.

Step VII - Adding a Timer
Finally, we make the program repeat this same process every 10 minutes. There are many ways to keep track of elapsing time. The easiest, however, is using the time module, more specifically, the time.time() function. We simply note down the current time at the beginning of the program and keep subtracting from it to determine elapsed time. If this happens to be a multiple of 600, it means 10 minutes or a multiple of 10 minutes has passed and each time it does, Slack is opened.
For the official documentation, please refer to: https://pyautogui.readthedocs.io/en/latest
Conclusion
GUI Automation, in all its essence, is in line with the very spirit of programming languages; it enables us to escape the mundanity of repetitive tasks by pawning it off to not-so-smart, smart computers by letting us communicate with them. The only difference here is the level of abstraction. This variant of computer automation is very surface-level and as a result, very easy to understand. The potential, however, is boundless.
This article has been written by Shravan Sridhar. He has worked in the fields of Cyber Security and Data Science, and is currently an experienced Python instructor at YoungWonks (https://www.youngwonks.com), a top after-school coding program for kids and teens. YoungWonks' WASC-accredited program offers kids a world-class introduction to Python. Students here get started with real syntactical computer programming and gain conceptual depth of a college level program with a kid-friendly curriculum.

Top comments (0)