Infrastructure as code has come a long way. If you are working with Azure, there are many options on how to set up your CI/CD to deploy your infrastructure. In this blog post we will look at how to securely deploy our infrastructure to Azure using GitHub Actions with ARM templates and Azure Key Vault. The goal of this blog post is not only to highlight the importance of automating your release pipeline but also how to do it securely using the right tools for the job. Secure Dev Ops (SecDevOps) FTW.
Prerequisites
To follow along, you'll need the following:
- A GitHub account (Free)
- An Azure subscription (Free with $200 credit
Set up Azure AD and Key Vault for deployment
The first thing we need to do is prepare our Azure subscription for deployment. Since the deployment tasks will be running as a GitHub Action, we need an account that has the right permissions to deploy to Azure. We will also need to set up an Azure Key Vault to store all our sensitive information, such as api keys, passwords and secrets that will be used to set up our Azure Resources.
We will start by creating a Service Principal account. If this is the first time you come across Service Principals, this blog post does a great job explaining what they are and how to create them. However, in this instance, the commands are slightly different as we need to configure the Service Principal for GitHub actions and there is a small difference in the syntax - and you can only use the Azure CLI for this (GitHub docs).
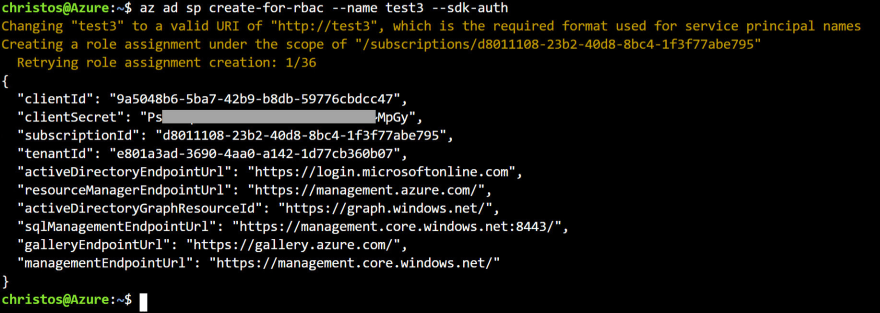
Open an Azure Cloud Shell session or your local Azure CLI and type the following:
az ad sp create-for-rbac --name "{sp-name}" --sdk-auth
This should generate the following output. Make sure to copy that somewhere safe as we will need it later.
Next, we need to update Azure Key Vault to allow our Service Principal to be used for deployment and to be able to retrieve secrets from Key Vault. In the CLI, type the following:
az keyvault set-policy --name "<YourKeyVaultName>" --spn <YourSPClientID> --secret-permissions list get
The output should look like this (some details omitted)
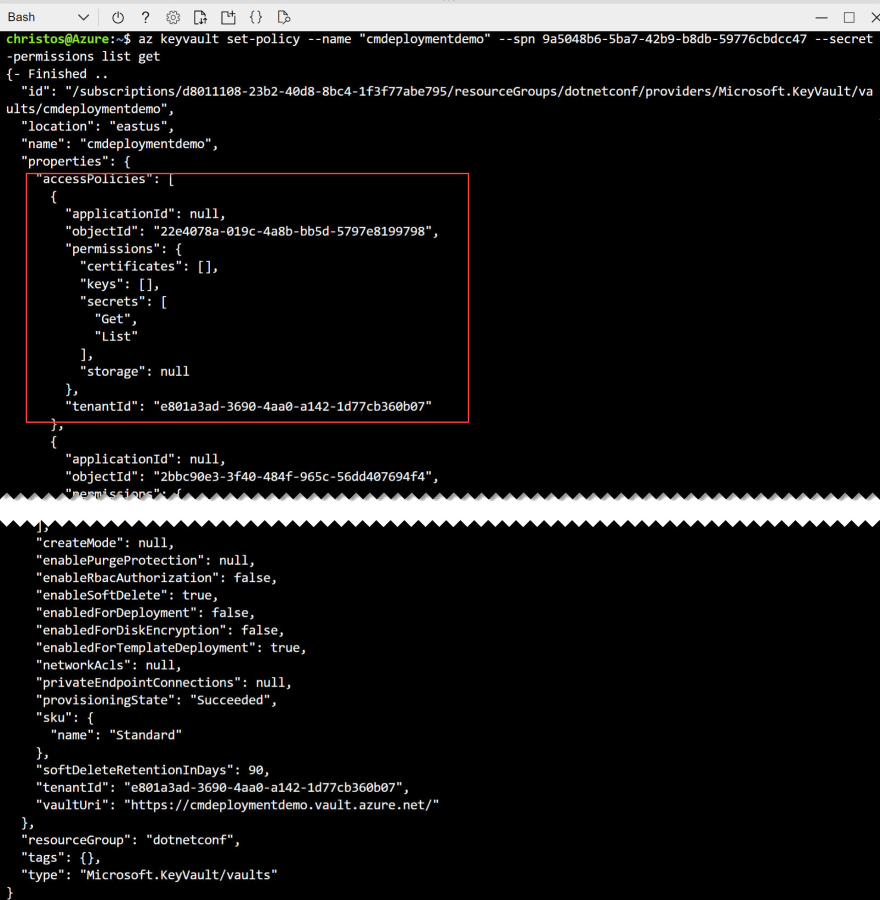
We can also confirm that this worked by checking the Access Policies in our Key Vault

Finally, we need to ensure that our Key Vault is set for deployments. In the CLI type the following:
az keyvault update --name "ContosoKeyVault" --resource-group "ContosoResourceGroup" --enabled-for-deployment "true"
This should generate a bunch of json but the important bit is highlighted below:
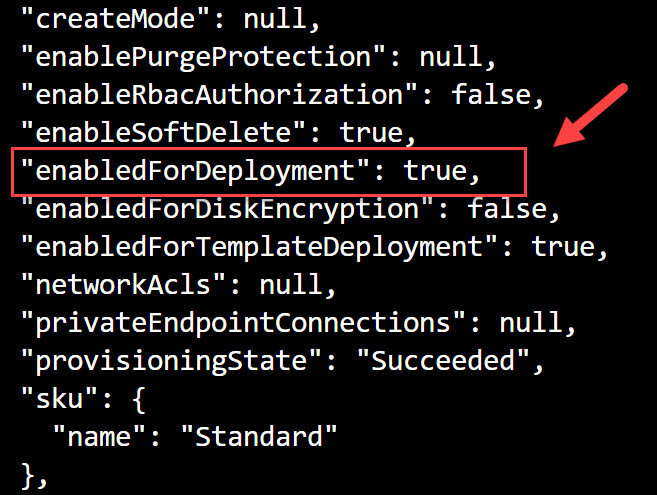
And again, we can confirm that our Key Vault has been configured correctly by checking in the portal:

This concludes the necessary configuration on the Azure side of things. We've created a Service Principal account (which is an Azure AD object) that can be used for deployments and has the right permissions to access Key Vault. Our Key Vault has also been configured to allow ARM deployments.
Create ARM templates that work with Key Vault
ARM templates are json files that describe the infrastructure we want to deploy to Azure. VS Code has some great extensions to allow you to create and edit ARM templates. For this example, I'm only deploying an Azure SQL Server and a database. Since Azure SQL requires an admin account, I would typically need to provide an admin username and password in my ARM templates. However, checking in that information into source control is not ideal as it can compromise the security of our infrastructure. In addition, we want to avoid making that information readily available to everyone that works in the project. Ideally, secrets should be kept away from code and developers and only be accessible to a few admins. For that reason, Key Vault is the ideal solution. It provides the right security and comes with strong policies and auditing that enterprises can use to ensure that their solutions remain accessible only to the right accounts.
ARM templates consist of two (or more) files. The infrastructure definition and a parameters file. We will update the parameters json file to pull the necessary secrets directly from Key Vault using the service principal account we created earlier.
{
    "$schema": "https://schema.management.azure.com/schemas/2019-04-01/deploymentParameters.json#",
    "contentVersion": "1.0.0.0",
    "parameters": {
        "location":{
            "value": "East US"
        },
        "serverName": {
            "value": "cmspdemosqlserver"
        },
        "administratorLogin": {
            "reference": {
                "keyVault": {
                    "id": "/subscriptions/d8011108-23b2-40d8-8bc4-1f3f77abe795/resourceGroups/myResourceGroup/providers/Microsoft.KeyVault/vaults/cmdeploymentdemo"
                },
                "secretName": "sqlAdministratorLogin"
            }
        },
        "administratorLoginPassword": {
            "reference": {
                "keyVault": {
                    "id": "/subscriptions/d8011108-23b2-40d8-8bc4-1f3f77abe795/resourceGroups/myResourceGroup/providers/Microsoft.KeyVault/vaults/cmdeploymentdemo"
                },
                "secretName": "sqlAdministratorLoginPassword"
            }
        }
    }
}
Notice how we define the two secret parameters, by referencing Key Vault instead of hardcoding them.
Configure the GitHub Action to securely login to Azure
Our ARM templates should be checked into a GitHub repo. In that same repo, we will define a GitHub Action to deploy our ARM template. The first thing we have to do, however, is to enable our GitHub Action to authenticate to Azure using the Service Principal we created earlier.
Grab the json that was generated by the az ad sp create... command (I told you to save it somewhere safe, remember?). If you lost it, fret not, just rerun the command:
az ad sp create-for-rbac --name test3 --sdk-auth
NOTE: this will update the current
ClientSecretso if you're using it elsewhere, you will need to update those tasks accordingly. However, this SP should ideally be only used for this deployment task
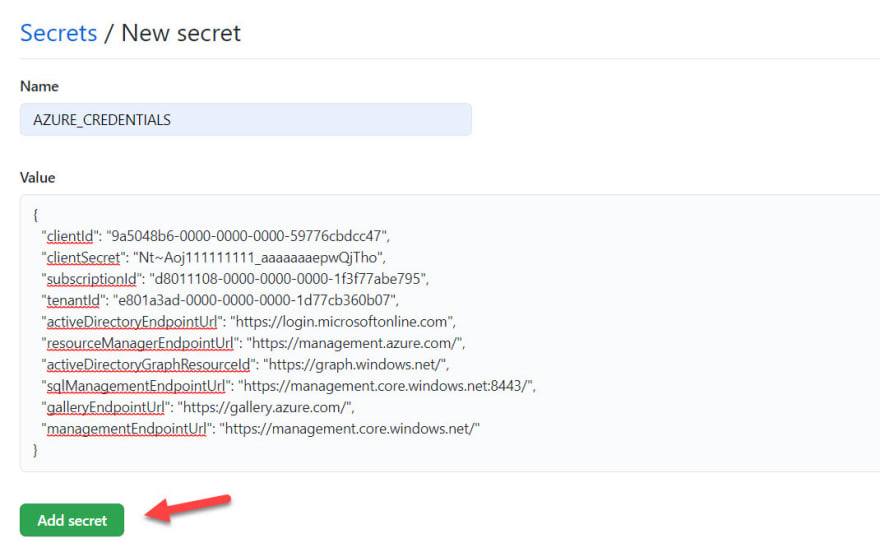
In your GitHub repo, navigate to Settings -> Secrets and create a new Secret.

The new Secret name should be AZURE_CREDENTIALS and the value should the be full json of our SP account
Create the GitHub Action to deploy the ARM template
GitHub Actions come with a number of predefined templates and there is great documentation if you want to create a new actions from scratch. In this instance, we need two main actions/steps:
- Azure Login
- Azure ARM Deployment
The yaml code(??) for our action is attached below"
name: CI

# Controls when the action will run. Triggers the workflow on push or pull request
# events but only for the main branch
on:
  push:
    branches: [ main ]
  pull_request:
    branches: [ main ]

# A workflow run is made up of one or more jobs that can run sequentially or in parallel
jobs:
  # This workflow contains a single job called "build"
  build:
    # The type of runner that the job will run on
    runs-on: ubuntu-latest

    # Steps represent a sequence of tasks that will be executed as part of the job
    steps:
      # Checks-out your repository under $GITHUB_WORKSPACE, so your job can access it
      - uses: actions/checkout@v2

      - name: Login via Az module
        uses: azure/login@v1
        with:
          creds: ${{secrets.AZURE_CREDENTIALS}}
          enable-AzPSSession: true

      # Runs a single command using the runners shell
      - name: Deploy Azure Resource Manager (ARM) Template
        uses: Azure/arm-deploy@v1.0.1
        with:
          # Provide the scope of the deployment. Valid values are: 'resourcegroup', 'managementgroup', 'subscription'
          scope: resourcegroup
          # Provide the Id of the subscription which should be used, only required for resource Group or Subscription deployments.
          subscriptionId: d8011108-0000-0000-0000-1f3f77abe795
          # Provide the name of a resource group, only required for resource Group deployments.
          resourceGroupName: myResourceGroup
          # Specify the path or URL to the Azure Resource Manager template.
          template: ./azuredeploy.json
          # Supply deployment parameter values.
          parameters: ./azuredeploy.parameters.kv.json

      - name: Azure logout
        run: az logout
We can now save and run the action. If everything was configured correctly, this is the expected outcome in the Action logs

Summary
As you can see, with a little bit of upfront setup and configuration, we can create a secure CI/CD pipeline using Azure Key Vault, Azure AD and GitHub actions, eliminating totally the need to manage secrets or keys end-to-end.

Top comments (0)