Microservices have become an essential part of modern software architecture due to their flexibility, scalability, and ease of maintenance. In this blog, we will explore how to build microservices using Spring Boot. We will cover the integration of essential tools like Eureka for service discovery, API Gateway for routing, Config Server for centralized configuration, and Zipkin for distributed tracing.
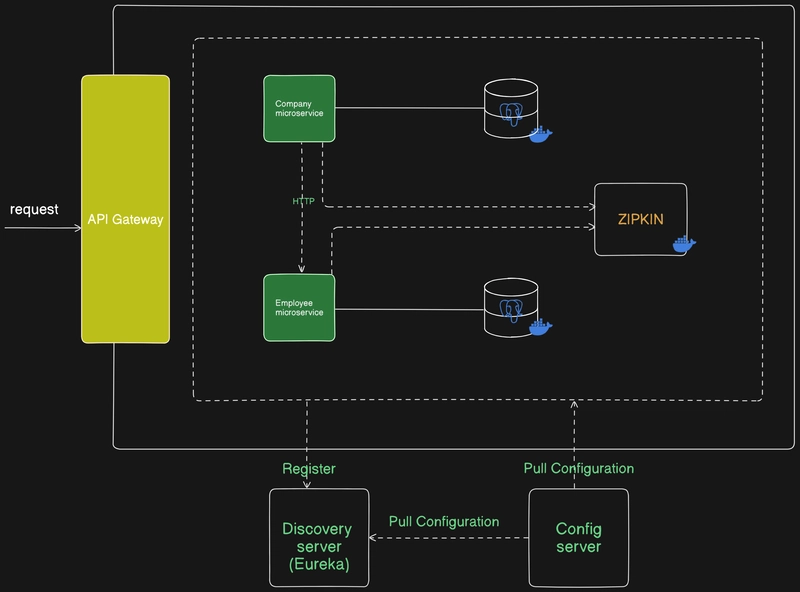
By the end of this guide, you will have a working Spring Boot project with two microservices: Company and Employee, running alongside an API Gateway, Eureka Discovery Server, Config Server, and Zipkin.
Prerequisites
Before we begin, ensure you have the following:
- Basic understanding of Spring Boot and Java.
- Familiarity with Spring Cloud concepts (Eureka, Config Server, etc.).
- Maven for dependency management.
- Docker (optional for Zipkin).
Overview of the Components
1. Microservices with Spring Boot
In this architecture, we have two microservices:
- Company Service: Manages company-related data.
- Employee Service: Handles employee data.
Each microservice is a Spring Boot application that operates independently but interacts with other services via HTTP requests.
2. Eureka Discovery Server
Eureka provides service discovery. It allows microservices to register themselves and discover each other dynamically. By using Eureka, you eliminate the need to hard-code service URLs, enabling a more flexible system.
3. API Gateway
The API Gateway is responsible for routing requests from clients to the appropriate microservices. It also offers additional features such as load balancing and security. In this demo, we will use Spring Cloud Gateway for routing.
4. Config Server
A Config Server centralizes the configuration for all microservices, making it easier to manage and update configurations without redeploying individual services.
5. Distributed Tracing with Zipkin
Distributed tracing helps track requests as they move through the various microservices. We'll use Zipkin to visualize and trace requests across services. Spring Cloud Sleuth automatically integrates with Zipkin, providing trace and span information.
Step-by-Step Implementation
Step 1: Setting up Eureka Discovery Server
Start by creating a Spring Boot application for the Eureka Server.
1) Add the required dependencies in your pom.xml:
<dependency>
    <groupId>org.springframework.cloud</groupId>
    <artifactId>spring-cloud-starter-netflix-eureka-server</artifactId>
</dependency>
2) Enable Eureka Server in your main application class:
@SpringBootApplication
@EnableEurekaServer
public class DiscoveryServer{
    public static void main(String[] args) {
        SpringApplication.run(EurekaServerApplication.class, args);
    }
}
3) Add Eureka configuration in application.yml:
server:
  port: 8761

eureka:
  client:
    register-with-eureka: false
    fetch-registry: false
Run the Eureka Server on port 8761. The Eureka dashboard can be accessed at http://localhost:8761.
Step 2: Creating Microservices
Both the Company Service and Employee Service will register with Eureka. Here's how to create them:
1) Add the following dependency to pom.xml for each microservice:
<dependency>
    <groupId>org.springframework.cloud</groupId>
    <artifactId>spring-cloud-starter-netflix-eureka-client</artifactId>
</dependency>
2) Enable Eureka Client in both microservices (Not Required for newer versions of Spring):
@SpringBootApplication
@EnableEurekaClient
public class CompanyServiceApplication {
    public static void main(String[] args) {
        SpringApplication.run(CompanyServiceApplication.class, args);
    }
}
3) Configure application properties (application.yml):
spring:
  application:
    name: company-service
  cloud:
    discovery:
      eureka:
        client:
          service-url:
            defaultZone: http://localhost:8761/eureka
Step 3: Setting up API Gateway
We'll use Spring Cloud Gateway to handle requests and route them to the appropriate microservices.
1) Add the required dependency for Spring Cloud Gateway:
<dependency>
    <groupId>org.springframework.cloud</groupId>
    <artifactId>spring-cloud-starter-gateway</artifactId>
</dependency>
2) Define routing in the application.yml:
server:
  port: 8222
spring:
  cloud:
    gateway:
      discovery:
        locator:
          enabled: true
      routes:
        - id: employees
          uri: http://localhost:8090
          predicates:
            - Path=/api/v1/employee/**
        - id: company
          uri: http://localhost:8070
          predicates:
            - Path=/api/v1/company/**
management:
  tracing:
    sampling:
      probability: 1.0
This configuration ensures that the API Gateway routes requests to company-service and employee-service based on the request path.
Step 4: Config Server Setup
Create a new Spring Boot application for the Config Server.
1) Add the following dependencies:
<dependency>
    <groupId>org.springframework.cloud</groupId>
    <artifactId>spring-cloud-config-server</artifactId>
</dependency>
<dependency>
    <groupId>org.springframework.cloud</groupId>
    <artifactId>spring-cloud-starter-eureka</artifactId>
</dependency>
2) Enable Config Server in the main class:
@SpringBootApplication
@EnableConfigServer
public class ConfigServerApplication {
    public static void main(String[] args) {
        SpringApplication.run(ConfigServerApplication.class, args);
    }
}
3) Point the Config Server to a Git repository (or file system) that holds the configuration files for your microservices.
Step 5: Integrating Zipkin for Distributed Tracing
Add Zipkin dependencies to the employee, company, gateway microservices:
<dependency>
            <groupId>io.micrometer</groupId>
            <artifactId>micrometer-tracing-bridge-brave</artifactId>
        </dependency>
        <dependency>
            <groupId>io.zipkin.reporter2</groupId>
            <artifactId>zipkin-reporter-brave</artifactId>
        </dependency>
Configure Zipkin in application.yml:
management:
  tracing:
    sampling:
      probability: 1.0
Run Zipkin (via Docker or standalone) on port 9411. You can now trace requests across the microservices.
Running the Application
Once everything is set up, run the following services:
Eureka Server: localhost:8761
Company Service: localhost:8070
Employee Service: localhost:8090
API Gateway: localhost:8222
Config Server: localhost:8888 (optional if using a Config Server)
Access the API Gateway at http://localhost:8222 and make requests to /company and /employee. All requests will be routed to the appropriate microservices.
You can also monitor traces in Zipkin's web UI at http://localhost:9411.
Conclusion
In this guide, we have successfully created 2 microservices with Spring Boot, integrating Eureka for service discovery, API Gateway for routing, Open Feign for communicating between the 2 microservices, Config Server for centralized configuration, and Zipkin for distributed tracing. These tools work together to help manage and monitor microservices effectively, providing a scalable and maintainable architecture.
With this setup, your microservices can scale independently, discover each other dynamically, and be monitored for performance and issues through distributed tracing.
Code Repository
You can access the full source code for this project on GitHub.
Thank you for reading! Happy coding with Spring Boot and Microservices!

Top comments (7)
Good job, Helpfull👍
Thanks for sharing!
Excellent!
Good blog buddy ...On getting started with microservices using Spring Boot! I really like how you’ve broken down each component and explained the architecture in a simple way.
Great work, Thank you!
Thanks for sharing. Great Job
Great blog!!