
We're back! So a bit recap of the last part: we now have our Fauna database set up, as well as our API with our greeting endpoint and the functionality to search for a user via their phone number. But before we continue, let me tell you I lied to you: I told you we would fetch the user's country from the phone number, but we did not. So let's do that right away!
Getting a country from a phone number
For this, we'll use the great phonenumbers library, which is the Python fork of Google's libphonenumber. Install it like so:
pip install phonenumbers
Now, let's go back to our greet.py file:
from fastapi import APIRouter, HTTPException, Form
import phonenumbers
from phonenumbers import geocoder # For geographical data

from src.models import User

user_greeting = APIRouter()

def phone_to_country(number: str) -> str:
    parsed_number = phonenumbers.parse(number)

    if not phonenumbers.is_possible_number(parsed_number):
        raise HTTPException(status_code=400, detail="Invalid phone number")

    return geocoder.country_name_for_number(parsed_number, "en")

@user_greeting.post("/greeting")
def greet_user(UserIdentifier: str = Form(...)):
    """
    User greet endpoint
    :param: UserIdentifier: user's phone number from Twilio
    """

    user = User.get_by_phone(phone_number=UserIdentifier)

# Greeting the user since already exists
    if user is not None:
        return {
            "actions": [
                {"remember": {"name": user.name, "country": user.country}},
                {"say": "Hi there {name}! Welcome back, how are things in {c}?".format(name=user.name, c=user.country)},
            ]
        }
    country = phone_to_country(UserIdentifier)

    return {
        "actions": [
            {
                "say": "Hello there! Looks like you are writing from {c}".format(c=country)
            },
            {"redirect": "task://can-have-name"},
        ]
    }
See that, besides importing phonenumbers we also import geocoder, this adds the ability to obtain the country (among other geographical information) from a phone number; it is a separated import because it adds a large amount of metadata.
Next, we write a little helper function to parse a phone number and throw a Bad Request error in case the number it's not valid. This would only happen if this endpoint it's hit outside of Twilio, but let's add it anyway. Then, it's just a matter of using that helper function in case the user its not in the database.
Cool, with that out of the way, let's do the rest of the API.
Saving users to FaunaDB
Ok, so the first thing we need its a method to store a user in Fauna. Lets quickly add one to our User class:
from typing import Optional, Any

from pydantic import BaseModel

from faunadb import query as q
from faunadb.objects import Ref

from src.core import session

class User(BaseModel):
  _collection_name: str = 'users'
  ref: Optional[Ref]
  ts: Optional[str]
  phone_number: str
  name: str
  country: str


  class Config:
    arbitrary_types_allowed = True

  def __init__(self, **data: Any):
    super().__init__(**data)

  def save(self):
    """
    Saves the document in the collection,
    the attributes are serialized utilizing Pydantic's dict method, which
    traverses trough the child class attributes
    :return: An instance of the newly saved object.
    """
    attributes = self.dict()
    result = session().query(
        q.create(q.collection(self._collection_name), {"data": attributes})
    )

    return self.__class__(ref=result["ref"], ts=result["ts"], **result["data"])
 # The code from the previous post
Thanks to Pydantic, this is pretty straightforward:
- First, I added an extra attribute (
_collection_name) to get the collection's name; it matches the name we set on the Fauna dashboard - We get the data we want to save as a
dict, we use theBaseModel'sdictinstance method; which does exactly this. - Next is the saving process itself:
- We then use the
sessionobject to create a query - We pass a
collectionobject using the collection name attribute - Finally, we pass the attributes
dictas a second argument. Remember we said that non-standard Fauna objects need to be inside adatadict? Here we do exactly that. - Finally, we create a new
Userobject using the class's__class__magic method; which it's basically like calling the constructor. Theresultobject is nothing more than the object returned by Fauna's saving operation. I know that this may not be the best approach (perhaps we should just set the new attributes instead of returning a new instance), but hey that's what I did
- We then use the
Parsing collect actions
Now, let's finally go to the reason for this entire series: asking the user for their name.
Asking the user if they want to give us their name
Remember the first post, when we defined our schema? We said that our endpoint's route would be can-have-name, the task's name would be the same, the action's name would be ask-for-name and the answer from the action would be can_have_name. Recall that action and tasks are two different things: a task is a series of one or more actions that a bot performs, while the action its the specific thing the bot will do in that task; in this case, asking a question.
Now, the code:
import json
# The other imports

# The code we added at the beginning

@user_greeting.post("/can-have-name")
def can_have_name(Memory: str = Form(...)):
    """
    Asks the user if he/she wants to give us their name
    :param: Memory: JSON Stringified object from Twilio
    """
    memory = json.loads(Memory)

    answer = memory["twilio"]["collected_data"]["ask-for-name"]["answers"][
        "can_have_name"
    ]["answer"]
    if answer == "Yes":
        return {"actions": [{"redirect": "task://store-user"}]}
    return {
        "actions": [
            {
                "say": "😭"
            }
        ]
    }
Recall that our collect question had a type of Twilio.YES_NO, that means that Autopilot's natural language processing engine has done it's magic to convert whatever the user wrote into a Yes or No answer (those two are literal). So we just need to parse that response.
Here, you need to take into account the thing that had me hitting the keyboard with my head a couple of days: Autopilot sends all requests with an encoding of application/x-www- form-urlencoded and the Memory object it's in JSON, but, because of the encoding, this JSON is not parsed; it is just a plain string. Because of that, we set the Memory parameter to be of type str and we then use Python's standard library json.loads to parse the Memory string into a dict. Now, what's that intricate dictionary right there? Well, the Memory object contains other things besides parsed responses, the parsed responses are saved under collected_data. After that key: the format is action_name.answers.question_name.answer, as we said above, our action's name is ask-for-name and the question is can_have_name.
So after that confusing prop drilling, we have our answer. If the user said yes we just redirect to the task tasked (no pun intended) to get the name; if not well we just can do whatever we want. In this case let's just return an emoji, why? Because we are using Whatsapp and we can!
Finally getting the name
For the last endpoint, let's get the user's name. Recall that we
wrote in our schema that the endpoint's route is store-user:
# Rest of greet.py up here

@user_greeting.post("/store-user")
def store_user(UserIdentifier: str = Form(...), Memory: str = Form(...)):
    """
    Stores a user in the database, fields stored are: country, name, and phone number
    :param: UserIdentifier: Phone number from Twilio
    :param: Memory: JSON Stringified object from Twilio
    """
    memory = json.loads(Memory)
    name: str = memory["twilio"]["collected_data"]["collect-name"]["answers"][
        "first_name"
    ]["answer"]

    country = phone_to_country(UserIdentifier)
    # This needs error handling right here ;)
    new_user = User(
        name=name.capitalize(), phone_number=UserIdentifier, country=country
    ).save()

    return {
        "actions": [
            {"remember": {"name": new_user.name, "country": new_user.country}},
            {
                "say": "Hi, {name} from {c}!".format(
                    name=new_user.name, c=country
                )
            },
            {
                "say": "This is a WIP ok bye"
            }
        ]
    }
Besides the Memory object, we also need the UserIdentifier; see how FastAPI allows us to pass as a parameter just the fields we need from the request.
The next couple of lines are the same as with the last endpoint, the only thing that changes is the keys for the memory dict: in this case, the name of the action is collect-name and the name of the question is first_name. If you check our schema, you'll realize that the type of question is Twilio.FIRST_NAME; was does this mean? You guessed it! Autopilot's natural language processing engine will try to parse the answer as a first name.
Now, the saving process:
- First, we parse the country just like we did in the
/greetingendpoint - Then, we pass instantiate a
Userobject with the parameters we have: name (we sanitize the input a bit via capitalizing the string), country, and the phone; we also call thesavemethod right away to have a full instance - Then, like in the first endpoint, we tell the bot to remember the name and the country and return whatever action we want
Testing all out
So now comes the part we've waited for: testing this bad boy out. For that, we first need to deploy our API to get an endpoint to put in our schema. There are several ways to do this, for example, you could deploy this on Heroku, Digital Ocean, or just write the code directly on Glitch to get a live URL (which is what I did for this series); whatever you choose is up to you! Just remember to set the DEBUG flag to false and to fill the FAUNA_SERVER_KEY env variable with a server key.
After the API is live, let's go to the schema file and replace all the occurrences of our_super_yet_to_be_endpoint with the live URL of our API. Now is the time to create the bot, go create a Twilio account if you already haven't; after that, copy the SID and the auth token you'll find in the dashboard.
There are two ways of creating an Autopilot bot: the first one is through the console and the second one is using the CLI. Since we already have the schema for the bot ready, let's use the CLI; you need either yarn or npm for that, I'll use the former:
yarn global add twilio-cli
twilio plugins:install @dabblelab/plugin-autopilot
After that's installed, to a twilio login in your terminal and paste the SID and auth key when prompted.
Now, set the terminal on the path where the finished schema is stored and do:
twilio autopilot:create -s=./schema.json
That will create a bot named almighty-bot with the account you used to log in. Now, for the final part, we need to request a phone number from Twilio and enable WhatsApp integration. The process for doing that is out of the scope of this post, so check here for enabling WhatsApp and connecting that number to our bot.
Texting the bot
Now, let's add our bot to our contact list a send a message!

We can greet the bot again:

Finally, let's go to the Fauna dashboard and erase our user; just to say no and see what happens:
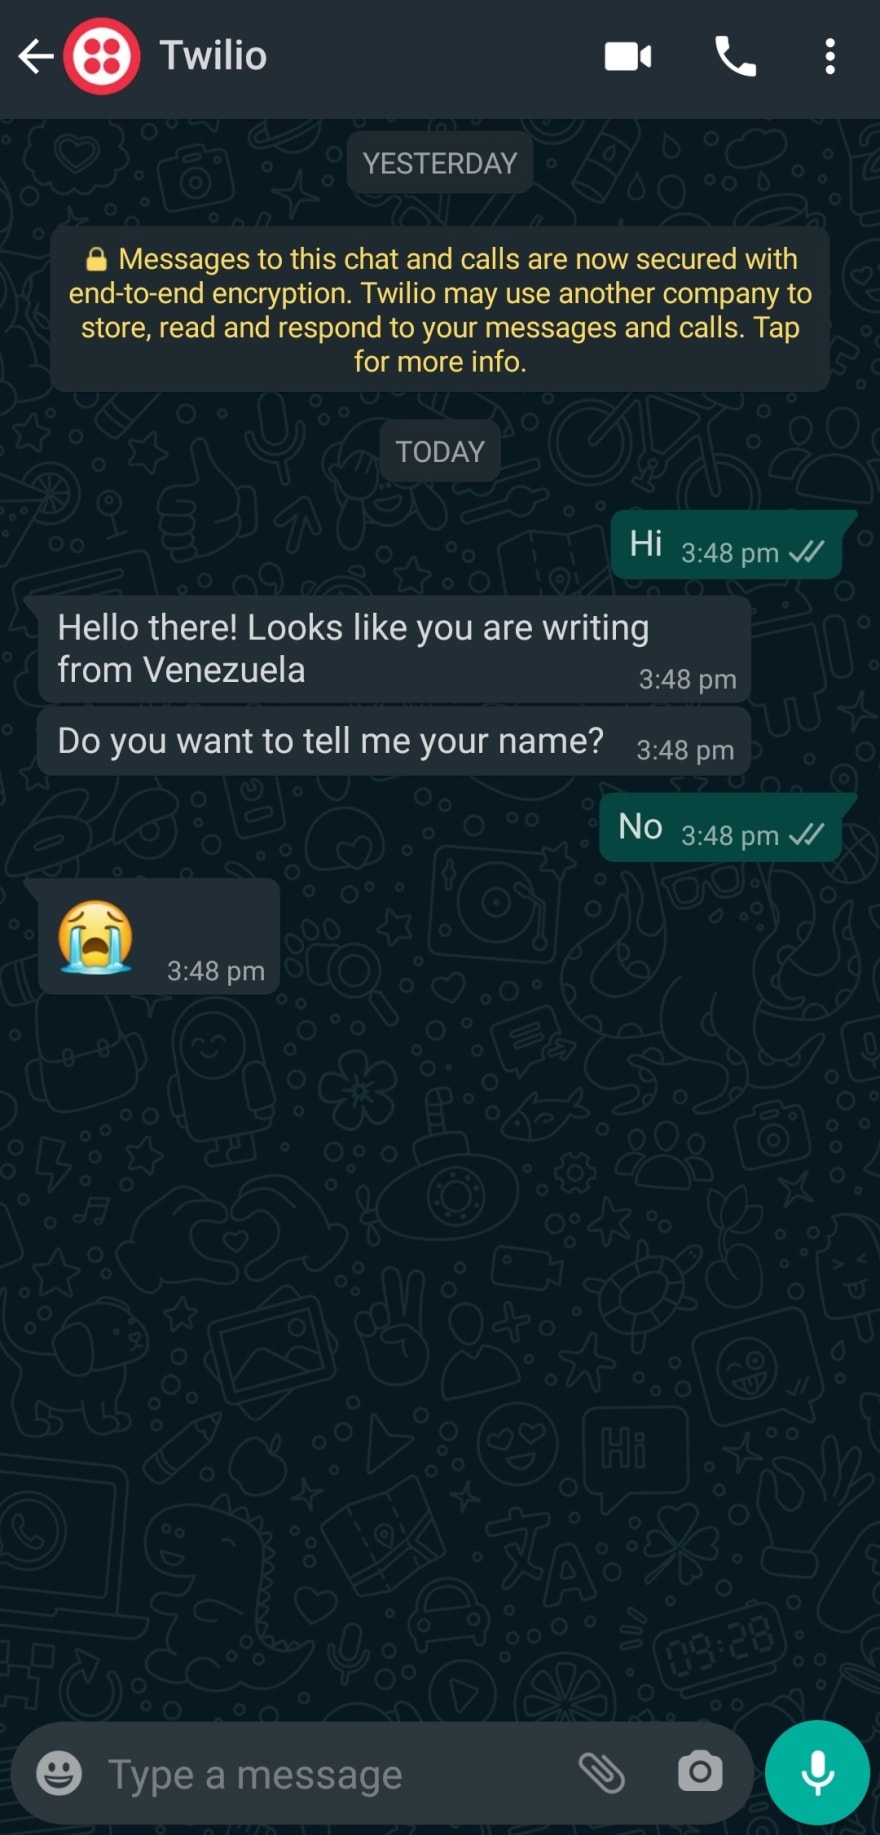
Great! We see that our bot reacts correctly to "yes" and "no".
"But wait a minute", I hear you say "Didn't you tell me that a session lasts for 24 hours? Why did the conversation reset the second time I greeted the bot". Well, that was a half-truth actually: a session lasts for 24 hours if we include a listen action at the end or if we redirect to another action. If you check the schema and the actions we returned from our endpoints, you'll realize that we did not return that action: we just drove the users to a pre-defined path, so to speak. So, if the returned action neither a redirection nor a listen action, the session will finish.
Are we done?
Of course not! You probably already thought about this: this does not seem too secure, does it? How do I know that the requests really come from Twilio? If you did, you're right, this is completely insecure: everyone could figure our API out and make requests to it. So let's change that.
Twilio has a package for Python that has, among other things, a class to validate that incoming requests come from Twilio; let's install it:
pip install twilio
Now, how do we implement this for every request? Well, if you are like me and already have worked with Python in the past, you probably are thinking of a decorator. And, if you're like me, you went directly to implement said decorator just to have it fail miserably when deployed live.
You see, Starlette (and FastAPI, by extension), don't quite work like this. Like I've mentioned a million times before, they are asynchronous; thus, various properties of the request object (like the body or the form) are implemented as asynchronous streams: if you consume them in, say, a decorator, they will complete and will not be available to the next handler in the chain. So, in mortal words: accessing the async parts of the request in any other part that it's not its final destination will make that data unavailable in that final destination; therefore an error will occur.
So, if not a decorator, how do we implement this? Well, we need to make a custom router. What's this? A router is a class whose methods get called before the request (or the response) hits the handler function. Because of this, we have, in a router, complete access to the request (or the response). Let's write the code:
from typing import Callable

from fastapi import Request, Response, HTTPException
from fastapi.routing import APIRoute
from starlette.datastructures import FormData
from twilio.request_validator import RequestValidator

from src.core import config

class AutopilotRequest(Request):
    """
    This class serves two purposes. First one, know that Starlette (framework on which Fastapi is built upon)
    is an ASGI framework. That means that parts of the request (like the body) are async. So, if we await those streams in middleware they will be consumed and will not be available to the final route.
    For that, this class consumes the steam (in this case the form) does what it needs to do with the data,
    and creates a new FormData object to pass to the final route.
    """

    async def form(self):
        if not config.DEBUG:
            return await self.__handle_non_dev_env()
    return super().form()

    async def __handle_non_dev_env(self):
        """
        In production or staging, validate that the request comes from Twilio
        """
        validator = RequestValidator(config.TWILIO_AUTH_TOKEN)

        params = await super().form()
        x_twilio_signature = super().headers.get("X-Twilio-Signature", "no-header")
        is_valid = validator.validate(str(super().url), params, x_twilio_signature)
        if not is_valid:
            raise HTTPException(status_code=403)
        return FormData(dict(params.items()))

class AutopilotRoute(APIRoute):
    """
    The custom route to route requests through our AutopilotRequest object
    """

    def get_route_handler(self) -> Callable:
        original_route_handler = super().get_route_handler()

        async def custom_route_handler(request: Request) -> Response:
            new_request = AutopilotRequest(request.scope, request.receive)
            return await original_route_handler(new_request)

        return custom_route_handler
Ok, what's going on here? First, for a custom router, we need two things: the custom router and the custom request object. For this, we subclass ApiRoute and Request (from FastApi) respectively.
Now, for the request:
- We are only interested in the
formproperty since that is where Twilio data is - We check if we're on debug mode if we are then we just return the original form
- Now, in the
__handle_non_dev_envis where the magic happens- We create a
RequestValidatorobject with theTWILIO_AUTH_TOKEN(remember that?) property that is already in our configuration object - We consume the
formstream, see that wee need toawaitit. We need to do this because it contains data the validator needs - Then, we extract the header from the request. The signature is in the
X-Twilio-Signatureheader - Now, we use the
RequestValidator'svalidatemethod to perform the validation - Next, we need to check if that method returned
True, if not we raise a403 Forbiddenerror - Finally, if the request did indeed come for Twilio, then we need to construct a new form since the old one was consumed; for this we just do:
FormData(dict(params.items()))which will return a newFormDatawith the original data from the request
- We create a
Now, the router is simpler: it just needs to convert the incoming request to an AutopilotRequest and pass it to the original handler. That way, when the handler calls the form method under the hood, the validation will occur.
How do we use this? Easily, let's go to our greet.py file:
# routes/greet.py

# Original imports
from .custom_router import AutopilotRoute

user_greeting = APIRouter()
user_greeting.route_class = AutopilotRoute # <- here
That's it, now just remember to fetch your Twilio auth token and set the TWILIO_AUTH_TOKEN with it.
Bonus
Now you're thinking: "Wait a minute, do I need to use my phone to debug this? Doesn't this like, cost money?" Yes! You're also right, texting a number provided by Twilio costs money. For Autopilot, they provide a simulator; which is great for debugging. But, unfortunately, the simulator does not send the UserIdentifier property; since is not a phone.
But fear not! I have you covered as well. Remember that FAKE_NUMBER property? Let's use that now, back our AutopilotRoute:
# The imports

class AutopilotRequest(Request):
    # The huge docstring

    async def form(self):
        if not config.DEBUG:
            return await self.__handle_non_dev_env()
        return await self.__handle_dev_env()

    async def __handle_dev_env(self):
        """
        Here we just inject a fake number for testing, this so we can test from
        the Twilio Autopilot Simulator through an SSH tunnel.
        """
        form = await super().form()
        new_form = FormData(dict(form.items()), UserIdentifier=config.FAKE_NUMBER)
        return new_form

    # __handle_non_dev_env goes here
# Our router goes here
Now, we have added a __handle_dev_env method that gets executed when DEBUGis set to True. And whats does it do? Well, it takes whatever the request was and injects the UserIdentifier property as whatever number we specified in FAKE_NUMBER. Now behold!

So, for debugging, just set DEBUG to True and set FAKE_NUMBER to a valid phone number. Pro-tip: you can use this with something like Ngrok to debug your API locally.
Wrapping up
That's all folks! I hope you liked the series. I certainly did learn a lot while doing this. Before finishing up let me state that this is all very basic, it could be improved in so many ways:
- Needs error handling
- While the Twilio default types do a good job in recognizing common language, the bot still needs to be trained using samples from real conversations
- Needs better automation for deployment
- So much more!
If you want to check out how I solved this things (and also check a slightly more complex bot) you can check out the original bot I was developing before writing this post.
PS: Oh, also, here's the code for this post, did you think I would forget? ;)

Latest comments (0)