
The way media storage is stored today is completely different from several years ago.
Cloud storage companies like Amazon (AWS) or Microsoft (Azure) have revolutionized the development and productivity of our applications.
Object Storage
You can store everything in real life: data, DNA, paper, food, money… For each of these you have many ways to do it. You could store money in a wallet or in a bank account, it depends of your needs.
It’s the same with data, the new gold mine of the 21st century. There is data everywhere, different support, different types. But what’s the best way to store them? Object storage is one solution for binary and media files.
Ceph
Ceph stands out from data clustering technologies in the industry. Several big company use it in production as Cdiscount, Cisco, Bloomberg, Deutsche Telekom…
Ceph offers several multi-level solutions: Object Storage, Block Storage, File System.
We will focus on Object Storage.
Ceph architecture
Before starting, it’s important to understand the philosophy behind Ceph. Here is an illustration of how the layers are decomposed:
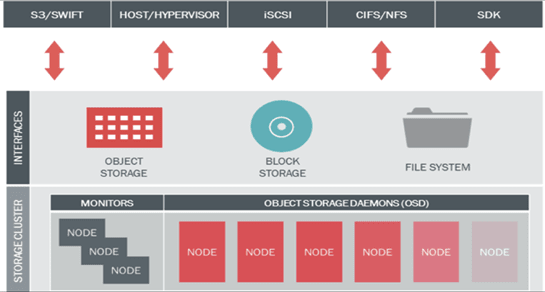
We need OSD (Object Storage Daemons) containing our data, monitors to analyze the health status of our OSDs and gateways for the client access.
We only use the Object Storage interface, which allows us to use a gateway providing an API along with a S3 compatible RestAPI (Amazon Simple Storage Service).
Creating our storage cluster
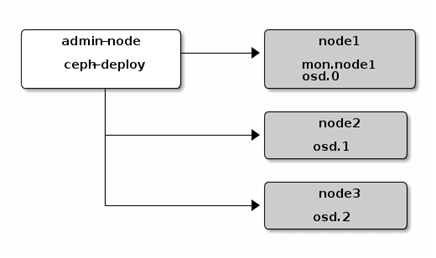
We need a dedicated client to orchestrate all our OSD, MON (monitors) and RGW (Rados Gateway API S3) using ceph-deploy.
To ensure a sufficient quorum, we deployed 5 OSD/MON and RGW. Each OSD has 1GB of RAM, 4GB of disk space for the system and 33GB for the user data for a total of 198GB of storage replicated twice.
Therefore, all our nodes are inspected with each other with the monitoring service. It is this service that is in charge of data recovery when an OSD is lost. When a client queries the S3 API, the API queries the interface that determines the location of the resource in the corresponding OSD or the location to save the resource.
Installing ceph-deploy
user@ceph ~ # wget -q -O- ‘https://download.ceph.com/keys/release.asc' | sudo apt-key add –
user@ceph ~ # echo deb $(lsb_release -sc) main | sudo tee /etc/apt/sources.list.d/ceph.list
user@ceph ~ # sudo apt update
user@ceph ~ # sudo apt install ceph-deploy
Once installed we can execute the commands in charge of installing Ceph on our whole cluster.
On each machine we have to add a specific user for the installation of Ceph to ensure an isolation of the execution.
user@ceph ~ # useradd -d /home/cephmgt -m cephmgt
user@ceph ~ # passwd cephmgt
user@ceph ~ # echo "cephmgt ALL = (root) NOPASSWD:ALL" | sudo tee /etc/sudoers.d/cephmgt
user@ceph ~ # chmod 0440 /etc/sudoers.d/cephmgt
In order to allow SSH access to all the machines from the cluster we install the public key of our Ceph client and configure the SSH discovery by defining the user used for each host.
user@ceph ~ # ssh-keygen
user@ceph ~ # for i in {1..6}; do ssh-copy-id cephmgt@ceph0${i}; done
user@ceph ~ # cat .ssh/config
Host ceph01
  Hostname ceph01
  User ceph-mgt
…
Data cluster
All these steps to configure our cluster are made from our client host.
For the creation of a new data cluster we create a new directory and then configure all our hosts as a member of our cluster.
user@ceph ~ # mkdir my-clusteruser@ceph ~ # cd my-cluster
We define which host belong to our cluster:
user@ceph ~ # ceph-deploy new ceph01 ceph02 ceph03 ceph04 ceph05 ceph06
Ceph binaries have to be installed in all the machines:
user@ceph ~ # ceph-deploy install ceph01 ceph02 ceph03 ceph04 ceph05 ceph06
A MON configuration file has to be created:
user@ceph ~ # ceph-deploy mon create-initial
And we deploy configuration accross the cluster:
user@ceph ~ # ceph-deploy admin ceph01 ceph02 ceph03 ceph04 ceph05 ceph06
To install monitor daemon on our hosts:
user@ceph ~ # ceph-deploy mon add ceph01 ceph02 ceph03 ceph04 ceph05 ceph06
As you can see, we use all our machines has MON and OSD because of our cluster limited size for the demo. The best practice is to separate our MON and OSD to provide better availability.
We create our OSDs and partition them:
user@ceph ~ # ceph-deploy osd create ceph01:sdb ceph02:sdb ceph03:sdb ceph04:sdb ceph05:sdb ceph06:sdb
Ceph will create partition on /dev/sdb for its journal (used to know where is the data) and the data itself.
Finally, we create the S3 gateway on all our servers. The best practice still to have dedicated machine to play the role of gateway.
user@ceph ~ # ceph-deploy rgw create ceph01 ceph02 ceph03 ceph04 ceph05 ceph06

Data Pool
All our data are divided into pools, we must create a pool divided into several blocks (64 kb), with a size of 2, which means that data will be written twice in our cluster and minimum once in case of availability failures.
user@ceph ~ # ceph osd pool create my-userfiles 64
user@ceph ~ # ceph osd pool set my-userfiles size 2
user@ceph ~ # ceph osd pool set my-userfiles min_size 1
S3 API configuration (radosGW)
Now that we have created our data store, we create a user linked to a bucket with 30 GB of quota.
user@ceph ~ # sudo radosgw-admin user create --uid="my-api" --display-name="My API"
If you are this message, it succeed:
"user": "my-api","access_key": "XXXXXXXXXXXXX","secret_key": "XXXXXXXXXXXX"
Now, we create permissions and quota:
user@ceph ~ # sudo radosgw-admin caps add --uid="supfile-api" --caps="users=*;buckets=*;metadata=*;usage=*;zone=*"
user@ceph ~ # sudo radosgw-admin quota set --uid="supfile-api" --quota-scope=bucket --max-size=30G
user@ceph ~ # sudo radosgw-admin quota enable --quota-scope=bucket --uid="supfile-api"
Conclusion
From now on we can use our storage through the S3 Rest API.
Ceph allows you to do a more lot of things as multisite replication, filesystem distribution, etc.
This article shows the basics of Ceph but performance tunning and production usage are more complex, Ceph stays relatively complicated to install but offers a scalability and cost reduction in the long-term.

Top comments (0)